Before existence of Hadoop, there was no concept of big data. At that point the data was stored in relational database like MySQL, Oracle etc. With the introduction of big data, the data needed to be dealt with more concise and in a effective way. Thus Sqoop came into existence. Sqoop stands for SQL + Hadoop.
Sqoop helped to transfer the large volume of data stored in the RDBMS to Hadoop. It was next to impossible to manually transfer this data, hence Sqoop was developed. Sqoop is the tool which is used to perform data transfer operations from RDBMS to Hadoop server. It helped us to transfer bulk data from one data point to the other.
-
Sqoop helps us connect the result from the SQL queries into HDFS
-
Sqoop helps us to load the processed data directly into the hive or HBase.
-
It performs the security operation of data with the help of Kerberos.
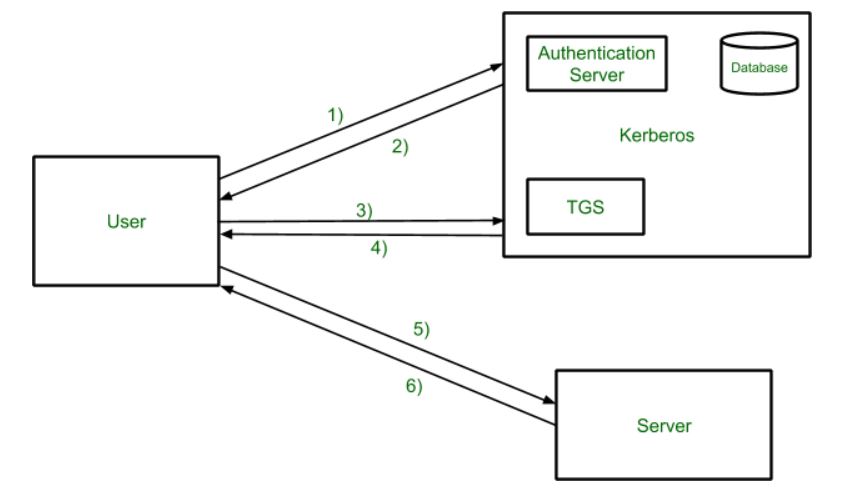
Kerberos provides a centralized authentication server whose function is to authenticate users to servers and servers to users. In Kerberos Authentication server and database is used for client authentication. Kerberos runs as a third-party trusted server known as the Key Distribution Center (KDC). Each user and service on the network is a principal.
The main components of Kerberos are:
- Authentication Server (AS): The Authentication Server performs the initial authentication and ticket for Ticket Granting Service.
- Database: The Authentication Server verifies the access rights of users in the database.
- Ticket Granting Server (TGS): The Ticket Granting Server issues the ticket for the Server
Kerberos Overview:
- Step-1: User login and request services on the host. Thus user requests for ticket-granting service.
- Step-2: Authentication Server verifies user’s access right using database and then gives ticket-granting-ticket and session key. Results are encrypted using the Password of the user.
- Step-3: The decryption of the message is done using the password then send the ticket to Ticket Granting Server. The Ticket contains authenticators like user names and network addresses.
- Step-4: Ticket Granting Server decrypts the ticket sent by User and authenticator verifies the request then creates the ticket for requesting services from the Server.
- Step-5: The user sends the Ticket and Authenticator to the Server.
- Step-6: The server verifies the Ticket and authenticators then generate access to the service. After this User can access the services.
-
With the help of Sqoop, we can perform compression of processed data.
-
Sqoop is highly powerful and efficient in nature.
- Import
- Export

The operations is Sqoop are user friendly. Sqoop uses CLI to process commands given by the user. Sqoop also used Java APIs to interact with the users. Sqoop only performs the import and export of data based on the commands given by the users. Sqoop can’t do the aggregation of data.
- Install docker in EC2
sudo apt-get update

sudo apt-get install \
    ca-certificates \
    curl \
    gnupg \
    lsb-release

sudo mkdir -m 0755 -p /etc/apt/keyrings

curl -fsSL https://download.docker.com/linux/ubuntu/gpg | sudo gpg --dearmor -o /etc/apt/keyrings/docker.gpg

echo \
  "deb [arch=$(dpkg --print-architecture) signed-by=/etc/apt/keyrings/docker.gpg] https://download.docker.com/linux/ubuntu \
  $(lsb_release -cs) stable" | sudo tee /etc/apt/sources.list.d/docker.list > /dev/null

sudo apt-get update

sudo apt-get install docker-ce docker-ce-cli containerd.io docker-buildx-plugin docker-compose-plugin

sudo docker run hello-world
Once docker is installed we will use Cloudera docker image to run our Sqoop
pwd

docker run --hostname=quickstart.cloudera --privileged=true -t -i -v /home/ubuntu:/Src --publish-all=true -p 8888 cloudera/quickstart:latest /usr/bin/docker-quickstart
Set the docker permission
sudo usermod -aG docker ubuntu
newgrp docker
Now let’s try to run SQL in the terminal
mysql -uroot -pcloudera

show databases;

use retail_db;

show tables;

select * from <table_name>
Lets open another terminal and try to see if we Sqoop works fine
docker run --hostname=quickstart.cloudera --privileged=true -t -i -v /home/ubuntu:/Src --publish-all=true -p 8888 cloudera/quickstart:latest /usr/bin/docker-quickstart

# check version
sqoop version

# list databases
sqoop list-databases --connect jdbc:mysql://localhost:3306 --username root --password cloudera

# list databases
sqoop list-databases \
--connect jdbc:mysql://localhost:3306 \
--username root \
--password cloudera

# list tables
sqoop list-tables \
--connect jdbc:mysql://localhost:3306/retail_db \
--username root \
--password cloudera

# get the table "categories" from "retail_db" database
sqoop import \
--connect jdbc:mysql://localhost:3306/retail_db \
--table categories \
--username root \
--password cloudera
There are 4 things that we can see in the output
- Data is selected with “Select” command
- Min & Max query is applied
- Default no of split = 4
- Mapper & Reducer task gets executed
In the SQL shell if we run the below query we can see the range is 58
SELECT MIN(`category_id`), MAX(`category_id`) FROM `categories`Now, if we want to see my data in the HDFS we can run the following command
hdfs dfs -ls /user/

hdfs dfs -ls /user/root/

hdfs dfs -ls /user/root/categories/

# getting inside the file
hdfs dfs -cat /user/root/categories/part-m-00000

# get no of rows
hdfs dfs -cat /user/root/categories/part-m-00000 | wc -l
To execute SQL query in Sqoop we can use “eval”
# see all the databases
sqoop eval \
--connect jdbc:mysql://localhost:3306/ \
--username root \
--password cloudera \
--query "show databases"
# see all the tables
sqoop eval \
--connect jdbc:mysql://localhost:3306/retail_db \
--username root \
--password cloudera \
--query "show tables"Boundary query is used to optimised query by using fields like min, max, between, split by etc kind of fields.
sqoop import --connect jdbc:mysql://localhost:3306/retail_db \
--table categories \
--username root \
--password cloudera \
--boundary-query "select min(category_id), max(category_id) from categories" \
--split-by category_id
Again if we want to see the data we can do it using the following commands
hdfs dfs -ls /user/

hdfs dfs -ls /user/root/

hdfs dfs -ls /user/root/categories/

hdfs dfs -cat /user/root/categories/part-m-00000If we look at the “categories” table that we have been using is having “categories_id” as a primary key.
show databases;

use retail_db;

show tables;

describe categories;- Sqoop by default uses 4 concurrent map tasks to import data from SQL to Hadoop.
- While performing the parallel imports Sqoop needs a criteria by which it can split the workload. Sqoop uses the splitting column to split the workload.
- By default, Sqoop will identify the primary key column (if present) in the table to use it as a splitting column
- The low and high values of splitting column are retrieved from databases and the map task operate on evenly sized components of total range.
If a table is not having a primary key it can be imported by 2 ways:
- By using split-by argument
- By using -m1, i.e., using only 1 mapper task. In this the table will not get split into parts.
Let’s create a table in retail_db
Now let’s import the table into Sqoop
sqoop import \
--connect jdbc:mysql://localhost:3306/retail_db \
--table customers \
--username root \
--password cloudera \
--m 10
hdfs dfs -ls /
hdfs dfs -ls /user
hdfs dfs -ls /user/root
hdfs dfs -ls /user/root/customers
hdfs dfs -cat /user/root/customers/part-m-00008Let’s try another example using 1 mapper
sqoop import \
--connect jdbc:mysql://localhost:3306/retail_db \
--table products \
--username root \
--password cloudera \
--m 1
hdfs dfs -ls /
hdfs dfs -ls /user
hdfs dfs -ls /user/root
hdfs dfs -ls /user/root/products
hdfs dfs -cat /user/root/products/part-m-00000
# delete a dir in hdfs
hfds dfs -rm -r /user/root/productsTill now we are passing the password as an argument. We will look how we can protect our password and we don’t to pass it as an argument. There are two ways to do it.
- Using standard input via keyword
- Saving the password in a file and specify the path to the file using - - password-file parameter. The file containing the password should be either on the HDFS or LFS (Local File System)
Using standard input via keyword
sqoop import \
--connect jdbc:mysql://localhost:3306/retail_db \
--table categories \
--username root \
--P \
--split-by category_id
Saving the password in a file and specify the path to the file using - - password-file parameter. The file containing the password should be either on the HDFS or LFS (Local File System)
# shows all the files present in the local file system
ls -ltr

# create a new file having the password
echo -n "cloudera" > sqoop.pwd

# let's verify
ls -ltr

# see the file
cat sqoop.pwd

# delete the dir
hdfs dfs -rm -r /user/root/categories

# import the table into sqoop with error
sqoop import \
--connect jdbc:mysql://localhost:3306/retail_db \
--table categories \
--username root \
--password-file sqoop.pwd \
--split-by category_id

# using file:///
sqoop import \
--connect jdbc:mysql://localhost:3306/retail_db \
--table categories \
--username root \
--password-file file:///sqoop.pwd \
--split-by category_id
This we did using the Local File System.
Now let’s put the the password file in HDFS and use it from there.
# picking the file from edge node to hdfs
hdfs dfs put file:///sqoop.pwd /user/cloudera

# import table
sqoop import \
--connect jdbc:mysql://localhost:3306/retail_db \
--table categories \
--username root \
--password-file /user/cloudera/sqoop.pwd \
--split-by category_idWe can speed the import using - -direct flag
sqoop import \
--connect jdbc:mysql://localhost:3306/retail_db \
--table customers \
--username root \
--password-file file:///sqoop.pwd
It took around 17 sec to import the data import Sqoop. Now let’s try direct parameter
# delete dir
hdfs dfs -rm -r /user/root/customers

# import the table
sqoop import \
--connect jdbc:mysql://localhost:3306/retail_db \
--table customers \
--username root \
--password-file file:///sqoop.pwd \
--direct
Using direct parameter it took around 16 sec to import the data import Sqoop.
Limitations of - - direct:
- Sqoop can only perform direct mode imports from DBs like MySQL, PostgreSQL, Oracle and Netezza.
- Binary formats like Sequence File or Avro won’t work with direct mode import.
- In case of MySQL, using direct parameter with import query, Sqoop will take advantage of MySQL’s native utility like mysqldump and mysqlimport, rather than using the JDBC interface for transferring data.
So the by default path of importing the data is /user/root. We can give our custom path by using target-dir parameter. target-dir parameter specify the directory on HDFS where Sqoop should import your data. Sqoop will import import the data in the form of part files in the specified directory.
# import the data in sqoop
sqoop import \
--connect jdbc:mysql://localhost:3306/retail_db \
--table customers \
--username root \
--password-file file:///sqoop.pwd \
--target-dir /user/data/customersThis deletes your existing directory with all files within it & creates a new directory.
# import the data in sqoop
sqoop import \
--connect jdbc:mysql://localhost:3306/retail_db \
--table customers \
--username root \
--password-file file:///sqoop.pwd \
--target-dir /user/data/customers
To overcome the error we can run the below command
# import the data in sqoop
sqoop import \
--connect jdbc:mysql://localhost:3306/retail_db \
--table customers \
--username root \
--password-file file:///sqoop.pwd \
--delete-target-dir --target-dir /user/data/customerssqoop import \
--connect jdbc:mysql://localhost:3306/retail_db \
--table customers \
--username root \
--password-file file:///sqoop.pwd \
--target-dir /user/data/customers \
--appendIts not that the data will be added to the existing part file. New part files will get created for the appended data.
While using the target directory parameter the data was imported in the specified but no directory was created by the table. Using warehouse-dir parameter a directory will get created with the table name and the part files will get imported in the created directory.
sqoop import \
--connect jdbc:mysql://localhost:3306/retail_db \
--table products \
--username root \
--password-file file:///sqoop.pwd \
--warehouse-dir /user/data
We will see a new directory with the name of products has been created in the /user/data directory.
sqoop import \
--connect jdbc:mysql://localhost:3306/retail_db \
--table customers \
--username root \
--password-file file:///sqoop.pwd \
--target-dir /user/data/customers \
--delete-target-dir \
--columns "customer_id, customer_fname, customer_lname"We will be using where clause to restrict the rows
sqoop import \
--connect jdbc:mysql://localhost:3306/retail_db \
--table customers \
--username root \
--password-file file:///sqoop.pwd \
--target-dir /user/data/customers \
--delete-target-dir \
--where "customer_id < 100"sqoop import \
--connect jdbc:mysql://localhost:3306/retail_db \
--table customers \
--username root \
--password-file file:///sqoop.pwd \
--target-dir /user/data/customers \
--delete-target-dir \
--columns "customer_id, customer_fname, customer_lname" \
--where "customer_id < 100"
Import all the tables from database at once using once rather than importing the tables one by one. It’s important to remember that
- target-dir parameter is not allowed
- Each table must have a single primary key or autoreset-to-one-mapper option must be used
- We must intend to import all columns of each table
sqoop import-all-tables \
--connect jdbc:mysql://localhost:3306/retail_db \
--username root \
--password-file file:///sqoop.pwd \
--warehouse-dir /user/data \
--autoreset-to-one-mapper
Let’s verify if we have imported all the tables successfully or not
hdfs dfs -ls /

hdfs dfs -ls /root

hdfs dfs -ls /root/dataAgain target-dir parameter can’t be used. We can only use warehouse-dir parameter.
exclude-tables parameter is used to exclude table. If more than one table we can use comma to separate them.
sqoop import-all-tables \
--connect jdbc:mysql://localhost:3306/retail_db \
--username root \
--password-file file:///sqoop.pwd \
--warehouse-dir /user/data \
--exclude-tables 'orders,products' \
--autoreset-to-one-mapper
Let’s verify if we have imported all the tables successfully or not
hdfs dfs -ls /

hdfs dfs -ls /user

hdfs dfs -ls /user/datasqoop import \
--connect jdbc:mysql://localhost:3306/retail_db \
--username root \
--password-file file:///sqoop.pwd \
--delete-target-dir \
--target-dir /user/data/customers \
--table customers \
--compressLet’s verify if we have imported all the tables successfully or not
hdfs dfs -ls /

hdfs dfs -ls /user

hdfs dfs -ls /user/data

hdfs dfs -ls /user/data/customers

hdfs dfs -cat /user/data/customers/part*

hdfs dfs -text /user/data/customers/part*Sqoop supports three different file formats, one of those is text and the other two are binary. By default, Sqoop imports the data in text files that are human readable format, platform independent and simplest structure.
The binary file formats are Avro and Hadoop’s SequenceFile. These binary formats provide the most precise representation of the imported data.
# Importing the data as sequencefile

sqoop import \
--connect jdbc:mysql://localhost:3306/retail_db \
--username root \
--password-file file:///sqoop.pwd \
--delete-target-dir \
--target-dir /user/data/customers \
--table customers \
--as-sequencefile
# Importing the data as avrodatafile
sqoop import \
--connect jdbc:mysql://localhost:3306/retail_db \
--username root \
--password-file file:///sqoop.pwd \
--delete-target-dir \
--target-dir /user/data/customers \
--table customers \
--as-avrodatafileWe can change the default delimiter of Sqoop ,i.e., ( , ) to any delimiter as output. Default file format in Sqoop is text.
sqoop import \
--connect jdbc:mysql://localhost:3306/retail_db \
--username root \
--password cloudera \
--table customers \
--delete-target-dir \
--fields-terminated-by '|'
Let’s verify in HDFS
hdfs dfs -ls /

hdfs dfs -ls /user

hdfs dfs -ls /user/root

hdfs dfs -ls /user/root/caegories

hdfs dfs -cat /user/root/categories/part-m-00000Sqoop supports two types of incremental imports
- append
- last-modified
We can use the incremental argument to specify the type of incremental import to perform.
- append mode
We should specify the append mode when importing a table, where new rows are continuously added with increasing row id values. We must specify the column containing the row’s id with check-column. Sqoop imports rows where the check column has value greater than the one specified with last-value. We can use append mode based on a primary column. The last append key will be stored in the Sqoop meta store.
- last-modified
An alternate table update strategy supported by Sqoop is called last-modified mode. This should be used when rows of the source table are updated and each such update will set the value of a last-modified column to the current timestamp. Rows where the check column holds a timestamp more recent than the timestamp specified with last-value are imported.
At the end of an incremental import, the value which should be specified as last-value for a subsequent import is printed to the screen. When running a subsequent import, we should specify last-value in this way to ensure we import only the new or updated data. This is handled automatically by creating an incremental import as a saved job, which is the preferred mechanism for performing a recurring incremental import.
Let’s create a table
-- login to sql
mysql -uroot -pcloudera

-- use database
use retail_db;

-- create table
create table inc_imp(id int, name varchar(50), city varchar(50));

-- insert data into table
insert into inc_imp \
values(101, "Vishal", "Delhi"), \
(102, "Sai", "Banglore"), \
(103, "Vinay", "VNS");
sqoop import \
--connect jdbc:mysql://localhost:3306/retail_db \
--username root \
--password cloudera \
--table inc_imp \
--delete-target-dirError occurs before we are not having any primary key
describe inc_imp;sqoop import \
--connect jdbc:mysql://localhost:3306/retail_db \
--username root \
--password cloudera \
--table inc_imp \
--delete-target-dir \
--m 1Let’s verify in HDFS
hdfs dfs -ls /user/root/inc_imp

hdfs dfs -cat /user/root/inc_imp/part*
Now, let’s add some more values to the table
insert into inc_imp \
values(104, "Utakrsh", "Agra"), \
(105, "Priya", "Delhi");

select * from inc_imp;
Let’s try append mode first for the incremental load
# using hard coded values
sqoop import \
--connect jdbc:mysql://localhost:3306/retail_db \
--username root \
--password cloudera \
--table inc_imp \
--m 1 \
--incremental append \
--check-column id \
--last-value 103
hdfs dfs -cat /user/root/inc_imp/part*Import and export can be repeatedly performed by issuing the same command multiple times. Specially when using the incremental import capability, this is an expected scenario. Sqoop allows us to define saved jobs which makes this process easier. A saved job records the configuration information required to execute a Sqoop command at a later time. By default, job descriptions are saved to a private repository stored in $HOME/.sqoop/. You can configure Sqoop to instead use a shared metastore, which makes saved job available to multiple users across a shared cluster. Let’s create our first job.
sqoop job \
--create inc_imp_id \
-- import \
--connect jdbc:mysql://localhost:3306/retail_db \
--username root \
--password cloudera \
--table inc_imp \
--m 1 \
--incremental append \
--check-column id \
--last-value 0
We will delete the last 2 records from our table
delete from inc_imp where id in (104, 105);sqoop job \
--create inc_imp_id \
-- import \
--connect jdbc:mysql://localhost:3306/retail_db \
--username root \
--password cloudera \
--table inc_imp \
--m 1 \
--incremental append \
--check-column id \
--last-value 0To solve the error
echo -n "cloudera" > sqoop.pwdsqoop job \
--create inc_imp_id \
-- import \
--connect jdbc:mysql://localhost:3306/retail_db \
--username root \
--password-file file:///sqoop.pwd \
--table inc_imp \
--m 1 \
--incremental append \
--check-column id \
--last-value 0sqoop job --listSo to execute the job we have the below command
sqoop job \
--exec inc_imp_id
Let’s check the HDFS
hdfs dfs -ls /user/root

hdfs dfs -cat /user/root/inc_imp/part*
Get the details of Sqoop job
sqoop job --show inc_imp_id

# to fetch particular value
sqoop job --show inc_imp_id | grep 'incremental.last.value'
Let’s insert the 2 records in MySQL database
insert into inc_imp values(104, "Utakrsh", "Agra"), (105, "Priya", "Delhi");Run the Sqoop job again
sqoop job \
--exec inc_imp_id
Verify in HDFS
hdfs dfs -cat /user/root/inc_imp/part*

sqoop job --show inc_imp_id | grep 'incremental.last.value'
Now let’s try to see how we can handle the incremental import using the date property
-- create table
create table inc_imp_dt(id int, name varchar(50), city varchar(50), start_date date);

-- inserting values into table
insert into inc_imp_dt \
values(101, 'Vishal', 'Delhi', now()-interval 1 day);

-- see the data
select * from inc_imp_dt;

-- add some more values
insert into inc_imp_dt \
values(102, 'Sai', 'Bangalore', now()-interval 2 day), \
(103, 'Viany', 'VNS', now()-interval 3 day);
Now let’s create a Sqoop job
sqoop job \
--create inc_imp_dt \
-- import \
--connect jdbc:mysql://localhost:3306/retail_db \
--username root \
--password-file file:///sqoop.pwd \
--table inc_imp_dt \
--m 1 \
--incremental append \
--check-column start_date \
--last-value 0000-00-00
See all jobs
sqoop job --listLet’s execute the job
sqoop job --exec inc_imp_dtLet’s verify in HDFS
hdfs dfs -ls /user/root/inc_imp_dt

hdfs dfs -cat /user/root/inc_imp_dt/part*
Let’s check the job details
sqoop job --show inc_imp_dtLet’s add some data into our table
insert into inc_imp_dt \
values(104, "Utakrsh", "Agra", now()), \
(105, "Priya", "Delhi", now());
Let’s execute Sqoop job again
sqoop job --exec inc_imp_dtLet’s verify in HDFS
hdfs dfs -ls /user/root/inc_imp_dt

hdfs dfs -cat /user/root/inc_imp_dt/part*-- create a table
create table inc_imp_dt_tm(id int, name varchar(50), city varchar(50), start_time timestamp);
-- insert values into table
insert into inc_imp_dt_tm \
values (101, 'Vishal', 'Delhi', now()), \
(102, 'Sai', 'Bangalore', now()), \
(103, 'Viany', 'VNS', now());Now, let’s create a Sqoop job
sqoop job \
--create inc_imp_dt_tm \
-- import \
--connect jdbc:mysql://localhost:3306/retail_db \
--username root \
--password-file file:///sqoop.pwd \
--table inc_imp_dt_tm \
--m 1 \
--incremental lastmodified \
--check-column start_time \
--last-value 0000:00:00-00:00:00 \
--merge-key id
Let’s run the Sqoop job
sqoop job --exec inc_imp_dt_tmLet’s verify in our hdfs
hdfs dfs -ls /user/root/inc_imp_dt_tm

hdfs dfs -cat /user/root/inc_imp_dt_tm/part*
Now, let modify one of the rows and insert one record
-- update the record
update inc_imp_dt_tm set name='Lalit', city='Kolkata' where id=102;

-- insert the record
insert into inc_imp_dt_tm values (104, 'Rakesh', 'Kolkata', now());
Let’s run the job again
sqoop job --exec inc_imp_dt_tmThis time you will see a reduce job has also taken place.
There are three scenario in this place
- Existing data didn’t get changed
- Existing data changed
- The record wasn’t present
Now, let’s see how the data looks in the HDFS
hdfs dfs -ls /user/root/inc_imp_dt_tm

hdfs dfs -cat /user/root/inc_imp_dt_tm/part*Till now we the importing the data from RDBMS to HDFS. Now, we will export the data from HDFS to RDBMS.
-- show tables
show tables;

-- create a new table for importing the department data
create table dept_exp as select * from departments where 1=2;

-- select the data
select * from dept_exp;
Let’s import the departments table to the HDFS first
sqoop import \
--connect jdbc:mysql://localhost:3306/retail_db \
--username root \
--password-file file:///sqoop.pwd \
--table departments
Let’s see the file in our HDFS
hdfs dfs -ls /user/root/departmentsNow, let’s export the data to RDBMS
sqoop export \
--connect jdbc:mysql://localhost:3306/retail_db \
--username root \
--password-file file:///sqoop.pwd \
--table dept_exp \
--export-dir /user/root/departmentsThis parameter overrides mapping from SQL to Java type for configured columns. Sometimes what happens is that when we are importing the data to our HDFS the Map Reduce operation is not able to correctly recognize the data type of certain columns and imports the column with some different data type. So to override that incorrect data and the a predefined datatype for certain column we can use map-column-java parameter.
Let’s try to import orders table in avrofile format
sqoop import \
--connect jdbc:mysql://localhost:3306/retail_db \
--username root \
--password-file file:///sqoop.pwd \
--delete-target-dir \
--target-dir /user/data/orders \
--table orders \
--as-avrodatafile
We have successfully imported the data in HDFS but let’s more to the HDFS and see the schema.
hdfs dfs -ls /user/data/orders

hdfs dfs -text /user/data/orders/part* | head -5
If we the orders table data
select * from orders;

describe orders;
You will see the “order_date” column is showing datetime type in SQL but it’s datatype has been changes to long in the HDFS.
In the base directory if I do
ls -ltr

cat orders.avsc
For the “order_date” column we will see that the datatype is “long”. So to overcome this issue we can write the below command.
sqoop import \
--connect jdbc:mysql://localhost:3306/retail_db \
--username root \
--password-file file:///sqoop.pwd \
--delete-target-dir \
--target-dir /user/data/orders_mapjava \
--table orders \
--as-avrodatafile \
--map-column-java order_date=String
Let’s verify in HDFS
hdfs dfs -ls /user/data/orders_mapjava

hdfs dfs -text /user/data/orders_mapjava/part* | head -5When we have to export our data from HDFS to RDBMS using update mode there are two options that we can use
- update only
- allow insert
Let’s create a table in database
create table dept_update as select * from departments where 1=2;Let’s import data to the data
sqoop export \
--connect jdbc:mysql://localhost:3306/retail_db \
--username root \
--password-file file:///sqoop.pwd \
--table dept_update \
--export-dir /user/root/departments
Let’s update the base “department” table
update departments set department_name = "Fit" where department_id=2;

update departments set department_name = "Foot" where department_id=3;

insert into departments values (8, "IT");
Let’s reimport the data to the HDFS
sqoop import \
--connect jdbc:mysql://localhost:3306/retail_db \
--username root \
--password-file file:///sqoop.pwd \
--table departments \
--delete-target-dir
Let’s verify in our HDFS
hdfs dfs -cat /user/root/departments/part*Now, let’s export our data back to the dept_update table
sqoop export \
--connect jdbc:mysql://localhost:3306/retail_db \
--username root \
--password-file file:///sqoop.pwd \
--table dept_update \
--export-dir /user/root/departments \
--update-mode updateonly \
--update-key department_id
Here we see that only the updated records got inserted and the new records didn’t get append to the table. So to insert the newly inserted data we will have to use the “allowinsert” parameter.
First let’s truncate the table because if don’t truncate the data will be appended in the already existing table.
truncate dept_update;Now let’s export the data
sqoop export \
--connect jdbc:mysql://localhost:3306/retail_db \
--username root \
--password-file file:///sqoop.pwd \
--table dept_update \
--export-dir /user/root/departments \
--update-mode allowinsert \
--update-key department_idWhile are exporting the data from HDFS the staging table gives us the flexibility not to dump the data directly into the RDBMS. It acts like an intermediatory table.
Let’s say the Sqoop export got failed in between due to some network issue or environment issue the data will become inconsistent that time in the HDFS and the RDBMS. The flow of the data in this will be something like, data is first pushed to the staging table and then from the staging table data is pushed to the main table.
Let’s create a staging table
create table dept_update_stg as select * from departments where 1=2;

truncate dept_update;
Now, lets export our data.
sqoop export \
--connect jdbc:mysql://localhost:3306/retail_db \
--username root \
--password-file file:///sqoop.pwd \
--table dept_update \
--export-dir /user/root/departments \
--staging-table dept_update_stg
The data will be first inserted into the staging table and then loaded into the main table. Once, loaded into the main table the data will be truncated from the staging table.