The purpose of this project is to make it easier to develop Graylog and its plugins.
Graylog consists of the core server project and several plugins (e.g. the collector plugin) which are all separate maven projects.
To make it possible to build all of those project with a single mvn package
command, we built this meta project which pulls in the core server and all
plugins into a single maven reactor.
The graylog-project CLI tool is used to manage this meta project and is a requirement.
- Install the latest version of the graylog-project CLI tool
- Bootstrap the graylog-project repository
- Import the graylog-project repository into your IDE
Go to the releases page of the CLI tool and download the latest version for your platform.
Put the binary somewhere into your PATH.
Example:
$ mkdir -p $HOME/bin
$ cp graylog-project.linux $HOME/bin/graylog-project
$ chmod +x $HOME/bin/graylog-project
If you use the example above, please make sure your $HOME/bin is in your PATH!
Use the graylog-project tool to bootstrap the graylog-project repository via
the graylog-project bootstrap github://Graylog2/graylog-project.git command.
Example:
$ graylog-project bootstrap github://Graylog2/graylog-project.git
    git clone git@github.com:Graylog2/graylog-project.git graylog-project
      Cloning into 'graylog-project'...
    git checkout master
      Already on 'master'
      Your branch is up-to-date with 'origin/master'.
Repository: git@github.com:Graylog2/graylog2-server.git
Cloning git@github.com:Graylog2/graylog2-server.git into graylog-project-repos/graylog2-server
    git clone git@github.com:Graylog2/graylog2-server.git graylog-project-repos/graylog2-server
      Cloning into 'graylog-project-repos/graylog2-server'...
Checkout revision: master
    git branch master origin/master
    git checkout master
      Already on 'master'
      Your branch is up-to-date with 'origin/master'.
Repository: git@github.com:Graylog2/graylog-plugin-anonymous-usage-statistics.git
Cloning git@github.com:Graylog2/graylog-plugin-anonymous-usage-statistics.git into graylog-project-repos/graylog-plugin-anonymous-usage-statistics
    git clone git@github.com:Graylog2/graylog-plugin-anonymous-usage-statistics.git graylog-project-repos/graylog-plugin-anonymous-usage-statistics
      Cloning into 'graylog-project-repos/graylog-plugin-anonymous-usage-statistics'...
Checkout revision: master
    git branch master origin/master
    git checkout master
      Already on 'master'
      Your branch is up-to-date with 'origin/master'.
Repository: git@github.com:Graylog2/graylog-plugin-map-widget.git
Cloning git@github.com:Graylog2/graylog-plugin-map-widget.git into graylog-project-repos/graylog-plugin-map-widget
    git clone git@github.com:Graylog2/graylog-plugin-map-widget.git graylog-project-repos/graylog-plugin-map-widget
      Cloning into 'graylog-project-repos/graylog-plugin-map-widget'...
Checkout revision: master
    git branch master origin/master
    git checkout master
      Already on 'master'
      Your branch is up-to-date with 'origin/master'.

[...]

Generating pom.xml file from template pom.xml.tmpl
Generating runner/pom.xml file from template runner/pom.xml.tmpl
Generating src/main/assembly/server-tarball.xml file from template src/main/assembly/server-tarball.xml.tmpl
Writing manifest state to .graylog-project-manifest-state
Now you can import the graylog-project folder into your IDE of choice.
At Graylog we are using IntelliJ IDEA so we are using that for the following example.
After importing the project into your IDE, create a server run configuration:
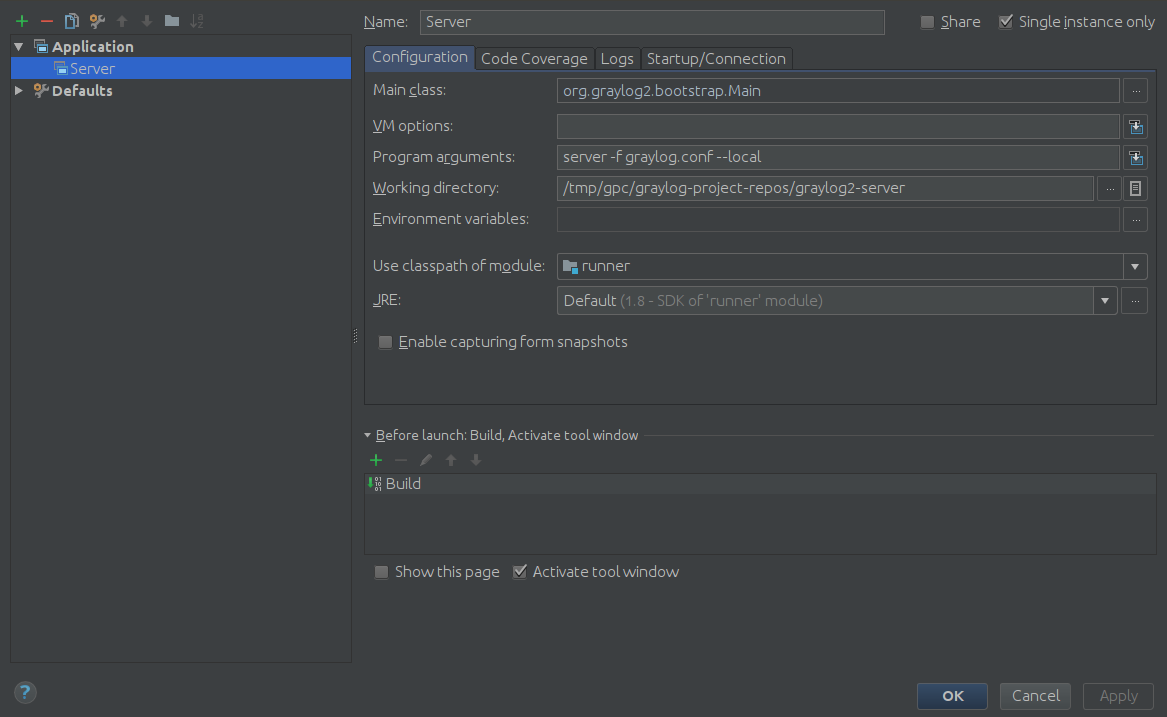
- Make sure to use the runner module for the Use classpath of module option
- Use the graylog2-server directory as Working directory
- In Program arguments use
server -f graylog.conf --local(--localto avoid sending usage stats and running version checks)
This allows the listed plugins to be on the same classpath and thus loaded directly without having to go through mvn package and symlinking/copying into Graylog's plugins folder.
Create a graylog.conf file inside the graylog2-server directory based on
the misc/graylog.conf example configuration.
Before you can run the server from the IDE, you have to run an initial build to create some assets.
$ mvn compile
This will build the backend and frontend parts.
Before you start the server, make sure you have an Elasticsearch and MongoDB
service running and the graylog.conf contains the correct connection
details for both.
Now you should be able to start the server from your IDE by using the run configuration that you created before.
For development we are using the webpack-dev-server. You can start it by
using the following command inside the graylog2-server/graylog2-web-interface
directory.
$ ./node/yarn/dist/bin/yarn start
If you are running the 2.4 branch or earlier, you have to use npm to start the development webserver:
$ ./node/npm run start
The web interface is now reachable via http://localhost:8080/.
To be able to run builds in environments that needs proxy settings to access the internet, first run mvn with the option to disable proxy by-pass to yarn.
mvn -Dfrontend.yarn.yarnInheritsProxyConfigFromMaven=false
Add the Proxy settings to the users .yarnrc:
proxy "https://<user>:<password>@proxy.in.lan:8080"
https-proxy "https://<user>:<password>@proxy.in.lan:8080"