My model railroad layout with JMRI on raspberryPi wit Digikeijs DR5000 + DR4024 + DR4088
This repo basically documents my specific installation steps and will hold any layout and automation files that I will create.
The instructions on jmri.org are a bit outdated and do not cover the JMRI test releases, and the image provided by M Steve Todd is really nice but configured as an access point and not really what I want.
My layout is controlled by a Digikeijs DR5000. It is connected to a RaspberryPi 3B+ via USB that is running JMRI. On the layout there are server Digikeijs DR4024 servo controllers that drive the points (switches, turnouts) and DR4088CS current sensors that are used for block occupancy detection.
The DR5000 also offers Wifi and is set to the Z21 protocol so that I can control stuff directly with my Roco WLAN maus.
The RaspberryPi connects to my regular guest wifi network so panels and the like can be accessed by anyone with access to this guest network.
The DR4024 servo controllers are powered by a separate 18V/3A supply but get their DCC commands from the main track power. This might seem overkill as I am using small servos, but their number might grow in the future and i want to have some spare power for signalling and lights.
The main power suuply is 18V/3A as well and feeds all the separate track blocks. All track block returns go through a DR4088CS power sensor that is connect to the S88N bus of the DR5000.
The DR5000 is connected to the Raspberry Pi over USB, and also offers a Wifi network for my Roco WLAN Maus. The Lan and Wifi interfaces of the DR5000 are configured for the Z21 protocol, not Loconet, but de DR5000 talks Loconet on its USB interface. (You could set the Lan and Wifi to Loconet if you have thottles that speak loconet, but my Roco Maus doesn't.)
If you start a webserver in JMRI it can be accessed by any tablet or pc connected to the same guest wifi network that the reaspberry pi is configured to connect to.
-
Raspberry Pi OS (64 bit) compatible with Debian Bullseye released April 4, 2022
see here but no need to download it, see below.
-
JMRI.4.99.10 (the latest test release as per June 12, 2022)
from here
I used the Raspberry Pi Imager on Ubuntu.
-
run it and select Raspberry Pi OS (64 bit)
Not the full edition, because we do not need all that recommended software.
-
In the settings I configured the following
hostname: raspberrypi
enable ssh
(with password authentication. You can generate a certificate later if you like)
set username and password
(do not use the default pi, and select a fairly strong password)
configure wireless lan
(select SSID and password. My Raspberry Pi will not act an access point but connect to our guest network)
-
choose storage
(make sure you have a writeable microsd card in your reader and check that you select the right one!)
-
write
Installing JMRI is really straight-forward, just install Java 11 (absolutely necessary for version 4.99!) and then get & unpack the JMRI release:
sudo apt-get install openjdk-11-jdk
wget https://github.com/JMRI/JMRI/releases/download/v4.99.10/JMRI.4.99.10+Rdc754efff4.tgz
gunzip -c JMRI.4.99.10+Rdc754efff4.tgz | tar xvf
This will leave you with a directory called JMRI that contains all the programs like PanelPro.
From this moment on you can login to the RaspberryPi using ssh, so on my Ubuntu machine I simply type
ssh -Y <username>@<ip-address of the rapberrypi>If you haven't installed a certificate you will be prompted for a password.
The -Y option will open any window started on the Raspberry Pi directly on the Ubuntu desktop.
After login, simply type
./JMRI/PanelProAf window will open showing the preferences (or open it from the PanelPro -> Edit -> Preferences).
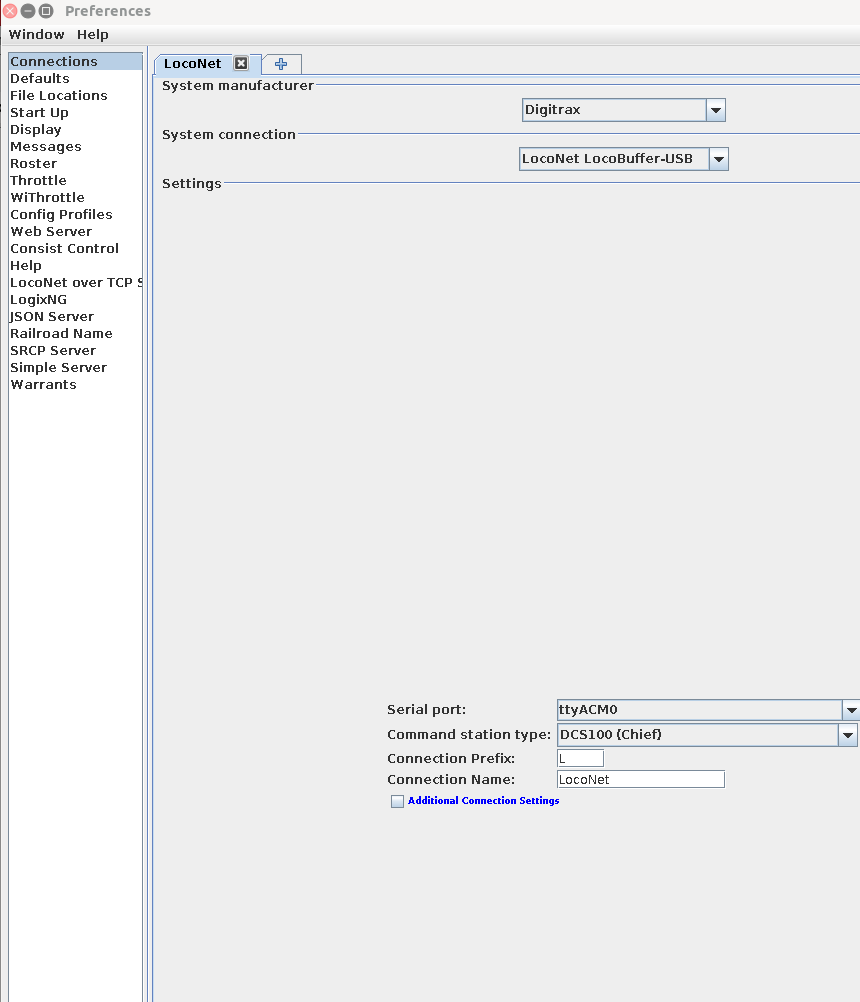
Make sure to select Connections and configure the connection as shown:
Note the serial port selection: ttyACM0. The dropdown will show several, this one works for me.
Don't forget to save these preferences and restart PanelPro (you will be prompted to to so)

