build script = build.gradle or build.gradle.kts
- build.gradle = Gradle build script definition
- settings.gradle = project name and other project settings
- build directory which containts generated filed and artifacts
The highest level Gradle concept is the project. Builds scripts configures project. Project is a Java object.
- Groovy Closures - see https://groovy-lang.org/closures.html
Closure delegates
- Each closure has a delegate object - usable to look up variables and method references to non-local variables and closure parameters.
- Heavily used for configuration, where delegate object refers to object being configured.
dependencies {
    assert delegate == project.dependencies
    testImplementation("junit:junit:4.13")
    delegate.testImplementation("junit:junit:4.13")
}- description ... shown when you execute the projects task
- group - describes who the project belongs to - describes the orhanization - its used as an ID when publishing artifacts
- version - used when publishing artifacts
- Initialization - finds out what projects take part in our build
- Configuration - task preparation, creates model of our projects
- Execution - executes tasks using command line settings
Task class is a blueprint for a task. Copy task comes pre-packaged and we can use it within our project after we :
- define an instance of that task class
- configure instance -> telling Copy about details like from and into.
Ad-hoc tasks combines task class and its definition at the same point. Example:
tasks.register('sayHello') {
    doLast {
        println 'Hello'
    }
}Best approach as it avoid unnecesary configuration. Class-based task (of Copy class): See more about performance: https://docs.gradle.org/current/userguide/task_configuration_avoidance.html
tasks.register('generateDescriptions', Copy) {
// configure task
}Uses Project.task() method. Has worse performance
task('generateDescriptions', type: Copy)Example of class based task:
task generateDescriptions(type: Copy) {
    from 'descriptions'
    into "$buildDir/descriptions"
    filter(ReplaceTokens, tokens: [THEME_PARK_NAME: "Grelephant's Wonder World"])
}Configuration of already defined tasks.
The best performance, recommended - it returns TaskProvider class instead of Task class. Perf benefits -- see book.
tasks.named('generateDescriptions') {
    into "$buildDir/descriptions-renamed"
}Returns Task class -- slower.
tasks.getByName('generateDescriptions') {
into "$buildDir/descriptions-renamed"
}Do not have to work with all plugins.
tasks.clean {
    doLast {
        println 'Squeaky clean!'

    }
}In Groovy DSL it is possible to use configuration by using task name. Unfortunately it also returns Task so there is perf downside.
clean {
    doLast {
        println 'Squeaky clean!'
    }
}- dependsOn prepareOutput - current task needs input from prepareOutput. Means that prepareOutput will be executed automatically before the current task.
- mustRunAfter zipAll - forces task order - current task must run after task B (it has effect of both tasks are actually going to take part int the build)
- finalizedBy taskA - taskA will be always executed after this task. TaskA will be executed even if the current task fails. Similar to finally section in try-catch.
- https://docs.gradle.org/current/userguide/incremental_build.html#sec:link_output_dir_to_input_files
- https://docs.gradle.org/current/javadoc/org/gradle/api/tasks/TaskInputs.html
Recommended definition:
plugins {
    id 'org.barfuin.gradle.taskinfo' version '1.3.1'
}
Legacy definition with missing optimisations and IntelliJ IDEA broken integration:
buildscript {
    repositories {
        maven {
            url "https://plugins.gradle.org/m2/"
        }
    }
    dependencies {
        classpath "gradle.plugin.org.barfuin.gradle.taskinfo:gradle-taskinfo:1.3.1"
    }
}
apply plugin: "org.barfuin.gradle.taskinfo"
How to search 3dr party plugins: https://plugins.gradle.org/
Core Gradle plugins: https://docs.gradle.org/current/userguide/plugin_reference.html
When searching for dependencies, repositories are used in provided order - declare the repo with the most dependencies first.
repositories {
    mavenCentral()
    google()
    maven {
        url 'https://my-custom-repo.com'
    }
}
Java classpath = list of files passed to Java when it complies and executes the code.
- Analogy in Gradle are compile and runtime classpaths.
Example how to declare runtime+compile time dependency with excluded transitive dependency.
dependencies {
    implementation(group = "commons-beanutils", name = "commons-beanutils", version =
            "1.9.4") {
        exclude(group = "commons-collections", module = "commons-collections")
    }
}Essential features for building Java applications:
- Compiling classes ( .java -> .class)
./gradlew compileJava
- Manage resources (other files like HTML, images, ...)
./gradlew processResources
- Handle dependencies (references to app dependencies)
- dependencies block
- Package - put all classes and resources into a single artifact
./gradlew jar
- Run tests (they mostly need different classpath then main application)
./gradlew test
Developer workflow features expected from build tools:
- run app
- manage Java versions
- seperate unit & integration tests
- publish artifact
java plugin adds tasks for essential features mentioned above.
plugins {
    id 'java'
}
Project layout that is expected by java plugin.
src/main/javaJava plugins expects to find classes theresrc/main/resourcesresourcessrc/test/javatest classessrc/test/resourcestest resources
Running .jar file using java -jar and there is "no main manifest attribute" error?
no main manifest attribute, in ./build/libs/06-theme-park-rides-status.jar
That means that Java doesn't know which class to execute. We can fix this by adding manifest:
tasks.named('jar') {
   manifest {
      attributes('Main-Class': 'com.gradlehero.themepark.RideStatusService')
   }
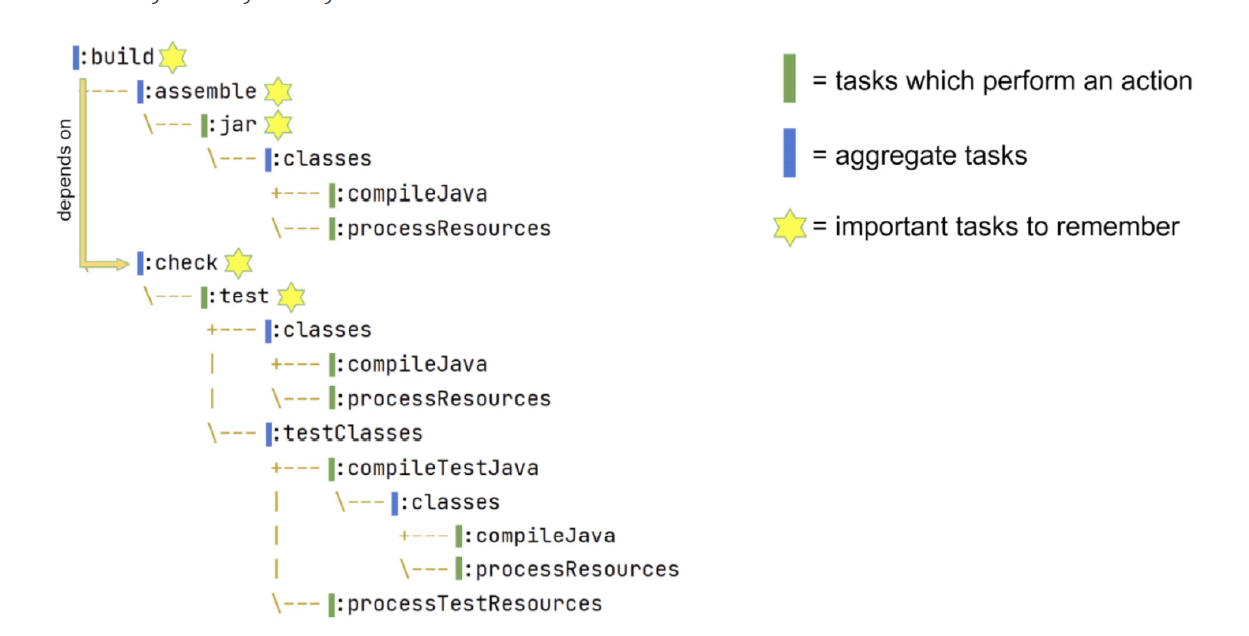
}Gradle build task has no actions, it only aggregate assemble and check tasks together.
- Similar tasks like build tasks are sometimes called lifecycle tasks in Gradle documentation.
Plugin to print task dependencies: https://github.com/dorongold/gradle-task-tree.
./gradlew build taskTree
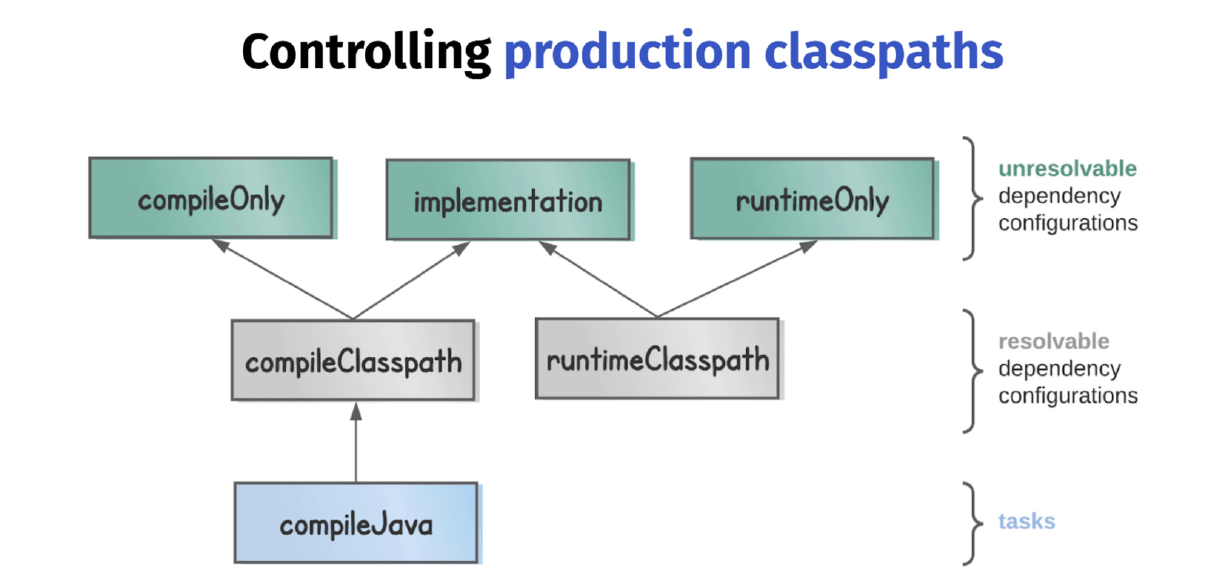
Production classpaths
- compile classpath to compile production code
- runtime classpath to run compiled code
Why not to make life easier and use the same classpath for compiling and running?
- compile classpath clean = compilation is more efficient, since Java doesn't have to load unnecessary libraries
- runtime classpath clean = reduced size of our deployable (not needed libraries are not included)
Resolvable = classpath can be generated from them. However, you can't declare dependencies againts them.
- A configuration that can be resolved is a configuration for which we can compute a dependency graph, because it contains all the necessary information for resolution to happen.That is to say we’re going to compute a dependency graph, resolve the components in the graph, and eventually get artifacts.
- See Gradle userguide
Unresolvable
- A configuration which has canBeResolved set to false is not meant to be resolved. Such a configuration is there only to declare dependencies.
To some extent, this is similar to an abstract class (canBeResolved=false) which is not supposed to be instantiated, and a concrete class extending the abstract class (canBeResolved=true). A resolvable configuration will extend at least one non-resolvable configuration (and may extend more than one).
compileOnly - useful when an app will be deployed in an environment where that library is already provided. For example servlet-api which is provided by Tomcat instance.
implementation - the most used - when application's code interacts directly with the code from library. For example StringUtils from Apache commons-lang3 - that library needs to be on **compile and runtime classpath = needs to be declared againts implementation.
runtimeOnly - for example DB connector (JDBC, JPA) which will be included at runtime
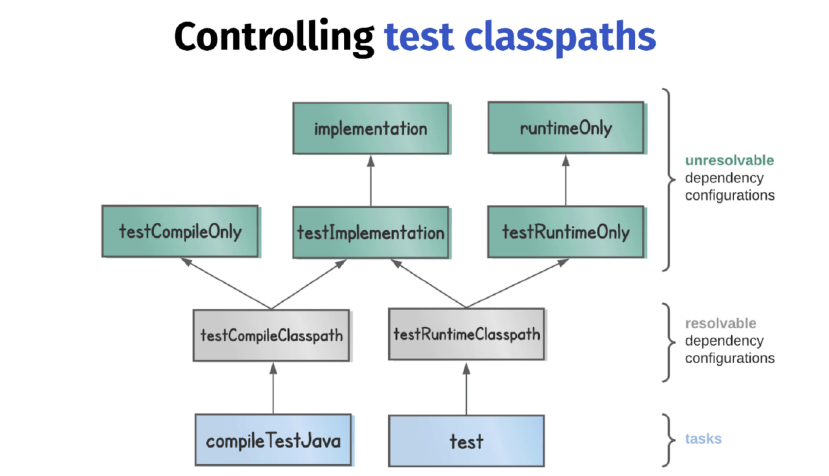
Test classpaths
Annotation procesors
When Java code is compiled it has a nice feature whereby additional source files can be generated by so-called annotation processors. The Java compiler accepts a processor path option on the command line, which is a list of all the annotation processor libraries.
The nnotationProcessor dependency configuration is used to control this processor path.
One example of this is the mapstruct library which generates mappers, classes which map one data representation to another.
annotationProcessor 'org.mapstruct:mapstruct-processor:1.4.2.Final'Another example is when you’re using the lombok library, which at compile time can generate boilerplate code like equals, hashCode, and toString methods.
annotationProcessor 'org.projectlombok:lombok:1.18.20'Now imagine we want to configure both compileJava and compileTestJava in the same way. Rather than configuring each task separately, there’s a way you can locate tasks by class type.
tasks.withType(JavaCompile).configureEach {
    options.verbose = true
}
Situation - we process our project resources with the command processResources and we don't want that some files ends up in producition jar. We can define include/exclude pattern like this:
tasks.named('processResources'){
    include '**/*.txt' //OR includes = '*.txt'
}
How to customise .jar?
For example to change jar name:
tasks.named('jar'){
    archiveBaseName = 'parkRideStatus'
}We can use application plugin to run application like ./gradlew run. It doesn't build .jar, it depends only on the "classses" task (compile Java and resources).
To properly run our application we need to define main class:
plugins {
   id 'application'
}

application { // Configuring application plugin mainClass
   mainClass = 'com.gradlehero.themepark.RideStatusService'
}
We can also create a custom task to run app from .jar file:
tasks.register('runJar', JavaExec) {
    classpath tasks.named('jar').map { it.outputs } // take output of jar task and put it under runJar classpath
    classpath configurations.runtimeClasspath // adds also runtime libraries (implementation and compileOnly)
    args ' teacups'
    mainClass = 'com.gradlehero.themepark.RideStatusService' // in case there are multiple jars (from dependencies), we need to define mainClass
}
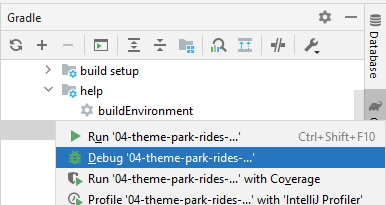
It is possible to debug Gradle tasks
See this page.
If your application uses a lot of memory, you might consider changing maxHeapSize, which defaults to 512mb.
  // set heap size for the test JVM(s)
test {
    minHeapSize = "128m"
    maxHeapSize = "512m"
}
It is possible to run Gradle tests with various settings like:
./gradlew test --tests org.gradle.SomeTestClass.someSpecificMethod
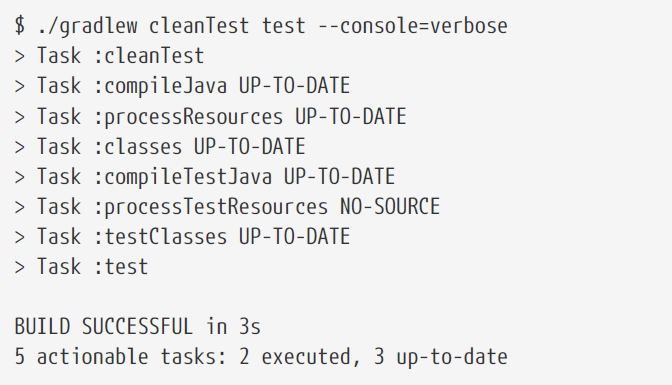
cleanTest (for flaky tests)
- Tests are cached by default and in case there are no changes to code, then the Gradle expect that the results will be the same again.
To re-run test again use
cleanTestto prevent unneeded build of the whole project. Do not useclean!
It is a good practise to have possibility to run unit and integration tests separately. We can use following plugin:
plugins {
    id 'org.unbroken-dome.test-sets' version '4.0.0'
}

testSets {
    integrationTest // invokes the tests under src/integrationTest/java
}

// to invoke integrationTest together under test / check task
tasks.named('check') {
    dependsOn tasks.named('integrationTest')
}By default, Gradle uses JAVA_HOME or PATH environment variables.
- This is problematic, because there might be different Java version for different developers and production.
- Secures that the specific Java version is used.
- It tries to find the version on localhost otherwise it will automatically download the version from the internet.
- You can use different version to compile, run and test my app.
- Tasks JavaExec, JavaCompile and Test will use the version specified by toolchain config, but it can be overridden at the task level.
// Use Java 11 by default for compile, run and test
java {
    toolchain {
        languageVersion = JavaLanguageVersion.of(11)
    }
}
// Application will run with Java 16 (overrides the settings above)
tasks.withType(JavaExec).configureEach {
    javaLauncher = javaToolchains.launcherFor {
        languageVersion = JavaLanguageVersion.of(16)
    }
}Publishing artifact = transferring artifact from the build directory to a remote Maven repository.
To configure:
- the artifact we want to publish
- the repository where we want to publish
plugins {
    id 'maven-publish'
}

publishing {
    // Artifact definition
    publications {
        maven(MavenPublication) {
            from components.java // from Java plugin, represents the jar file create by jar task
        }
    }
    // Target repo definition
    repositories {
        maven {
            name = 'maven'
            url '<your-repository-url>'
            credentials {
                username 'aws'
                password System.getenv("CODEARTIFACT_AUTH_TOKEN")
            }
        }
    }
}- components are defined by plugins and provide a simple way to reference a publication for publishing. This java component has been added by the java plugin, and represents the jar file created by the jar task.
To publish your artifact to local Maven repo run ./gradlew publishToMavenLocal (it needs group and version defined)
group 'com.gradlehero'
version '1.0-SNAPSHOT'
Then you can find your jar in ~/.m2/repository/$group/version/YOUR_JAR and run java -jar YOUR_JAR
- warning: the *.jar file may miss dependencies. To have complete bundle (fat jar) use Shadowplugin and its
shadowJartask.
Spring Boot has embedded web server, Tomcat by default -> you execute the jar file and Tomcat will start serving my app over the network.
There are 2 main plugins to work with Spring Boot
- Spring Boot plugin
- run Spring Boot application
- generate and executable jar file
- Spring Dependency Management plugin
- Making sure Spring Boot dependencies stay consistent
See build.gradle in 07-theme-park-api.
plugins {
    id 'java'
    id 'org.springframework.boot' version '3.0.6'
}
The plugin above provides ./gradlew bootRun to run the app.
- After running
./gradlew assemble(which invokesbootJar) we can run simplyjava -jar build/libs/07-theme-park-api.jarto run the Spring Boot app from jar.
In Gradle you can build 2 types of Java projects:
- Application 2. Standalone service which actually gets run, like web application, API service or desktop application. 3. Consumer (consuming libraries)
- Library 4. Artifact that isn't intended to be run standalone, but is consumed by other libraries or applications to create something else. 5. Producer.
Why is consumer vs producer important?
- implementation dependencies of the library will end up on the runtime classpath of any consumer, but not on the compile classpath.
ABI application binary interface
- Let's say we have the following method
-
  public static ObjectNode getRideStatus(String ride) {
    List<String> rideStatuses = readFile(String.format("%s.txt", StringUtils.trim(ride)));
    String rideStatus = rideStatuses.get(new Random().nextInt(rideStatuses.size()));
    ObjectNode node = new ObjectMapper().createObjectNode();
    node.put("status", rideStatus);
    return node;
  }
- In case we use a library with the following method. We will need ObjectNode to be on our compile classpath so we are able to operate with return value = ABI.
- Whereas StringUtils.trim() is not the ABI, and it is needed only at runtime
What falls under ABI?
- return types (as ObjectNode in example above)
- public method parameters
- types used in parent classes or interfaces
Due to ABI it may happen that we will need the following scenario in our consumer app:

What benefits would be to selectively build up classpaths like this?
- cleaner classpaths (faster compilation)
- won't accidentally use a library that we haven't depended on explicitly
- less recompilation, since we do not need to recompile when runtime classpath change
The Java Library plugin makes it possible using api.
apidependencies are part of the library's ABI.- Therefore, they will appear on the compile and runtime classpaths of any consumer.
implementationdependencies aren't part of the library's ABI, and will appear only on the runtime classpath of consumers.
Helpful to store passwords that we do not want to commit.
repositories {
    maven {
        url '<your-repository-url>'
        credentials {
            username 'aws'
            password mavenPassword // property
        }
    }
}
Then we can run the task with -P flag to add properties
./gradlew publish -PmavenPassword=<password>
Other examples:
- deployment - extra information like region to which to deploy.
- test memory allocation - configure maxHeapSize by different environments.
- DB connection string
Passing project properties
- Multiple ways with different priorities. Here are in descending order by prio:
- command line
2.
./gradlew <task-name> -PmyPropName=myPropValue - java system properties using -D
4.
./gradlew <task-name> -Dorg.gradle.project.myPropName=myPropValue - Environment variables
6.
ORG_GRADLE_PROJECT_myPropName=myPropValue ./gradlew publish - gradle.properties file in user home directory
8. Normally
~/.gradle/gradle.properties8.myPropName=myPropValue... key=value in the file above - gradle.properties file in project root directory 10. Commited to version control and shared to team.
Non-project specific properties
- Adding
org.gradle.console=verboseto the~/.gradle/gradle.propertiesfile and all local projects will be verbose. - Documentation for the full list of these properties.
Accessing project properties
tasks.register('print') {
    doLast {
        println project.property('myPropName')
        println project.findProperty('myPropName') // when the property is not found, does not throw error, but returns null
        println project.findProperty('myPropName1') ?: 'defaultValue' // useful for default val
    }
    // check existence
    if (hasProperty('myPropName1')) {
        println 'Doing some conditional build logic'
    }
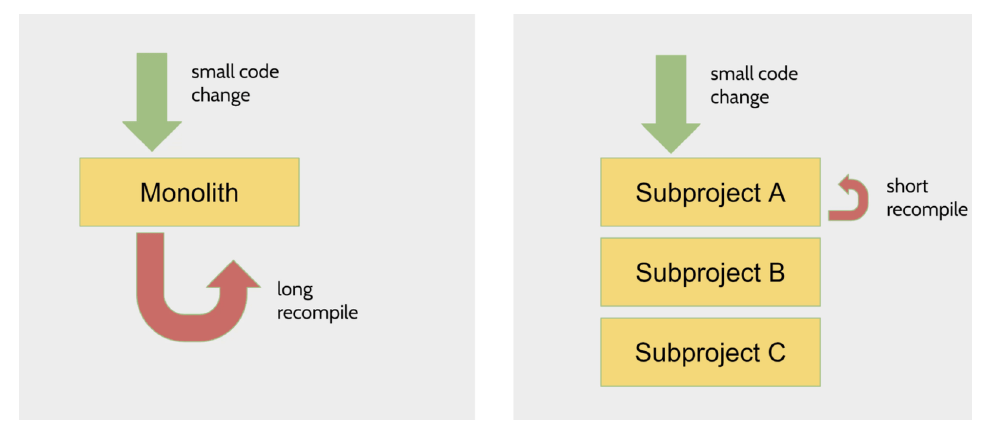
}Why using multi-project builds?
- Modularisation - enforce interactions between layers
- Performance
When using sub-modules, the gradle tasks are prefixed with the subproject name.
:app:runinstead ofrun
Root project
Top level project which contains:
.gradlecache,- gradle directory with wrapper files
settings.gradlefile- Gradle wrapper scripts themselves
Only the build.gradle lives in the subprojects
Executing tasks
By default, any task names you pass to the wrapper script will get executes againts any subproject that contains the task.
./gradlew clean --console=verboseis executed in all subprojects.
To execute the task only in the specific module, we need to use fully qualified name and task name.
./gradlew :app:clean --console=verbose- or
./gradlew app:clean --console=verbosewithout the initial ":" is the same.
See 09-theme-park-manager
Copying a single file
tasks.register('generateDescriptions', Copy) {
    from 'descriptions/rollercoaster.txt'
    into "$buildDir/descriptions"
}
the same result written in a different form
tasks.register('generateDescriptions', Copy) {
    from file('descriptions/rollercoaster.txt')
    into file("$buildDir/descriptions")
}
another form is to use project.layout object which provides helpful references to other directories
tasks.register('generateDescriptions', Copy) {
    from file('descriptions/rollercoaster.txt')
    into layout.buildDirectory.dir('descriptions')
}Let's assume following structure
descriptions/
├── log-flume.txt
├── rollercoaster.txt
├── sub
│ └── dodgems.txt
└── teacups.txt
The simplest approach is to specify the directory as a string.
tasks.register('generateDescriptions', Copy) {
    from 'descriptions'
    into layout.buildDirectory.dir('descriptions')
}
The same result using file:
tasks.register('generateDescriptions', Copy) {
    from file('descriptions')
    into layout.buildDirectory.dir('descriptions')
}
Or we can use explicit definition layout.projectDirectory.dir:
tasks.register('generateDescriptions', Copy) {
    from layout.projectDirectory.dir('descriptions')
    into layout.buildDirectory.dir('descriptions')
}
Or you can pass FileTree object - FileTree represents a collection of files with a common parent directory.
tasks.register('generateDescriptions', Copy) {
    from fileTree(layout.projectDirectory.dir('descriptions'))
    into layout.buildDirectory.dir('descriptions')
}
FileTree is useful because you can include your own pattern like this:
tasks.register('generateDescriptions', Copy) {
    from fileTree(layout.projectDirectory) {
        include 'descriptions/**'
    }
    into buildDir
}
And you can achieve exactly the same output using include method on the Copy task.
- FileTree offers more flexibility, as you could copy from multiple file trees each with their own specific include.
tasks.register('generateDescriptions', Copy) {
    from layout.projectDirectory
    include 'descriptions/**'
    into buildDir
}
Output of the commands above is always:
build
└── descriptions
    ├── log-flume.txt
    ├── rollercoaster.txt
    ├── sub
    │   └── dodgems.txt
└── teacups.txtThe last scenario is when you want to copy multiple files without the directory structure. To do this we need to use a different type called a FileCollection.
We need to use FileCollection which is like FileTree, but it doesn't maintain the original directory structure.
We can actually generate a fileCollection from a fileTree by adding .files on the end. We also have to specify the descriptions directory again when we call into.
tasks.register('generateDescriptions', Copy) {
    from fileTree(layout.projectDirectory.dir('descriptions')).files
    into layout.buildDirectory.dir('descriptions')
}
The output of the command above is:
build
└── descriptions
    ├── dodgems.txt
    ├── log-flume.txt
    ├── rollercoaster.txt
    └── teacups.txt
Another way is to call project.files and pass relative path of each file.
tasks.register('generateDescriptions', Copy) {
    from files(
            'descriptions/rollercoaster.txt',
            'descriptions/log-flume.txt',
            'descriptions/teacups.txt',
            'descriptions/sub/dodgems.txt')
    into layout.buildDirectory.dir('descriptions')
}The following Zip task takes input from another task called generateDescriptions, output is under /build/zips-here/destinations.zip
tasks.register('zipDescriptions', Zip) {
    from generateDescriptions
    destinationDirectory = layout.buildDirectory.dir('zips-here')
    // alternative
    // destinationDirectory = file("$buildDir/zips-here")
    archiveFileName = 'descriptions.zip'
}buildSrc is one such mechanism, which lets you pull logic out of your build script into a directory called buildSrc at the top level of your project. This extracted build code can then be reused in any project of your build, which both cleans up your build scripts and promotes reuse.
Convention plugins are a way of applying the same build logic to multiple subprojects. They are local plugins.
How to define Convention plugin?
Create /buildSrc directory with the file build.gradle and put there:
plugins {
    id 'groovy-gradle-plugin' // Groovy convention plugin
}
Then we will create the following structure under:
buildScr/src/main/groovy/com.gradlehero.themepark-conventions.gradle
- We can write there any build logis as it would be build.gradle file. When the plugin gets applied to a project, the logic contained in this file will be applied.
The last step is to apply our convention plugin to subprojects
plugins {
    //other plugins ...
    id 'com.gradlehero.themepark-conventions'
}
Summary
- as projects grow the complexity of the build logic grows too
- reduce complexity by extracting build logic into the buildSrc directory
- code within buildSrc can be reused within any project of your build
- extract build logic into a convention plugin, then apply it to specific subprojects
- use multiple convention plugins to apply different build logic to different categories of subproject
The easiest way how to define your own task is definition inside a build.gradle file, you can for example define a custom task to print which file has bigger size with file params.
tasks.register('fileDiff', FileDiffTask) {
    file1 = file('src/main/resources/static/images/rollercoaster.jpg')
    file2 = file('src/main/resources/static/images/logflume.jpg')
}

abstract class FileDiffTask extends DefaultTask {
    @TaskAction
    def diff() {
        File file1 = getFile1().get().asFile
        File file2 = getFile2().get().asFile
        if (file1.size() == file2.size()) {
            println "${file1.name} and ${file2.name} have the same size"
        } else if (file1.size() > file2.size()) {
            println "${file1.name} was larger"
        } else {
            println "${file2.name} was larger"
        }
    }

    @InputFile // this is important to enable UP-TO-DATE Gradle feature
    abstract RegularFileProperty getFile1()

    @InputFile
    abstract RegularFileProperty getFile2()
}
To see an example how to move this under buildSrc - see 09-theme-park-manager.
We can define plugins the same way as tasks - inside the build.gradle file and extend them to take advantage of custom params.
Plugins can be written in any JVM language including Java, Groovy or Kotlin.
Example with plugin definition is in 11-file-diff-plugin.
- The plugin is published to maven repo using
./gradlew publishToMavenLocaland consumed by a standard plugin definition and changes to settings.gradle in 09-theme-park-manager
See 11-file-diff-plugin and its tests to see plugin explanatory testing.
Definition of custom dependencies.
Configurations are buckets for dependencies (like implementation, api, ..).
configurations {
    antContrib
    externalLibs
    deploymentTools
}

dependencies {
    antContrib files('ant/antcontrib.jar')
    externalLibs files('libs/commons-lang.jar', 'libs/log4j.jar')
    deploymentTools(fileTree('tools') { include '*.exe' })
}
The example above defines several custom configurations.
- And I do not know what is ther default behaviour :( ... needs more study
- they are usefull in case we have some generated classes and we want to add those sources under existing build classpath (under /build directory)
tasks.register<Copy>("generateMlCode") {
    from(layout.projectDirectory.dir("../mlCodeGenTemplate"))
    into(layout.buildDirectory.dir("generated/sources/mlCode"))
}

sourceSets {
    main {
        java {
            srcDir(tasks.named("generateMlCode")) // adds output of the task under srcDir
        }
    }
}
Previous sourceSets definition adds another source directory to "main" sourceset. It will be like:
[main]
   srcDirs:
      src/main/resources
      src/main/java
      build/generated/sources/mlCode
We can also add a custom sourceSet for example to start our application in some special debug mode:
val extraSrc = sourceSets.create("extra")
dependencies {
    "extraImplementation"("joda-time:joda-time:2.11.1")
}
And then we can also add a custom exec task to run it
tasks.register<JavaExec>("runExtra"){
    classpath = extraSrc.output + extraSrc.runtimeClasspath
    mainClass.set("Extra")
}
See https://github.com/gradle/build-tool-training-exercises/tree/main/Jvm_Builds_with_Gradle_Build_Tool/exercise1 for more info.
It is possible to debug current sourceSets using helpful task:
import java.nio.file.Path
import java.nio.file.Paths

tasks.register("sourceSetsInfo") {
    doLast {
        Path projectPath = layout.projectDirectory.asFile.toPath()
        Path gradleHomePath = gradle.gradleUserHomeDir.toPath()
        Path cachePath = Paths.get(gradleHomePath.toString(), "caches/modules-2/files-2.1/")


        sourceSets.forEach {
            SourceSet sourceSet = it
                    println()
            println("[" + sourceSet.name + "]")

            println("   srcDirs:")
            sourceSet.allSource.srcDirs.forEach {
                println("      " + projectPath.relativize(it.toPath()))
            }

            println("   outputs:")
            sourceSet.output.classesDirs.files.forEach {
                println("      " + projectPath.relativize(it.toPath()))
            }
            println("   impl dependency configuration:")
            println("      " + sourceSet.implementationConfigurationName)

            println("   compile task:")
            println("      " + sourceSet.compileJavaTaskName)

            println("   compile classpath:")
            sourceSet.compileClasspath.files.forEach {
                if (it.toString().contains(".gradle/")) {
                    println("      " + cachePath.relativize(it.toPath()))
                } else {
                    println("      " + projectPath.relativize(it.toPath()))
                }
            }
        }
    }
}
Use toolchains - https://docs.gradle.org/current/userguide/toolchains.html
Old sourceCompatibility are deprecated
java {
    sourceCompatibility = "1.6"
    targetCompatibility = "1.8"
}
Talking about buckets and resolved dependencies
- bucket = implementation, compileOnly, etc.. groups to define dependencies - using abstract concept DefaultExternalModuleDependencu
- resolved dependencies = under the hood classpaths using .jars
A] Manual
- create SourceSeet
- configure dependencies
- Configure classpaths
- Create custom tasks (for running for example)
B] Use JVM Test Suites plugin
- automates a lot of the work
- it is already bundled in 'java' plugin
Usage:
- 'java' plugin
- following code in build.gradle:
- add <intTest>/java/<package> under 'src' (same level as "main" and "test" folders)
- add some tests/code under this test suite
- use predefined tasks "compileIntTestJava" and "intTest" to run
testing {
     suites {
         val intTest by registering(JvmTestSuite::class) {
             dependencies {
                 implementation(project)
                 implementation("org.seleniumhq.selenium:selenium-java:4.9.0")
             }
         }
     }
}- we can enforce code coverage
Example of configuration in Kotlin DSL
plugins {
 jacoco
}
tasks.named("test") {
 finalizedBy("jacocoTestReport")
}
tasks.named("jacocoTestReport") {
 dependsOn("test")
}
tasks.named<JacocoCoverageVerification>("jacocoTestCoverageVerification") {
    dependsOn("jacocoTestReport")
     violationRules {
         rule {
             limit {
                 counter = "LINE"
                 value = "COVEREDRATIO"
                 minimum = "0.9".toBigDecimal()
             }
         }
     }
}
tasks.named("check") {
 dependsOn("jacocoTestCoverageVerification")
}
Code style
Java
- Checkstyle https://docs.gradle.org/current/userguide/checkstyle_plugin.html
- specify tool version
- add checkstyle rules
Static code analysis
- TODO 3:20:00
- Verbose console:
--console=verbose ./gradlew build -i.. for info level output./gradlew build --warning-mode all --stacktraceuseful for deprecated warnings- Everything
./gradlew build --warning-mode all --stacktrace -i --console=verbose
- Wrapper upgrade from CMD
./gradlew wrapper --gradle-version 8.0.2 - help for specific command
gradle help --task wrapper - Tasks default parameters (configuration like group, description, enabled) is here - look for setters.
tasks.register('sayBye') {
    doLast {
        println 'Bye!'
    }
    onlyIf {
        2 == 3 * 2
    }
}-
Show all subprojects
./gradlew projects -
we should avoid using mavenLocal(), see detailed info here
-
Plugin to print task dependencies:
./gradlew build taskTree
-
Toolchain full example
-
  tasks.withType(JavaCompile).configureEach {
      javaCompiler = javaToolchains.compilerFor {
          languageVersion = JavaLanguageVersion.of(11)
          }
      }
  tasks.withType(JavaExec).configureEach {
      javaLauncher = javaToolchains.launcherFor {
          languageVersion = JavaLanguageVersion.of(17)
      }
  }
  tasks.withType(Test).configureEach {
      javaLauncher = javaToolchains.launcherFor {
          languageVersion = JavaLanguageVersion.of(17)
      }
  }
-
-
How to check available SDKs for toolchain?
./gradlew -q javaToolchains
-
How to rerun tasks without using cache?
./gradlew help --no-build-cache --rerun-tasks
-
How to see simple profiling?
./gradlew help --profile --offline --rerun-tasks
-
How to exclude libraries globally?
configurations.all {
   exclude group:"org.apache.geronimo.specs", module: "geronimo-servlet_2.5_spec"
   exclude group:"ch.qos.logback", module:"logback-core"
}
Platform vs Version catalog
- https://docs.gradle.org/current/userguide/platforms.html#sub:platforms-vs-catalog
- Blog about version catalog in Micronaut
How to share version catalog between multiple projects?
Migration from Groovy DSL to Kotlin DSL
With each removed TODO it would be nice to add some info of its outcome / tips.
- Try out Gradle profiler https://github.com/gradle/gradle-profiler
- Try Gradle 8.1 configuration cache https://docs.gradle.org/current/userguide/configuration_cache.html#config_cache:usage:enable
- Gradle performance - parallel tests: https://docs.gradle.org/current/userguide/performance.html#execute_tests_in_parallel
- Max parallel forks> https://docs.gradle.org/current/dsl/org.gradle.api.tasks.testing.Test.html#org.gradle.api.tasks.testing.Test:maxParallelForks
- read about SBOMs and write it down to this repo
- Add build scans under MDM CI to be browsable and downloadable after build in CI
- MDM Platform knowledge / test
- Udělat si nový modul v mdm (gradle modul) a použít tam import platform depdencies a podívat se co vše se nabere.
- MDM - Add -pDoDev as a default into task definition in build.gradle and put there if(CI) -> then perform complete build
- and maybe add another param to enable localhost invokal by some true/false flag in settings.gradle
- Check Jacoco setup in MDM
- Try out checkstyle plugin in MDM and explore formatting possibilities using IDEA plugin
