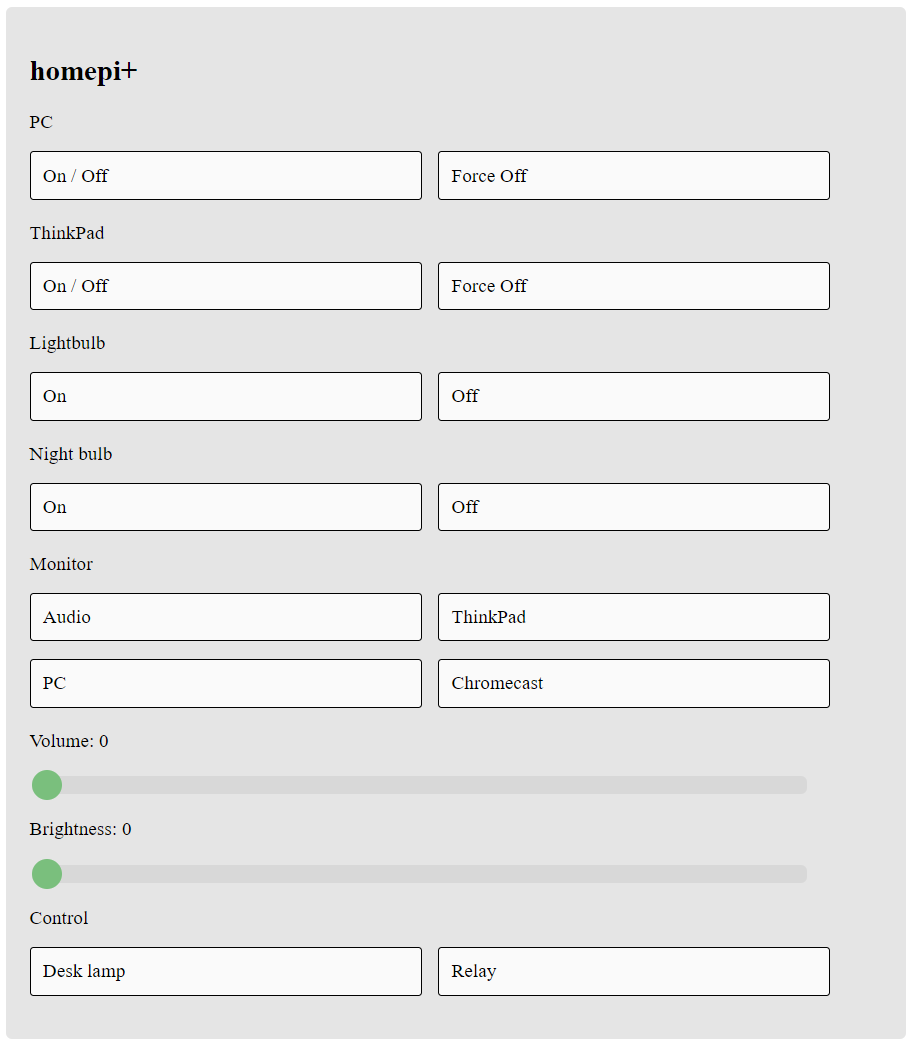
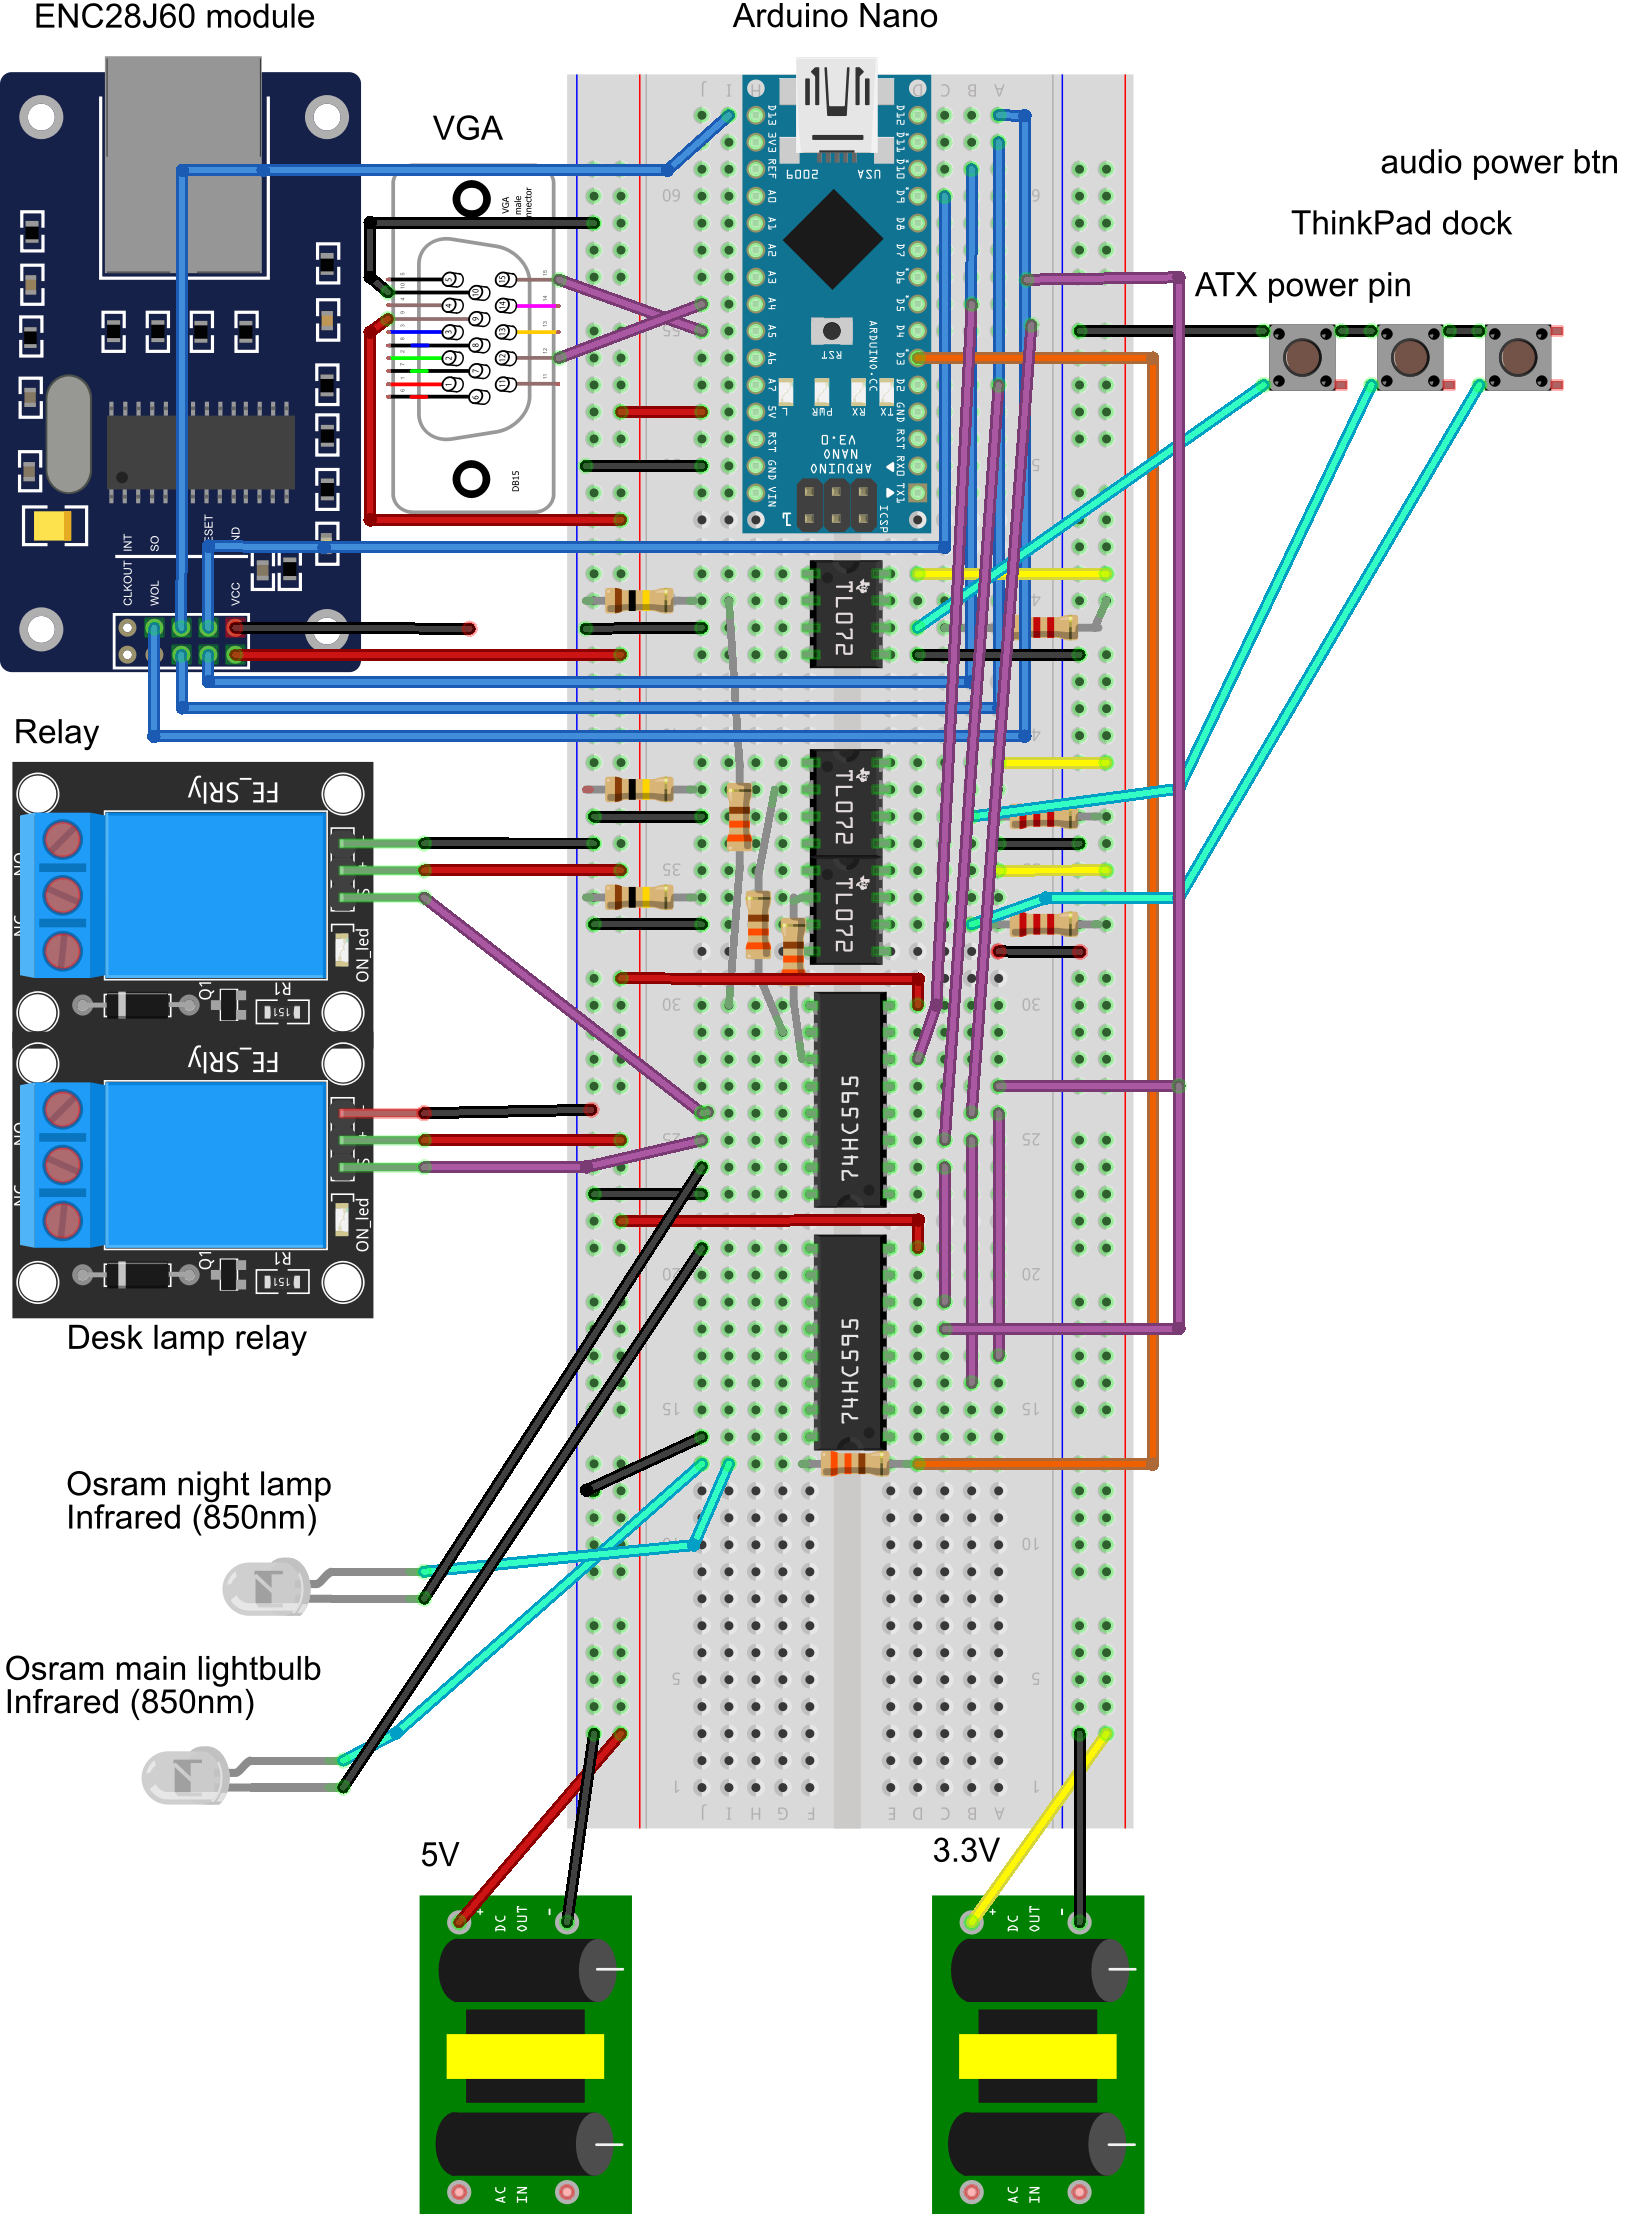
homepi+ is an Arduino based implementation of a home control system. It is an evolution of my previous project which accomplished a similar task and which was implemented on a Raspberry Pi. This time, everything is happening on a microcontroller, in order to reduce overhead and speed up execution. Also, advantages include easier communication with the hardware (for example, working with infrared LEDs does not involve messing with gigantic monoliths like the LIRC library on Linux). This is intended to be deployed to an Arduino Nano.
Currently, this project interfaces with and allows control of the following:
- Connection to motherboard power headers in order to allow PC power cycle
- Connection to ThinkPad Ultra Dock in order to allow docked laptop power cycle
- Control of OSRAM LEDs which use the NEC infrared protocol
- Changing active source, volume, and brightness of my AOC U3277FWQ monitor by issuing DDC/CI commands over the D-Sub connector
- Control of a 2-5V-relay module
- (Deprecated) Control of Delock 18685 4K HDMI switch which uses the NEC infrared protocol
- Controlled access from public Internet; you may need to set up port forwarding on the NAT box (the router usually) if you (VERY VERY probably) do not assign a public IP to this
In order to 'talk' with the Arduino, a web service is implemented. This leverages the ENC28J60 module; communication is done using the EtherCard library. This was chosen instead of UIPEthernet because it comes with a smaller footprint, especially on the flash memory side, which is almost maxed out by the latter library on the Nano.
In order to easily discover the service, the service exposes its presence via mDNS. This has been achieved by slightly patching the EtherCard library in order to accommodate a dedicated mDNS library, EtherCard-MDNS. The version used is a fork with some patches I added that, in addition to original functionality of resolving the service via a .local address (one can access the application at http://homepi.local on a system with a resolver capable of mDNS), now it exposes the service via DNS-SD. This allows its IP address to be discovered by compatible clients. Such a client is the Android client for homepi that I have implemented and is available here: https://github.com/valinet/homepi-android-client.
The EtherCard library is configured to automatically obtain an IPv4 address using DHCP. That used to be the case, but because it was not obtaining correctly all the data, plus my constant need for more flash memory, now the IP is hardcoded. In order to provide a fallback mechanism, 2 strategies can be employed:
Configure the DHCP server to reserve a particular IP address for the ENC28J60 on-board NIC (that's what I use at home, and how the project is configured currently)Statically assign an IP address to the ENC28J60 on-board NIC using the EtherCard library
In order to facilitate access from the public Internet, a series of precautions had to be taken. Specifically, a low overhead method of authentication was necessary, as otherwise anyone who knows or finds out the IP and the external port (if using NAT) could potentially issue commands to this, at least. Furthermore, this is not really intended as a general purpose web application, but rather dedicated only to the user of the system in those exceptional situations when he/she is remote and needs to change some of the system's parameters. HTTPS was first that came to mind, but the overhead was too big to bear; furthermore, extensive rewrites of some of the libraries would have been required. Seeking a faster solution, I thought about TOTP (time based one-time password), publicly well known as 'authenticator' (popularly used in tokening applications, like 2 factor authentication, with popular clients like Google Authenticator etc). The protocol is low overhead, and with a few precautions it can be a very robust security solution. The way it is implemented in this:
- Arduino connects to the Internet and figures out the current date and time (epoch) by querying a public NTP server
- Only when an HTTP request from the outside is made,
the system will report back "401 Unauthorized" to the user agent. This will make the user agent ask for credentials, most probably in the form of an authentication prompt in the browser.the system will have the browser prompt the user for a 'password' by sending a page containing JavaScript. - As a password, the user agent is expected to provide the current authenticator code. When the provided code matches with the expected one, the web page is served back with a "200 OK" status code and an internal counter is incremented. The system is now in the 'open' state. When the user agent uploads the new configuration data via a custom formatted GET request, the same counter is incremented yet again and the confirmation is sent back to the user agent in the form of serving back the updated page and a "200 OK" status code. The system will revert back to the 'closed' state. From this moment on, the user agent will be denied any new request until the current authenticator code expires. After this happens, the user agent will again have to provide the current authenticator code and the cycle will repeat.
- The above is done so that we reduce the chance external agents will tamper with the service when it is in the 'open' state. This could be implemented by reducing the time a code is valid, but that meant typing it in the authentication prompt had to be done faster.
- If data is not uploaded while the current code is valid, posting the data subsequently will fail (the request will hang, as the server will outright discard the request without processing any of it) until the user agent requests the web resource again and provides the new authenticode.
- Limitations: another agent may hijack the server and post its own data in the time between a successful initial get request and the subsequent post back of updated data before a new authenticode generates. Also, multiple legitimate agents cannot use the web page at the same time, as the service does not keep track of the individual agents that connect to it (this is pretty impossible no matter how many arrays you implement to keep track of 'connected' agents because EtherCard works pretty much on a single port; for this to work, you'd have to talk separately on different ports with all the agents connected for a use case that frankly does not really exist for this application; also, you have to watch out and fir all of this in the measly quantity of available program and random access memory)
- In order to improve TOTP security, the SHA-256 algorithm and 8 digits authenticodes are used by default.
- The above procedure is done by employing the following libraries: TOTP-Arduino - for authenticode generation, Cryptosuite - used internally by TOTP-Arduino to generate SHA-1 or SHA-256 hashes,
arduino-base64 - used to decode the authentication data in the HTTP headers
In order to generate the secret key for Arduino, you can use the provided generator ripped from the TOTP-Arduino project, found in "res/totp.html".
There are other two libraries used with this project: Wire, from the default Arduino libraries, in order to facilitate i2c communication with the monitor, via DDC/CI; and IRLib2, which is used to control the infrared lights that control the lightbulbs in my room.
This repository contains all the necessary info to clone and correctly compile this, by including specific versions of the libraries used in the project. To correctly clone this repository, do:
git clone https://github.com/valinet/homepi-plus
cd homepi-plus
git submodule init
git clone --depth=1 --no-checkout `git config submodule.src/ArduinoCore-avr.url` src/ArduinoCore-avr
git -C src/ArduinoCore-avr config core.sparsecheckout true
echo "libraries/Wire" >> src/ArduinoCore-avr/.git/info/sparse-checkout
git submodule absorbgitdirs src/ArduinoCore-avr
git submodule update --force --checkout src/ArduinoCore-avr
git clone `git config submodule.src/EtherCard-MDNS.url` src/EtherCard-MDNS
git submodule absorbgitdirs src/EtherCard-MDNS
git submodule update --force --checkout src/EtherCard-MDNS
git clone `git config submodule.src/EtherCard.url` src/EtherCard
git submodule absorbgitdirs src/EtherCard
git submodule update --force --checkout src/EtherCard
git clone `git config submodule.src/IRLib2.url` src/IRLib2
git submodule absorbgitdirs src/IRLib2
git submodule update --force --checkout src/IRLib2
git clone --depth=1 --no-checkout `git config submodule.src/Cryptosuite.url` src/Cryptosuite
git -C src/Cryptosuite config core.sparsecheckout true
echo "Sha/sha256.h" >> src/Cryptosuite/.git/info/sparse-checkout
echo "Sha/sha256.cpp" >> src/Cryptosuite/.git/info/sparse-checkout
git submodule absorbgitdirs src/Cryptosuite
git submodule update --force --checkout src/Cryptosuite
git clone `git config submodule.src/TOTP-Arduino.url` src/TOTP-Arduino
git submodule absorbgitdirs src/TOTP-Arduino
git submodule update --force --checkout src/TOTP-Arduino
This project compiles successfully using Arduino IDE 1.8.3. Future versions may work as well; to compile successfully, make sure you do not already have copies of the libraries used in this project already in your Documents/libraries folder (this is because of a quirk of the Arduino build system; otherwise, you will get linker errors because some translation units will be compiled twice). Please temporarily remove the libraries from your libraries folder when attempting to compile this from the Arduino IDE.
Lastly, there are two includes that you have to replace with proper data for your deployment:
#include "KEYS/key.h"- key.h contains a define that specifies the secret key used by the TOTP algorithm:
#define KEY {0x00, 0x01, 0x02, 0x03, 0x04, 0x05, 0x06, 0x07, 0x08, 0x09, 0x0A, 0x0B, 0x0C, 0x0D, 0x0E, 0x0F}
To make sure the sketch works properly, I recommend flashing your Arduino with the MiniCore bootloader; that's what I currently use. Beside cool advantages, like faster upload times, what really made me seek an alternative was that my Nanos came with the "old bootloader" which had a bug that does not reset the internal register responsible for watchdog reset, so if the watchdog was hit once, then it would boot loop until cold booted again. This is fixed by the newer, current bootloader (the so called Optiboot), but that also has an issue I discovered I switched to it: the value in the MCUSR register, which tells the reason for power up (cold boot, browning, user reset etc.), was cleared before control was handed to the sketch by the bootloader, so I could not read it. These has been known for ages and left in a zombie state, with endless discussions around it on the forums. Fortunately, there is this alternative that also has a few other goodies included, besides fixing this annoyance, so I'd encourage you to check the project page for more information, including guidance on how to flash your Arduino.

