FLSUN Speeder Pad Configurations

Table of Contents
- About
- Repo Changelog
- Useful Links
- STL Files
- Restore OS Image File
- SSH Connection
- Change pi User Password
- Update Ubuntu dependencies
- Change Timezone
- Change Wi-Fi Location
- Delete Flsun Builds
- Install Official Builds (1 instance)
- Install Official Builds (Multiple instances)
- Update Motherboard Firmware
- Update V400 Motherboard Firmware (MKS Robin Nano V2.0 - STM32F103)
- Update V400 Motherboard Firmware (Nano V2.1 Clone - GD32F303)
- Update V400 Motherboard Firmware (BigTreeTech SKR 3.0)
- Update Super Racer Motherboard Firmware (MKS Robin Nano V3.0/V3.1)
- Update Super Racer Motherboard Firmware (BigTreeTech SKR 1.3)
- Update Super Racer Motherboard Firmware (BigTreeTech SKR 2.0)
- Use Configurations
- Get USB Serial from Motherboard
- Fix Shutdown button in Mainsail
- Add Webcams Support
- Install and Update Timelapse
- Slicer Side Changes
- Calibrate your Printer
- Use ADXL for Resonance Compensation
- Use Neopixels Ring Light
- For Advanced Users Only
- Special Thanks
If you like my work, don't hesitate to support me by paying me a 🍺 or a ☕. Thank you 🙂

About
By default, FLSUN does not use builds from official GitHub repositories. Updates point to Gitee repositories which are very slow, sometimes inaccessible and not updated. In addition, during Delta Calibration, tower angles and delta radius are never recalculated in their Klipper build, which can cause several issues.
This procedure explains the whole process in order to obtain Root access on the Speeder Pad, to configure it correctly with optimized printer settings.
This settings are compatible with FLSUN Speeder Pad.
- Useful and automated macros with notifications to KlipperScreen
- Configuration for ADXL345
- Improved Start/End Gcodes
- And more...
Before using Klipper please read this documentations:
- Klipper (Operating System): https://www.klipper3d.org/
- Moonraker (API Web Server): https://moonraker.readthedocs.io/
- Mainsail (Web Interface): https://docs.mainsail.xyz/
- KlipperScreen (Screen Interface): https://klipperscreen.readthedocs.io/
Repo Changelog
22/05/2023:
- Updated macros.cfg files to support new PID menu on KlipperScreen.
17/04/2023:
- Improved all files.
- Added support for FLSUN ADXL.
15/03/2023:
- Replace FLSUN restoration image file by new V1.2.
12/03/2023:
- Improve Gcode Arc support.
05/03/2023:
- Updated macros files to load default Bed Mesh at startup.
19/02/2023:
- Fixed "default" bed mesh in START_PRINT macro.
18/02/2023:
- Fixed V400 Hotend LED for some configuration files
- Fixed Z-Offset in configuration files
17/02/2023:
- Updated all configuration files so that they are in line with the new version of KlipperScreen. All your files need to be replaced with the new ones
- New version of KlipperScreen which now allows to calibrate the Z-Offset and apply a safety Gcode Offset of 2mm before starting the first print
- Added configuration files for Super Racer with BigTreetech SKR 2.0 Rev A and Rev B
- Added new section to fix Shutdown button in Mainsail
- Improved 'Calibrate your Printer' section for new changes
- Added Start / End Gcode for Simplify3D
10/02/2023:
- Added new section to fix Shutdown button in Mainsail (need to have latest update of Moonraker)
30/12/2022:
- Fixed bad character in
printer.cfgfiles for Super Racer
24/12/2022:
- Updated
macros.cfgfile ([gcode_macro START_PRINT])
16/12/2022:
- Fixed Start Gcode for PrusaSlicer / SuperSlicer (Thanks to Julien Geffray)
- Changed Hotend preheat to 150C° instead of 100C° in START_PRINT macro
13/12/2022:
- Fixed delete
.gitconfigfile before installing Kiauh in Delete Flsun Builds section
12/12/2022:
- Updated
macros.cfgfile ([gcode_macro START_PRINT]) for latest Klipper changes with gcode_arcs - Added how to add camera support on Speeder Pad screen in Improve Webcams Support section
- Updated
KlipperScreen.conffile to support camera url
11/12/2022:
- Changes in Install Official Builds (1 instance) & Install Official Builds (3 instances) sections to install Klipper with Python 3.x as recommended
- Added new section to Update V400 Motherboard Firmware (BigTreeTech SKR 3.0)
- Added new BigTreeTech SKR 3.0 config files for V400
Useful Links
-
To calibrate your extruder, see here: https://www.klipper3d.org/Rotation_Distance.html
-
To adjust Pressure Advance, see here: https://www.klipper3d.org/Pressure_Advance.html
-
To adjust manually Resonance Compensation, see here: https://www.klipper3d.org/Resonance_Compensation.html
-
To mesure Resonances with ADXL, see here: https://www.klipper3d.org/Measuring_Resonances.html
-
To use Exclude Objects function, see here: https://docs.mainsail.xyz/overview/features/exclude-objects
-
To use Timelapse function, see here: https://github.com/mainsail-crew/moonraker-timelapse/blob/main/docs/configuration.md
- PDF with settings can be found here: Instructions for timelapse (corrected).pdf
-
To display thumbnails on screen, see here: https://klipperscreen.readthedocs.io/en/latest/Thumbnails/
-
Speeder Pad Mainsail Theme: Speeder Pad Mainsail Theme.zip
STL Files
Many usefull STL for FLSUN Super Racer and V400 can be found on my profiles:
- Printables: Here
- Thingiverse: Here
- ADXL345 Mount for Super Racer : Here
- Fysetc Portable Input Shaper Mount for Super Racer : Here
Restore OS Image File
By default, Root access is not allowed on Speeder Pad. To enable it, follow these instructions to restore OS image file:
Note: A microSD card of at least 32 GB is required.
-
Download this restoration image and unzip it: Speeder Pad Restoration Image V1.2
-
Download and install Raspberry Pi Imager here: https://www.raspberrypi.com/software/
-
Launch Raspberry Pi Imager:

-
Select
Speeder_Pad_V1.2_Restoration-230303.xzimage file asOperating Systemby selectingUse custom. -
Select your microSD card as
Storage. -
Then click
Write. -
Once the image is written, turn off Speeder Pad if is on and remove all devices plugged into the USB ports.
-
Insert microSD card in Speeder Pad and turn on it.
-
A loading bar should appear:

-
And wait until the bar is fully charged and green, this may take several minutes (10/15 minutes):

-
When it's done, turn off Speeder Pad and remove the microSD card.
-
Turn Speeder Pad back on, it should start normally and arrive on KlipperScreen splashscreen.
-
Wait until KlipperScreen show a connection error message on the Speeder Pad and go to
Menu-->Networkand connect it to your WiFi network. -
Once connected, restart the Speeder Pad for the connection to take effect.
-
You can now connect to SSH with this login:
  user: pi
  password: flsun
SSH Connection
-
Download and install the MobaXterm software here: https://mobaxterm.mobatek.net/download-home-edition.html
-
Launch it then click on the
Sessionicon:

- Then on then
SSHicon:

- Enter the IP address of your Speeder Pad in the
Remote Hostfield, check theSpecify usernamebox and enter the usernamepiin the field then click onOK:

- On the new displayed window, enter the password
flsun(it's not displayed when typing, this is normal):

-
An authorization window will appear, authorize it. It's also possible that another window asking you to change the password will appear, ignore it.
-
Once connected, on the left part of the window you have access to the folders and files of your Speeder Pad and on the right part to the SSH command prompt window:

Change pi User Password
It's possible to change the password of the pi user:
- In the SSH command prompt window, enter the following command:
passwd
-
You’ll get asked to enter your current password for verification ->
flsun. -
After verification, you can type in your new password and press
Enter.- Note: You’ll not be able to see any characters on the window while entering the password. So, don’t panic, just type in your password and press
Enter.
- Note: You’ll not be able to see any characters on the window while entering the password. So, don’t panic, just type in your password and press
-
Once you’ve successfully verified your password, it’ll get applied right away.
Update Ubuntu dependencies
- In the SSH command prompt window, enter the following command to download updates list (you will need to enter your user password):
sudo apt update
- Then this command to install all of them:
sudo apt full-upgrade -y
- Then remove not needed dependencies if present (one command at a time):
sudo apt autoremove
sudo apt autoclean
sudo apt clean
- And this command to reboot:
sudo reboot
Change Timezone
To change Timezone, follow these instructions:
- In the SSH command prompt window, enter the following command to check the current time zone:
timedatectl
- You can change your timezone by entering this command:
sudo dpkg-reconfigure tzdata
-
On the page that appears, select your geographic area from the list and press
Enter. -
Then select your timezone in the new list and press
Enter. -
You can then verify that the change has been taken into account by retyping this command:
timedatectl
Change Wi-Fi Location
By default, there is no Wi-Fi location defined.
- In the SSH command prompt window, enter the following command to check the current Wi-Fi location:
iw reg get
- You obtain this:
global
country 00: DFS-UNSET
        (755 - 928 @ 2), (N/A, 20), (N/A), NO-IR
        (2402 - 2472 @ 40), (N/A, 20), (N/A)
        (2457 - 2482 @ 20), (N/A, 20), (N/A), AUTO-BW, NO-IR
        (2474 - 2494 @ 20), (N/A, 20), (N/A), NO-OFDM, NO-IR
        (5170 - 5250 @ 80), (N/A, 20), (N/A), AUTO-BW, NO-IR
        (5250 - 5330 @ 80), (N/A, 20), (0 ms), DFS, AUTO-BW, NO-IR
        (5490 - 5730 @ 160), (N/A, 20), (0 ms), DFS, NO-IR
        (5735 - 5835 @ 80), (N/A, 20), (N/A), NO-IR
        (57240 - 63720 @ 2160), (N/A, 0), (N/A)
- All available locations can be displayed with this command:
sudo cat /usr/share/zoneinfo/zone.tab
- To change the location enter the following command replacing
FRby your country (you will need to enter your user password):
sudo iw reg set FR
You can verify that the change has been made by entering this command again:
iw reg get
- You obtain this (related to your country):
global
country FR: DFS-ETSI
        (2400 - 2483 @ 40), (N/A, 20), (N/A)
        (5150 - 5250 @ 80), (N/A, 23), (N/A), NO-OUTDOOR, AUTO-BW
        (5250 - 5350 @ 80), (N/A, 20), (0 ms), NO-OUTDOOR, DFS, AUTO-BW
        (5470 - 5725 @ 160), (N/A, 26), (0 ms), DFS
        (5725 - 5875 @ 80), (N/A, 13), (N/A)
        (5945 - 6425 @ 160), (N/A, 23), (N/A), NO-OUTDOOR
        (57000 - 71000 @ 2160), (N/A, 40), (N/A)
- To make the location permanent, enter the following command replacing
FRby your country (you will need to enter your user password):
sudo sed -i 's/^REG.*=$/&FR/' /etc/default/crda
- Then, this command:
sudo sed -i '/^exit 0/ d' /etc/rc.local
- And this command replacing
FRby your country:
echo -e "iw reg set FR\nexit 0" | sudo tee -a /etc/rc.local
- Then reboot with this command:
sudo reboot
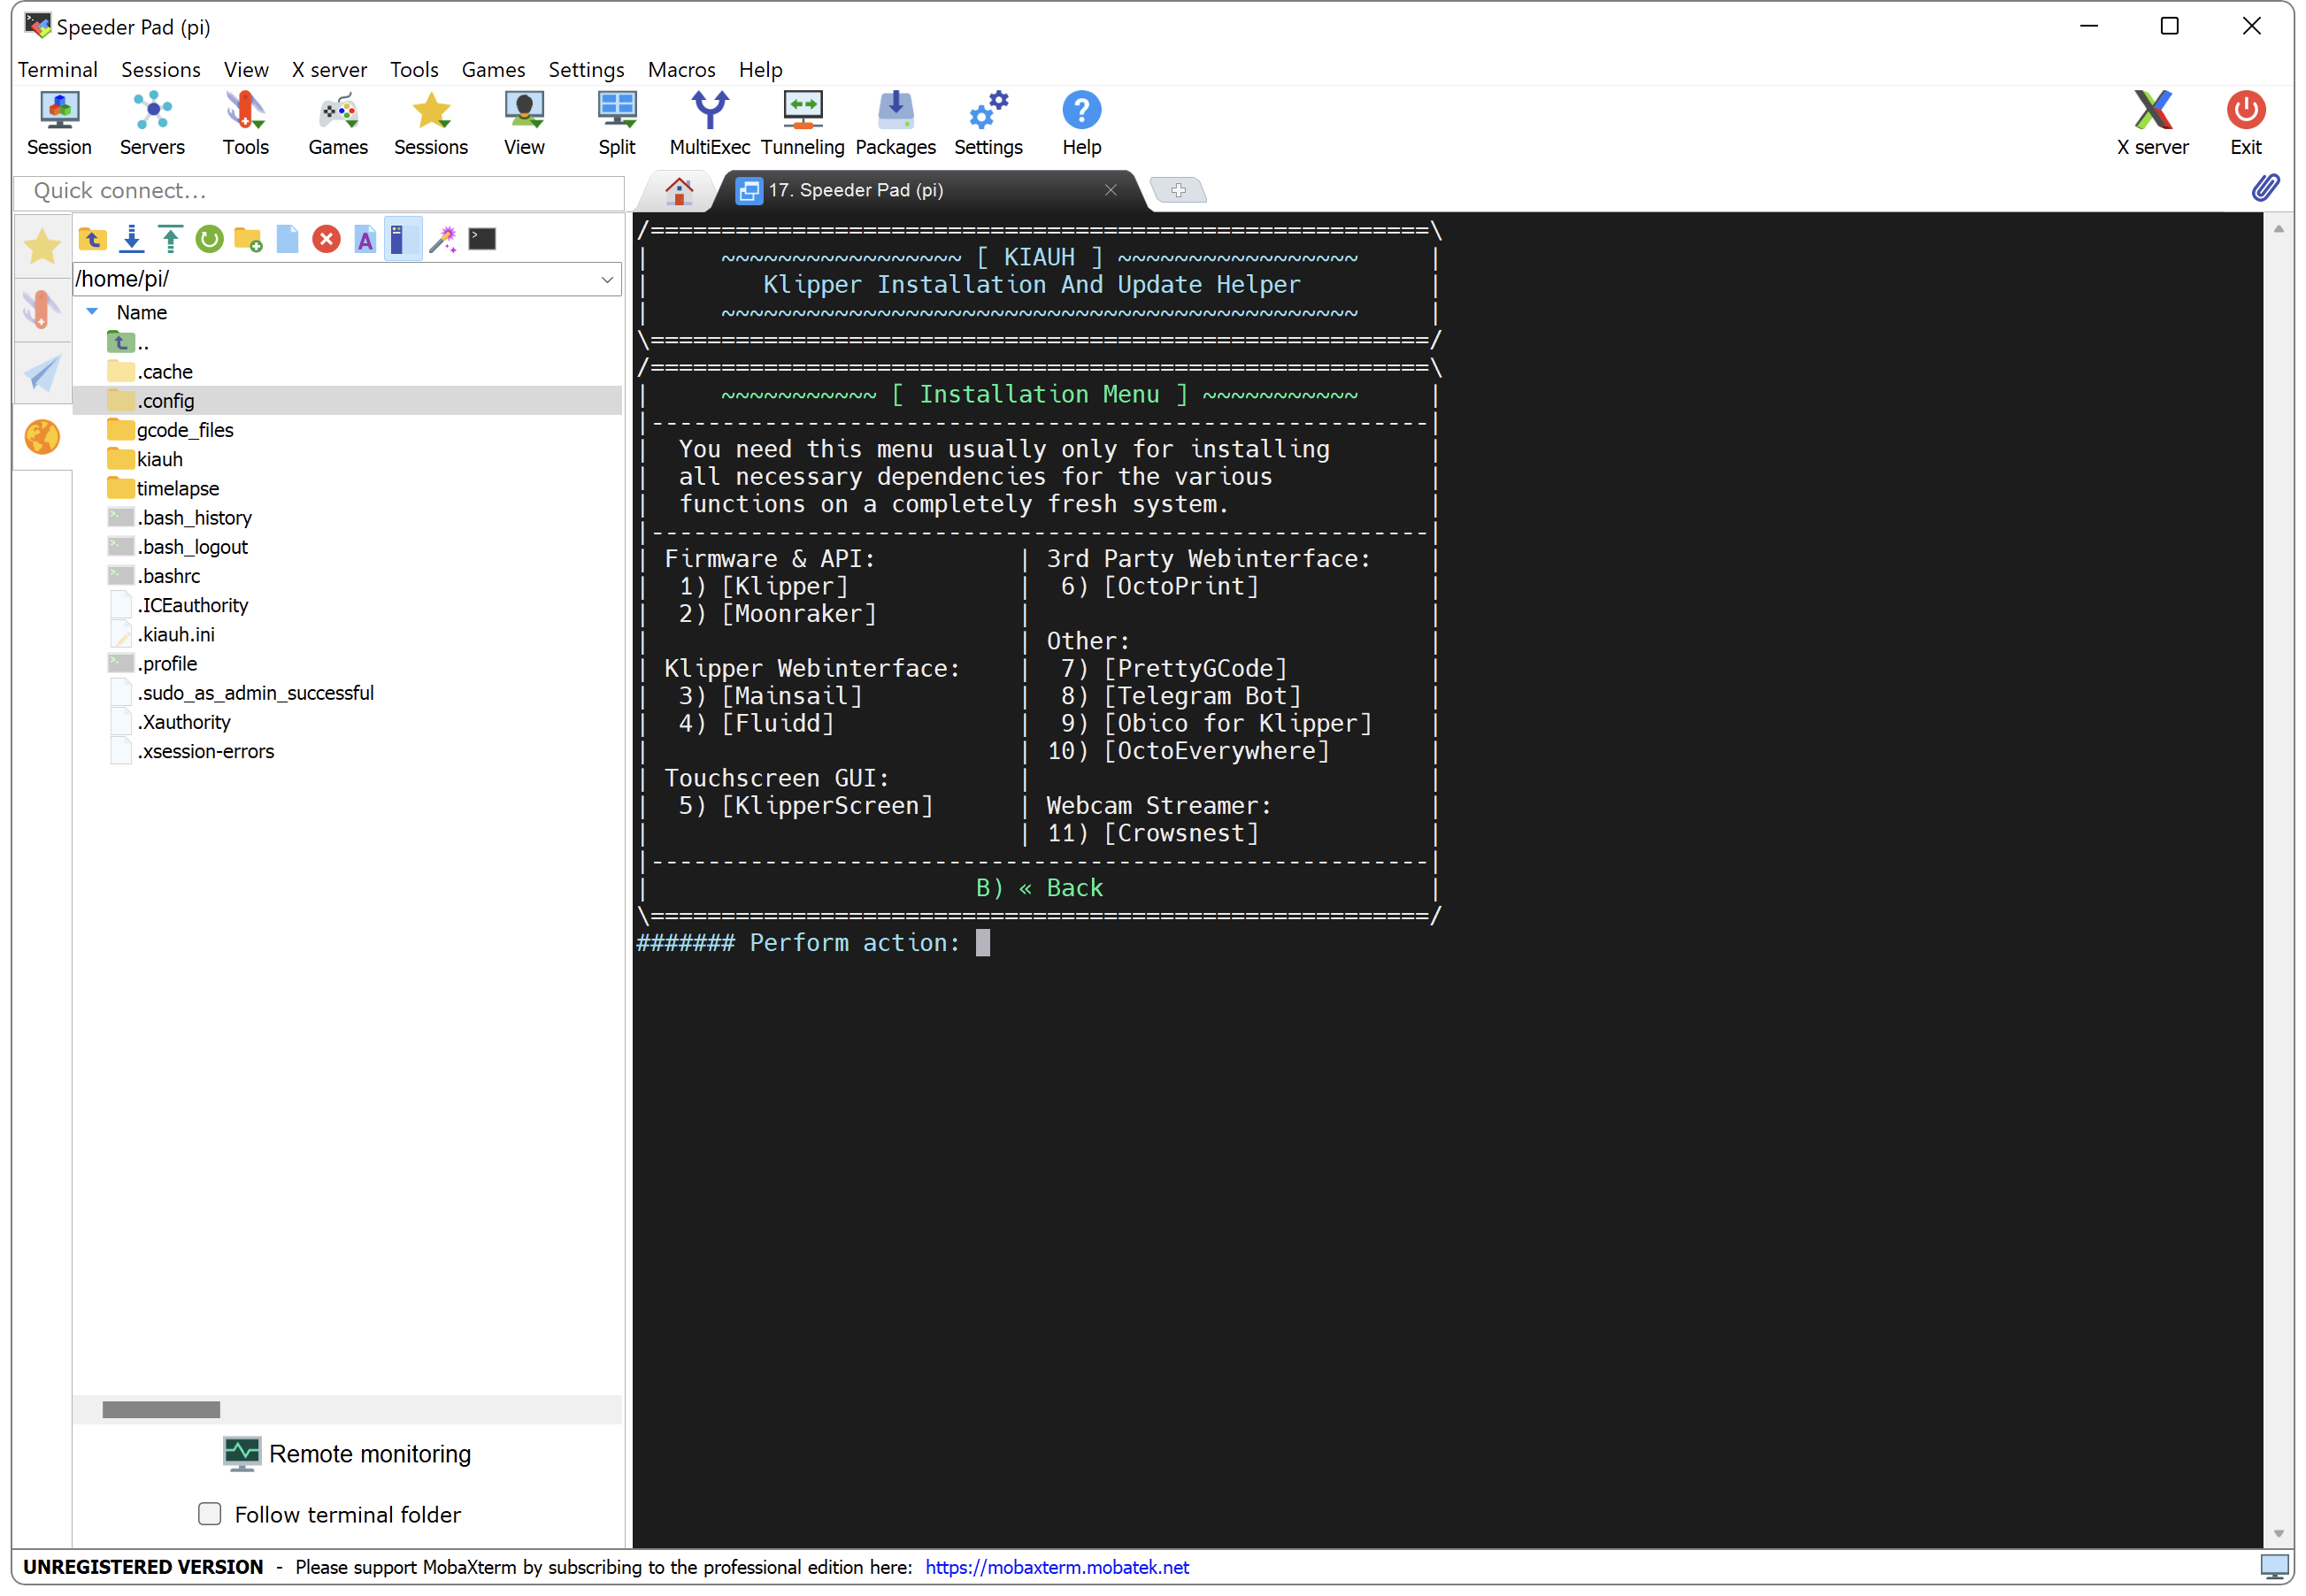
Delete Flsun Builds
To upgrade to official builds, follow these instructions:
- In the SSH command prompt window, enter the following command to install Kiauh:
cd ~ && git clone https://github.com/th33xitus/kiauh.git
- Launch Kiauh by entering this command:
./kiauh/kiauh.sh
- This window should appear:

- Enter in
3) [Remove]menu by typing3thenEnter:

-
Remove
10) [MJPG-Streamer]by typing10thenEnter(you will need to enter your user password). -
Remove
7) [KlipperScreen]by typing7thenEnter. -
Remove
3) [Mainsail]by typing3thenEnter. -
Remove
2) [Moonraker]by typing2thenEnter. -
When it's done, remove
1) [Klipper]by typing1thenEnter. -
When it's done, go back to main menu by typing
BthenEnter. -
Exit Kiauh by typing
QthenEnter. -
Enter the following commands (one at a time):
sudo rm -rf ~/.moonraker_database_1 && rm -rf ~/.moonraker_database_2 && rm -rf ~/.moonraker_database_3
sudo rm -rf ~/klipper_config && rm -rf ~/klipper_logs && rm -rf ~/moonraker-timelapse
sudo rm ~/savedVariables1.cfg && rm ~/savedVariables2.cfg && rm ~/savedVariables3.cfg
sudo rm -rf ~/.cache && rm -rf ~/.gnupg && rm -rf ~/.local && rm -rf ~/.config && rm -rf ~/.dbus
Install Official Builds (1 instance)
- Relaunch Kiauh by entering this command:
./kiauh/kiauh.sh
- Enter in
1) [Install]menu by typing1thenEnter:

-
Install
1) [Klipper]by typing1thenEnter. -
Select
1) [Python 3.x] (recommended)by typing1thenEnter. -
Then enter the number of Klipper instance by typing
1andEnterto confirm:

-
When it's done, install
2) [Moonraker]by typing2thenEnterand confirm by typingY. -
When it's done, install
3) [Mainsail]by typing3thenEnterand select no by typingnwhen asked to add the recommended macros. -
When it's done, go back to main menu by typing
BthenEnter. -
Exit Kiauh by typing
QthenEnter. -
Enter the following commands (one at a time) to install KlipperScreen:
cd ~ && git clone https://github.com/Guilouz/KlipperScreen-Flsun-Speeder-Pad.git
sudo mv ~/KlipperScreen-Flsun-Speeder-Pad ~/KlipperScreen
./KlipperScreen/scripts/KlipperScreen-install.sh
Note: Installation may take several minutes.
- When it's done, enter this commands (one at a time):
cd ~ && ln -s ~/gcode_files/USB-Disk ~/printer_data/gcodes/USB-Disk
sudo reboot
-
After reboot, go to your Mainsail Web interface then select the
Machinetab. -
Open the
moonraker.conffile and add the following lines at the end of the file:
[update_manager KlipperScreen]
type: git_repo
path: ~/KlipperScreen
origin: https://github.com/Guilouz/KlipperScreen-Flsun-Speeder-Pad.git
env: ~/.KlipperScreen-env/bin/python
requirements: scripts/KlipperScreen-requirements.txt
install_script: scripts/KlipperScreen-install.sh
-
Once done, click on
SAVE & RESTARTat the top right to save the file. -
You will get the latest versions of KlipperScreen which point to my repo (More info are available here: KlipperScreen-Flsun-Speeder-Pad).
-
Your Speeder Pad now running offical builds with 1 instance.
Install Official Builds (Multiple instances)
In this section, we will install 3 instances but you can install 2 if you want (no more than 3 is recommended).
- Relaunch Kiauh by entering this command:
./kiauh/kiauh.sh
- Enter in
1) [Install]menu by typing1thenEnter:
-
Install
1) [Klipper]by typing1thenEnter. -
Select
1) [Python 3.x] (recommended)by typing1thenEnter. -
Then enter the number of Klipper instances by typing
3andEnterto confirm:

- When asked to assign custom names, select NO by typing
NthenEnter:

-
When it's done, install
2) [Moonraker]by typing2thenEnterand confirm by typingY. -
Then enter the number of Moonraker instances by typing
3thenEnterand confirm by typingY:

- When it's done, you get your 3 instances with their IP addresses and ports, write them down they will be useful later:

-
Install
3) [Mainsail]by typing3thenEnterand select no by typingnwhen asked to add the recommended macros. -
When it's done, go back to main menu by typing
BthenEnter. -
Exit Kiauh by typing
QthenEnter. -
Enter the following commands (one at a time) to install KlipperScreen:
cd ~ && git clone https://github.com/Guilouz/KlipperScreen-Flsun-Speeder-Pad.git
sudo mv ~/KlipperScreen-Flsun-Speeder-Pad ~/KlipperScreen
./KlipperScreen/scripts/KlipperScreen-install.sh
Note: Installation may take several minutes.
- When it's done, enter this commands (one at a time):
cd ~ && ln -s ~/gcode_files/USB-Disk ~/printer_1_data/gcodes/USB-Disk
ln -s ~/gcode_files/USB-Disk ~/printer_2_data/gcodes/USB-Disk
ln -s ~/gcode_files/USB-Disk ~/printer_3_data/gcodes/USB-Disk
sudo reboot
-
After reboot, go to your Mainsail Web interface then select the
Machinetab. -
Open the
moonraker.conffile and add the following lines at the end of the file:
[update_manager KlipperScreen]
type: git_repo
path: ~/KlipperScreen
origin: https://github.com/Guilouz/KlipperScreen-Flsun-Speeder-Pad.git
env: ~/.KlipperScreen-env/bin/python
requirements: scripts/KlipperScreen-requirements.txt
install_script: scripts/KlipperScreen-install.sh
-
Once done, click on
SAVE & RESTARTat the top right to save the file. -
You will get the latest versions of KlipperScreen which point to my repo (More info are available here: KlipperScreen-Flsun-Speeder-Pad).
-
Your Speeder Pad now running offical builds with 3 instances.
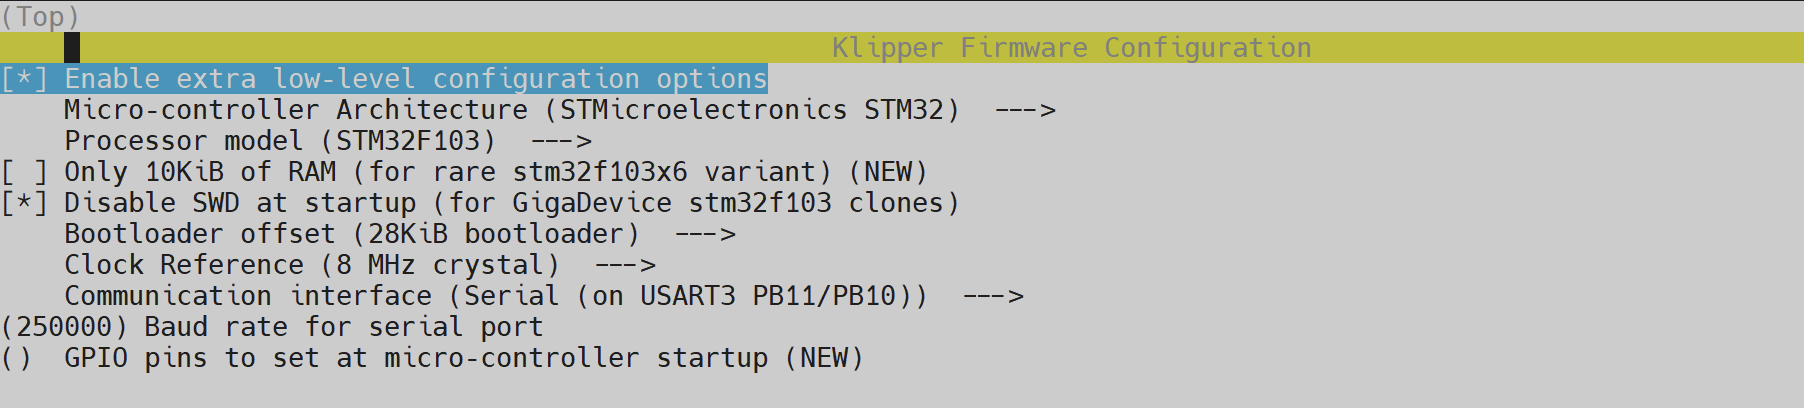
Update V400 Motherboard Firmware (MKS Robin Nano V2.0 - STM32F103)
It's important that your motherboard firmware version matches with the installed Klipper version.
Version is visible on System Loads tile -> mcu section (in Machine tab).
To update firmware, follow these instructions:
- In the SSH command prompt window, enter the following commands (one at a time):
cd ~/klipper/
make menuconfig
- Move on the menu with the
UpandDownkeys of your keyboard and validate the selected item with theEnterkey and select these settings:

-
Then on your keyboard press the
Qkey thenYto save configuration. -
Enter the following commands to compile firmware (one at a time):
make clean
make
- Then this one to convert firmware:
./scripts/update_mks_robin.py out/klipper.bin out/Robin_nano35.bin
-
V400 motherboard doesn't support DFU mode, so it's not possible to install the firmware directly. It's therefore necessary to install it manually.
-
Get the firmware named
Robin_nano35.binin/home/pi/klipper/out/directory (on the left part of MobaXterm). -
Copy it to the root of an microSD card formatted in FAT32 and an allocation size of 4096.
-
Insert the microSD card into the motherboard then turn on the printer.
-
Installation only takes a few seconds, to verify that the firmware has been successfully installed, the file on the microSD card must have been renamed to
ROBIN_NANO35.BIN.CUR.
Update V400 Motherboard Firmware (Nano V2.1 Clone - GD32F303)
It's important that your motherboard firmware version matches with the installed Klipper version.
Version is visible on System Loads tile -> mcu section (in Machine tab).
To update firmware, follow these instructions:
- In the SSH command prompt window, enter the following commands (one at a time):
cd ~/klipper/
make menuconfig
- Move on the menu with the
UpandDownkeys of your keyboard and validate the selected item with theEnterkey and select these settings:
-
Then on your keyboard press the
Qkey thenYto save configuration. -
Enter the following commands to compile firmware (one at a time):
make clean
make
- Then this one to convert firmware:
./scripts/update_mks_robin.py out/klipper.bin out/Robin_nano35.bin
-
V400 motherboard doesn't support DFU mode, so it's not possible to install the firmware directly. It's therefore necessary to install it manually.
-
Get the firmware named
Robin_nano35.binin/home/pi/klipper/out/directory (on the left part of MobaXterm). -
Copy it to the root of an microSD card formatted in FAT32 and an allocation size of 4096.
-
Insert the microSD card into the motherboard then turn on the printer.
-
Installation only takes a few seconds, to verify that the firmware has been successfully installed, the file on the microSD card must have been renamed to
ROBIN_NANO35.BIN.CUR.
Update V400 Motherboard Firmware (BigTreeTech SKR 3.0)
Note: Wiring for BigTreeTech SKR 3.0 is available here
It's important that your motherboard firmware version matches with the installed Klipper version.
Version is visible on System Loads tile -> mcu section (in Machine tab).
To update firmware, follow these instructions:
- In the SSH command prompt window, enter the following commands (one at a time):
cd ~/klipper/
make menuconfig
- Move on the menu with the
UpandDownkeys of your keyboard and validate the selected item with theEnterkey and select these settings:

-
Then on your keyboard press the
Qkey thenYto save configuration. -
Enter the following commands to compile firmware (one at a time):
make clean
make
-
Get the firmware named
klipper.binin/home/pi/klipper/out/directory (on the left part of MobaXterm). -
Rename it to
firmware.binand copy it to the root of an microSD card formatted in FAT32 and an allocation size of 4096. -
Insert the microSD card into the motherboard then turn on the printer.
-
Installation only takes a few seconds, to verify that the firmware has been successfully installed, the file on the microSD card must have been renamed to
FIRMWARE.BIN.CUR.
Note: For future Klipper firmware updates, it's possible to directly flash the firmware via SSH.
-
USB serial is needed for this, you can retrieve it by following this step: Get USB Serial from Motherboard
-
In the SSH command prompt window, enter the following command :
make flash FLASH_DEVICE=/dev/serial/by-id/XXXXX (replacing the XXXXX with the serial obtained previously)
- It should look like this:
make flash FLASH_DEVICE=/dev/serial/by-id/usb-Klipper_stm32h743xx_39004C001251303232383230-if00
- There will be a
dfu-util: Error during download get_statuserror message after the update. Don't pay attention to it, the most important thing is to get the green lineFile downloaded successfully.
Update Super Racer Motherboard Firmware (MKS Robin Nano V3.0/V3.1)
It's important that your motherboard firmware version matches with the installed Klipper version.
Version is visible on System Loads tile -> mcu section (in Machine tab).
To update firmware, follow these instructions:
- In the SSH command prompt window, enter the following commands (one at a time):
cd ~/klipper/
make menuconfig
- Move on the menu with the
UpandDownkeys of your keyboard and validate the selected item with theEnterkey and select these settings:

-
Then on your keyboard press the
Qkey thenYto save configuration. -
Enter the following commands to compile firmware (one at a time):
make clean
make
-
Super Racer motherboard doesn't support DFU mode, so it's not possible to install the firmware directly. It's therefore necessary to install it manually.
-
Get the firmware named
klipper.binin/home/pi/klipper/out/directory (on the left part of MobaXterm). -
Rename it to
Robin_nano_v3.binand copy it to the root of an microSD card formatted in FAT32 and an allocation size of 4096. -
Insert the microSD card into the motherboard then turn on the printer.
-
Installation only takes a few seconds, to verify that the firmware has been successfully installed, the file on the microSD card must have been renamed to
ROBIN_NANO_V3.BIN.CUR.
Update Super Racer Motherboard Firmware (BigTreeTech SKR 1.3)
It's important that your motherboard firmware version matches with the installed Klipper version.
Version is visible on System Loads tile -> mcu section (in Machine tab).
To update firmware, follow these instructions:
- In the SSH command prompt window, enter the following commands (one at a time):
cd ~/klipper/
make menuconfig
- Move on the menu with the
UpandDownkeys of your keyboard and validate the selected item with theEnterkey and select these settings:

-
Then on your keyboard press the
Qkey thenYto save configuration. -
Enter the following commands to compile firmware (one at a time):
make clean
make
-
Super Racer motherboard doesn't support DFU mode, so it's not possible to install the firmware directly. It's therefore necessary to install it manually.
-
Get the firmware named
klipper.binin/home/pi/klipper/out/directory (on the left part of MobaXterm). -
Rename it to
firmware.binand copy it to the root of an microSD card formatted in FAT32 and an allocation size of 4096. -
Insert the microSD card into the motherboard then turn on the printer.
-
Installation only takes a few seconds, to verify that the firmware has been successfully installed, the file on the microSD card must have been renamed to
FIRMWARE.BIN.CUR.
Update Super Racer Motherboard Firmware (BigTreeTech SKR 2.0)
There are two revisions of BigTreetech SKR 2.0 motherboards, one with an SMT32F407 processor called Rev A and the other with an SMT32F429 processor called Rev B:
| SMT32F407 (Rev A) | SMT32F429 (Rev B) |
|---|---|
 |
 |
It's important that your motherboard firmware version matches with the installed Klipper version.
Version is visible on System Loads tile -> mcu section (in Machine tab).
To update firmware, follow these instructions:
- In the SSH command prompt window, enter the following commands (one at a time):
cd ~/klipper/
make menuconfig
- Move on the menu with the
UpandDownkeys of your keyboard and validate the selected item with theEnterkey and select these settings forBigTreeTech SKR 2.0 Rev A (STM32F407):

- Move on the menu with the
UpandDownkeys of your keyboard and validate the selected item with theEnterkey and select these settings forBigTreeTech SKR 2.0 Rev B (STM32F429):

-
Then on your keyboard press the
Qkey thenYto save configuration. -
Enter the following commands to compile firmware (one at a time):
make clean
make
-
Get the firmware named
klipper.binin/home/pi/klipper/out/directory (on the left part of MobaXterm). -
Rename it to
firmware.binand copy it to the root of an microSD card formatted in FAT32 and an allocation size of 4096. -
Insert the microSD card into the motherboard then turn on the printer.
-
Installation only takes a few seconds, to verify that the firmware has been successfully installed, the file on the microSD card must have been renamed to
FIRMWARE.BIN.CUR.
Use Configurations
In case you use 1 instance:
-
Download and unzip my repository zip file here: https://github.com/Guilouz/Klipper-Flsun-Speeder-Pad/archive/refs/heads/main.zip
-
Go to your Mainsail Web interface then click on
Machinetab. -
Then upload
KlipperScreen.conf,printer.cfg,macros.cfg,neopixels.cfg,adxl345_pico.cfg,adxl345_fysetc.cfgandadxl345_flsun.cfgfiles located inConfigurationsdirectory according to your printer. -
Restart Speeder Pad and printer to take effect.
In case you use more than 1 instance:
-
Download and unzip my repository zip file here: https://github.com/Guilouz/Klipper-Flsun-Speeder-Pad/archive/refs/heads/main.zip
-
Go to your Mainsail Web interface then click on
Machinetab. -
Then upload
KlipperScreen.conf,printer.cfg,macros.cfg,neopixels.cfg,adxl345_pico.cfg,adxl345_fysetc.cfgandadxl345_flsun.cfgfiles located inConfigurationsdirectory according to your printer. -
Open the
KlipperScreen.conffile and edit it to enable multiple instance by removing the#symbols like this:
-
Go to the Mainsail settings (gear at the top right of the interface) and select
PRINTERStab. -
Add as many printers as you have installed instances of Klipper/Moonraker by adding the IP address of your Speeder Pad and the port of each instance (The same IP addresses and ports obtained after installing Moonraker) like this:

-
You can now select
Printerson left tab and switch to others printers. -
You need to upload
printer.cfg,macros.cfg,neopixels.cfg,adxl345_pico.cfg,adxl345_fysetc.cfgandadxl345_flsun.cfgfiles for each printer. -
Open
printer.cfgfile, find[save_variables]and[virtual_sdcard]sections and edit paths for each configured printer:
For 1st printer:
[save_variables]
filename: ~/printer_1_data/config/variables.cfg

[virtual_sdcard]
path: ~/printer_1_data/gcodes
For 2nd printer:
[save_variables]
filename: ~/printer_2_data/config/variables.cfg

[virtual_sdcard]
path: ~/printer_2_data/gcodes
For 3rd printer:
[save_variables]
filename: ~/printer_3_data/config/variables.cfg

[virtual_sdcard]
path: ~/printer_3_data/gcodes
Note: Changes in the KlipperScreen.conf file only have an effect on the first configured printer, it's not needed on others.
- Restart Speeder Pad and printer to take effect.
Note: You can select printer you want at startup on the screen. You can also enable default_printer setting in KlipperScreen.conf to start directly on printer you want and switch to others with shuffle button on the left side.
Get USB Serial from Motherboard
-
Connect your printer to one of the Speeder Pad's USB ports.
-
Connect in SSH then enter the following command to retrieve the motherboard USB serial:
cd ~ && ls /dev/serial/by-id/*
-
You should see the USB serial appear like this (serial is different depending on the motherboard):

-
In case you use same multiple printers connected on the Speeder Pad and you only see one serial when running this command, enter this one instead:
ls /dev/serial/by-path/*
-
If the second command shows multiple results, adjust the path of the serial accordingly, so all instances of
/by-id/should be replaced with/by-path/. -
Go to your Mainsail Web interface then click on
Machinetab. -
Open
printer.cfgfile and find[mcu]section. -
Edit the following existing line with serial you have just obtained like this:
serial: /dev/serial/by-id/usb-1a86_USB_Serial-if00-port0
-
Click on
SAVE & RESTARTat the top right to save the file. -
Your printer should connect to your Speeder Pad.
Fix Shutdown button in Mainsail
Shutdown button in Mainsail only restarts the Speeder Pad because some distros don't support poweroff function and this is the case for the Ubuntu Operating System.
To correct this, in the SSH command prompt window, enter the following commands (one at time):
cd ~/moonraker/scripts
./set-policykit-rules.sh
sudo reboot
-
After reboot, go to your Mainsail Web interface then select the
Machinetab. -
Open the
moonraker.conffile and add the following lines:
[machine]
shutdown_action: halt
-
Once done, click on
SAVE & RESTARTat the top right to save the file. -
The Shutdown button now properly shuts off the Pad.
Add Webcams Support
It's possible to improve Webcams support and in particular the framerate by uninstalling mjpg-streamer and installing Crowsnest daemon (see here for more info).
Installing Crowsnest:
- Launch Kiauh by entering this command:
./kiauh/kiauh.sh
-
Enter in
1) [Install]menu by typing1thenEnter: -
Install
11) [Crownest]by typing11thenEnter. -
For 1 instance, nothing is asked and installation is automatic.
-
For more than 1 instance, when asked to continue with configuration select
Yesby typingy. -
For more than 1 instance when asked to continue to install Crowsnest select
Yesby typingYthenEnter. -
For more than 1 instance when asked to specify path for config file (crowsnest.conf) type:
/home/pi/printer_1_data/config- For more than 1 instance when asked to specify path for log file (crowsnest.logs) type:
/home/pi/printer_1_data/logs- For more than 1 instance when asked to specify path for environment file (crowsnest.env) type:
/home/pi/printer_1_data/systemd-
For more than 1 instance when asked if Raspicam Fix should be applied select
Noby typingNthenEnter. -
For more than 1 instance when asked to add Crowsnest Update Manager entry to moonraker.conf select
Noby typingNthenEnter.
-
-
When asked to reboot NOW select
Yesby typingythenEnter. -
After restart, go to your Mainsail Web interface then click on
Machinetab. -
Open the
moonraker.conffile and and add the following lines at the end of the file:
[update_manager crowsnest]
type: git_repo
path: ~/crowsnest
origin: https://github.com/mainsail-crew/crowsnest.git
managed_services: crowsnest
install_script: tools/install.sh
-
Once done, click on
SAVE & RESTARTat the top right to save the file. -
You can now click the refresh button (still in the Machine tab) on the Update Manager tile.
-
You will see a new crowsnest line appear.
-
You can now configure your webcam (resolution, fps, focus etc...) by clicking on the
EDIT CROWSNEST.CONFlink in theWEBCAMStab of Mainsail settings.
Add camera support on the Speeder Pad screen:
-
Go to your Mainsail Web interface then click on
Machinetab. -
Open the
KlipperScreen.conffile and and uncomment the line:
camera_url: http://127.0.0.1/webcam/?action=stream
-
Click on SAVE & RESTART at the top right to save the file.
-
A new
Cameraicon will appear in theActionsmenu.
Uninstalling Crowsnest:
- If needed you can uninstall Crowsnest by entering this command:
./kiauh/kiauh.sh
-
Enter in
3) [Remove]menu by typing3thenEnter: -
Remove
9) [Crownest]by typing9thenEnter. -
When asked if you want to remove Crowsnest select
Yesby typingy. -
When asked if you want to remove crowsnest.conf file select
Yesby typingy. -
Go to your Mainsail Web interface then click on
Machinetab. -
Open the
moonraker.conffile and and remove this lines:
[update_manager crowsnest]
type: git_repo
path: ~/crowsnest
origin: https://github.com/mainsail-crew/crowsnest.git
managed_services: crowsnest
install_script: tools/install.sh
- When it's done, restart the Speeder Pad.
Install and Update Timelapse
- In the SSH command prompt window, enter the following commands (one at a time):
In case you use 1 instance:
cd ~ && git clone https://github.com/mainsail-crew/moonraker-timelapse.git
ln -sf "/home/pi/moonraker-timelapse/component/timelapse.py" "/home/pi/moonraker/moonraker/components/timelapse.py"
ln -sf "/home/pi/moonraker-timelapse/klipper_macro/timelapse.cfg" "/home/pi/printer_data/config/timelapse.cfg"
sudo reboot
In case you use 3 instances:
cd ~ && git clone https://github.com/mainsail-crew/moonraker-timelapse.git
ln -sf "/home/pi/moonraker-timelapse/component/timelapse.py" "/home/pi/moonraker/moonraker/components/timelapse.py"
ln -sf "/home/pi/moonraker-timelapse/klipper_macro/timelapse.cfg" "/home/pi/printer_1_data/config/timelapse.cfg"
ln -sf "/home/pi/moonraker-timelapse/klipper_macro/timelapse.cfg" "/home/pi/printer_2_data/config/timelapse.cfg"
ln -sf "/home/pi/moonraker-timelapse/klipper_macro/timelapse.cfg" "/home/pi/printer_3_data/config/timelapse.cfg"
sudo reboot
-
Go to your Mainsail Web interface then click on
Machinetab. -
Open
printer.cfgand uncomment (remove the #) to the following line like that:
[include timelapse.cfg] #Enable if you want to use Timelapse
-
Click on
SAVE & RESTARTat the top right to save the file. -
Then, open the
moonraker.conffile and add the following lines at the end of the file:
[timelapse]

[update_manager timelapse]
type: git_repo
primary_branch: main
path: ~/moonraker-timelapse
origin: https://github.com/mainsail-crew/moonraker-timelapse.git
managed_services: klipper moonraker
-
Once done, click on
SAVE & RESTARTat the top right to save the file. -
You can now click the refresh button (still in the Machine tab) on the
Update Managertile. -
You will see a new
timelapseline appear.
Slicer Side Changes
-
Change your Start and End Gcode in your Slicer settings like this:
-
For Cura:
- Start Gcode:
;Nozzle diameter = {machine_nozzle_size} ;Filament type = {material_type} ;Filament name = {material_brand} {material_name} ;Filament weight = {filament_weight} ;M109 S{material_print_temperature} ;M190 S{material_bed_temperature} START_PRINT BED_TEMP={material_bed_temperature_layer_0} EXTRUDER_TEMP={material_print_temperature_layer_0} - End Gcode:
END_PRINT
- Start Gcode:
-
For PrusaSlicer / SuperSlicer:
- Start Gcode:
START_PRINT BED_TEMP=[first_layer_bed_temperature] EXTRUDER_TEMP=[first_layer_temperature] M104 S[first_layer_temperature] M190 S[first_layer_bed_temperature] - End Gcode:
END_PRINT
- Start Gcode:
-
For LycheeSlicer:
- Start Gcode:
START_PRINT BED_TEMP={bed_temp} EXTRUDER_TEMP={temp} - End Gcode:
END_PRINT
- Start Gcode:
-
For Simplify3D:
- Start Gcode:
START_PRINT BED_TEMP=[platform0_temperature] EXTRUDER_TEMP=[extruder0_temperature] - End Gcode:
END_PRINT
- Start Gcode:
-
For OrcaSlicer:
- Start Gcode:
START_PRINT BED_TEMP=[bed_temperature_initial_layer_single] EXTRUDER_TEMP=[nozzle_temperature_initial_layer] M104 S[nozzle_temperature_initial_layer] M190 S[bed_temperature_initial_layer_single] - End Gcode:
END_PRINT
- Start Gcode:
-
-
Firmware retraction gives an advantage compared to Slicer retraction, it can be modified during a print (from Mainsail or KlipperScreen) and therefore the same gcode can be printed with different parameters without the need to be re-sliced.
- For Cura, it's needed to install
Klipper Settings Plugin(available here: Klipper Settings Plugin) and enableEnable Firmware Retractionsetting like that:

- For PrusaSclicer / SuperSlicer, you just need to enable
Use firmware retractionsetting like that:

-
For OrcaSlicer, you just need to enable
Use firmware retractionsetting like that:
- For Cura, it's needed to install
Calibrate your Printer
This calibrations can be done by Mainsail Interface with Macros or on Speeder Pad directly.
-
Calibrate your extruder by calculing Rotation Distance (see this documentation : Rotation Distance | Klipper)
-
Calibrate Z-OFFSET with
Z_OFFSET_CALIBRATIONmacro.-
⚠️ The leveling sensor must be connected for this operation ! -
This function performs a palpation on the bed, then raises the hotend and starts the manual adjustment function:

-
Then remove the leveling sensor and using a piece of "copy machine paper" between the bed and the nozzle, adjust the height of the Z until you feel a little friction when pushing the paper back and forth. This helps determine the actual distance between the nozzle and the bed.
Note: Prefer to use the buttons in the
ADVANCEDsection, they are more precise and this could prevent the nozzle from forcing on the bed. -
Once these steps are completed, you can click on
ACCEPTto validate the Z-Offset measurement. -
It's necessary to save the configuration by clicking on the
SAVEmacro.
-
-
Calibrate ENDSTOPS with
ENDSTOPS_CALIBRATIONmacro and save the configuration by clicking on theSAVEmacro. -
Start DELTA CALIBRATION with
DELTA_CALIBRATIONmacro and save the configuration by clicking on theSAVEmacro.⚠️ The leveling sensor must be connected for this operation !
-
Start BED LEVELING with
BED_LEVELINGmacro and save the configuration by clicking on theSAVEmacro.⚠️ The leveling sensor must be connected for this operation !
-
Start BED PID with
PID_BED_65macro and save the configuration by clicking on theSAVEmacro. -
Start HOTEND PID with
PID_HOTEND_220macro and save the configuration by clicking on theSAVEmacro. -
After all the calibrations done, I recommend to apply a Safety Offset of 2 mm via the
SECURITY_OFFSETmacro.This could prevent the nozzle from scratching or sinking on the bed in the event of an incorrect adjustment of the Z-Offset.
-
After performing all printer calibrations, then start a print and adjust the first layer using babysteps via the
Adjustmentsbutton in KlipperScreen or via theHeadlinesection in Mainsail:
-
⚠️ Don't save the Z-Offset value, a macro save automatically this value in the variables.cfg file and reload it automatically when Klipper starts:
-
You can find a test STL to print to fit your first layer here: First_Layer_Test.stl
Measure resonances with Raspberry Pi Pico
You can use ADXL345 with FLSUN Speeder Pad for measuring Resonances via USB with a Raspberry Pi Pico.
Needed:
- Raspberry Pi Pico
- ADXL345 Accelerometer
- USB-A/Male to Micro-USB/Male Cable
- Cable, tin and soldering iron
Wiring:

- Some dependencies are required to use ADXL345, install them with this following commands (one at a time):
sudo apt update
sudo apt install python3-numpy python3-matplotlib libatlas-base-dev
- Followed by this command to install Numpy in Klipper's environment:
~/klippy-env/bin/pip install -v numpy
- It's also necessary to compile firmware for Raspberry Pico, enter the following commands (one at a time):
cd ~/klipper/
make menuconfig
-
Select these settings:

-
Then on your keyboard press the
Qkey thenYto save configuration. -
Enter the following commands to compile firmware (one at a time):
make clean
make
-
Plug Raspberry Pi Pico into one of the Speeder Pad's USB ports while holding down the
BOOTSELbutton. -
Type this commands to flash firmware (one at a time):
cd ~ && sudo mount /dev/sda1 /mnt
sudo cp /home/pi/klipper/out/klipper.uf2 /mnt/
-
Now disconnect and reconnect the accelerometer, without holding the
BOOTSELbutton this time to restart it in normal mode. -
Then, type this command to retrieve the serial:
cd ~ && ls /dev/serial/by-id/*
-
You should see 2 serials appear, one is your printer serial an other is the Raspberry Pi Pico, the one with the mention
Klipper Rp2040:
-
Go to your Mainsail Web interface then click on
Machinetab. -
Open
adxl345_pico.cfgfile and edit following line with serial you have just obtained:
serial: /dev/serial/by-id/usb-Klipper_rp2040_E6605481DB318D34-if00
-
Click on
SAVE & RESTARTat the top right to save the file. -
Then uncomment (remove the #) to the following line in the
printer.cfgfile to enable ADXL support:
[include adxl345_pico.cfg]
-
Click on
SAVE & RESTARTat the top right to save the file. -
You should see the
ADXL MCUconnecting to Klipper. -
You can test accelerometer by entering this command:
ACCELEROMETER_QUERY
- Something like this must be returned:
accelerometer values (x, y, z): 5551.544565, 7048.078582, -1924.535449
- Enter this command to measure the noise of the accelerometer for each axis:
MEASURE_AXES_NOISE
-
You should get some baseline numbers for the noise of accelerometer on the axes (should be somewhere in the range of ~1-100). Too high axes noise (e.g. 1000 and more) can be indicative of the sensor issues, problems with its power, or too noisy imbalanced fans.
-
To measure the resonances, see here: https://www.klipper3d.org/Measuring_Resonances.html
Note: After tests, it's better to disable the ADXL by commenting out the [include adxl345_pico.cfg] line again.
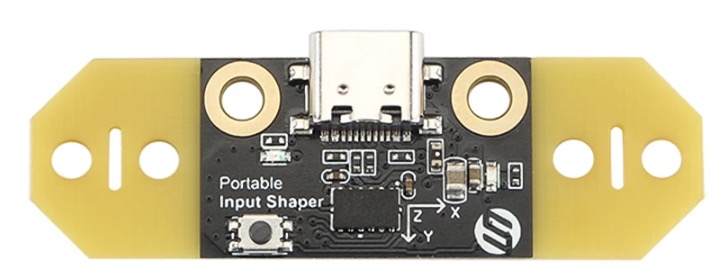
Measure resonances with Fysetc Portable Input Shaper
You can use Fysetc Portable Input Shaper with FLSUN Speeder Pad for measuring Resonances via USB.
Needed:
- Fysetc Portable Input Shaper accelerometer available: Here
- USB-A/Male to USB-C/Male Cable
Note: You can cut the yellow edges to reduce the width
- Some dependencies are required to use this accelerometer, install them with this following commands (one at a time):
sudo apt update
sudo apt install python3-numpy python3-matplotlib libatlas-base-dev
- Followed by this command to install Numpy in Klipper's environment:
~/klippy-env/bin/pip install -v numpy
- It's also necessary to compile firmware for Fysetc Portable Input Shaper, enter the following commands (one at a time):
cd ~/klipper/
make menuconfig
-
Select these settings:

-
Then on your keyboard press the
Qkey thenYto save configuration. -
Enter the following commands to compile firmware (one at a time):
make clean
make
-
Plug Portable Input Shaper into one of the Speeder Pad's USB ports while holding down the button.
-
Type this commands to flash firmware (one at a time):
cd ~ && sudo mount /dev/sda1 /mnt
sudo cp /home/pi/klipper/out/klipper.uf2 /mnt/
-
Now disconnect and reconnect the accelerometer, without holding the button this time to restart it in normal mode.
-
Then, type this command to retrieve the serial:
ls /dev/serial/by-id/*
-
You should see 2 serials appear, one is your printer serial an other is the Fysetc Portable Input Shaper, the one with the mention
Klipper Rp2040:
-
Go to your Mainsail Web interface then click on
Machinetab. -
Open
adxl345_fysetc.cfgfile and edit following line with serial you have just obtained:
serial: /dev/serial/by-id/usb-Klipper_rp2040_E6605481DB318D34-if00
-
Click on
SAVE & RESTARTat the top right to save the file. -
Then uncomment (remove the #) to the following line in the
printer.cfgfile to enable ADXL support:
[include adxl345_fysetc.cfg]
-
Click on
SAVE & RESTARTat the top right to save the file. -
You should see the
PIS MCUconnecting to Klipper. -
You can test accelerometer by entering this command:
ACCELEROMETER_QUERY
- Something like this must be returned:
accelerometer values (x, y, z): 5551.544565, 7048.078582, -1924.535449
- Enter this command to measure the noise of the accelerometer for each axis:
MEASURE_AXES_NOISE
-
You should get some baseline numbers for the noise of accelerometer on the axes (should be somewhere in the range of ~1-100). Too high axes noise (e.g. 1000 and more) can be indicative of the sensor issues, problems with its power, or too noisy imbalanced fans.
-
To measure the resonances, see here: https://www.klipper3d.org/Measuring_Resonances.html
Note: After tests, it's better to disable the ADXL by commenting out the [include adxl345_fysetc.cfg] line again.
Measure resonances with FLSUN ADXL
You can use FLSUN ADXL with FLSUN Speeder Pad for measuring Resonances via USB.
Needed:
- FLSUN ADXL
- USB cable

- Some dependencies are required to use this accelerometer, install them with this following commands (one at a time):
sudo apt update
sudo apt install python3-numpy python3-matplotlib libatlas-base-dev
- Followed by this command to install Numpy in Klipper's environment:
~/klippy-env/bin/pip install -v numpy
-
When it's done, plug FLSUN ADXL into one of the Speeder Pad's USB ports.
-
Then, type this command to retrieve the serial:
ls /dev/serial/by-id/*
-
You should see 2 serials appear, one is your printer serial an other is the FLSUN ADXL, the one with the mention
Klipper_stm32f103xe:
-
Go to your Mainsail Web interface then click on
Machinetab. -
Open
adxl345_flsun.cfgfile and edit following line with serial you have just obtained:
serial: /dev/serial/by-id/usb-Klipper_stm32f103xe_A83331333634120136343231-if00
-
Click on
SAVE & RESTARTat the top right to save the file. -
Then uncomment (remove the #) to the following line in the
printer.cfgfile to enable ADXL support:
[include adxl345_flsun.cfg]
-
Click on
SAVE & RESTARTat the top right to save the file. -
You should see the
mcu adxlconnecting to Klipper. -
You can test accelerometer by entering this command:
ACCELEROMETER_QUERY
- Something like this must be returned:
accelerometer values (x, y, z): 5551.544565, 7048.078582, -1924.535449
- Enter this command to measure the noise of the accelerometer for each axis:
MEASURE_AXES_NOISE
-
You should get some baseline numbers for the noise of accelerometer on the axes (should be somewhere in the range of ~1-100). Too high axes noise (e.g. 1000 and more) can be indicative of the sensor issues, problems with its power, or too noisy imbalanced fans.
-
To measure the resonances, see here: https://www.klipper3d.org/Measuring_Resonances.html
Note: After tests, it's better to disable the ADXL by commenting out the [include adxl345_flsun.cfg] line again.
Use Neopixels Ring Light

Available modes:
- Turn On Neopixels with
NEOPIXEL_ONmacro - Turn Off Neopixels with
NEOPIXEL_OFFmacro - Turn On Neopixels in blue with
NEOPIXEL_BLUEmacro - Turn On Neopixels in red with
NEOPIXEL_REDmacro - Turn On Neopixels in green with
NEOPIXEL_GREENmacro - Turn On Neopixels in yellow with
NEOPIXEL_YELLOWmacro - Turn On Neopixels in orange with
NEOPIXEL_ORANGEmacro - Turn On Neopixels in violet with
NEOPIXEL_VIOLETmacro - Turn on Neopixels based on nozzle temperature (All LEDs) with
HOTEND_GLOWmacro - Turn on Neopixels based on nozzle temperature (LED by LED) with
HOTEND_PROGRESSmacro - Turn on Neopixels based on bed temperature (All LEDs) with
BED_GLOWmacro - Turn on Neopixels based on bed temperature (LED by LED) with
BED_PROGRESSmacro - Turn on Neopixels based on printing progress (All LEDs) with
PERCENT_GLOWmacro - Turn on Neopixels based on printing progress (LED by LED) with
PERCENT_PROGRESSmacro - Turn on Neopixels based on printing speed (All LEDs) with
SPEED_GLOWmacro - Turn on Neopixels based on printing speed (LED by LED) with
SPEED_PROGRESSmacro
Necessary:
-
Neon Flexible Tube 1m T1616-Side 10mm PCB: Here
-
LED Strip WS2812 1 m 60 IP 30: Here
-
Cable Ties 2.5mm
-
Support (STL) : Here
Wiring for V400 (MKS Robin Nano V2.0):

Wiring for Super Racer (MKS Robin Nano V3.0/V3.1):

Wiring for Super Racer (BigTreeTech SKR 1.3):

Wiring for Super Racer (BigTreeTech SKR 2.0):

Configuration:
-
Go to your Mainsail Web interface then click on
Machinetab. -
Then import the
KlipperScreen.conffile located inNeoPixelsfolder of the pack (make sure you get the correct version V400 or Super Racer in the respective folders). -
Open the
printer.cfgfile and modify the following line by removing the#at the very beginning:
[include neopixels.cfg] #Enable if you want to use Neopixels
- Once done, click on
SAVE & RESTARTat the top right to save the file.
Enable Root Access
- Connect in SSH and enter the following command (you will need to enter your user password):
sudo -i
- Then enter this command to change root password:
passwd
-
Enter a password twice for the root user.
-
Then enter the following command:
sudo nano /etc/ssh/sshd_config
- Edit the file by replacing the line
#PermitRootLogin prohibit-passwordbyPermitRootLogin yes:

-
Then on your keyboard press the keys
Ctrl + Xto exit,Yto save andEnterto validate. -
Enter this command to apply change:
sudo service ssh restart
-
Log out of the current SSH session.
-
You can now login to SSH with
rootuser rather thanpi.
Change SSH Welcome Message and Cleanup Files
This step allows you to change the SSH welcome message to obtain information about the system and to cleanup some files.

-
Connect in SSH with root user and your password.
-
In
rootfolder create a new folder namedspeeder_padby typing this command:
mkdir /root/speeder_pad
-
Download this files pack and unzip it: Speeder Pad Files
-
Drag and drop all files from the pack to the
/root/speeder_pad/folder. -
Then enter this commands (one at a time):
rm /etc/update-motd.d/00-header
rm /etc/update-motd.d/10-help-text
rm /etc/update-motd.d/50-motd-news
rm /etc/update-motd.d/60-unminimize
cp /root/speeder_pad/00-banner /etc/update-motd.d/
cp /root/speeder_pad/10-sysinfo /etc/update-motd.d/
cp /root/speeder_pad/colors /etc/update-motd.d/
chmod 755 /etc/update-motd.d/00-banner
chmod 755 /etc/update-motd.d/10-sysinfo
cp /root/speeder_pad/sshd_config /etc/ssh/
cp /root/speeder_pad/cfgguard.sh /usr/sbin/
service ssh restart
- You can now disconnect your SSH session and reconnect to see changes.
Set a Static IP Address
-
Connect in SSH with root user and your password.
-
In
rootfolder create a new folder namedspeeder_padby typing this command:
mkdir /root/speeder_pad
-
Download this files pack and unzip it: Speeder Pad Files
-
Open the file
01-network-manager-all.yamlwith a text editor and replace this lines with your information:-
addresses: [xxx.xxx.xxx.xxx/24]-> Replace xxx.xxx.xxx.xxx by the IP address you want to assign to your Speeder Pad -
gateway4: xxx.xxx.xxx.xxx-> Replace xxx.xxx.xxx.xxx by your gateway -
addresses: [xxx.xxx.xxx.xxx, xxx.xxx.xxx.xxx]-> Replace xxx.xxx.xxx.xxx, xxx.xxx.xxx.xxx by your DNS addresses
-
-
At this step make sure you have entered the correct information otherwise your Speeder Pad will not connect to the WiFi network and the only solution will be to restore the Speeder Pad.
-
Save the file and drag and drop it to the
/root/speeder_pad/folder. -
Then enter this commands (one at a time):
cp /root/speeder_pad/01-network-manager-all.yaml /etc/netplan/
chmod 755 /etc/netplan/01-network-manager-all.yaml
sudo netplan apply
-
It's possible that your SSH session freezes after the last command, this is due to the fact that the Speeder Pad has just taken the new IP address. In this case, you must restart the Speeder Pad.
-
After restarting, your Speeder Pad will then have the new IP address.
Change Boot Logo

-
Connect in SSH with root user and your password.
-
Download Boot Logo Pack you want and unzip it:
-
Drag and drop all files from the pack to the
/root/folder. -
This will overwrite existing loading boot screen files.
-
Then enter this commands to replace the first boot screen (one at a time):
mount /dev/mmcblk0p1 /mnt
cp /root/bootlogo.bmp /mnt/
rm /root/bootlogo.bmp
sudo reboot
- After reboot, you will see the new boot logo.
Special Thanks
- FLSUN for sending me a free V400 and Speeder Pad.
- digitalninja-ro for Klipper NeoPixel Templates.
- NERO 3D for his tips about Input Shaper with a Raspberry Pi Pico.
- ManuMod for his tips about symlink on USB-Disk folder.
- Desuuuu & danorder for the basics of some macros.
- Jonny Lissoos for his Timelapse instruction PDF.
- Iago Diaz & Mathieu Chantome for their tests.
- AbomShep for his tips to connect multiple printers on one board.