Today we mainly will talked about the IAM related concept. We will talk about the user, role, policy, which is most fundamental part before we start to build any workload on AWS.
We will introduce the IAM users, how to create policy and make sure the lease privilege you grant to your team crew. And we will show you what's the different way to get your
Switch Region on the AWS console, a drag down menu near right-up corner. For example, we pick N. Viginia(us-east-1) for our lab practice.
- Create a new IAM User
- AWS Console > IAM > Create User
- Create a user, with proper user name, with password, choose both programmic and console usage.
- Attach existing policies directly, and pick AmazonEC2FullAccess and AmazonS3FullAccess
- After review, then create the user
- At the last page, please remeber to download the credential csv, or copy the Access Key ID and Secrect Access Key on the page.
- Make sure you set each account with MFA
- AWS console > IAM > users, and click the user name you just created
- Pick the Security credentials tab, you can see the link Assigned MFA device
- Click and pick A virtual MFA device, with download mobile app, you could enable the Multi-Factor-Authentication to protect your account. For more detail, please check the document (https://aws.amazon.com/iam/details/mfa/)
-
Check if you already have a EC2 Key pair in your selected region.
-
If not, create one through AWS Console > EC2 > Key Pairs > Create Key Pair.
-
Remember to download the private key(.pem) and well saved.
-
In usual, we will move it into ~/.ssh/ sub-folder in your home directory.
-
To make it secure, remeber to change the privilege with command
chmod 0400 XXXXX.pem -
If you are windows user, and you should download putty.exe and puttygen.exe from Here. And also check the document Here if you don't know how to convert .pem to .ppk
- Create cloudformation stack: AWS Console > Cloudformation > Create Stack > from S3 template > https://s3-ap-northeast-1.amazonaws.com/workshop-data-public/cloudformation-workshop-20180731-vpc-bastion-rds.cfn.yml
- All the step will be the same with our pervious workshop (https://github.com/juntinyeh/AWSWorkshop-20180731-VPC-EC2-S3-RDS)
- Check your web service stack
- You will find an Application Load Balancer, A web server and a backend server, and also a S3 bucket.
- In this practice, you can see how to create resource for our basic practice. You can try to understand how we design the network topology, how we devide AZ and subnet.
- Also, we talked about the security group. By default, all the network routing rule has been pre-defined, you don't need to do anything. In this empty stack, you can see what we showed in the first diagram.
- If you want to ssh into those machine, please refer to (https://aws.amazon.com/blogs/security/securely-connect-to-linux-instances-running-in-a-private-amazon-vpc/) for further configurations.
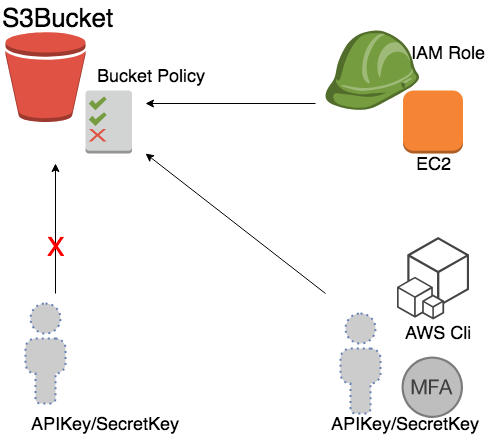
- Now find the bucket policy file in (AWSWorkshop-20180823-IAM-Role-S3-CW-SNS/policies/bucket-policy.json)
- Copy it, and paste to your S3 bucket policy: AWS Console > S3 >
YOURBUCKET> Permission > bucket policy Paste it and save.(You have to change the aws-user-id from 1111111111 to your own id.)
- Now compare with different access method, try to use
awsclifrom bastion, on your laptop (if you skip step5).
- Try to access the bucket, with and without MFA.
- The command with MFA delete will like this:
aws s3api delete-object --bucket nctu-aws-workshop --key test.py --mfa "arn:aws:iam::111111111111:mfa/$YOURUSER 123456"
- Now we are going to do several manual configuration for more secure setting - Change bucket policy and log configurations.
- Create a web servers and backend server stack: AWS Console > Cloudformation > Create Stack > from S3 template > https://s3-ap-northeast-1.amazonaws.com/workshop-data-public/cloudformation-workshop-20180823-sns-ct.json
- This will Activate CloudTrail Service, and create a new Trail, new SNS, and also put the email address into subscription
- Now we go back to S3 bucket you created in
Step 5> Properties > Object-level logging
- select the Trail you just create, and check the read/write event, to make sure you send out all the log to CloudTrail.
- Now we goto Cloudwatch, and create a new rule AWS Console > CloudWatch > Rules > Create Rule
- Check Event Pattern
- Build event pattern to match events by service
- Service Name will be
S3 - Event Type will be
All Events - And Add Target, pick
SNS topic, and make sure you send it to the right topic. - After you give it a name, it's done now.
- Now, try to put some file into your bucket, modify and delete, you will get email notification.
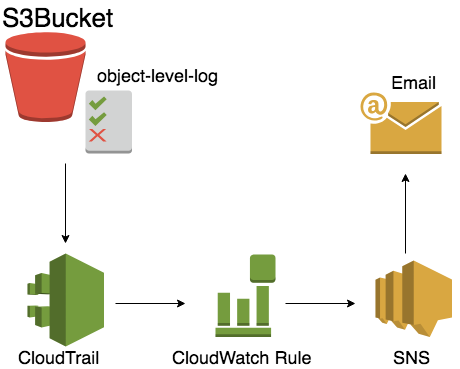
For the whole notification flow will look like this, S3 bucket will send the log to CloudTrail, and trigger the event to target SNS. If you have more subscriber in the SNS topic, all of them will get notified.
- Go to Cloudformation, select your stack and delete stack.
- Remember to delete all the stack above with reversed sequence. (step 7 > step 5)