EKS Workshop 动手实验说明
本文档目的是指导用户熟悉建立Amazon EKS集群的过程,并利用AWS相关的服务和插件部署一套常见应用程序。
部署流程如下:
1. 准备工作
a. 请确保您有海外AWS账号和足够的资源配额
- 请确保您有创建海外AWS账号的IAM user,该用户有Administrator权限。
b. 准备Cloud9所需要的VPC
- 可以使用默认的VPC或者创建新的VPC, 可以参考这个文档创建新的VPC。
2. 创建Cloud9
点击这里启动Cloud9开发环境
填入Cloud9名称,Next Step进入到下一步:

其它步骤可以保持默认参数不变,最后一步点击Create Environment. Cloud9新环境创建需要一分钟左右。
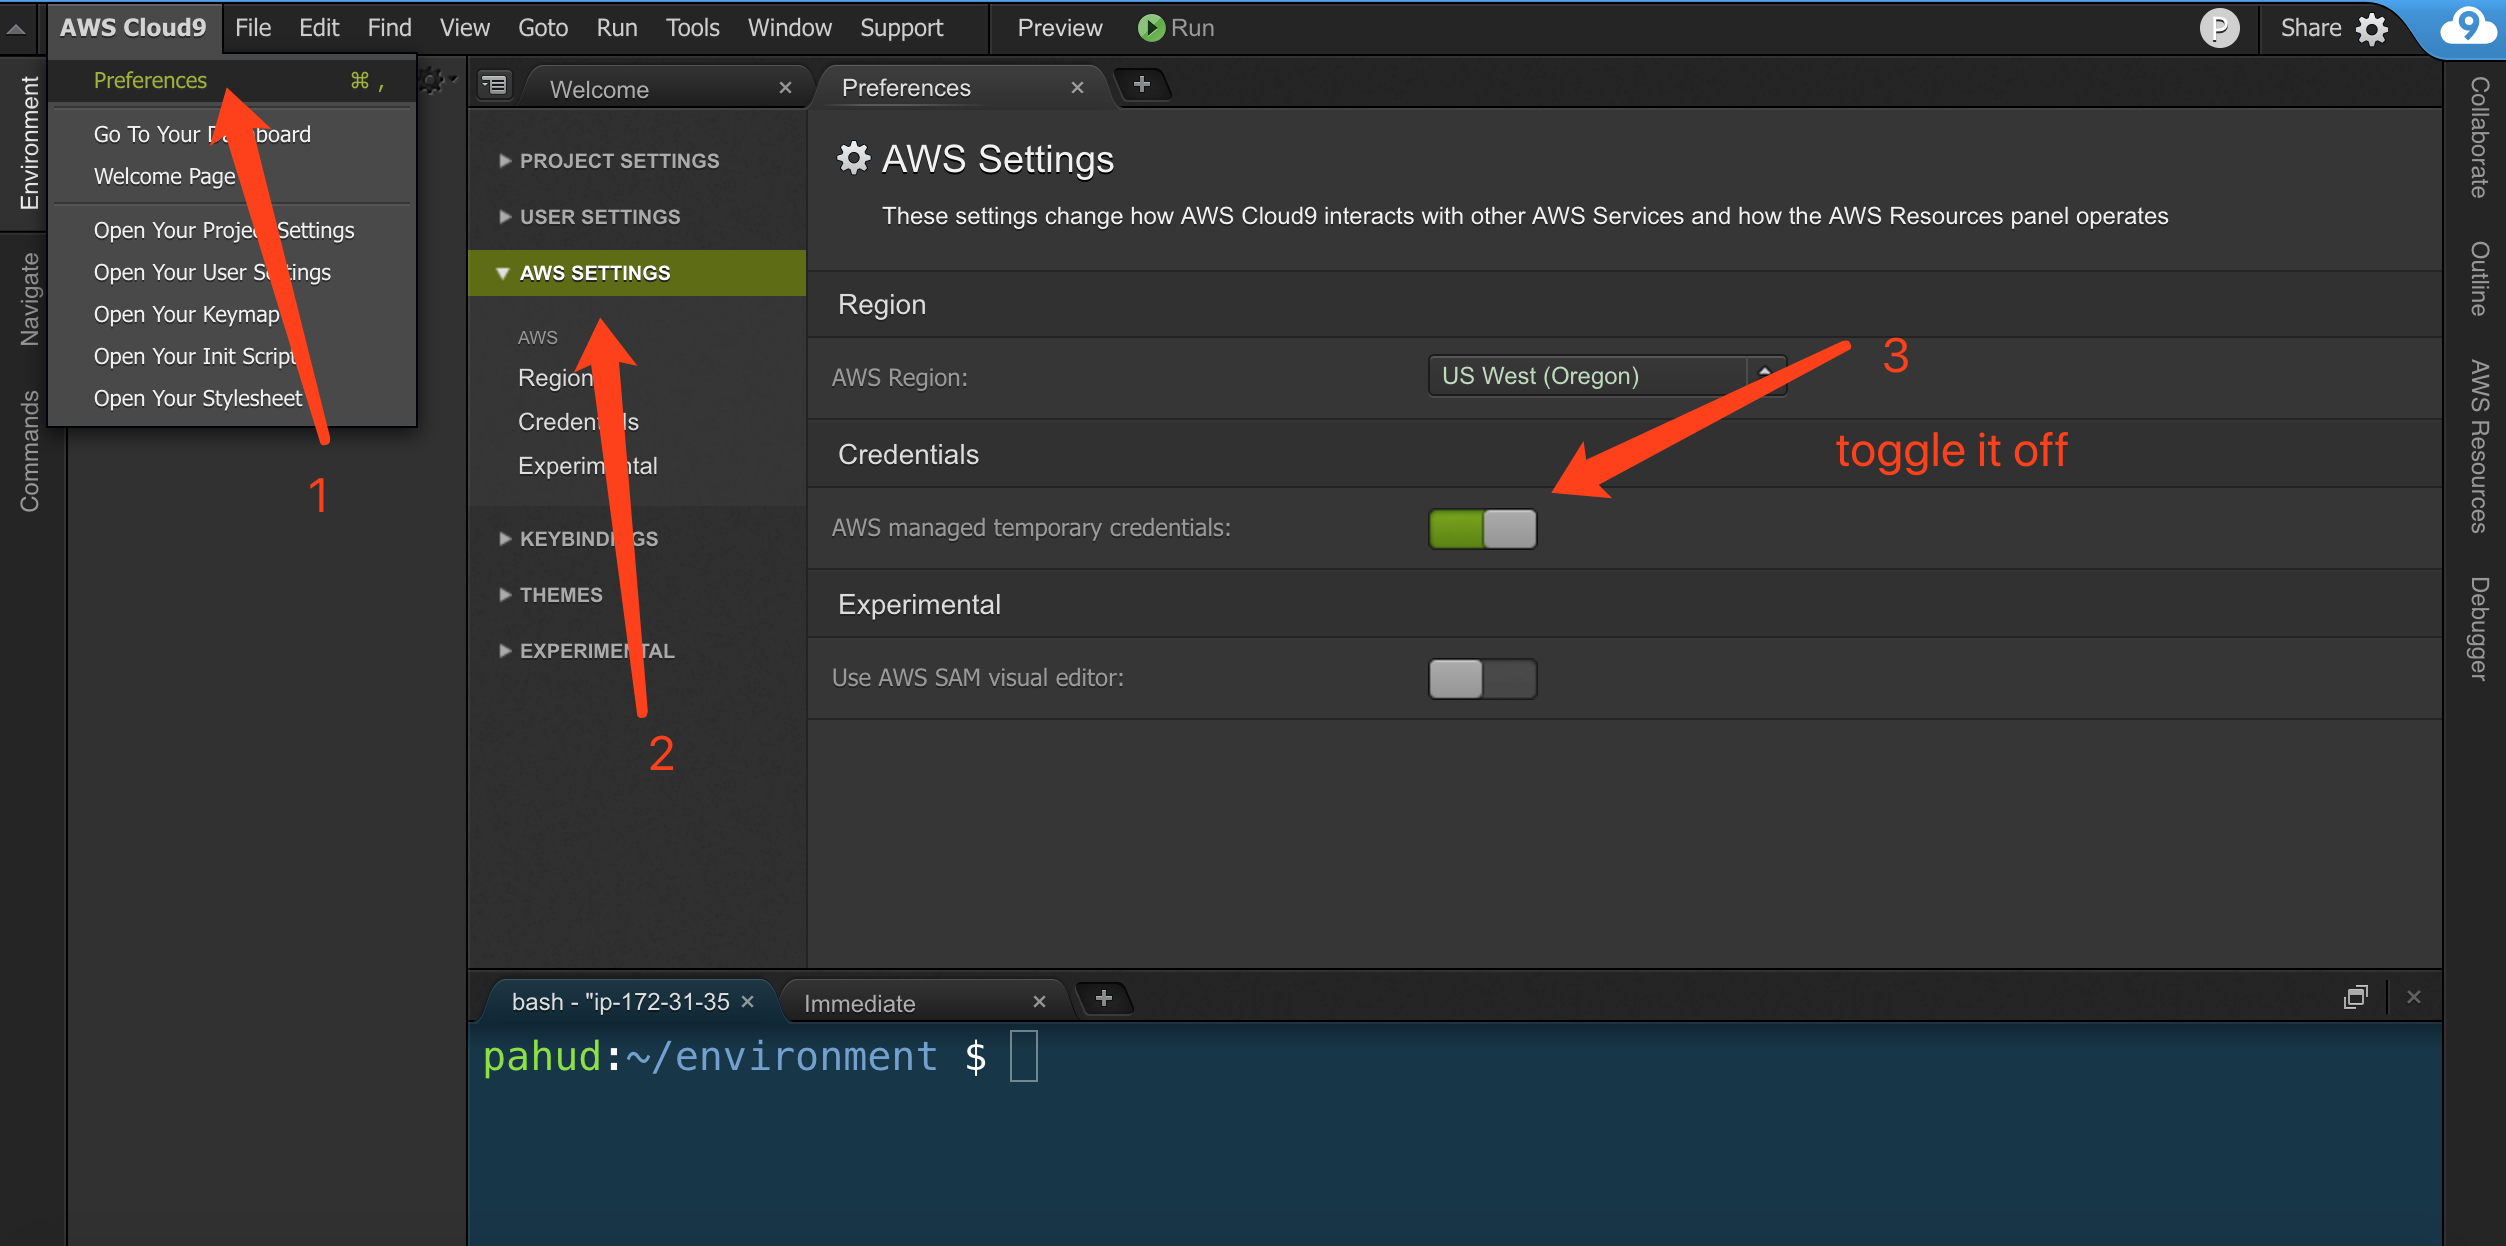
3. 配置Cloud9环境
-
在Cloud9 terminal窗口中执行如下命令,创建新的EC2 instance profile并配置给当前Cloud9实例。请注意下面第二行命令需要等待两分钟左右完成。
$ aws cloudformation create-stack --stack-name eksworkshop-instprofile --capabilities CAPABILITY_IAM --template-url https://whe-pub.s3-ap-southeast-1.amazonaws.com/c9-instance-profile.yaml
$ aws cloudformation wait stack-create-complete --stack-name eksworkshop-instprofile
$ PROFILENAME=$(aws cloudformation describe-stacks --stack-name eksworkshop-instprofile --output text --query 'Stacks[0].Outputs[0].OutputValue')
$ MYINSTID=$(curl -sS http://169.254.169.254/latest/meta-data/instance-id)
$ aws ec2 associate-iam-instance-profile --instance-id $MYINSTID --iam-instance-profile Name=$PROFILENAME
-
禁用掉managed temporary credentials:
正确配置完成后,运行
aws sts get-caller-identity将会看到如下类似json输出。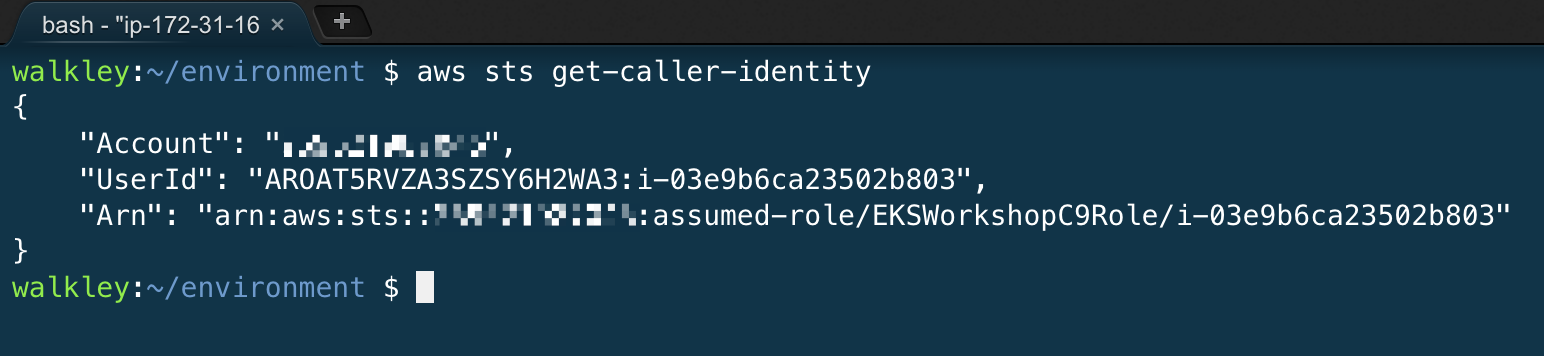
-
下载
kubectl$ sudo curl -o /usr/local/bin/kubectl https://amazon-eks.s3-us-west-2.amazonaws.com/1.13.7/2019-06-11/bin/linux/amd64/kubectl $ sudo chmod +x /usr/local/bin/kubectl
-
下载
eksctl$ curl -sL "https://github.com/weaveworks/eksctl/releases/download/latest_release/eksctl_$(uname -s)_amd64.tar.gz" | tar xz -C /tmp $ sudo mv /tmp/eksctl /usr/local/bin
-
下载
aws-iam-authenticator。目前eksctl还不支持使用aws cli get-token�配置kube config$ sudo curl -o /usr/local/bin/aws-iam-authenticator https://amazon-eks.s3-us-west-2.amazonaws.com/1.13.7/2019-06-11/bin/linux/amd64/aws-iam-authenticator $ sudo chmod +x /usr/local/bin/aws-iam-authenticator


4. 创建EKS集群
-
运行如下命令,用eksctl创建一个包含默认node group的集群:
$ sudo yum install -y jq
$ REGION=`curl -sS http://169.254.169.254/latest/dynamic/instance-identity/document | jq -r .region`
$ aws configure set default.region $REGION
$ eksctl create cluster --region $REGION --name eks-workshop --alb-ingress-access
更多参数可参考eksctl官方文档。
所有资源创建需要15分钟左右。
5. 配置Helm环境
- 安装helm cli,创建tiller namespace:
$ curl -L https://git.io/get_helm.sh | bash $ kubectl create namespace tiller - 启动本地tiller server:
$ export TILLER_NAMESPACE=tiller $ tiller -listen=localhost:44134 -storage=secret -logtostderr - 不要关闭上述命令行窗口,在旁边启动一个新tab页命令行窗口,运行下面的命令以初始化本地heml环境:
$ export HELM_HOST=:44134
$ helm init --client-only
$ helm repo update
5. 创建示例应用程序 2048小游戏
在本部分中,您将创建一个2048小游戏来测试新集群。
$ kubectl apply -f https://raw.githubusercontent.com/kubernetes-sigs/aws-alb-ingress-controller/master/docs/examples/2048/2048-namespace.yaml
$ kubectl apply -f https://raw.githubusercontent.com/kubernetes-sigs/aws-alb-ingress-controller/master/docs/examples/2048/2048-deployment.yaml
$ kubectl apply -f https://raw.githubusercontent.com/kubernetes-sigs/aws-alb-ingress-controller/master/docs/examples/2048/2048-service.yaml
6. 创建AWS ALB Ingress controller
a. 部署 ALB ingress controller
$ helm repo add incubator http://storage.googleapis.com/kubernetes-charts-incubator
$ helm repo update
$ helm install incubator/aws-alb-ingress-controller \
--set clusterName=eks-workshop \
--set autoDiscoverAwsRegion=true \
--set autoDiscoverAwsVpcID=true
b. 部署 ingress
下载ingress YAML:
$ curl -sS https://raw.githubusercontent.com/kubernetes-sigs/aws-alb-ingress-controller/master/docs/examples/2048/2048-ingress.yaml -o 2048-ingress.yaml编辑 2048-ingress.yaml 文件, 在annotations中增加 alb.ingress.kubernetes.io/target-type: ip. 本示例中我们将用ip mode 作为目标类型,这样ALB的流量将会直接转发到Pod上。
 然后创建ingress
$ kubectl apply -f 2048-ingress.yaml获取ingress资源的Address属性:
$ kubectl -n 2048-game describe ing/2048-ingress
c. 用浏览器打开上一步的ALB地址。如果不能正常显示,等待一分钟左右,或者进入EC2控制台查看ALB的状态。

7. Amazon EKS结合Amazon EC2 Spot
参考此文档以创建基于spot fleet的EKS集群。
8. 清理环境
a. 删除ingress
$ kubectl delete -f 2048-ingress.yamlb. 删除EKS集群
$ eksctl delete cluster eks-workshop