WS2812 Server is a program for driving programmable LEDs like the WS2812 or SK9822 from your Raspberry Pi. It is based on the rpi_ws281x PWM driver library from jgarff (https://github.com/jgarff/rpi_ws281x).
LEDs can be controlled by using simple predefined text commands, no advanced programming skills are required.
Some features:
- Control LEDs from text file using predefined effect commands
- Run as a service in the background
- Send commands over TCP socket or named pipe to connect with other applications or programming languages like Python, C# or PHP webserver
- Make LEDs react to audio input
- Support for 2D LED panels
- Capture desktop or directly or load JPG, PNG and GIF files
- Create a message board
- Use the Raspberry Pi PWM, PCM or SPI interface
- Capture and display video from Pi camera module or HDMI USB capture device.
- Capture video and generate ambilight for your TV!
- Master - Slave mode, let 1 Pi control LED strings connected to multiple other Pis over Wifi/Ethernet.
Read the change log to see what is new: CHANGES.md
Support for Master-Slave

You can use this with the WS2811, WS2812, SK6812, SK9822 chips.
If you are using the Raspberry Pi OS with desktop enabled the audio output is activated by default. This audio interface uses the PCM/PWM module which is required to drive the LEDs (ws2812 / SK6812) so you need to disable default audio output first. You can do this by blacklisting the sound module:
echo "blacklist snd_bcm2835" | sudo tee /etc/modprobe.d/snd-blacklist.conf
If this doesn't work, also comment out the dtparam=audio=on parameter in /boot/config.txt
sudo sed -i "s/^dtparam=audio=on/#dtparam=audio=on/g" /boot/config.txt
Standard installation with support for all features use the following commands:
sudo apt-get update
sudo apt-get install gcc make git libjpeg-dev libpng-dev pkg-config libasound2-dev libcairo2-dev libx11-dev libxcb1-dev libfreetype6-dev libv4l-dev v4l-utils
git clone https://github.com/tom-2015/rpi-ws2812-server.git
cd rpi-ws2812-server
make
sudo chmod +x ws2812svr
Now you can start testing or install the program as a service (automatic startup). To install as a service use:
sudo make install
A new service will be added (ws2812svr), edit /etc/ws2812svr.conf to configure the settings.
Connect your LEDs to the PWM output (default is physical pin 12 on the connector) of the Raspberry Pi and start the program:
sudo ./ws2812svr
Now first initialize the driver code from jgarff by typing 'setup'. On the following line you must replace 10 by the number of leds you have attached!.
setup 1,10
init
Now you can type commands to change the color of the leds. For example make them all red:
fill 1,FF0000
render
You can find examples in the examples folder.
On Youtube:

Install the Visual Studio Code extension to get syntax highlighting and autocompletion when writing scripts.

Search for ws2812svr extension in your Visual Studio Code IDE and save file with the .ws extension.
It is possible to start threads, a thread will execute commands between thread_start and thread_stop in the background. Multiple threads can run at the same time by changing the parameter. <join_type> will determine the behavior next time you call thread_start with the value of a thread that is still running if join_type is 0 the thread will be aborted immediately, value of 1 it will wait until the thread completed all commands and then READY + CRLF is returned.
thread_start <index>,<join_type>
	do
		rotate 1,1,2
		render
		delay 200
	loop
thread_stop
For a complete list and description of all supported commands see the COMMANDS.md file.
set_thread_exit_typeThis will set if the thread should be aborted when the kill_thread or ini_thread command is executed for the <thread_id> parameterwait_threadwait for a given thread to finish all commands (the exit type is ignored here)kill_threadterminate the given thread_idwait_signalwaits for a signal from another thread before executing the next commandsignal_threadsend a signal to the given thread_id to continue executing commands
You can add do ... loop [times] to repeat commands.
For example the commands between do and loop will be executed 10 times:
do
	<enter commands here to repeat>
loop 10
Endless loops can be made by removing the '10'. Inside a loop you can use {i} for the loop counter as function argument where i is the nested loop index.
For example {0} will be automatically replaced by 0,1,2,3,4:
do
	fill 1,FF0000,{0},1
loop 5
render
is the same as the C-style code:
for (i=0; i<5; i++) {
	fill (1,FF0000,i,1);
}
If you have nested loops you can increase the {0} to {1}, {2},...
do
	do
		fill 1,FF0000,{1},1
	loop 5
	render
loop
Also possible to add a step value for the loop index to fill every "even" led
do
	fill 1,FF0000,{0},1
loop 5,2
is the same as:
for (i=0; i<5; i+=2) {
	fill (1,FF0000,i,1);
}
To create an alternating pattern of colors use rotate commands in a loop. For a 300 LED string this will create alternating RED-YELLOW-GREEN-BLUE-PINK colors:
do
	rotate 1,1,1,FF0000
	rotate 1,1,1,FFFF00
	rotate 1,1,1,00FF00
	rotate 1,1,1,0000FF
	rotate 1,1,1,FF00FF
loop 60
First start the server program in TCP mode:
sudo ./ws2812svr -tcp
Then run the php code from the webserver (check on google how to setup a webserver PHP+APACHE or PHP+NGINX on your Pi):
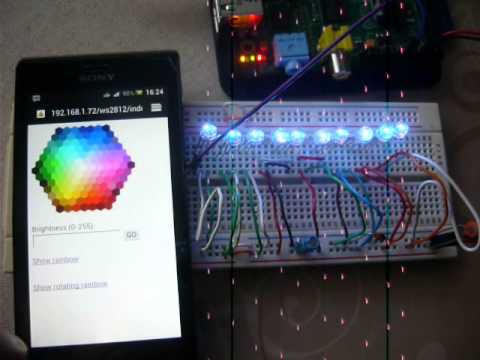
// Create a rainbow for 10 leds on channel 1:

send_to_leds("setup 1,10;init;brightness 1,32;");

function send_to_leds ($data) {
	$sock = fsockopen("127.0.0.1", 9999);
	fwrite($sock, $data);
	fclose($sock);
}# Listens for clients to connect to port 9999 (default).
sudo ./ws2812svr -tcp 9999`
# Loads commands from a text file
sudo ./ws2812svr -f text_file.txt
# Creates a device called /dev/ws281x where you can write you commands to with any other programming language (do-loop not supported here).
sudo ./ws2812svr -p /dev/ws281x
# Initializes with command setup 1,4,5 and command init it
sudo ./ws2812svr -i "setup 1,4,5; init;"
# Loads with settings from a config file
sudo ./ws2812svr -c /etc/ws2812svr.conf
To run as service run make install after compilation and adjust the config file in /etc/ws2812svr.conf
make
sudo make install
After installing service it will run by default in TCP mode on port 9999, if you want to change this you must edit the config file:
sudo nano /etc/ws2812svr.conf
Change the mode to: tcp for TCP mode (change the port= setting) file for file mode (change the file= setting for location of file) pipe for named pipe mode (change the pipe= setting for the location of the named pipe) mode must be first setting in the conf file! init setting can be used to initialize the led count and type fill color,...
mode=tcp
port=9999
file=/home/pi/test.txt
pipe=/dev/leds
init=
For a complete list and description of all supported commands see the COMMANDS.md file.
setupsetup LED string type / LED count, command must be called everytime the program is started, before init command.initMust be called after all setup commands to initialize the hardware.slave_listenListens for incoming connection from master Pi, returns when connection is lost/closed.save_statesaves current color and brightness values of a channel to a CSV file, format is.load_stateloads saved color and brightness values from CSV file. see save_state for format.resetreset all initialized led strings, ready for new setup commandsrendercommand sends the internal buffer to all ledsrotatecommand moves all color values of 1 channelrainbowcommand creates rainbows or gradient fillsfillcommand fills number of leds with a color valuedelaycommand waits for number of millisecondsbrightnesscommand changes the brightness of a single or multiple leds without changing the actual color valuefadecommand changes the brightness over timegradientcommand makes a smooth change of color or brightness level in a channelrandomcommand can create a random colorreadjpgcommand can read the pixels from a JPEG file and fill them into the LEDs of a channelreadpngcommand can read the pixels from a PNG file and fill them into the LEDs of a channelblinkcommand makes a group of leds blink between 2 given colorsrandom_fade_in_outcreates some kind of random blinking/fading leds effectcolor_changeslowly change all leds from one color to anotherchasermakes a chaser lightfly_infill entire string with given brightness level, moving leds from left/right untill all leds have brightness level or a given colorfly_outfill entire string with given brightness level, moving leds from left/right untill all leds have brightness level or a given colorprogressgenerates a progress bar effect or sets the leds brightness to a given progress valueambilightCapture video from USB HDMI capture card or Raspberry camera and generate ambilight for your TV
Support for multiple 2D connected WS2812 LED panels is added since version 5.3 2D graphics are rendered using cairo (https://www.cairographics.org), first a 1D led string channel must be initialized with total LEDs in your 2D matrix. Next you call config_2D which will initialize cairo surface / layers and attach them to the 1D led string. After this calling render on the channel will flush the cairo surface to the 1D led string and render it to the leds. Executing 1D effects on a 2D configured channel will have no effect.
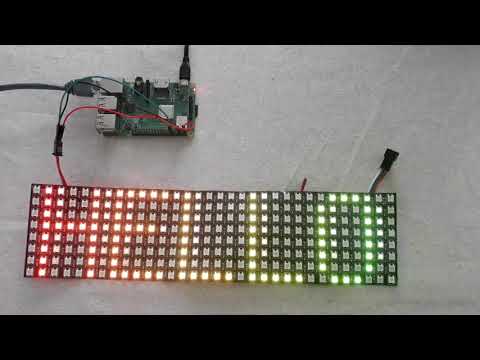
By default only the bottom layer is initialized but it's possible to initialize more layers and change the layer the 2D commands will paint to. The render command will then paint all layers to the bottom layer where the top most layer has tkhe priority. The result will be send to the 1D string and to LEDs. It's possible to load a PNG file as background on the bottom layer and paint shapes or text on top of it using a second layer. Clear text layer and paint something else without having to redraw the entire PNG and shapes.
For a complete list and description of all supported commands see the COMMANDS.md file.
config_2Dconfigure 2D LED matrix (requires compile with ENABLE_2D=1)init_layerInitializes a new 2D graphics cairo layer or change layer settingschange_layerchanges the current layer 2D cairo graphics are painted todraw_circleDraws a circle or arc (cairo_arc) on the current selected layerclsFills current layer with a colordraw_imagedraws an image filedraw_linedraws an image filedraw_sharp_linedraws an image filedraw_rectangledraws and fills a rectanglemessage_boardmakes a scrolling messageprint_textprints text, uses cairo_show_texttext_inputprints scrolling text which is send to a TCP socket listening on port_nrset_pixel_colorSets a pixel to a colorcameraCaptures frames from a v4l2 MJPEG camera (Raspberry Pi camera or HDMI USB capture card). Prints this to the 2D matrix.
Since version 6.1 it's possible to make LEDs react to audio input. This audio will be captured from an ALSA sound device (USB sound card,...). Before you can use any of the audio commands you first need to start recording, you can do so with the record_audio command. NOTE: if you want to use multiple threads each thread needs to run the record_audio command before you can use the audio effect commands.
record_audiorecords audio
First start the record command (see above), then you can use these commands to make LEDs react to audio input.
For a complete list and description of all supported commands see the COMMANDS.md file.
light_organGenerates a light organ, alle LEDs blink to the rhythm of the music.pulsesGenerates wave pattern on the LED strip (like a music driven chaser)vu_meterGenerates a volume meter effect