Microsoft Power Automate scheduled cloud flow to automatically set Automatic Replies in case of Out of Office.
- AutoffOffice
- Power Automate
- AutoffOffice flow
- Recurrence
- Current time
- Get future time
- Initialize variable (startTime)
- Initialize variable (endTime)
- Get calendar view of events (V3)
- Apply to each
- Condition (Show as Out of Office)
- Condition (Minimize startTime)
- Set variable (Set startTime with Start time)
- Condition (Maximize endTime)
- Set variable (Set endTime with End time)
- Condition (Enable Automatic Replies)
- Set up automatic replies (V2) (Schedule Automatic Replies)
- Set up automatic replies (V2) (Disable Automatic Replies)
- Finalize
- Run AutoffOffice flow
- Outlook Calendar
- Contributing
Head over to Microsoft Power Automate and click Sign in in the top right corner. This will take you to your companies sign in page.
After a successful login, you will be redirected to the Power Automate landing page. At the left hand side of the screen, you will see the Power Automate main menu.
First we need to set up a Connection so your AutoffOffice flow can interact with Office 365 Outlook.
From the main menu unfold the Data section and click the Connections button.
Press the New connection button.
In the next screen select the Office 365 Outlook connection.
Click the Create button in the pop-up.
You will be redirected to your companies login page. Allow Power Automate to interact with Outlook. Your connection is now ready to use.
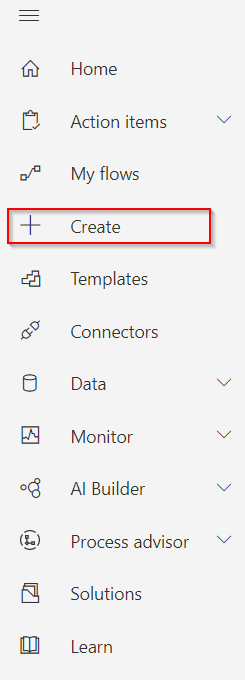
Click the Create button.
In the Start from blank section choose the Scheduled cloud flow button.
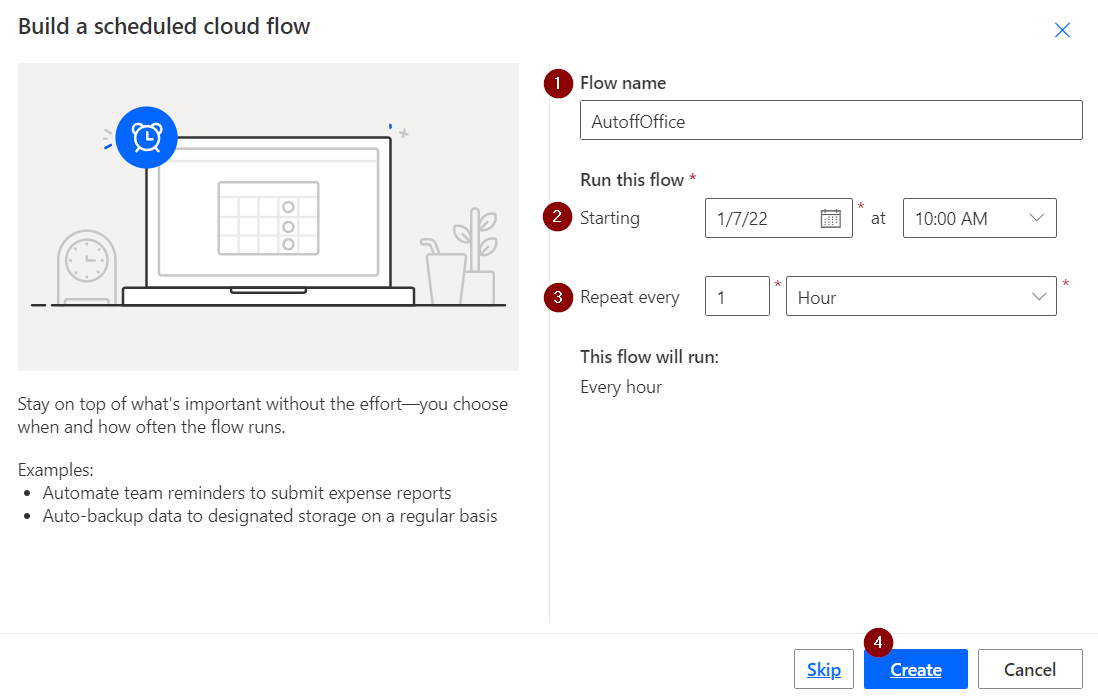
You are confronted with a pop-up to build your scheduled cloud flow:
- Give your flow a name. I chose
AutoffOffice. - Choose a starting date. The provided default is fine.
- Set the interval to
1 Hour. This will run the flow every hour. - Finally, press the
Createbutton.
At last, you can build and configure your AutoffOffice flow.
First we will take a brief look into the steps the flow will take in order to achieve its goal.
- Initialize and set variables
- Get events from your Outlook Calendar
- Check if events apply for Automatic Replies
- Enable or disable Automatic Replies based on previous checks
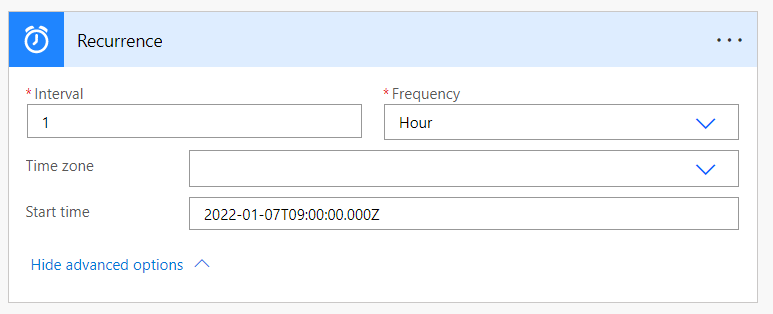
The Recurrence step is automatically created by the Build a scheduled cloud flow.
Add a new Current time step.
Add a new Get future time step and configure its interval to 2 Hours
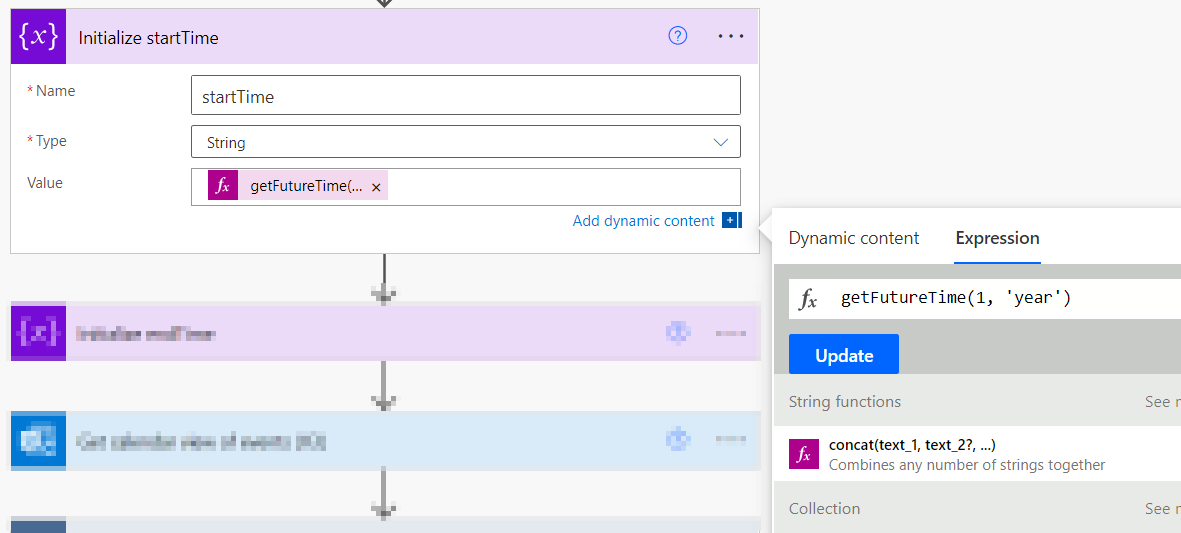
Add a new Initialize variable step. Set its name to startTime and its type to String. Initialize the variable using the getFutureTime expression from the Dynamic content section and configure the expression accordingly:
getFutureTime(1, 'year')For better readability you can rename this step to Initialize startTime.
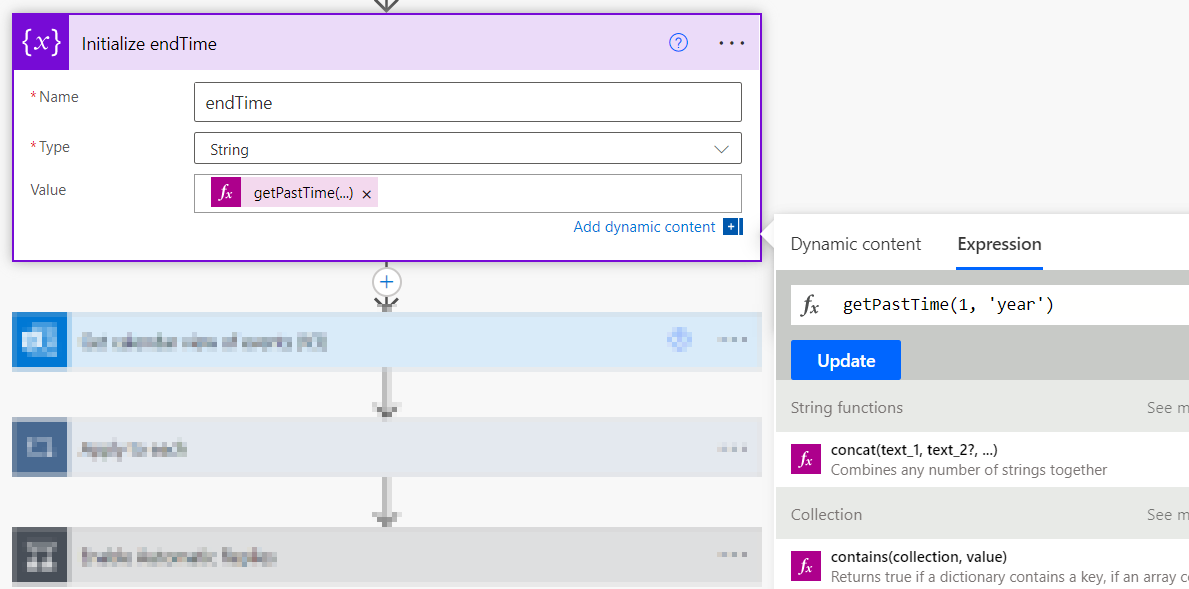
Add a new Initialize variable step. Set name to endTime and type to String. Initialize the variable using the getPastTime expression from the Dynamic content section and configure the expression accordingly:
getPastTime(1, 'year')For better readability you can rename this step to Initialize endTime.
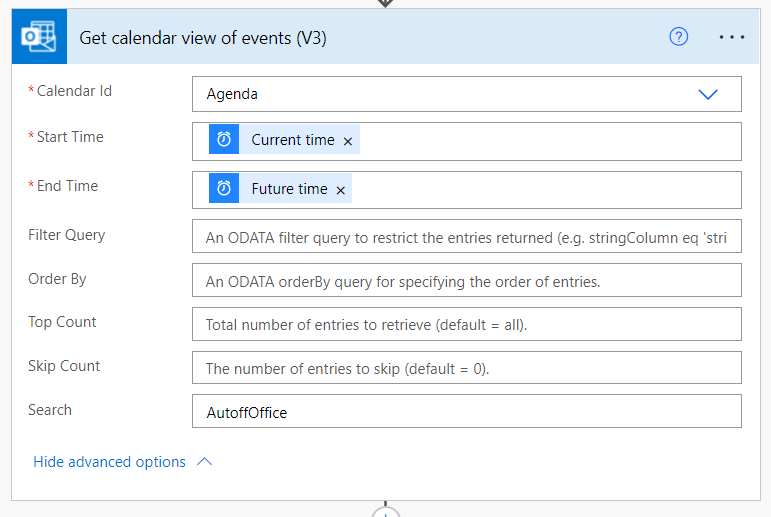
Add a new Get calendar view of events (V3) step. Select your Calendar Id and configure the Start time with the Current time variable from the Dynamic content section.
Configure the End time with the Future time variable from the Dynamic content section.
In the Search field add AutoffOffice
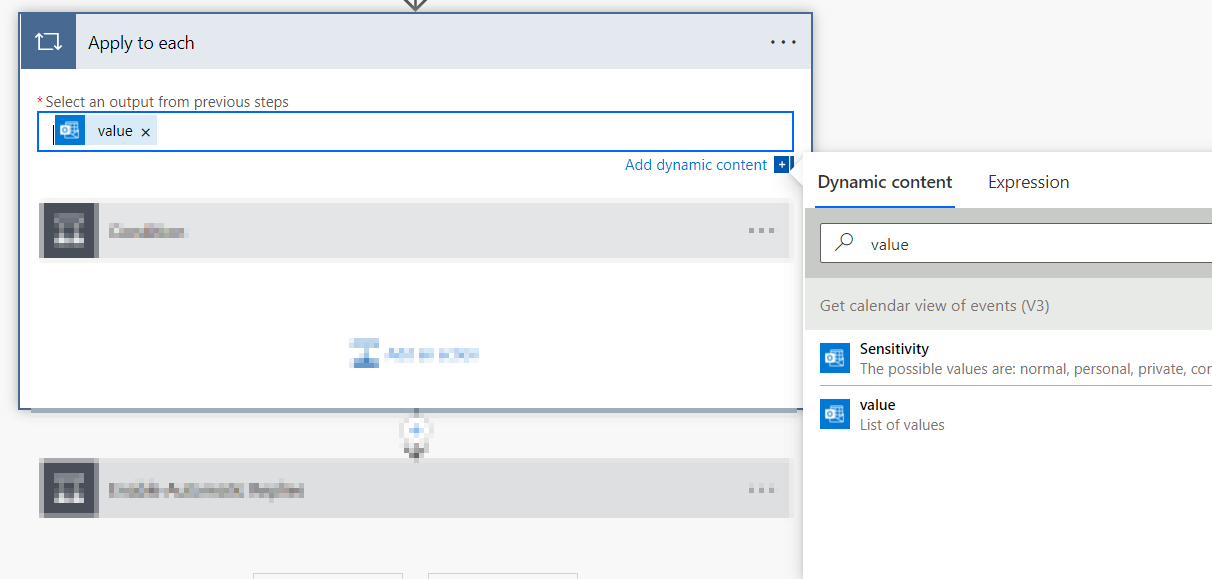
Add a Apply to each step. Select value from the Dynamic content section for the Select an output from previous steps field.
This will create and embody a loop that iterates over all the events fetched in the Get calendar view of events (V3) step.
Inside the Apply to each click the Add an action button and add select Condition. Select Show as from the Dynamic content section as value and select is equal to as comparator. Finally set oof as value for the comparison.
This will create a junction with a If yes and a If no flow. The If no can be left empty in this Condition.
For better readability you can rename this action to Show as Out of Office
Inside the If yes branch of the Show as Out of Office condition add a Condition action.
Select Start time from the Dynamic content section as value and select is less than as comparator. Finally select the startTime variable from the Dynamic content section for the comparison.
This will create a junction with a If yes and a If no flow. The If no can be left empty in this Condition.
For better readability you can rename this action to Minimize startTime
Inside the If yes branch of the Minimize startTime condition add a Set variable action. Select startTime as Name and select Start time as Value from the Dynamic content section.
For better readability you can rename this action to Set startTime with Start time
Inside the If yes branch of the Show as Out of Office condition add a Condition action.
Select End time from the Dynamic content section as value and select is greater than as comparator. Finally select the endTime variable from the Dynamic content section for the comparison.
This will create a junction with a If yes and a If no flow. The If no can be left empty in this Condition.
For better readability you can rename this action to Maximize endTime
Inside the If yes branch of the Maximize endTime condition add a Set variable action. Select endTime as Name and select End time as Value from the Dynamic content section.
For better readability you can rename this action to Set endTime with End time
Add a new Condition step. Select the startTime variable from the Dynamic content section as value and select is less than as comparator. Finally select the endTime variable from the Dynamic content section for the comparison.
This will create a junction with a If yes and a If no flow.
For better readability you can rename this step to Enable Automatic Replies
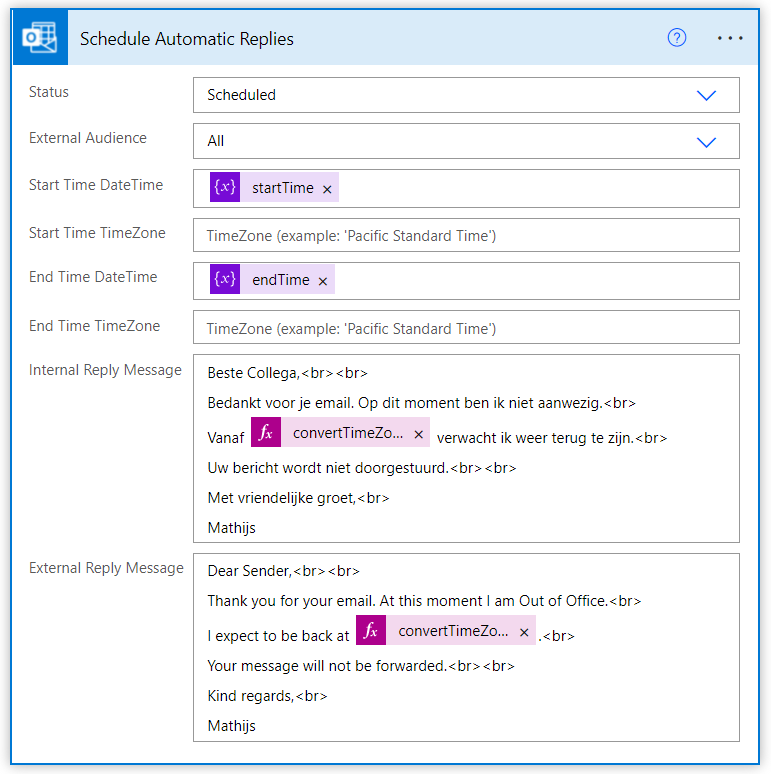
Add a new Set up automatic replies (V2) action inside the If yes branch of the Enable Automatic Replies condition.
Select Scheduled as Status and configure All for External Audience. You can configure this to your own preference.
Select the startTime variable from the Dynamic content section for the Start time DateTime.
Select the endTime variable from the Dynamic content section for the End time DateTime.
Both the Internal Reply Message and External Reply Message allow HTML to style your automatic replies. New and blank lines won't show up in the final messages.
Dynamic content and/or Expressions are also allowed within these text fields. I use the following reply messages:
Internal (in Dutch) 🇳🇱
Beste Collega,<br><br>
Bedankt voor je email. Op dit moment ben ik niet aanwezig.<br>
Vanaf @{convertTimeZone(variables('endTime'),'UTC','W. Europe Standard Time','dddd d MMMM yyyy')} verwacht ik weer terug te zijn.<br>
Uw bericht wordt niet doorgestuurd.<br><br>
Met vriendelijke groet,<br>
Mathijs
External (in English) 🇬🇧
Dear Sender,<br><br>
Thank you for your email. At this moment I am Out of Office.<br>
I expect to be back at @{convertTimeZone(variables('endTime'),'UTC','W. Europe Standard Time','dddd d MMMM yyyy')}.<br>
Your message will not be forwarded.<br><br>
Kind regards,<br>
Mathijs
As you can see an Expression is used in both the messages:
convertTimeZone(variables('endTime'),'UTC','W. Europe Standard Time','dddd d MMMM yyyy')This will convert and pretty print the endTime of your Out of Office event(s) from UTC to my time zone.
See Microsofts Default Time Zones for your own time zone.
Remark
Localization is currently and unfortunately not available in Power Automate. Therefore the day and month will be in English.
For better readability you can rename this action to Schedule Automatic Replies
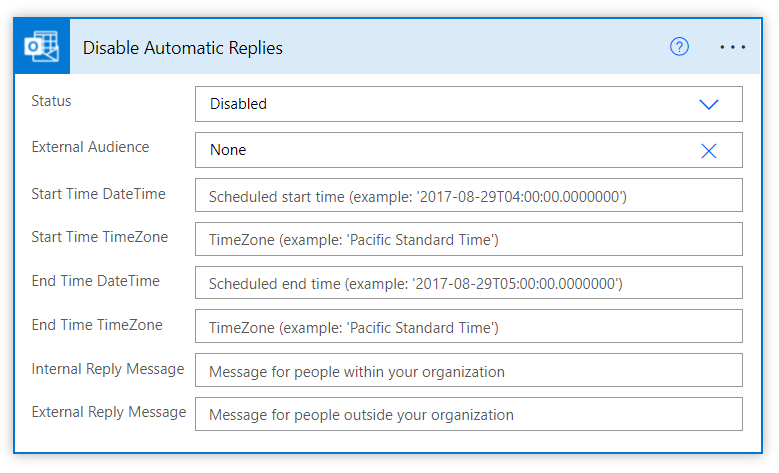
Add a new Set up automatic replies (V2) action inside the If no branch of the Enable Automatic Replies condition.
Select Disabled as Status and configure None for External Audience. Leave all the other text fields empty.
For better readability you can rename this action to Disable Automatic Replies
There is a neat Flow checker that will give you an early warning or error in case of faults in your flow.
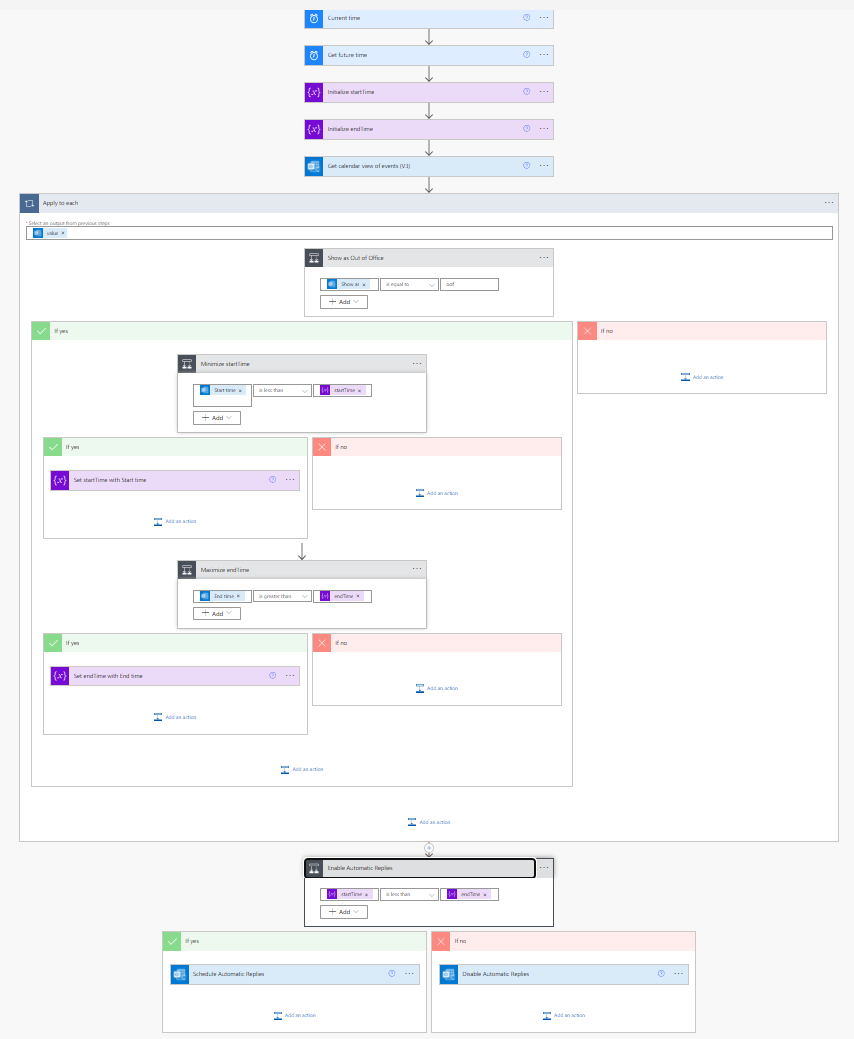
Finally you'll end up with a flow that looks something like this.
After you saved your AutoffOffice flow, you can Run it for the first time. This will test whether all variables are initialized and the steps are configured correctly.
Click the Test flask in the top right corner and select Manually as the Test Flow. The Save & Test or Test button will light up. Click it and press the Run flow in the next screen. Your flow will now run.
Afterwards you can review and debug the steps, data and conditions on the Flow Runs Page. This will also show historical runs, both scheduled and manual runs.
Finally we can add events (Appointments) to our Outlook Calendar for the AutoffOffice flow to pick up.
In order for the AutoffOffice flow to enable Automatic replies during your absence make sure that Appointments meet the following two criteria:
Show Asmust be set to "Out of Office". This is configured in step Condition (Show as Out of Office).- Either the
subject(Title) orbodyof the Appointment must contain the wordAutoffOffice. This is configured in step Get calendar view of events (V3) in theSearchfield.
When these two criteria are met, the AutoffOffice flow will schedule an Automatic Reply during the length of the Appointment.
In case there are multiple and/or overlapping Appointments within the given time frame, the earliest Start Time and latest End Time will be used when scheduling the Automatic Replies.
This Microsoft Power Automate flow is a "Works for me" solution to provide automatic scheduling of dynamic Automatic Replies in case of Out of Office.
As of June 29th 2023 this repository is Archived, so contributing is not possible anymore.
