Conversation Sample Application


This Node.js application demonstrates the Conversation service in a simple chat interface simulating a cognitive car dashboard.
To see a running instance of the application demo, click here.
For more information about the Conversation service, see the detailed documentation.
Deploying the application
If you want to experiment with modifying the application or use it as a basis for building your own application, you need to deploy it in your own environment. You can then explore the files, make changes, and see how those changes affect the running application. After making modifications, you can deploy your modified version of the application to the Bluemix cloud.
Before you begin
-
You must have a Bluemix account, and your account must have available space for at least 1 application and 1 service. To register for a Bluemix account, go to https://console.ng.bluemix.net/registration/. Your Bluemix console shows your available space.
-
You must have the following prerequisites installed:
- the Node.js runtime (including the npm package manager)
- the Cloud Foundry command-line client
Getting the files
-
Download the application code to your computer. You can do this in either of the following ways:
-
Download the .zip file of the GitHub repository and extract the files to a local directory
-
Use GitHub to clone the repository locally
-
-
At the command line, go to the local project directory (
conversation-simple).
Setting up the Conversation service
-
Make sure you have logged in to your Bluemix account using Cloud Foundry. For more information, see the Watson Developer Cloud documentation.
-
Create an instance of the Conversation service in the IBM cloud:
cf create-service Conversation <service_plan> <service_instance>
For example:
cf create-service Conversation free conversation-simple-demo-test1
-
Create a service key:
cf create-service-key <service_instance> <service_key>
For example:
cf create-service-key conversation-simple-demo-test1 conversation-simple-demo-test1-key1
Importing the Conversation workspace
-
In your browser, navigate to your Bluemix console.
-
From the All Items tab, click the newly created Conversation service in the Services list.
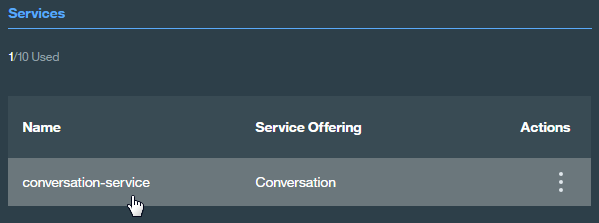
The Service Details page opens.
-
Click the Launch tool button.
The Conversation service tool opens.
-
Click Import. When prompted, specify the location of the workspace JSON file in your local copy of the application project:
<project_root>/training/car_workspace.json -
Select Everything (Intents, Entities, and Dialog) and then click Import. The car dashboard workspace is created.

Configuring the application environmnet
-
Copy the
.env.examplefile to a new.envfile. Open this file in a text editor. -
Retrieve the credentials from the service key:
cf service-key <service_instance> <service_key>
For example:
cf service-key conversation-simple-demo-test1 conversation-simple-demo-test1-key1
The output from this command is a JSON object, as in this example:
{
  "password": "87iT7aqpvU7l",
  "url": "https://gateway.watsonplatform.net/conversation/api",
  "username": "ca2905e6-7b5d-4408-9192-e4d54d83e604"
}
-
In the JSON output, find the values for the
passwordandusernamekeys. Paste these values (not including the quotation marks) into theCONVERSATION_PASSWORDandCONVERSATION_USERNAMEvariables in the.envfile:CONVERSATION_USERNAME=ca2905e6-7b5d-4408-9192-e4d54d83e604 CONVERSATION_PASSWORD=87iT7aqpvU7lLeave the
.envfile open in your text editor. -
In your Bluemix console, open the Conversation service instance where you imported the workspace.
-
Click the menu icon in the upper right corner of the workspace tile, and then select View details.
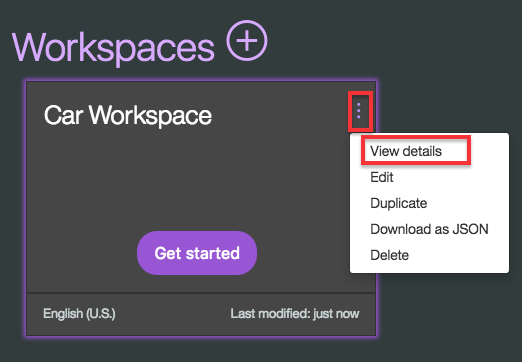
The tile shows the workspace details.
-
Click the
 icon to copy the workspace ID to the clipboard.
 -
On the local system, paste the workspace ID into the WORKSPACE_ID variable in the
.envfile. Save and close the file. -
Install the demo application package into the local Node.js runtime environment:
npm install
-
Start the application:
npm start

The application is now deployed and running on the local system. Go to http://localhost:3000 in your browser to try it out.
Optional: Deploying from the local system to Bluemix
If you want to subsequently deploy your local version of the application to the Bluemix cloud, you can use Cloud Foundry to do so.
-
In the project root directory, open the
manifest.ymlfile in a text editor. -
Specify the following values in the file:
-
In the
applicationssection of themanifest.ymlfile, change thenamevalue to a unique name for your version of the demo application. -
In the
servicessection, specify the name of the Conversation service instance you created for the demo application. If you do not remember the service name, use thecf servicescommand to list all services you have created. -
In the
envsection, add theWORKSPACE_IDenvironment variable, specifying the value from the.envfile.
The following example shows a modified
manifest.ymlfile:--- declared-services: conversation-service: label: conversation plan: free applications: - name: conversation-simple-app-test1 command: npm start path: . memory: 256M instances: 1 services: - conversation-simple-demo-test1 env: NPM_CONFIG_PRODUCTION: false WORKSPACE_ID: fdeab5e4-0ebe-4183-8d10-6e5557a6d842
-
-
Save and close the
manifest.ymlfile. -
Push the application to Bluemix:
cf push
When the command finishes processing, your application is deployed and running on Bluemix. You can access it using the URL specified in the command output.
What to do next
After you have the application installed and running, experiment with it to see how it responds to your input.
The application interface is designed and trained for chatting with a cognitive car. The chat interface is on the left, and the JSON that the JavaScript code receives from the server is on the right. Your questions and commands are interpreted using a small set of sample data trained with the following intents:
turn_on
turn_off
turn_up
turn_down
traffic_update
locate_amenity
weather
phone
capabilities
greetings
goodbyes
To see details of how these intents are defined, including sample input for each intent, open the workspace in the Conversation tooling on Bluemix, and go to the Intents tab. (For more information about intents, see the Conversation service documentation.)
If you type a request such as music on or I want to turn on the windshield wipers, the system understands your intent and responds accordingly. You can see the details of how your input was understood by examining the JSON data in the Watson understands section on the right side. For example, if you type Turn on some music, the JSON data shows that the system understood the turn_on intent with a high level of confidence, along with the appliance entity with a value of music.
Modifying the application
After you have the application deployed and running, you can explore the source files and make changes. Try the following:
-
Modify the .js files to change the application logic.
-
Modify the .html file to change the appearance of the application page.
-
Use the Conversation tool to train the service for new intents, or to modify the dialog flow. For more information, see the Conversation service documentation.
Troubleshooting
If you encounter a problem, you can check the logs for more information. To see the logs, run the cf logs command:
cf logs <application-name> --recentLicense
This sample code is licensed under Apache 2.0. Full license text is available in LICENSE.
Contributing
See CONTRIBUTING.
Open Source @ IBM
Find more open source projects on the IBM Github Page.