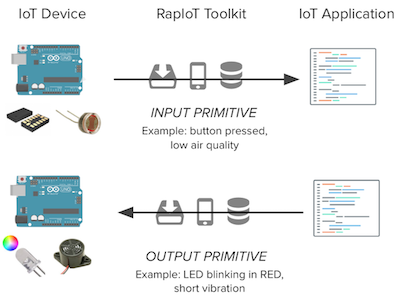
RapIoT is a software platform for simple programming of ecologies of IoT devices and services. It builds on top of IoT-enabling technologies such as MQTT, CoAP and BTLE.
RapIoT is part of Tiles, an inventor toolbox to support the design and making of interactive objects for learning and play. For more information tilestoolkit.io
For furter references and details please read: S.Mora, F. Gianni and M.Divitini. “RapIoT Toolkit: Rapid Prototyping of Collaborative Internet of Things Applications”. In proceedings of the International Conference on Collaboration Technologies and Systems (CTS), 2016. preprint
RapIoT is released under Apache 2.0 license.
RapIoT enables the definition, implementation and manipulation of data type primitives. RapIoT's primitives allow to abstract low-level implemenetation details and provide a loosely-coupled interface between different achitectural layers. Data types primitives facilitate the development of IoT architectures in mulpliple ways:
-
Act as a loosely coupled interface between devices and applications, allowing devices to serve different applications without need for reprogramming their firmware
-
Allow for centralising the application login in the cloud layer, offering a platform as a service and simplifying the development of systems that make use of ecologies of devices distribuited to multiple users/environments
-
Facilitate collaboration among developers working on different IoT layers by providing simple constructs to be used to describe the data exchanged between embedded devices and applications
-
Allow non-experts to think in terms of high-level abstractions without dealing with hardware complexities. For example data from an accelerometer describing an object's manipulation can be provided as “isShaken, isRotatedClockwise, isTouched” programming primitives rather than raw accelerometer data.
Example of data primitives are:
Input primitives a discrete information sensed by an IoT device; for example a data-point captured by a sensor or a manipulation performed via a user interface
Output primitves an action that can be performed by the IoT device via output features such as actuators or displays, for example a motor spinning or a LED (Light Emitting Diode) blinking
RapIoT composed by:
- RapEmbedded: an Arduino library to support definition and implementation of input and output primitives on embedded hardware devices;
- RapMobile: a cross-platform mobile app that acts as internet gateway and allows to discover and configure IoT devices;
- RapCloud: a cloud service, real-time APIs and javascript library that support the development of applications that interact with IoT devices.
TBD
RapMobile is a software application for smartphones that wirelessly connects IoT devices to your application via RapCloud. This is required for the interaction primitives to be captured and exchanged between the Square modules and your application.
To setup RapMobile on your smartphone (Android or iPhone) follow these instructions.
RapCloud provides a centralized, software interface to interact with ecologies Arduino-based IoT devices. It allows developers that are not specialized in writing code for embedded devices to create applications using simple javascript instructions. Functionalities provided by multiple devices can be programmed from routines running in a centralized cloud environment; without requiring physical access to the hardware modules.
A RapIoT test server is provided at http://138.68.144.206 with administrator interface at http://admin.tilestoolkit.io If you want to setup your own RapCloud server follow these instructions
TBD
Build your IoT device with Arduino and RapEmbedded. As an alternative you can use RapIoT-ready IoT devices called Tiles Squares.
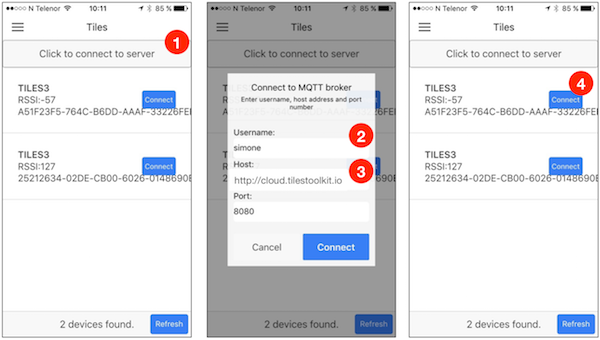
Open the RapMobile app on your smartphone. This is how it looks like.
- Tap on “Click to connect to server”
- Type in your username. If you don’t have one it will be automatically created. OPTIONAL: If you have a custom RapIoT server type the address here, otherwise leave the default server.
- Connect to one or more square modules
- Leave the Tiles connect app open on your phone
Write some code in javascript usint the provided libray TBD.
v1.0: 2016
v2.0: 2017
-
Run
mongod.exe. It should be located inside thebinfolder of where MongoDB is installed (typically../MongoDB/Server/[version]/bin/). This should initialize the database and listen for connections on the default port27017. -
Open a new console and navigate to the project directory and start the API server:
cd "CLOUD"
cd "v0.0" //use 'v1.0' or 'v2.0'
npm start
This will run Ponte with three servers: one for MQTT, one for HTTP, and one for CoAP, listening on ports 1883, 8080, and 5683, respectively.
The REST API can be used to list the Tiles registered to a user, and also be used to send real-time commands to the Tiles. To receive real-time events from the Tiles devices to your server see the Webhooks section.
Example command:
Activating the LED light: {"activation": "on"}
| Method | Route | Description |
|---|---|---|
GET |
/users/[userId]/tiles | List Tiles registered with this user |
GET |
/evt/[userId]/[tileId] | Get the most recent event sent from the Tile |
PUT |
/evt/[userId]/[tileId] | Simulate an event being sent from the Tile |
GET |
/cmd/[userId]/[tileId] | Get the most recent command sent to the Tile |
PUT |
/cmd/[userId]/[tileId] | Send a command to the Tile |
The REST API can also be used to manage webhooks. Register a webhook by performing a POST request to /webhooks/[userId]/[tileId] with a JSON message in the following format: {"postUrl": "[postUrl]"}. The same format is used for updating a webhook.
Overview of API methods for managing webhooks:
| Method | Route | Description |
|---|---|---|
GET |
/webhooks | List all webhooks |
GET |
/webhooks/[userId] | List webhooks registered with this user |
GET |
/webhooks/[userId]/[tileId] | List webhooks registered with this user and Tile |
POST |
/webhooks/[userId]/[tileId] | Create (register) a webhook |
GET |
/webhooks/[userId]/[tileId]/[webhookId] | Get a webhook |
PUT |
/webhooks/[userId]/[tileId]/[webhookId] | Update a webhook |
DELETE |
/webhooks/[userId]/[tileId]/[webhookId] | Delete (unregister) a webhook |
The server also has a simple web interface for managing webhooks.
Instructions for registering a webhook:
- Navigate to your Tile administration page:
[domain]:3000/#/users/[userId] - Click on the ID of the Tile you want to register a webhook for.
- Enter the URL for callback in the input field under 'Register a new webhook'.
- Click 'Register'.
The body of the POST request will be a JSON message, and the request will therefore have a Content-Type: application/json header field. Based on the type of event that triggered the webhook, the JSON message will have one of the following formats:
-
Tile event message:
{ "tileId":"[tileId]", "userId":"[userId]", "state":{ "type":"[type]", "event":"[event]" } } -
Tile connected/disconnected:
{
	"tileId":"[tileId]",
	"userId":"[userId]",
  "active":[active]
}
Possible values:
| Field | Type | Value |
|---|---|---|
| active | Boolean | true / false |
| state.type | String | 'button_event' |
| state.event | String | 'pressed' / 'released' |


