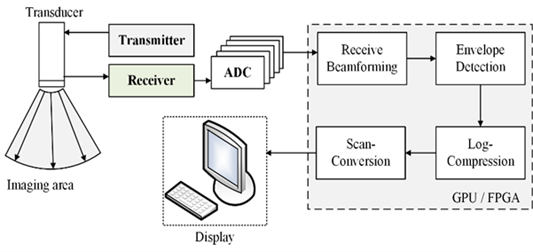
This project contains ultrasound software beamforming samples, which process ultrasound raw data into images human readable. The project use Intel oneAPI to do computation acceleration with Intel GPU and FPGA.
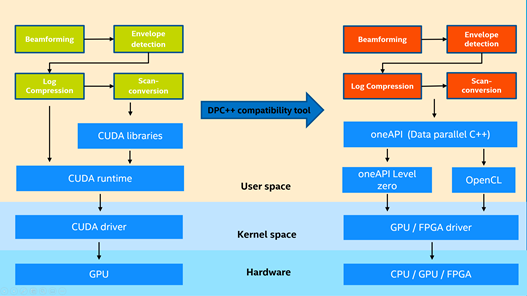
This project is focusing on the kernel functions of the workflow of ultrasound beamforming process, including Receive Beamforming, Envelope Detection, Log Compression and Scan Conversion. The kernel functions are developed and rewritten based on Supra(https://github.com/IFL-CAMP/supra). We have released a project for migrating origial Supra CUDA code to standard DPC++. For more details, please refer to: https://github.com/intel/supra-on-oneapi.
The purpose of this project is for extracting and rewriting the kernel code for easy utilization and running on Intel GPU and FPGA devices.
The preferred (and tested) development host platform is PC with Ubuntu 18.04 & 20.04. The PC could have an Intel processor with integrated graphics, a discrete graphics card, or an Intel FPGA. Also you could test the project on Intel Devcloud.
The Intel DevCloud is a development sandbox to learn about and test programming cross architecture applications with OpenVino, High Level Design (HLD) tools – oneAPI, OpenCL, HLS – and RTL. Devcloud for OneAPI can be used for running and testing this project and you could choose to use Intel FPGA or Intel GPU. Please refer to https://devcloud.intel.com/oneapi to view the details of how to use Devcloud.
If you have your own Intel acceleration devices including Intel CPU with integrated GPU, Intel discrete GPU and Intel FPGA. Run the project on your own development machine is an option. If you do not have any acceleration devices, you could also use Intel CPU as a FPGA emulator to view beamforming results.
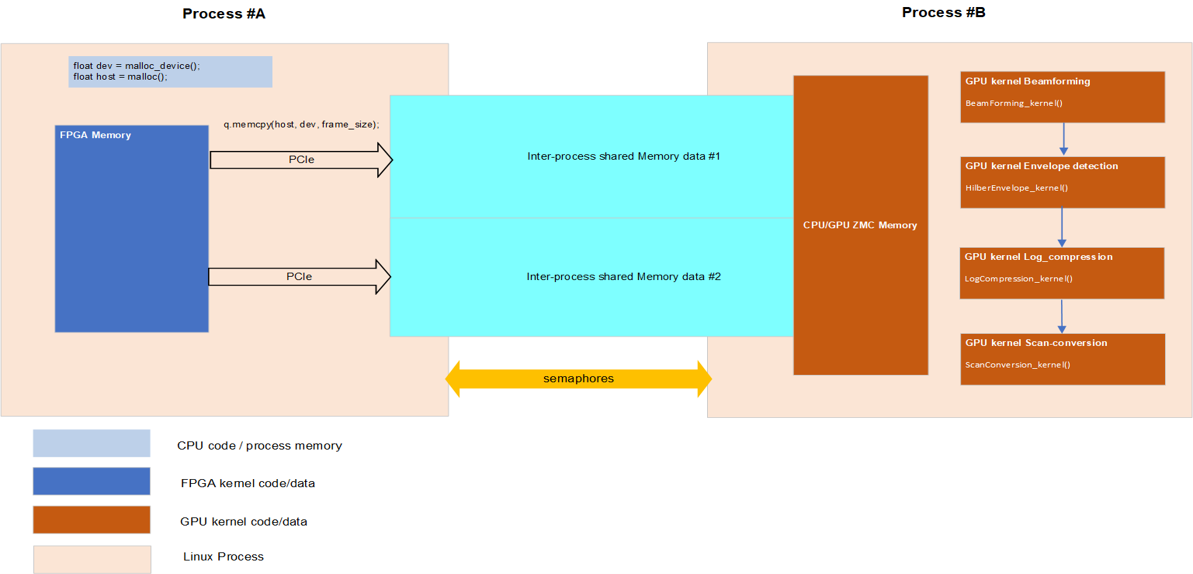
This project provides 3 samples to test software beamforming. The first one is for Intel GPU, including integrated GPUs and discrete GPUs. The second sample is using Intel FPGA as data producer to provide data for GPU. The kernel code for GPU is same as the fisrt sample. The third sample is for Intel FPGA. You could choose to run the kernels one by one or make them pipelined to reach better performance.
| Sample | Acceleration Device |
|---|---|
| 1st | Intel® i7-8700K CPU with Intel(R) UHD Graphics 630 |
| /Intel® i7-1165G7 CPU with Intel® Iris® Xe Graphics | |
| 2nd | Intel® Programmable Acceleration Card with Intel Arria® 10 GX FPGA (Data Producer) |
| Intel® i7-8700K CPU with Intel(R) UHD Graphics 630 | |
| /Intel® i7-1165G7 CPU with Intel® Iris® Xe Graphics | |
| 3nd | Intel® Programmable Acceleration Card with Intel Arria® 10 GX FPGA |
$ sudo apt-get install cmake cmake-gui libtbb-dev git build-essential clang
Please refer to Intel(R) oneAPI installation guide: https://software.intel.com/content/www/us/en/develop/articles/installation-guide-for-intel-oneapi-toolkits.html.
If you are using Intel FPGA, choose the version following your FPGA model type to add FPGA additional package, and refer to https://www.intel.com/content/www/us/en/developer/articles/release-notes/intel-oneapi-dpcpp-fpga-add-on-release-notes.html.
Download the source code from GitHub.
$ git clone https://github.com/intel/ oneAPI-Ultrasound-Beamforming-Library.git
After downloading source code, we could start compile it. Initialize one API environment:
$ source <oneapi root dir>/setvars.sh
Default:
$ source /opt/intel/inteloneapi/setvars.sh
Enter the project folder.
$ cd oneAPI-Ultrasound-Beamforming-Library/gpu
Create a directory build at the gpu directory:
$ mkdir build

$ cd build
In this repo, we just call the oneAPI feature to avoid moving data back and forth between host and device as ZMC(Zero memory copy, just an abbreviation to describe the feature in this repo). The detail of the feature could be found in https://www.intel.com/content/www/us/en/develop/documentation/oneapi-gpu-optimization-guide/top/memory/host-device-memory.html. And the feature is only used for Intel integrated GPU to make no memory copy operation between host and Intel integrated GPU. If you want to test the GPU performance, select whether to use ZMC feature (set to use ZMC by default), run cmake using the command:
$ cmake .. -DUSE_ZMC=ON/OFF
Then run make using the command:
$ make -j4
Note: ZMC feature can be only used with Intel integrated GPU. Please switch USE_ZMC = OFF if using Intel discrete graphics card.

Download data to build directory.
$ mkdir data
$ cd data
$ wget https://f000.backblazeb2.com/file/supra-sample-data/mockData_linearProbe.zip
$ unzip mockData_linearProbe.zip
$ cd ..
If just test the GPU performance for easy testing, run the command:
$ src/easy_app data/linearProbe_IPCAI_128-2.mock data/linearProbe_IPCAI_128-2_0.raw
Note: If you run it on Intel discrete GPU, you need to run export IGC_EnableDPEmulation=1 before running above command.
Comsuming time of each kernel's calculation could be seen in the terminal.
Visual *.png results are stored in res directory. You could also specify the directory to store result by running the command:
$ src/easy_app data/linearProbe_IPCAI_128-2.mock data/linearProbe_IPCAI_128-2_0.raw <directory to store results>
In real application scenarios, FPGA is often used to connect the ultrasound probe to collect data. So we simulated using FPGA as a data producer to provide data for GPU. Of course, a simple application is also provided to test software beamforming on the GPU in Chapter 3. We have tested and valided data producer on Intel® Programmable Acceleration Card with Intel Arria® 10 GX FPGA.
Enter the project folder.
$ cd oneAPI-Ultrasound-Beamforming-Library/gpu
Create a directory build at the gpu directory:
$ mkdir build

$ cd build
In this repo, we just call the oneAPI feature to avoid moving data back and forth between host and device as ZMC(Zero memory copy, just an abbreviation to describe the feature in this repo). The detail of the feature could be found in https://www.intel.com/content/www/us/en/develop/documentation/oneapi-gpu-optimization-guide/top/memory/host-device-memory.html. And the feature is only used for Intel integrated GPU to make no memory copy operation between host and Intel integrated GPU. If you want to test the GPU performance, select whether to use ZMC feature (set to use ZMC by default), run cmake using the command:
$ cmake .. -DUSE_ZMC=ON/OFF
Then run make using the command:
$ make -j4
If you want to compile FPGA binary or using FPGA emulator to emulate data producer to send data, run cmake using the command:
$ cmake .. -DUSE_ZMC=ON/OFF -DCOMPILE_FPGA=ON
then run make using the command if a new FPGA binary is needed to be compiled:
$ make fpga -j4
If you want to use FPGA emulator, use the command:
$ make fpga_emu -j4
Note: ZMC feature can be only used with Intel integrated GPU. Please switch USE_ZMC = OFF if using Intel discrete graphics card.

Download data to build directory.
$ mkdir data
$ cd data
$ wget https://f000.backblazeb2.com/file/supra-sample-data/mockData_linearProbe.zip
$ unzip mockData_linearProbe.zip
$ cd ..
If just test the GPU performance for easy testing, run the command:
$ src/easy_app data/linearProbe_IPCAI_128-2.mock data/linearProbe_IPCAI_128-2_0.raw
Note: (if you run it on Intel discrete GPU, you need to run export IGC_EnableDPEmulation=1 before running above command)
If you compile an FPGA emulator version to test, run the command:
$ src/fpga_producer.fpga_emu data/linearProbe_IPCAI_128-2.mock data/linearProbe_IPCAI_128-2_0.raw
If you compile an FPGA hardware version to test, run the command:
$ src/fpga_producer.fpga data/linearProbe_IPCAI_128-2.mock data/linearProbe_IPCAI_128-2_0.raw
And for the comsumer app, use the command in another terminal:
$ src/ultrasound data/linearProbe_IPCAI_128-2.mock data/linearProbe_IPCAI_128-2_0.raw
Comsuming time of each kernel's calculation could be seen in the terminal.
Visual *.png results are stored in res directory. You could also specify the directory to store result by running the command:
$ src/ultrasound data/linearProbe_IPCAI_128-2.mock data/linearProbe_IPCAI_128-2_0.raw <directory to store results>
Ultrasound Beamforming Standalone Kernels on Intel FPGA code has been tested and valided on Intel® Programmable Acceleration Card with Intel Arria® 10 GX FPGA.
Enter the project folder.
$ cd oneAPI-Ultrasound-Beamforming-Library/fpga/standalone
Create a directory build at the standalone directory:
$ mkdir build
$ cd build
To compile for the Intel® PAC with Intel Arria® 10 GX FPGA, run cmake using the command :
$ cmake ..
Alternatively, to compile for the Intel® FPGA PAC D5005 (with Intel Stratix® 10 SX), run cmake using the command:
cmake .. -DFPGA_BOARD=intel_s10sx_pac:pac_s10
You can also compile for a custom FPGA platform. Ensure that the board support package is installed on your system. Then run cmake using the command:
$ cmake .. -DFPGA_BOARD=<board-support-package>:<board-variant>
Compile the design through the generated Makefile. The following build targets are provided, matching the recommended development flow:
Compile for emulation (compiles quickly, targets emulated FPGA device):
$ make emu
Generate the optimization report:
$ make report
Compile for FPGA hardware (takes longer to compile, targets FPGA device):
$ make fpga
Download data to build directory.
$ mkdir data
$ cd data
$ wget https://f000.backblazeb2.com/file/supra-sample-data/mockData_linearProbe.zip
$ unzip mockData_linearProbe.zip
$ cd ..
If you compile an FPGA emulator version to test, run the command:
$ ./ultrasound.fpga_emu data/linearProbe_IPCAI_128-2.mock data/linearProbe_IPCAI_128-2_0.raw
If you compile an FPGA hardware version to test, run the command:
$ ./ultrasound.fpga data/linearProbe_IPCAI_128-2.mock data/linearProbe_IPCAI_128-2_0.raw
Comsuming time of each kernel's calculation could be seen in the terminal.
Visual *.png results are stored in res directory. You could also specify the directory to store result by running the command:
$ ./ultrasound.fpga data/linearProbe_IPCAI_128-2.mock data/linearProbe_IPCAI_128-2_0.raw <directory to store results>
or
$ ./ultrasound.fpga_emu data/linearProbe_IPCAI_128-2.mock data/linearProbe_IPCAI_128-2_0.raw <directory to store results>
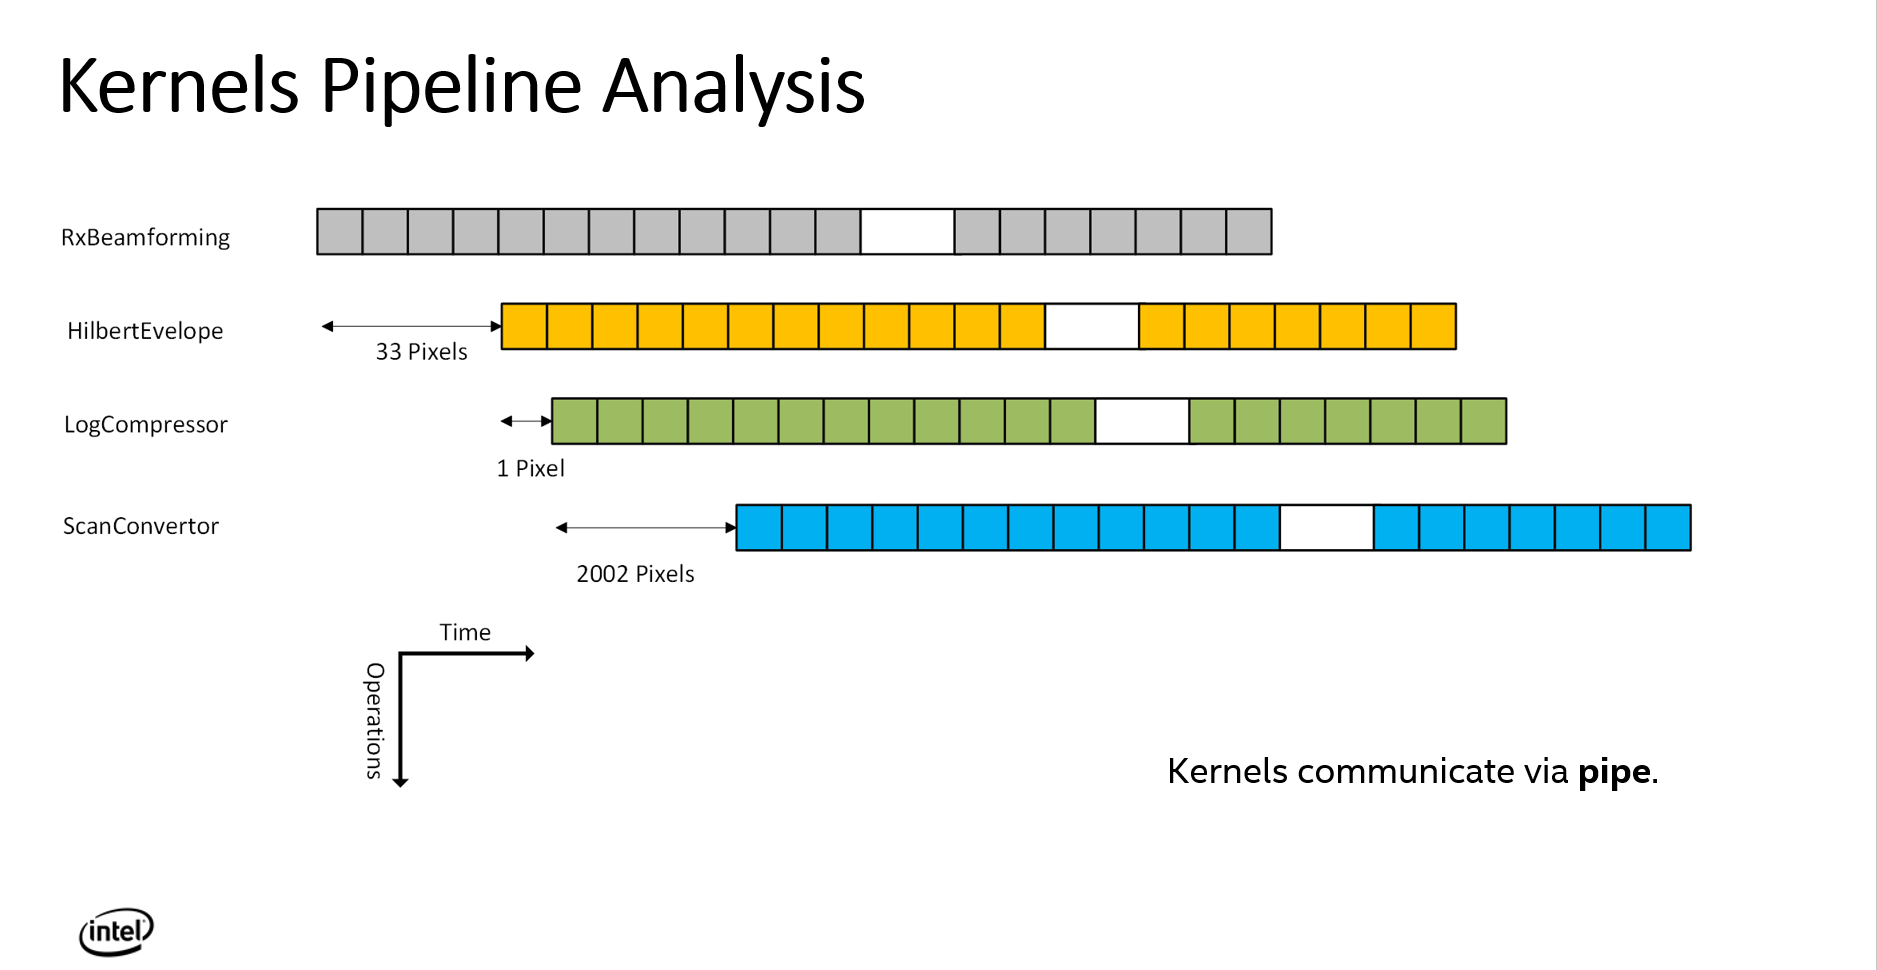
Ultrasound Beamforming Standalone Kernels on Intel FPGA code has been tested and valided on Intel® Programmable Acceleration Card with Intel Arria® 10 GX FPGA. Pipelining the kernels can improve the efficiency and performance of the beamforming algorithm on FPGAs. You can refer to the link to learn more about oneAPI dpcpp optimization on Intel FPGA. https://software.intel.com/content/dam/develop/external/us/en/documents/oneapi-dpcpp-fpga-optimization-guide.pdf
Enter the project folder.
$ cd oneAPI-Ultrasound-Beamforming-Library/fpga/pipeline
Create a directory build at the pipeline directory:
$ mkdir build
$ cd build
To compile for the Intel® PAC with Intel Arria® 10 GX FPGA, run cmake using the command. If you want to store the results of each kernel(storing by default and you can choose not to set this option).
$ cmake .. -DSTORE=ON
Or
$ cmake .. -DSTORE=OFF
Alternatively, to compile for the Intel® FPGA PAC D5005 (with Intel Stratix® 10 SX), run cmake using the command:
$ cmake .. -DFPGA_BOARD=intel_s10sx_pac:pac_s10 -DSTORE=ON/OFF
You can also compile for a custom FPGA platform. Ensure that the board support package is installed on your system. Then run cmake using the command:
$ cmake .. -DFPGA_BOARD=<board-support-package>:<board-variant> -DSTORE=ON/OFF
You can choose FAKEDATA building option on/off to valid the performance without DDR bandwith limit. By default, the program will use real raw data to do calculations. If set -DFAKEDATA=ON, there will not be DDR bandwidth limit to decrease the throughput of the pipelined program and fake input data will be used. So if using FAKEDATA, run cmake using the command:
$ cmake .. -DFAKEDATA=ON -DSTORE=OFF/ON
Compile the design through the generated Makefile. The following build targets are provided, matching the recommended development flow:
Compile for emulation (compiles quickly, targets emulated FPGA device):
$ make emu
Generate the optimization report:
$ make report
Compile for FPGA hardware (takes longer to compile, targets FPGA device):
$ make fpga
Download data to build directory.
$ mkdir data

$ cd data

$ wget https://f000.backblazeb2.com/file/supra-sample-data/mockData_linearProbe.zip

$ unzip mockData_linearProbe.zip

$ cd ..
If you compile an FPGA emulator version to test, run the command:
$ ./ultrasound.fpga_emu data/linearProbe_IPCAI_128-2.mock data/linearProbe_IPCAI_128-2_0.raw
If you compile an FPGA hardware version to test, run the command:
$ ./ultrasound.fpga data/linearProbe_IPCAI_128-2.mock data/linearProbe_IPCAI_128-2_0.raw
Comsuming time of each kernel's calculation could be seen in the terminal.
Visual *.png results are stored in res directory. You could also specify the directory to store result by running the command:
$ ./ultrasound.fpga data/linearProbe_IPCAI_128-2.mock data/linearProbe_IPCAI_128-2_0.raw <directory to store results>
or
$ ./ultrasound.fpga_emu data/linearProbe_IPCAI_128-2.mock data/linearProbe_IPCAI_128-2_0.raw <directory to store results>


