This is a branch for v1.0. If you want an v0.1.2 that works with iotex-core@0.4.2 please visit here.

iotex-explorer is a frontend website for iotex-core blockchain.
Check our site hosted at https://iotexscan.io.
Or deploy your own instance on Heroku.

git clone git@github.com:iotexproject/iotex-explorer.gitThis is intended for *nix users. If you use Windows, go to Run on Windows. Let's first prepare the environment.
nvm use 10.15.0
npm install

# prepare environment variable
cp ./.env.tmpl ./.env
Please specify your iotex-core endpoint with the envroment variable IOTEX_CORE in the .env file.
To run your project in development mode, run:
npm run watchThe development site will be available at http://localhost:4004.
It's sometimes useful to run a project in production mode, for example, to check bundle size or to debug a production-only issue. To run your project in production mode locally, run:
npm run build-production
NODE_ENV=production npm run startnpm run test: test the whole project and generate a test coveragenpm run ava ./path/to/test-file.js: run a specific test filenpm run build: build source code fromsrctodistnpm run lint: run the linternpm run kill: kill the node server occupying the port 4004.
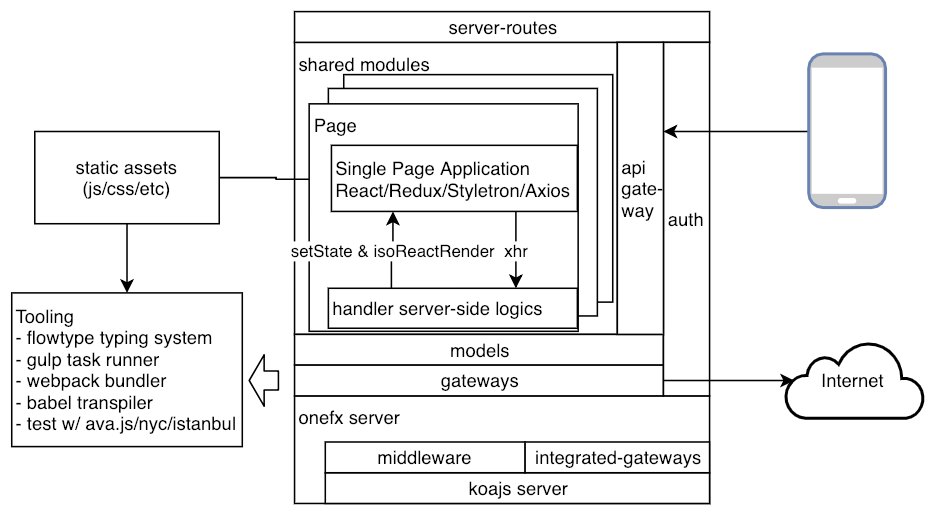
.
├── README.md
├── ava.config.js           // ava test util configuration
├── babel.config.js         // babel compiler/transpiler configuration
├── config                  // project configuration
│   ├── default.js          // base config to be extended in all env
│   ├── development.js      // config in NODE_ENV=development
│   ├── production.js       // config in NODE_ENV=production
│   └── test.js             // config in NODE_ENV=test
├── coverage                // test coverage
├── dist                    // destination for src build result
├── gulpfile.babel.js       // gulp task runner config
├── package.json
├── renovate.json           // renovate bot to automate dependency bumps
├── server.ts               // project entry
├── src                               // source code
│   ├── client                        // browser-side source code
│   │   ├── javascripts
│   │   │   └── main.js
│   │   ├── static
│   │   │   ├── favicon.png
│   │   │   ├── manifest.json
│   │   │   └── robots.txt
│   │   └── stylesheets
│   │       └── main.scss
│   ├── model                         // data models
│   │   ├── index.ts
│   │   └── model.js
│   ├── server                        // onefx server
│   │   ├── babel-register.js
│   │   ├── index.ts
│   │   ├── middleware                // koa middleware
│   │   │   ├── index.ts
│   │   │   ├── manifest-middleware.js
│   │   │   └── set-middleware.js
│   │   ├── server-routes.js          // server-side routes
│   │   └── start-server.ts           // server initialization
│   └── shared                        // js code shared by both the server and the client
│       ├── app-container.js
│       ├── app.js
│       ├── common
│       ├── home
│       │   └── home.js
│       └── register-service-worker.js
├── translations          // translations supported in this website
│   ├── en.yaml
│   └── zh-cn.yaml
├── Procfile                // heroku Procfile
└── webpack.js // webpack bundler config- install Windows Subsystem for Linux. Choose Ubuntu, for example.
- On WSL Ubuntu, install node version manager and install the latest lts dubnium
curl -o- https://raw.githubusercontent.com/creationix/nvm/v0.33.11/install.sh | bash
export NVM_DIR="$HOME/.nvm"
[ -s "$NVM_DIR/nvm.sh" ] && \. "$NVM_DIR/nvm.sh"  # This loads nvm
[ -s "$NVM_DIR/bash_completion" ] && \. "$NVM_DIR/bash_completion"  # This loads nvm bash_completion

nvm ls
nvm install lts/Dubnium
nvm use lts/dubnium- clone repo to
C:/
cd /mnt/c/
https://github.com/iotexproject/iotex-explorer.git