本文说明了LSP、FLIC、MPII、MSCOCO、AIC的图片及annotation可视化。
代码链接:https://github.com/WangChen100/pose_visualization
LSP数据集的人体关节点一共为14个,各个关节点的序号,如下图所示。

可视化代码如下,修改id即可生成相应图片的annotation,因为LSP是单人数据集,因此关节点连线用黄色实线连接。
import os
import numpy as np
import json
import cv2
import random
from tqdm import tqdm

def show_skeleton(img,kpts,color=(255,128,128)):
    skelenton = [[0, 1], [1, 2], [3, 4], [4, 5],
                 [10, 11], [11,12], [13,14],[14,15],
                 [8,9]]
    points_num = [num for num in range(1, 17)]
    for sk in skelenton:
        pos1 = (int(kpts[sk[0]][0]), int(kpts[sk[0]][1]))
        pos2 = (int(kpts[sk[1]][0]), int(kpts[sk[1]][1]))
        if pos1[0] > 0 and pos1[1] > 0 and pos2[0] > 0 and pos2[1] > 0:
            cv2.line(img, pos1, pos2, color, 2, 8)
    for points in points_num:
        if points==6 or points==7 or points==16 or points==17: continue
        pos = (int(kpts[points-1][0]),int(kpts[points-1][1]))
        if pos[0] > 0 and pos[1] > 0 :
            cv2.circle(img, pos,3,(0,0,255),-1) #为肢体点画红色实心圆
    return img


with open("train.json", "r") as load_f:
    load_dict = json.load(load_f)
id=15  #  自行选择id
file_name = "im000"+str(id)+".jpg"
image = cv2.imread(file_name)

for dict_num in tqdm(load_dict):
    imgIds = dict_num["annolist_index"]
    if id == imgIds:
        show_skeleton(image, dict_num["joints"], color=(0,   208, 244))
        break
# cv2.namedWindow('lsp', cv2.WINDOW_NORMAL)
# cv2.imshow("lsp"+str(id), image)
# cv2.waitKey()
cv2.imwrite("lsp_15.png", image)
FLIC截取自好莱坞电影片段,虽然场景内可能包含多人,但groundturth仅包含一个人的关节信息。一共11个关节,序号如下:

代码如下:
import os
import numpy as np
import json
import cv2
import random
from tqdm import tqdm
from scipy.io import loadmat
import math

def show_skeleton(img,kpts,color=(255,128,128)):
    skelenton = [[0, 1], [1, 2], [3, 4], [4, 5],
                 [13, 12], [12,16], [13,16],
                 [6,9]]
    points_num = [num for num in range(1, 29)]
    for sk in skelenton:
        if math.isnan(kpts[sk[0]][0]): continue
        if math.isnan(kpts[sk[1]][0]): continue
        pos1 = (int(kpts[sk[0]][0]), int(kpts[sk[0]][1]))
        pos2 = (int(kpts[sk[1]][0]), int(kpts[sk[1]][1]))
        if pos1[0] > 0 and pos1[1] > 0 and pos2[0] > 0 and pos2[1] > 0:
            cv2.line(img, pos1, pos2, color, 2, 8)
    for points in points_num:
        if math.isnan(kpts[points-1][0]): continue
        pos = (int(kpts[points-1][0]),int(kpts[points-1][1]))
        if pos[0] > 0 and pos[1] > 0 :
            cv2.circle(img, pos,3,(0,0,255),-1) #为肢体点画红色实心圆
    return img

m = loadmat("examples.mat")
examples=m['examples']
filepath = examples['filepath']
coords = examples['coords']


file_name = "american-wedding-unrated6x9-00003831.jpg" #"2-fast-2-furious-00003631.jpg"
image = cv2.imread(file_name)
skeleton_color = [(154, 194, 182),
                  (123, 151, 138),
                  (0,   208, 244),
                  (8,   131, 229),
                  (18,  87,  220)]  # 选择自己喜欢的颜色
for id in range(5003):
    if file_name == filepath[0][id][0]:
        print("yes")
        joints=coords[0][id].T
        show_skeleton(image, joints, color=(0,   208, 244))
        break
# cv2.namedWindow('lsp', cv2.WINDOW_NORMAL)
# cv2.imshow("lsp"+str(id), image)
# cv2.waitKey()
cv2.imwrite("flic_3.png", image)
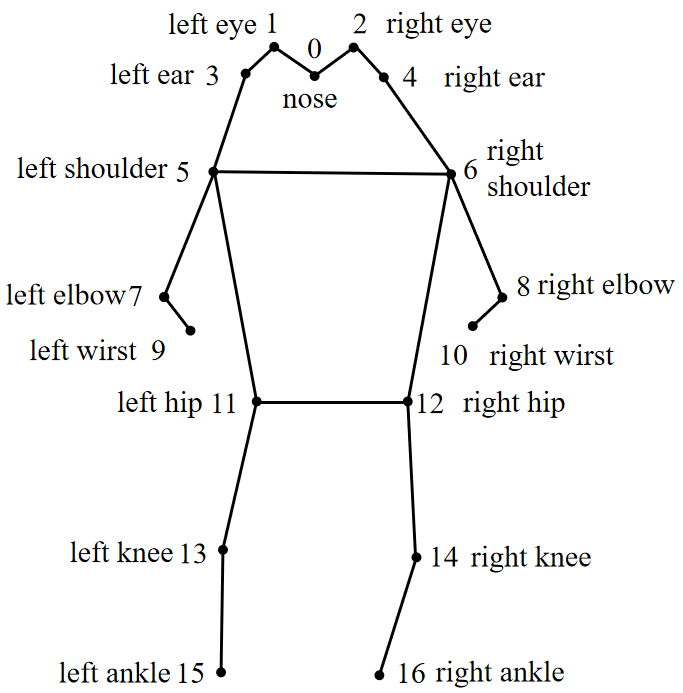
MPII是多人数据集,完整人体一共16个关节,关节点信息如下

可视化代码如下:
import os
import numpy as np
import json
import cv2
import random
from tqdm import tqdm

def show_skeleton(img,kpts,color=(255,128,128)):
    skelenton = [[10, 11], [11, 12], [12, 8], [8, 13], [13, 14], [14, 15], [8, 9], [7, 8], [2, 6],
                 [3, 6], [1, 2], [1, 0], [3, 4], [4, 5],[6,7]]
    points_num = [num for num in range(1,16)]
    for sk in skelenton:
        pos1 = (int(kpts[sk[0]][0]), int(kpts[sk[0]][1]))
        pos2 = (int(kpts[sk[1]][0]), int(kpts[sk[1]][1]))
        if pos1[0] > 0 and pos1[1] > 0 and pos2[0] > 0 and pos2[1] > 0:
            cv2.line(img, pos1, pos2, color, 2, 8)
    for points in points_num:
        pos = (int(kpts[points-1][0]),int(kpts[points-1][1]))
        if pos[0] > 0 and pos[1] > 0 :
            cv2.circle(img, pos,4,(0,0,255),-1) #为肢体点画红色实心圆
    return img


with open("train.json", "r") as load_f:
    load_dict = json.load(load_f)
file_name = "043030589.jpg"
image = cv2.imread(file_name)
skeleton_color = [(154, 194, 182),
                  (123, 151, 138),
                  (0,   208, 244),
                  (8,   131, 229),
                  (18,  87,  220)]  # 选择自己喜欢的颜色
for dict_num in tqdm(load_dict):
    imgIds = dict_num["image"]
    if file_name == imgIds:
        print("yes")
        color = random.choice(skeleton_color)
        show_skeleton(image, dict_num["joints"], color=color)

cv2.imwrite("mpi_3.png", image)
COCO是微软维护的多人数据集,也是目前最为常用的数据集,相比MPII,COCO的annotation一共有17个关节点。
由于COCO本身对数据的读取和可视化都较好的封装,可视化代码非常简洁,具体如下:
from crowdposetools.coco import COCO  # pycocotools
import numpy as np
import skimage.io as io
import matplotlib.pyplot as plt
import pylab
pylab.rcParams['figure.figsize'] = (8.0, 10.0)

# dataDir= '/home/andrew/datasets/MSCOCO/coco2017'
# dataType='train2017'
# annFile='{}/annotations/instances_{}.json'.format(dataDir,dataType)
annFile='data/crowdpose/person_keypoints_train2017.json'
# 初始化标注数据的 COCO api
coco=COCO(annFile)

imgIds = coco.getImgIds(imgIds = [100000])
img = coco.loadImgs(imgIds[0])[0]

I = io.imread('data/crowdpose/%s'%(img['file_name']))
plt.figure()
plt.imshow(I)
plt.axis('off')

ax = plt.gca()
annIds = coco.getAnnIds(imgIds=img['id'], iscrowd=None)
anns = coco.loadAnns(annIds)
coco.showAnns(anns)
plt.show()
# plt.savefig('coco4.png')
CrowdPose数据集是由上海交通大学团队构建的,主要是针对拥挤场景的多人关节点识别,每人14个关节点,如下图所示,下图中括号外的序号为CrowdPose数据集annotation序号,括号外的序号为AI C数据集

代码如下:
import numpy as np
import json
import cv2
import random
from tqdm import tqdm


def show_skeleton(img,kpts,color=(255,128,128),thr=0.5):
    kpts = np.array(kpts).reshape(-1,3)
    skelenton = [[0, 2], [1, 3], [2, 4], [3, 5], [6, 8], [8, 10], [7, 9], [9, 11], [12, 13], [0, 13], [1, 13],
                 [6,13],[7, 13]]
    points_num = [num for num in range(14)]
    for sk in skelenton:

        pos1 = (int(kpts[sk[0], 0]), int(kpts[sk[0], 1]))
        pos2 = (int(kpts[sk[1], 0]), int(kpts[sk[1] , 1]))
        if pos1[0] > 0 and pos1[1] > 0 and pos2[0] > 0 and pos2[1] > 0 and kpts[sk[0], 2] > thr and kpts[
            sk[1], 2] > thr:
            cv2.line(img, pos1, pos2, color, 2, 8)
    for points in points_num:
        pos = (int(kpts[points,0]),int(kpts[points,1]))
        if pos[0] > 0 and pos[1] > 0 and kpts[points,2] > thr:
            cv2.circle(img, pos,4,(0,0,255),-1)  # 为肢体点画红色实心圆
    return img


with open("person_keypoints_train2017.json","r") as load_f:
    load_dict = json.load(load_f)

images=load_dict['images']
annotations=load_dict['annotations']

id=100000
image = cv2.imread(str(id)+'.jpg')
# for img in tqdm(images):
#     if img['file_name'] == '100002.jpg':
#         print(img['id'])

joints=list()
skeleton_color = [(154, 194, 182), (123,151,138),(0,208,244),(8,131,229),(18,87,220)]
for person in tqdm(annotations):
    if person['image_id'] == id:
        print('here')
            # person_1 = np.array(person_mss[person_num]['keypoints']).reshape(-1, 3)
        color=random.choice(skeleton_color)
        show_skeleton(image, person['keypoints'], color=color)

cv2.imshow('crow_pose', image)
cv2.waitKey()
# cv2.imwrite('crowd_5.png',image)
AIC的annotation如上图所示,关节点序号见括号内,代码如下:
import os
import numpy as np
import json
import cv2
import random
from tqdm import tqdm

def show_skeleton(img,kpts,color=(255,128,128),thr=0.5):
    kpts = np.array(kpts).reshape(-1,3)
    skelenton = [[0, 1], [1, 2], [13, 0], [13, 3], [3, 4], [4, 5], [12, 13], [6, 13], [9, 13], [6, 7], [7, 8],
                 [9,10],[10, 11]]
    points_num = [num for num in range(14)]
    for sk in skelenton:

        pos1 = (int(kpts[sk[0], 0]), int(kpts[sk[0], 1]))
        pos2 = (int(kpts[sk[1], 0]), int(kpts[sk[1] , 1]))
        if pos1[0] > 0 and pos1[1] > 0 and pos2[0] > 0 and pos2[1] > 0 and kpts[sk[0], 2] > thr and kpts[
            sk[1], 2] > thr:
            cv2.line(img, pos1, pos2, color, 2, 8)
    for points in points_num:
        pos = (int(kpts[points,0]),int(kpts[points,1]))
        if pos[0] > 0 and pos[1] > 0 and kpts[points,2] > thr:
            cv2.circle(img, pos,4,(0,0,255),-1) #为肢体点画红色实心圆
    return img


with open("keypoint_train_annotations_20170909.json", "r") as load_f:
    load_dict = json.load(load_f)
file_name = "011b9c119b57aff48f307916b7b9d85bb3dc5659"
image = cv2.imread(file_name+'.jpg')
skeleton_color = [(154, 194, 182),
                  (123, 151, 138),
                  (0,   208, 244),
                  (8,   131, 229),
                  (18,  87,  220)]  # 选择自己喜欢的颜色
for dict_num in tqdm(load_dict):
    imgIds = dict_num["image_id"]
    if file_name == imgIds:
        print("yes")
        for kp in dict_num["keypoint_annotations"].values():
            color = random.choice(skeleton_color)
            show_skeleton(image, kp, color=color)
        break
# cv2.imshow('aic_1', image)
# cv2.waitKey()
cv2.imwrite("aic_4.png", image)