To run the example code first make sure you have Airflow up and running. To do this, we will use Airflow running on Docker. We will use the formal instructions as provided from Airflow on how to run a Docker instance using the Docker Compose
To deploy Airflow on Docker Compose, you should fetch docker-compose.yaml.
curl -LfO 'https://airflow.apache.org/docs/apache-airflow/2.0.1/docker-compose.yaml'This file contains several service definitions:
airflow-scheduler- The scheduler monitors all tasks and DAGs, then triggers the task instances once their dependencies are complete.airflow-webserver- The webserver available athttp://localhost:8080.airflow-worker- The worker that executes the tasks given by the scheduler.airflow-init- The initialization service.flower- The flower app for monitoring the environment. It is available athttp://localhost:8080.postgres- The database.redis- The redis - broker that forwards messages from scheduler to worker.
All these services allow you to run Airflow with CeleryExecutor. For more information, see Basic Airflow architecture.
Some directories in the container are mounted, which means that their contents are synchronized between your computer and the container.
./dags- you can put your DAG files here../logs- contains logs from task execution and scheduler../plugins- you can put your custom plugins here.
Before starting Airflow for the first time, You need to prepare your environment, i.e. create the necessary files, directories and initialize the database.
On Linux, the mounted volumes in container use the native Linux filesystem user/group permissions, so you have to make sure the container and host computer have matching file permissions.
mkdir ./dags ./logs ./plugins
echo -e "AIRFLOW_UID=$(id -u)\nAIRFLOW_GID=0" > .env
On all operating system, you need to run database migrations and create the first user account. To do it, run.
docker-compose up airflow-initAfter initialization is complete, you should see a message like below.
airflow-init_1       | Upgrades done
airflow-init_1       | Admin user airflow created
airflow-init_1       | 2.0.1
start_airflow-init_1 exited with code 0
The account created has the login airflow and the password airflow.
Now you can start all services:
docker-compose upIn the second terminal you can check the condition of the containers and make sure that no containers are in unhealthy condition:
$ docker ps
CONTAINER ID   IMAGE                  COMMAND                  CREATED          STATUS                    PORTS                              NAMES
247ebe6cf87a   apache/airflow:2.0.1   "/usr/bin/dumb-init …"   3 minutes ago    Up 3 minutes              8080/tcp                           compose_airflow-worker_1
ed9b09fc84b1   apache/airflow:2.0.1   "/usr/bin/dumb-init …"   3 minutes ago    Up 3 minutes              8080/tcp                           compose_airflow-scheduler_1
65ac1da2c219   apache/airflow:2.0.1   "/usr/bin/dumb-init …"   3 minutes ago    Up 3 minutes (healthy)    0.0.0.0:5555->5555/tcp, 8080/tcp   compose_flower_1
7cb1fb603a98   apache/airflow:2.0.1   "/usr/bin/dumb-init …"   3 minutes ago    Up 3 minutes (healthy)    0.0.0.0:8080->8080/tcp             compose_airflow-webserver_1
74f3bbe506eb   postgres:13            "docker-entrypoint.s…"   18 minutes ago   Up 17 minutes (healthy)   5432/tcp                           compose_postgres_1
0bd6576d23cb redis:latest "docker-entrypoint.s…" 10 hours ago Up 17 minutes (healthy) 0.0.0.0:6379->6379/tcp compose_redis_1After starting Airflow, you can interact with it in 3 ways;
- by running CLI commands.
- via a browser using the web interface.
- using the REST API.
You can also run CLI commands, but you have to do it in one of the defined airflow-* services. For example, to run airflow info, run the following command:
docker-compose run airflow-worker airflow infoIf you have Linux or Mac OS, you can make your work easier and download a optional wrapper scripts that will allow you to run commands with a simpler command.
curl -LfO 'https://airflow.apache.org/docs/apache-airflow/2.0.1/airflow.sh'
chmod +x airflow.sh
Now you can run commands easier.
./airflow.sh infoYou can also use bash as parameter to enter interactive bash shell in the container or python to enter python container.
./airflow.sh bash./airflow.sh pythonTo stop and delete containers, delete volumes with database data and download images, run:
docker-compose down --volumes --rmi allNotes
By default, the Docker Compose file uses the latest Airflow image (apache/airflow). If you need, you can customize and extend it.
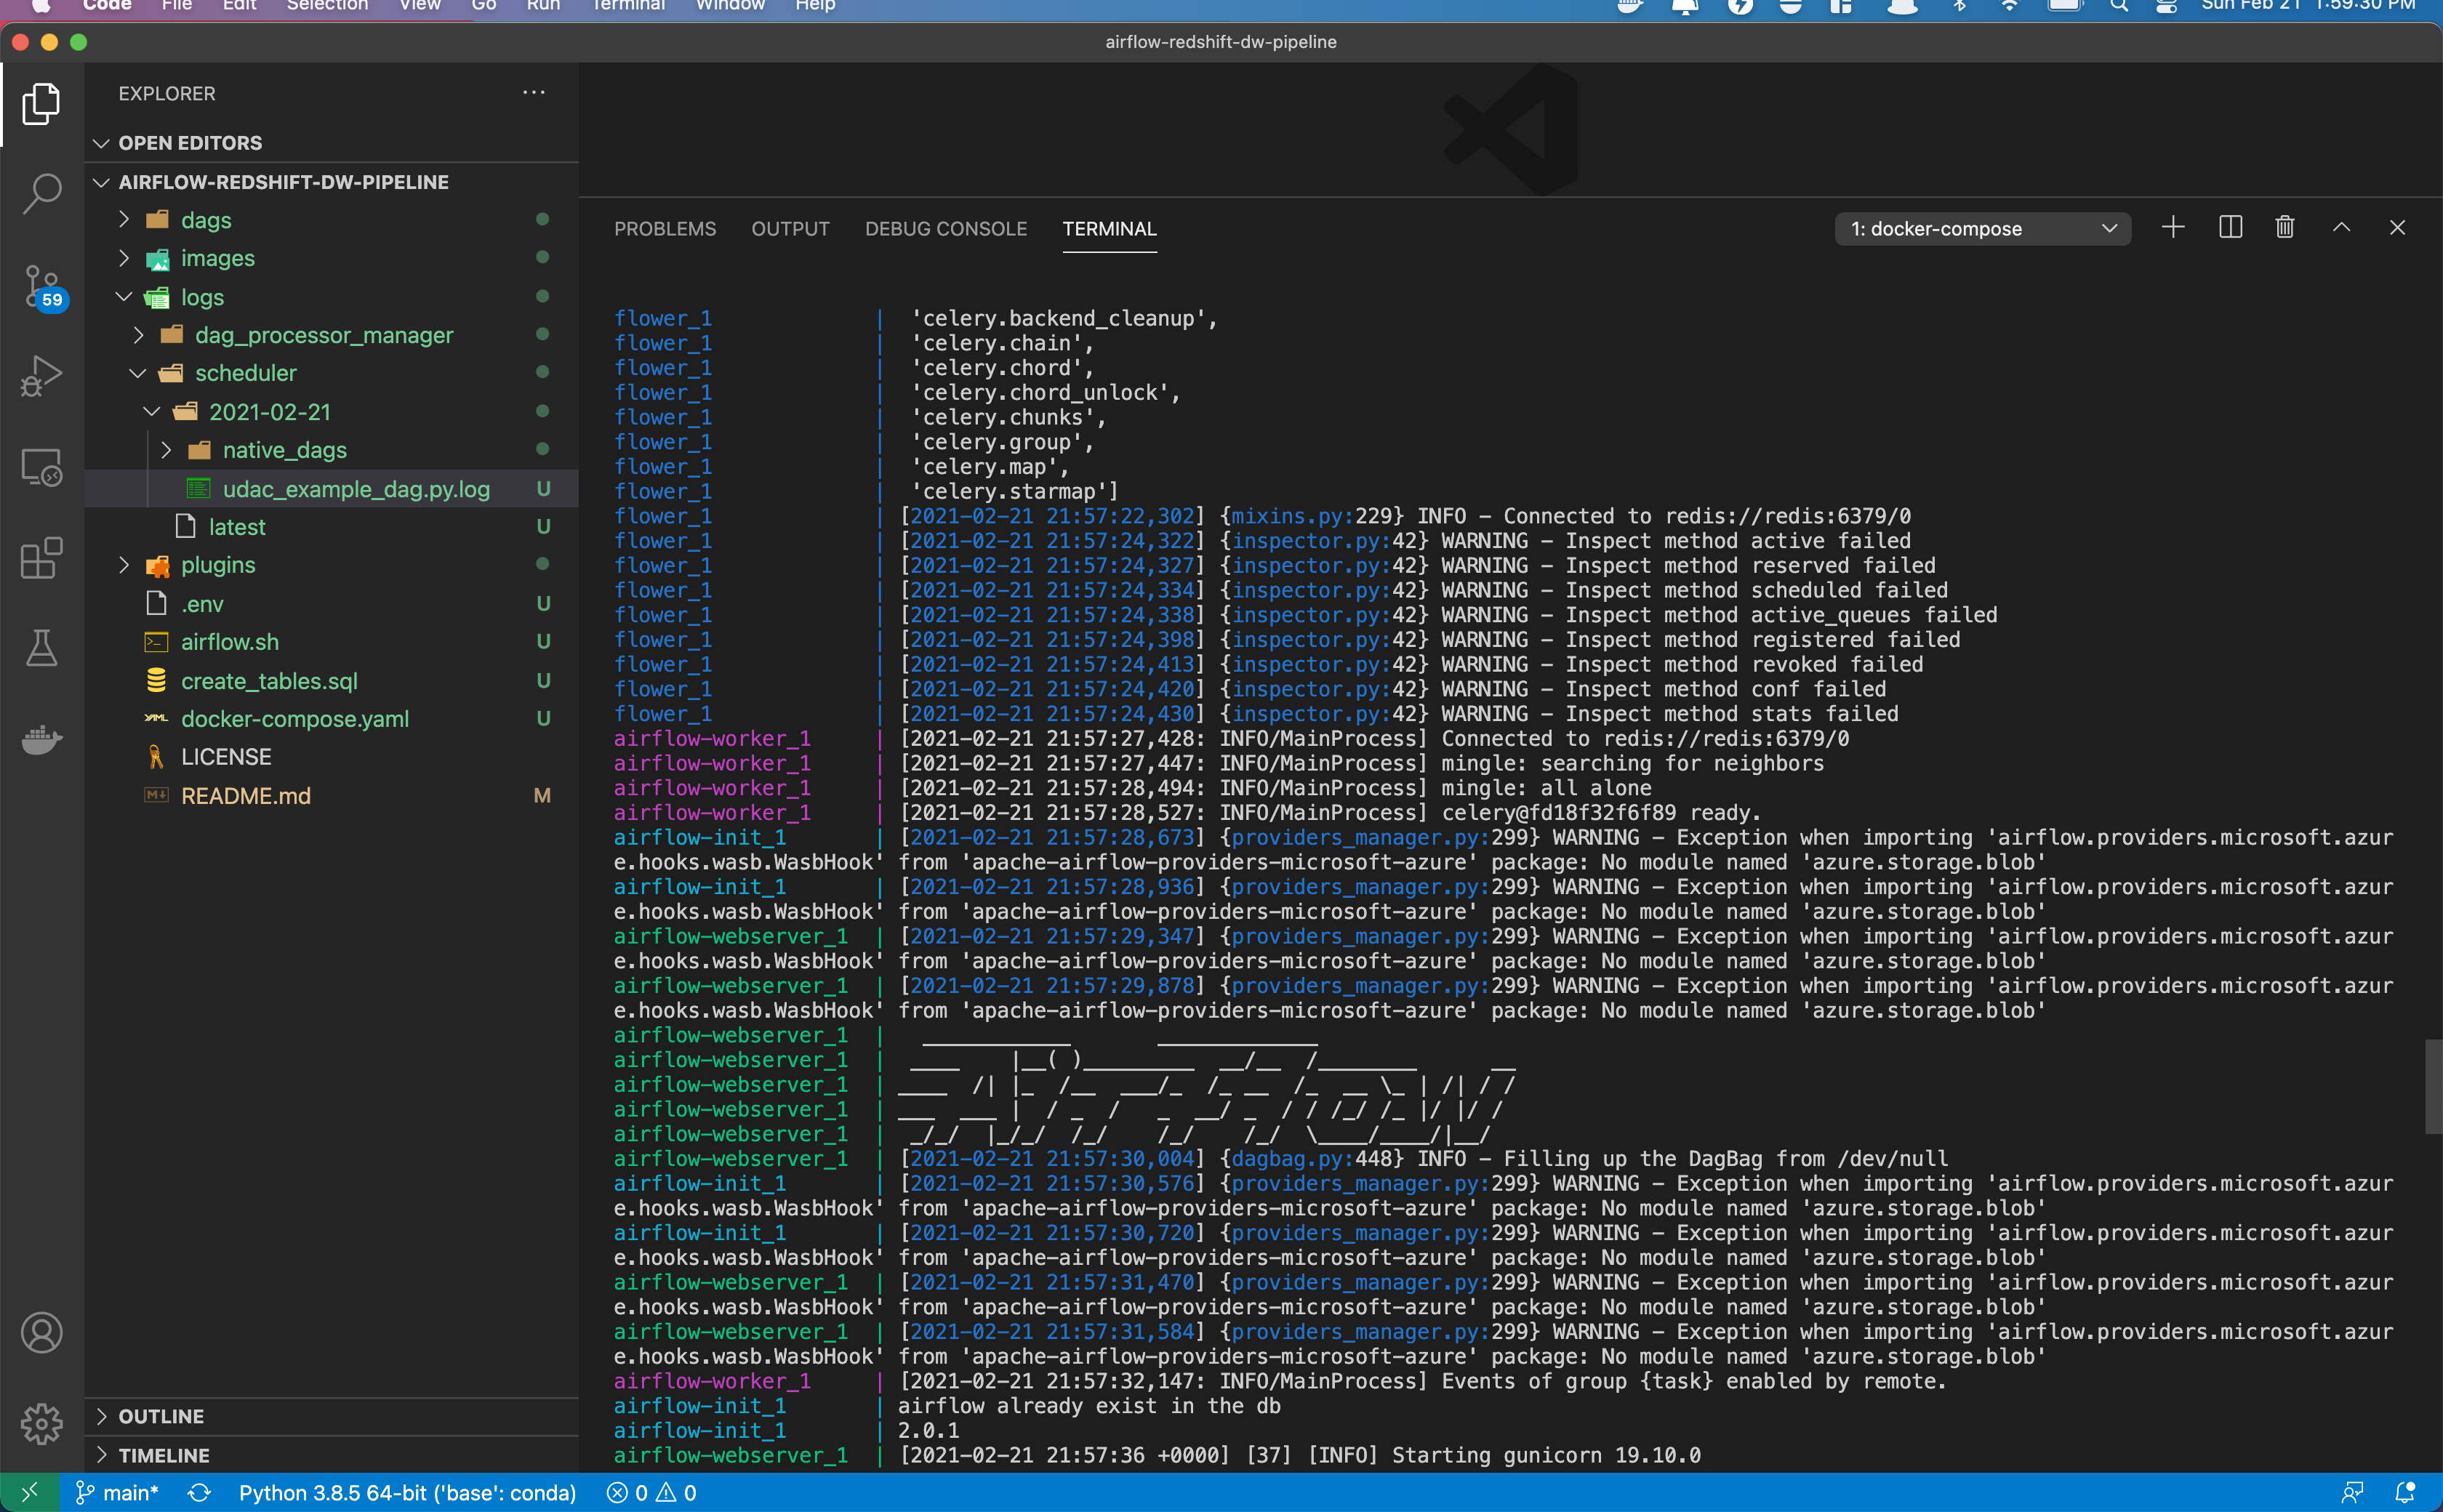
Once Airflow server is up and running as shown
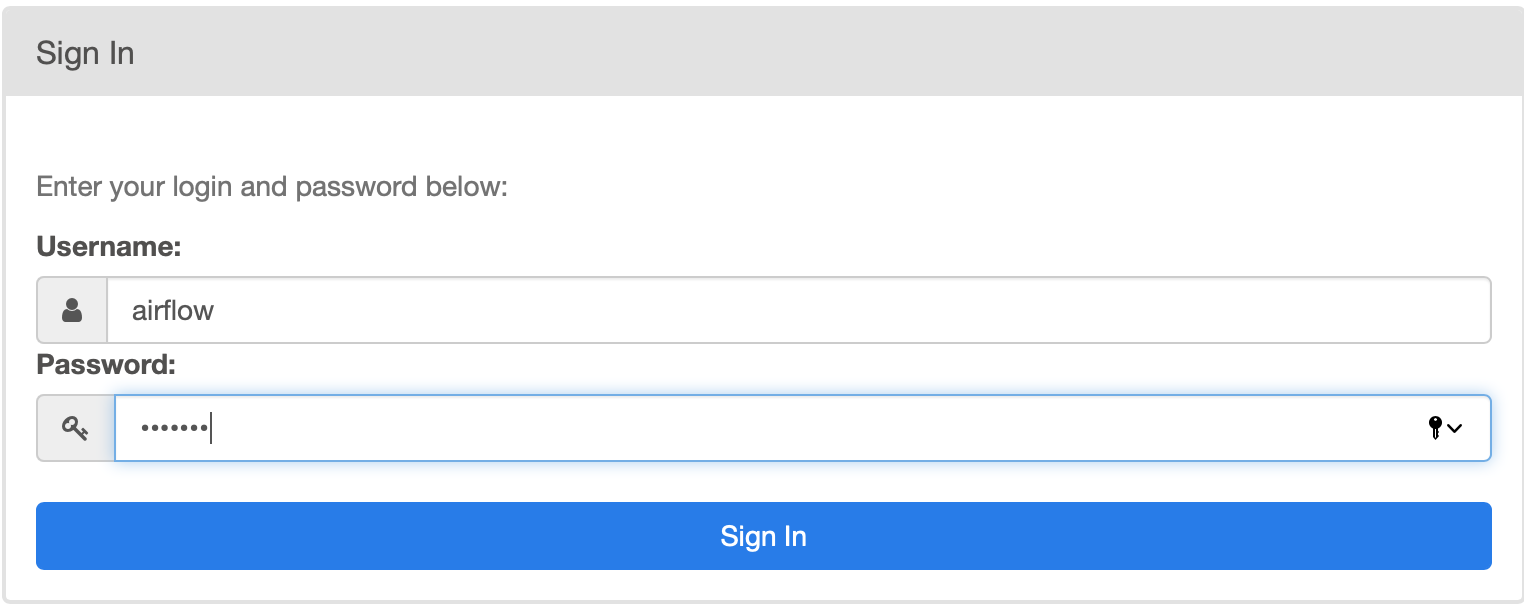
You can open your browser and go to http://localhost:8080/ and this should take you to the main login screen
To login use username airflow and password airflow
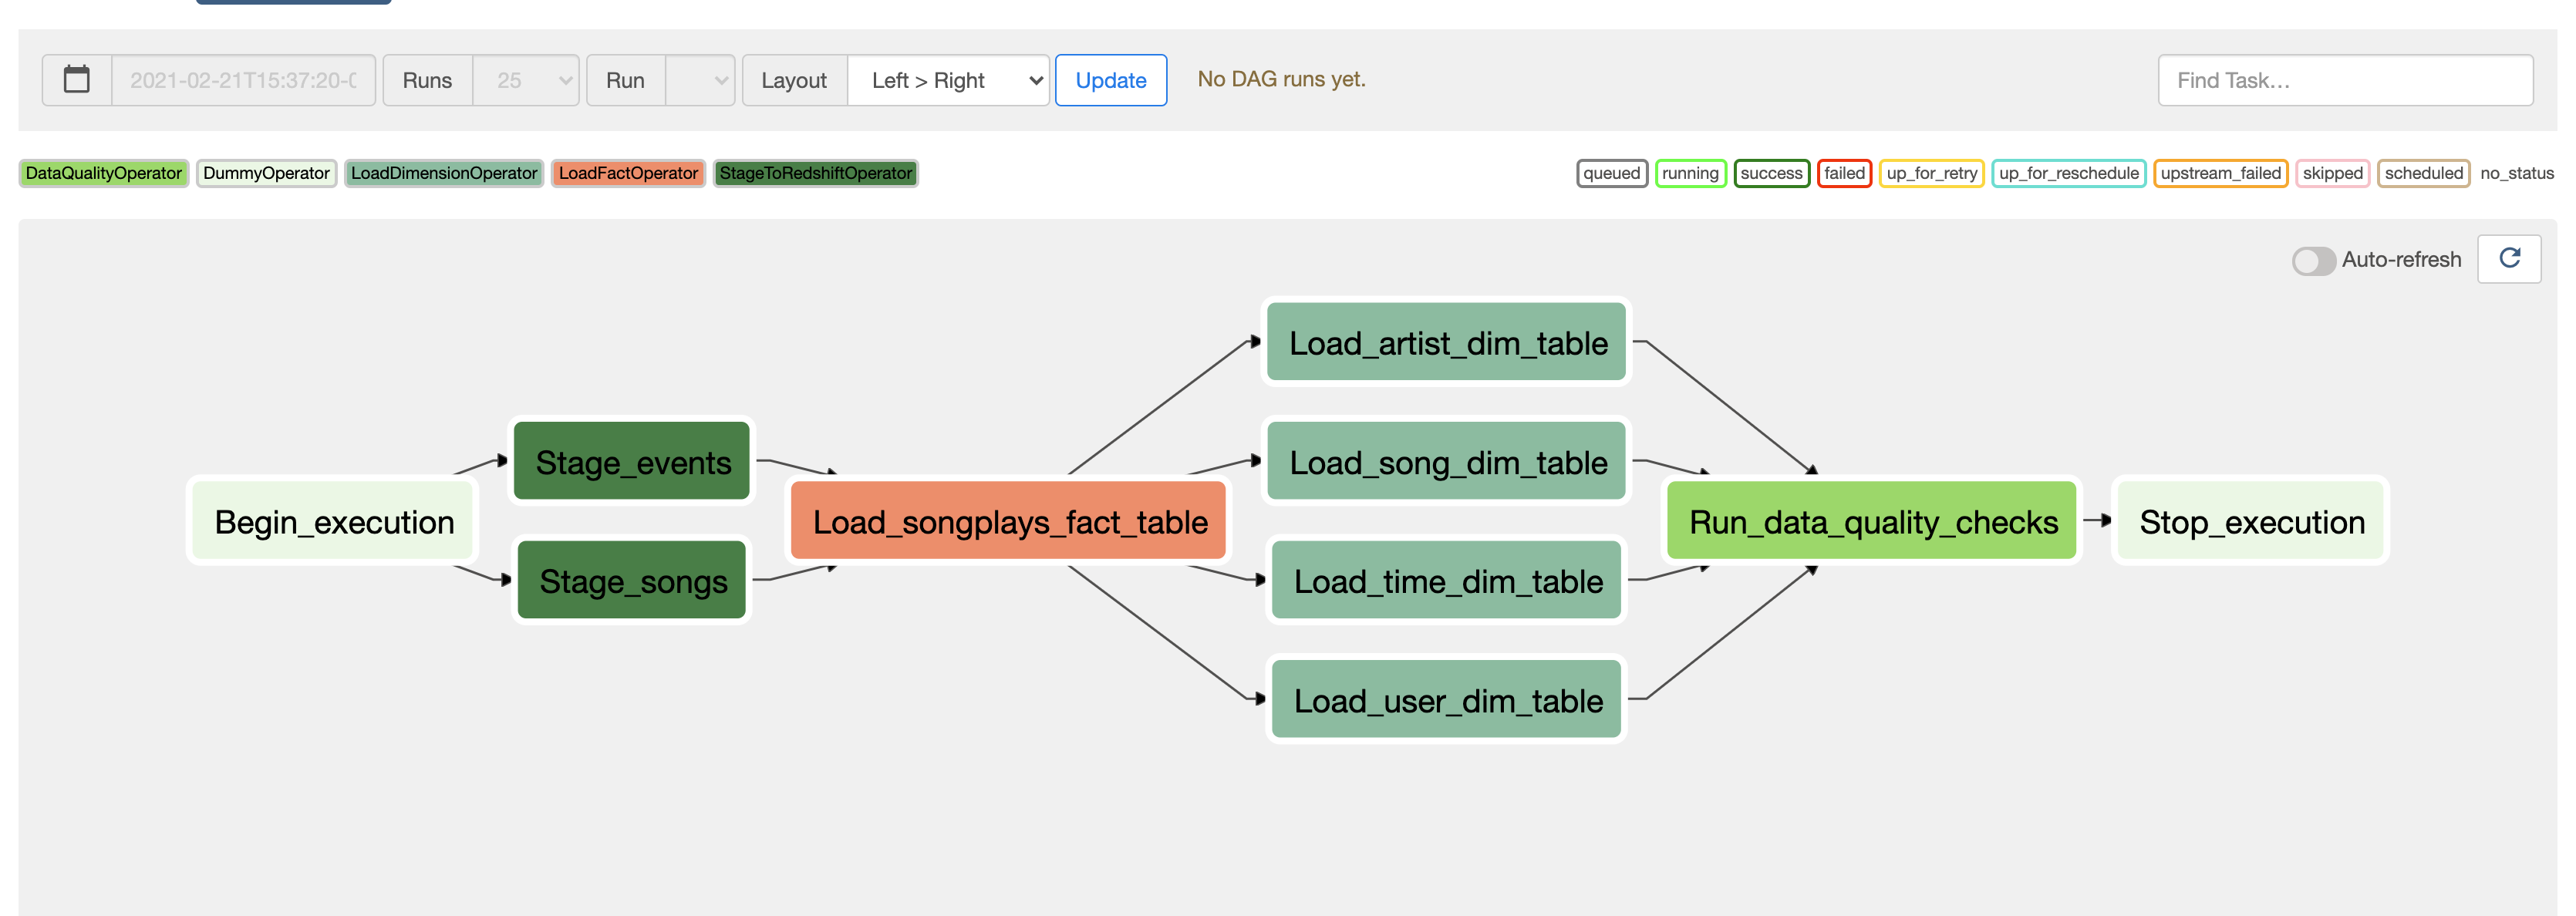
There are several example DAGs provided with the Docker install. The DAG from t his repo would be named etl_dag
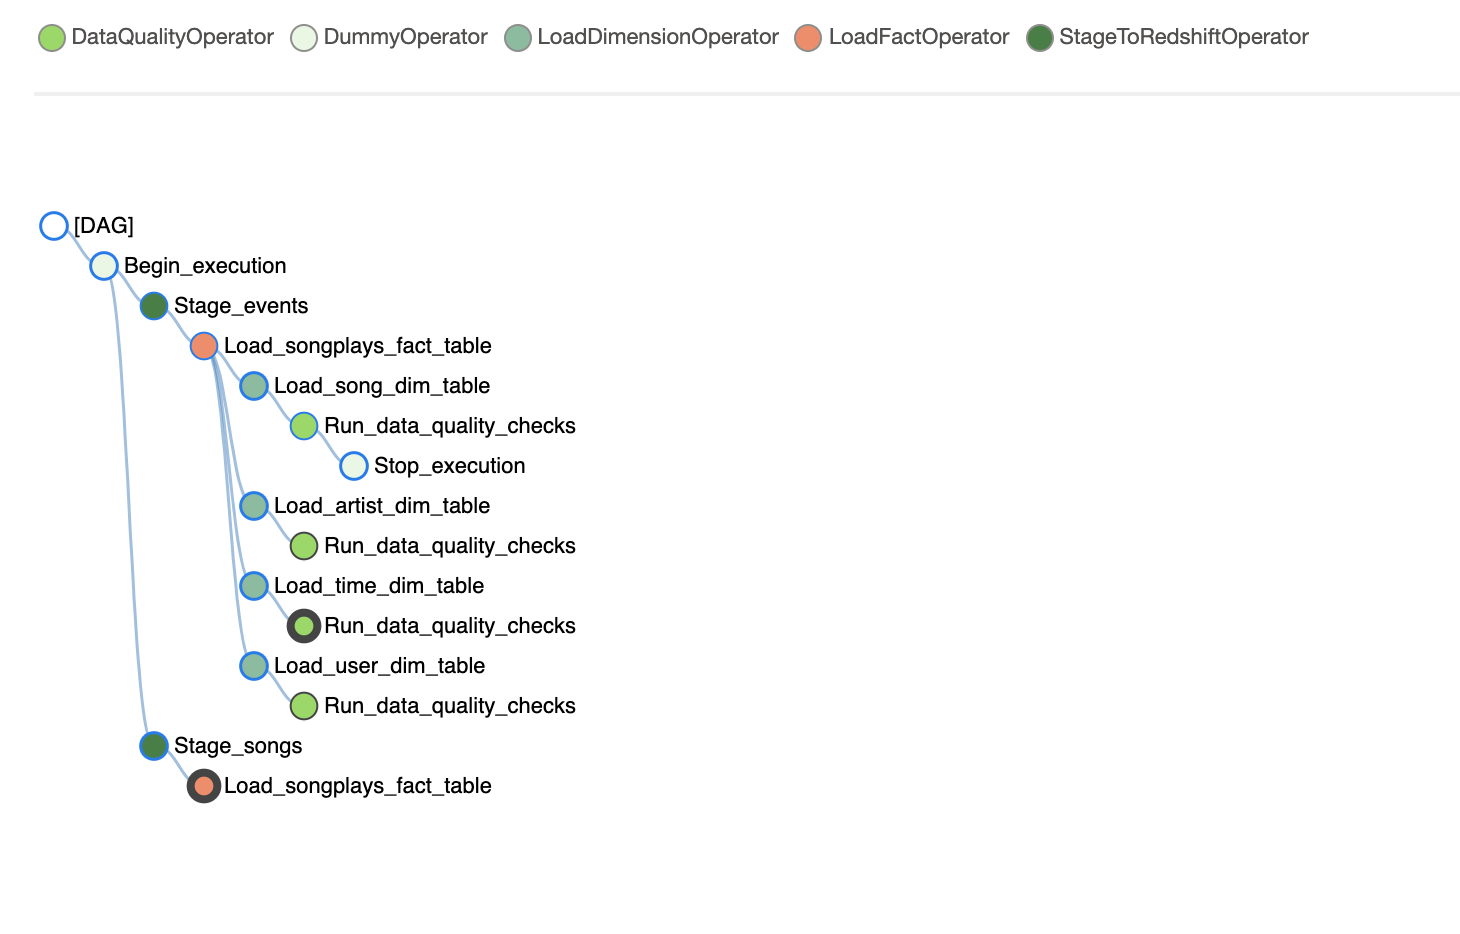
You can inspect the DAG and you should see the different tasks associated:
A music streaming company, Sparkify, has decided that it is time to introduce more automation and monitoring to their data warehouse ETL pipelines and come to the conclusion that the best tool to achieve this is Apache Airflow.
They have decided to bring you into the project and expect you to create high grade data pipelines that are dynamic and built from reusable tasks, can be monitored, and allow easy backfills. They have also noted that the data quality plays a big part when analyses are executed on top the data warehouse and want to run tests against their datasets after the ETL steps have been executed to catch any discrepancies in the datasets.
The source data resides in S3 and needs to be processed in Sparkify's data warehouse in Amazon Redshift. The source datasets consist of JSON logs that tell about user activity in the application and JSON metadata about the songs the users listen to.
This project will introduce you to the core concepts of Apache Airflow. To complete the project, you will need to create your own custom operators to perform tasks such as staging the data, filling the data warehouse, and running checks on the data as the final step.
We have provided you with a project template that takes care of all the imports and provides four empty operators that need to be implemented into functional pieces of a data pipeline. The template also contains a set of tasks that need to be linked to achieve a coherent and sensible data flow within the pipeline.
You'll be provided with a helpers class that contains all the SQL transformations. Thus, you won't need to write the ETL yourselves, but you'll need to execute it with your custom operators.
Example DAG
Here, we'll use Airflow's UI to configure your AWS credentials and connection to Redshift.
- To go to the Airflow UI:
- You can use the Project Workspace here and click on the blue Access Airflow button in the bottom right.
- If you'd prefer to run Airflow locally, open http://localhost:8080 in Google Chrome (other browsers occasionally have issues rendering the Airflow UI).
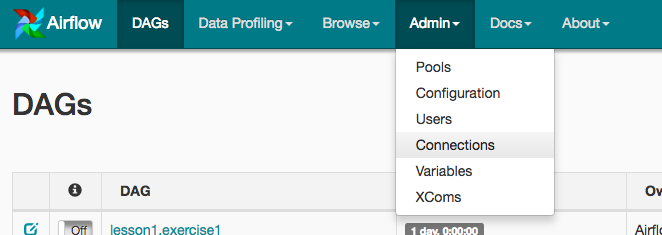
- Click on the Admin tab and select Connections.
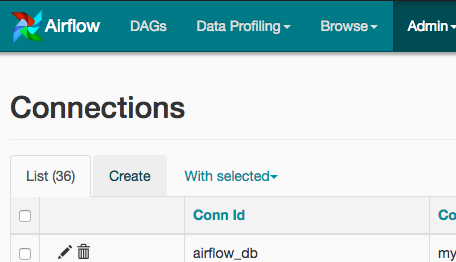
- Under Connections, select Create.
-
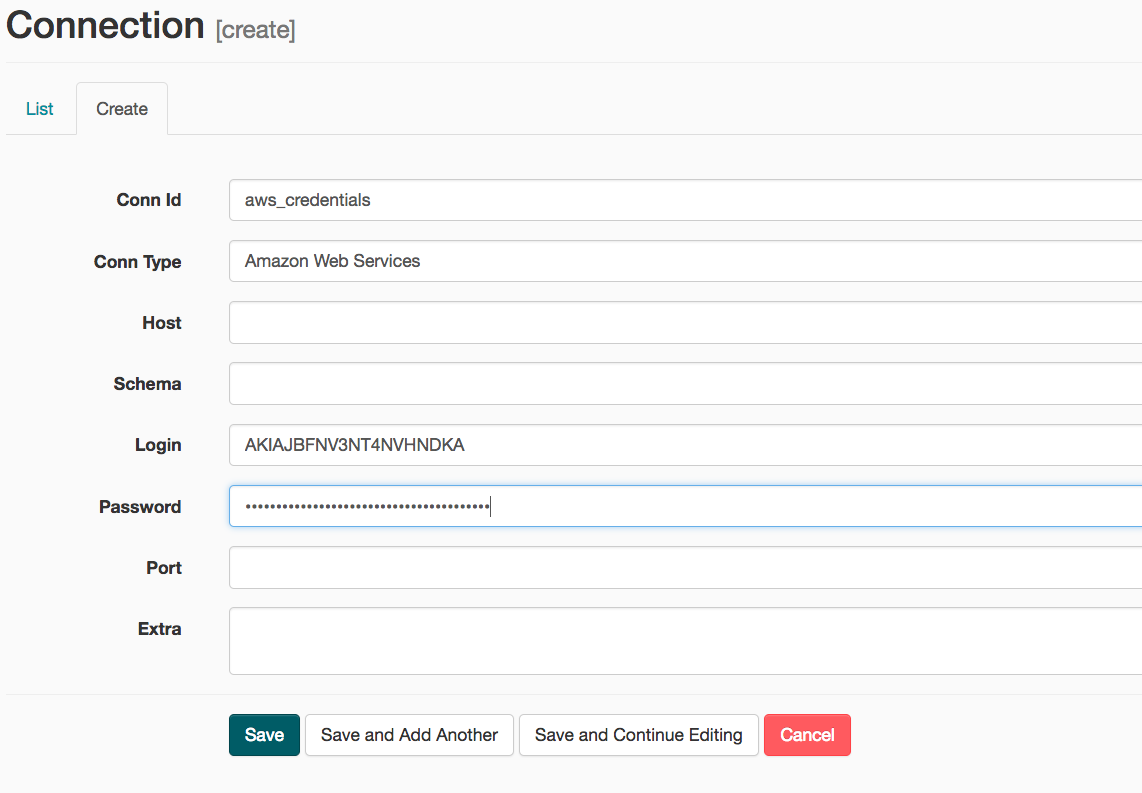
On the create connection page, enter the following values:
- Conn Id: Enter
aws_credentials. - Conn Type: Enter
Amazon Web Services. - Login: Enter your Access key ID from the IAM User credentials you downloaded earlier.
- Password: Enter your Secret access key from the IAM User credentials you downloaded earlier.
Once you've entered these values, select Save and Add Another.
- Conn Id: Enter
-
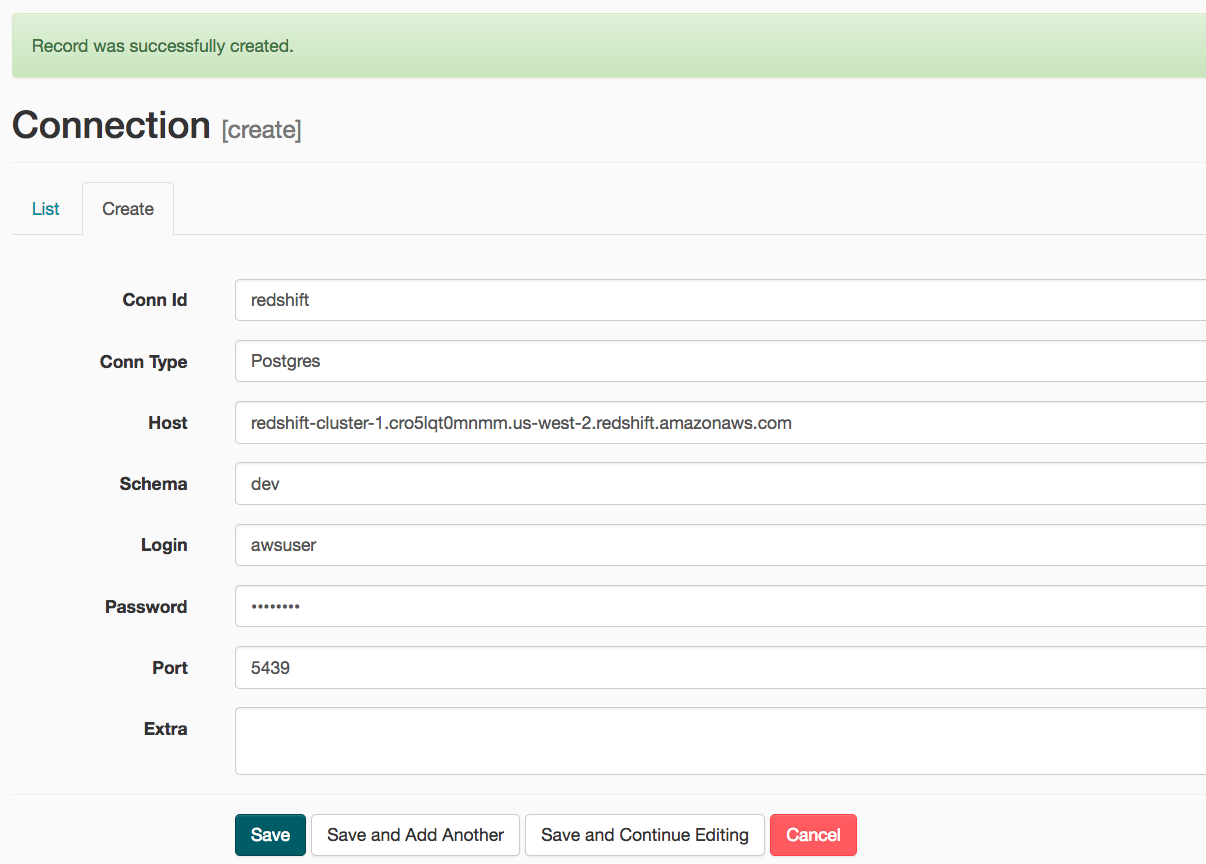
On the next create connection page, enter the following values:
- Conn Id: Enter
redshift. - Conn Type: Enter
Postgres. - Host: Enter the endpoint of your Redshift cluster, excluding the port at the end. You can find this by selecting your cluster in the Clusters page of the Amazon Redshift console
- Schema: Enter schema name. This is the Redshift database you want to connect to.
- Login: Enter Redshift username.
- Password: Enter the password you created when launching your Redshift cluster.
- Port: Enter
5439.
Once you've entered these values, select Save.
- Conn Id: Enter
Awesome! You're now all configured to run Airflow with Redshift.
WARNING: Remember to DELETE your cluster each time you are finished working to avoid large, unexpected costs.
For this project, you'll be working with two datasets. Here are the s3 links for each:
- Log data:
s3://udacity-dend/log_data - Song data:
s3://udacity-dend/song_data
