SECOND for KITTI object detection
SECOND detector. Based on my unofficial implementation of VoxelNet with some improvements.
ONLY support python 3.6+, pytorch 0.4.1+. Don't support pytorch 0.4.0. Tested in Ubuntu 16.04/18.04.
Feel free to contact me by issue or email if encounter any problems. I don't know whether this project is runnable in other computer.
Performance in KITTI validation set (50/50 split)
Car AP@0.70, 0.70, 0.70:
bbox AP:90.80, 88.97, 87.52
bev  AP:89.96, 86.69, 86.11
3d   AP:87.43, 76.48, 74.66
aos  AP:90.68, 88.39, 86.57
Car AP@0.70, 0.50, 0.50:
bbox AP:90.80, 88.97, 87.52
bev  AP:90.85, 90.02, 89.36
3d   AP:90.85, 89.86, 89.05
aos  AP:90.68, 88.39, 86.57
Cyclist AP@0.50, 0.50, 0.50:
bbox AP:95.99, 88.46, 87.92
bev  AP:88.59, 86.03, 85.07
3d   AP:88.36, 85.66, 84.51
aos  AP:95.71, 88.10, 87.53
Cyclist AP@0.50, 0.25, 0.25:
bbox AP:95.99, 88.46, 87.92
bev  AP:94.99, 87.04, 86.47
3d   AP:94.99, 86.91, 86.41
aos  AP:95.71, 88.10, 87.53
Pedestrian AP@0.50, 0.50, 0.50:
bbox AP:76.07, 67.04, 65.92
bev  AP:74.21, 65.67, 64.24
3d   AP:72.48, 63.89, 57.80
aos  AP:70.14, 61.55, 60.53
Pedestrian AP@0.50, 0.25, 0.25:
bbox AP:76.07, 67.04, 65.92
bev  AP:85.00, 75.40, 68.27
3d   AP:85.00, 69.65, 68.26
aos  AP:70.14, 61.55, 60.53
Install
1. Clone code
git clone https://github.com/traveller59/second.pytorch.git
cd ./second.pytorch/second
2. Install dependence python packages
It is recommend to use Anaconda package manager.
pip install shapely fire pybind11 pyqtgraph tensorboardXIf you don't have Anaconda:
pip install numbaFollow instructions in https://github.com/facebookresearch/SparseConvNet to install SparseConvNet.
Install Boost geometry:
sudo apt-get install libboost-all-dev3. Setup cuda for numba
you need to add following environment variable for numba.cuda, you can add them to ~/.bashrc:
export NUMBAPRO_CUDA_DRIVER=/usr/lib/x86_64-linux-gnu/libcuda.so
export NUMBAPRO_NVVM=/usr/local/cuda/nvvm/lib64/libnvvm.so
export NUMBAPRO_LIBDEVICE=/usr/local/cuda/nvvm/libdevice
4. add second.pytorch/ to PYTHONPATH
Prepare dataset
- Dataset preparation
Download KITTI dataset and create some directories first:
└── KITTI_DATASET_ROOT
       ├── training    <-- 7481 train data
       |   ├── image_2 <-- for visualization
       |   ├── calib
       |   ├── label_2
       |   ├── velodyne
       |   └── velodyne_reduced <-- empty directory
       └── testing     <-- 7580 test data
           ├── image_2 <-- for visualization
           ├── calib
           ├── velodyne
           └── velodyne_reduced <-- empty directory
- Create kitti infos:
python create_data.py create_kitti_info_file --data_path=KITTI_DATASET_ROOT- Create reduced point cloud:
python create_data.py create_reduced_point_cloud --data_path=KITTI_DATASET_ROOT- Create groundtruth-database infos:
python create_data.py create_groundtruth_database --data_path=KITTI_DATASET_ROOT- Modify config file
There is some path need to be configured in config file:
train_input_reader: {
...
database_sampler {
database_info_path: "/path/to/kitti_dbinfos_train.pkl"
...
}
kitti_info_path: "/path/to/kitti_infos_train.pkl"
kitti_root_path: "KITTI_DATASET_ROOT"
}
...
eval_input_reader: {
...
kitti_info_path: "/path/to/kitti_infos_val.pkl"
kitti_root_path: "KITTI_DATASET_ROOT"
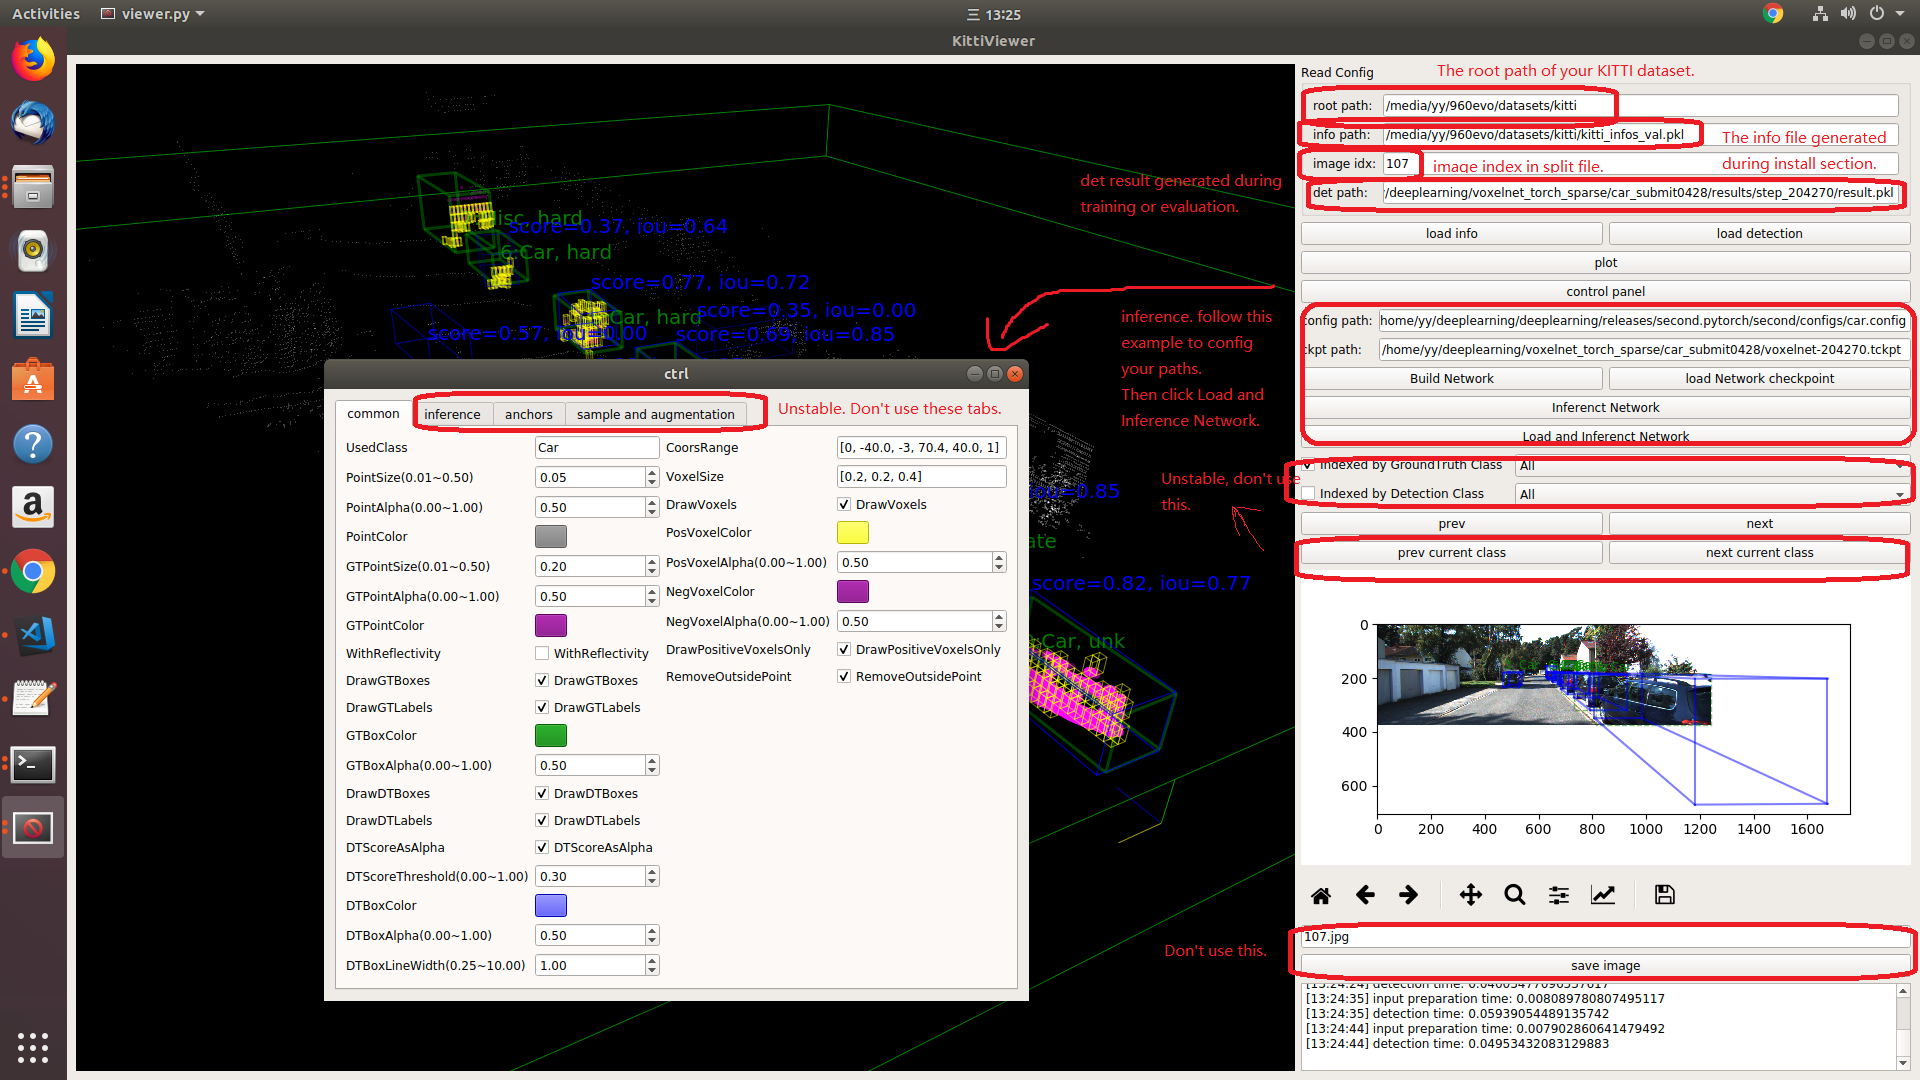
}Try Kitti Viewer (Unstable)
You should use kitti viewer based on pyqt and pyqtgraph to check data before training.
Before using kitti viewer, you need to modify some file in SparseConvNet because the pretrained model doesn't support SparseConvNet master:
- convolution.py
# self.weight = Parameter(torch.Tensor(
#     self.filter_volume, nIn, nOut).normal_(
#     0,
#     std))
self.weight = Parameter(torch.Tensor(
    self.filter_volume * nIn, nOut).normal_(
    0,
    std))
# ...
# output.features = ConvolutionFunction.apply(
#     input.features,
#     self.weight,
output.features = ConvolutionFunction.apply(
    input.features,
self.weight.view(self.filter_volume, self.nIn, self.nOut),- submanifoldConvolution.py
# self.weight = Parameter(torch.Tensor(
#     self.filter_volume, nIn, nOut).normal_(
#     0,
#     std))
self.weight = Parameter(torch.Tensor(
    self.filter_volume * nIn, nOut).normal_(
    0,
    std))
# ...
# output.features = SubmanifoldConvolutionFunction.apply(
#     input.features,
#     self.weight,
output.features = SubmanifoldConvolutionFunction.apply(
    input.features,
    self.weight.view(self.filter_volume, self.nIn, self.nOut),
Then run python ./kittiviewer/viewer.py, check following picture to use kitti viewer:
Usage
- train
python ./pytorch/train.py train --config_path=./configs/car.config --model_dir=/path/to/model_dirMake sure "/path/to/model_dir" doesn't exist if you want to train new model. A new directory will be created if the model_dir doesn't exist, otherwise will read checkpoints in it.
- evaluate
python ./pytorch/train.py evaluate --config_path=./configs/car.config --model_dir=/path/to/model_dir- pretrained model
You can download pretrained models in google drive. The car model is related to car.config and the people model is related to people.config.
Concepts
- Kitti lidar box
A kitti lidar box is consist of 7 elements: [x, y, z, w, l, h, rz], see figure.
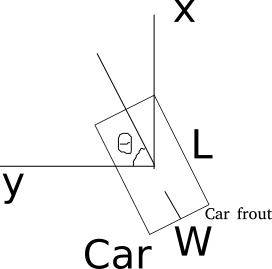
All training and inference code use kitti box format. So we need to convert other format to KITTI format before training.
- Kitti camera box
A kitti camera box is consist of 7 elements: [x, y, z, l, h, w, ry].