Automatic Mobility Based Behavioral Quantification ( With Option for Manual Scoring ).
We've enhanced DBscorer's functionality and usability. We advise using DBscorerV2.
Added DBscorerV2Dev with few changes in GUI and outputs files.

Installation:
Windows (Tested):
-
Install the MATLAB runtime 9.9 first.
-
Click the DBscorerV2 app to launch the GUI.
Mac (Need MATLAB):
Use DBscorerV2 exported.m file.
- Mount the camera using a tripod.
- The background should be free of glare and shadows. To prevent shadows and glares, use diffuse indirect light. Use a non-shiny background.
- Crop a rectangular area so that all animal parts are contained within it while avoiding the surrounding area. View the demo video.
- The size of the video imposes restrictions on DBscorer. In such cases, downsample or convert the video. (Issue is fixed in DBscorer V2).
- Video should have a constant frame rate. If not, then convert with ffmpeg or any other program you prefer.
- Do not use a video with very low or very high immobility for threshold generation, it might fail to compute threshold in such cases. Immobility between 30-70% works best. Check your file name after you generate the manual analysis; it should be in pairs, FST.mat and FST manual.mat.
- Your video name or entered info should not contain full stop (.).
To prevent issues with detection, it is always a good idea to enhance video quality while recording. To test and get a sense of the recording conditions, kindly view the sample videos.
Sample Videos
Video Pre-Processing
This can be easily done using ffmpeg software.
-
Create a folder and name it "Convert".
-
Place the convert.bat file, ffmpeg.exe and all videos in the same folder.
-
Create a subfolder in "Convert" and name it "Output".
-
Double click the "Convert.bat" file to start conversion.
Convert the videos to a constant frame rate video in a MATLAB-supported video format (mp4, avi, mov). Use ffmpeg as described. You may downsample the video if needed. You can select one video file at a time for processing. Please follow the steps below.
-
Load Video: Use this button to load the video to be analyzed. Pressing this button would open a window for file selection. Click on your video file that is to be analyzed and click open. This will open a “figure window” showing the first frame.
-
Figure Window: Use this button to reopen the figure window if you have closed it.
-
Start (s) and End (s): Use this to define the start and end (seconds) of the video analysis. Figure window will help you to choose the start and end points appropriately.
-
Time: This shows the total duration of video to be analyzed. This field is not editable.
-
Label: You can use this field to add labels. Do not use any special characters or file extensions here (alphanumeric characters only).
-
Create Background: You can create a clean background (without a mouse) for a selected part of the video using this. In most cases you will get a clean background. In case you do not get a clean background image, you can change start and end such that you get a clean background. After getting a clean background, you should change the start and end points back to their original values for analysis.
-
Fix Background: If the background is not clean even after step no 7 then click fix background button to select the area covering artifact pixels as shown in the demo video.
-
Mark ROI: For TST and FST, select the area where the animal remains for the analysis period. The animal should not go outside the selected area throughout the analysis period.
-
Process Video: You can use this button to perform the immobility analysis. This will create a .mat file for each animal which will be used for subsequent analysis. You can repeat the steps to process all the animals.
Jump to step no 16 for automated analysis using the recommended threshold.
-
Manual Scoring: Do manual scoring either to determine an optimal threshold or you want to do manual analysis in a more detailed fashion than using a stopwatch. To perform manual scoring for obtaining the optimal threshold, you will have to perform all the previous steps in that order. We do not recommend performing manual scoring for threshold determination steps by non-experts. Because this will lead to erroneous threshold. Instead you can use the recommended threshold. Recommended threshold for FST is 1.6 , and TST is 0.6. For threshold determination, we recommend manually analyzing 3-4 randomly chosen videos (first and last 2 minutes of each video will result in better threshold determination).
-
Play and State: These buttons are used for manual scoring. They will be activated only when the manual scoring option is selected. Video will be paused at frame 1 of analysis by default and pressing “play” will start playing the video. Use the state button to switch between mobile (Green) and immobile(Magenta). You will also see a colored strip on top of the video corresponding to the state you have selected to aid in manual scoring. The default state is mobile.
-
Clip: Clip value removes periods of state switching. A clip value of 1 (recommended) will clip data from pre and post-transition while determining the optimal threshold. Doing this accounts for the delay in changing the toggle button.
-
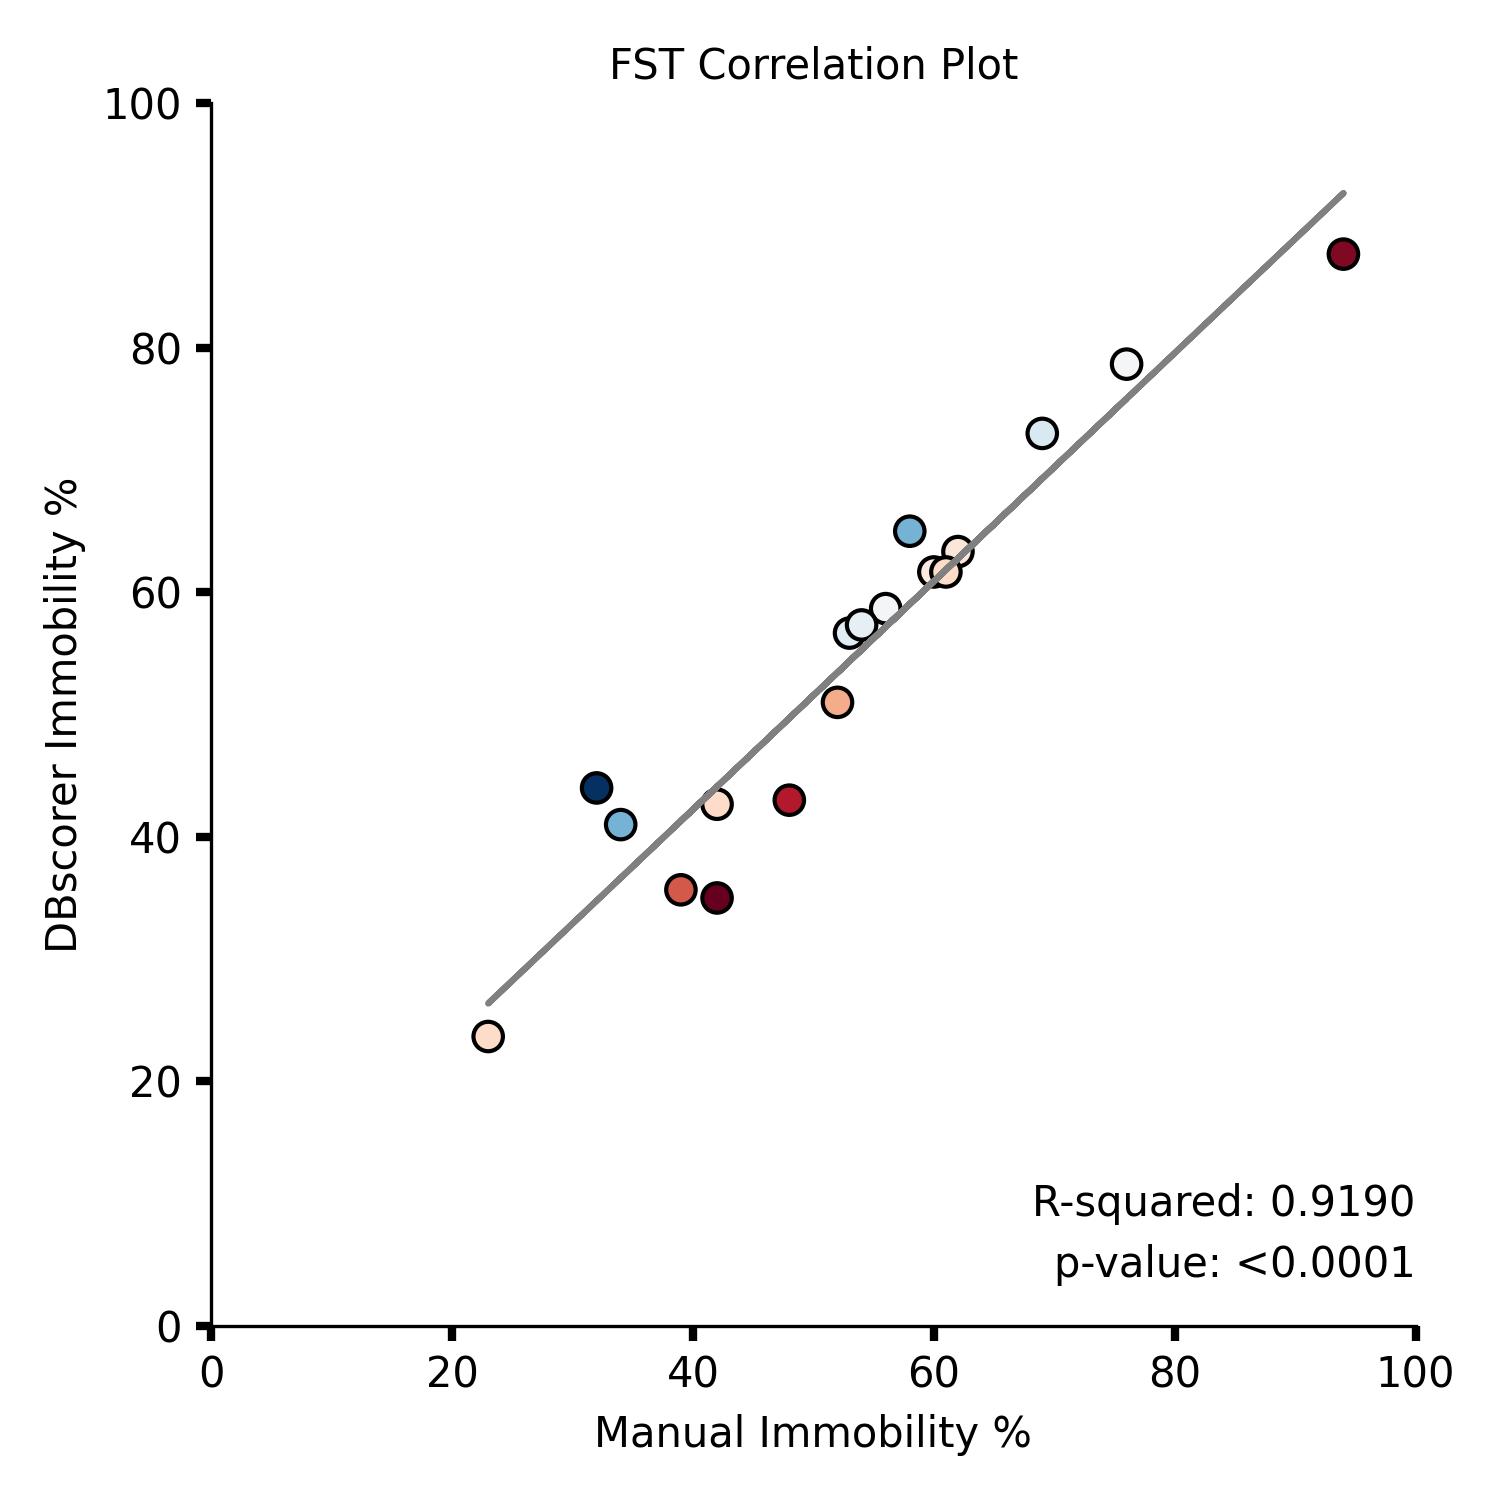
Get Threshold: Once you manually score 3-4 videos, you can select all the .mat files to get an optimum threshold. It will generate a csv file with optimum threshold value and AUC, precision and recall for the threshold ( Higher the better). You can then use the threshold for rest of videos in the batch.
-
Time threshold is the minimum time required to say an animal is immobile or not. Let's say you consider that an animal is immobile when it remains immobile for at least 2 seconds. Doing so will remove any immobility period that is less than 2 seconds and it will reduce the total immobility %.
0 0 0 1 0 0 0 1 1 0 1 1 0 0 1 0 1 0 . Before (7 second immobile, latency 4, 5 bouts)
0 0 0 0 0 0 0 1 1 0 1 1 0 0 0 0 0 0 . After(4 second immobile, latency 8, 2 bouts)
-
Compile Manual: This step is required only if you wish to do complete manual analysis and not required for threshold determination. Once you finish scoring all the videos manually, you can select all the .mat files by clicking the “compile manual button”. It will generate an excel sheet containing all the data together. It compiles only the .mat files generated from manual scoring. It will also generate a raster plot in order that is there in the excel sheet.
-
Compile: This button works in a similar manner as earlier except for automated analysis. Here, once you process all the videos, you can select all the .mat files generated from the “process video”(step 9). It will generate an excel sheet containing all the data together. It will also generate a raster plot in order that is there in the excel sheet.
Published in eNeuro
Please cite the paper if you use the code.
If you have a long video recorded, it is also possible to detect animal activity (not shown with data, but the concept is the same).