In this assignment you will be required to
- Create a dataset consisting of at least 4 classes
- Train a classifier to at least 80% accuracy
- Deploy your classifier to Heroku. Instructions on setting up an account and deploying can be found there. YOU DO NOT NEED A PAID ACCOUNT FOR THIS, THE FREE ACCOUNT IS FINE
- Your app should report the classes you support at
/api/class_list. This should be aGETendpoint. - Your app should accept a URL in a post request with an image and respond with a classification at
/api/classify
- Your app should report the classes you support at
Your classifier must be a "fine grained" classifier. Think cat breeds, not cat vs elephant.
In addition to the classification, you will need to submit answers to 3 questions (these answers should be added to the app.py in the appropriate spot...see below):
- How can you detect overfitting or underfitting?
- Describe how gradient decent works.
- What is the goal of regression?
I will use the code in js/build to exersise your app (see below). I will try a few images against your classifier. You must correctly predict the class more often than not to pass. I will also look at your question answers via your app.
In this folder, you'll find 2 other folders, js and py. The js folder is here so you can test your code, you do not need to modify the JS code at all for this assignment. The JS application is also how I will test your code. In the py folder, you'll find several files. Most of these are related to deploying to Heroku. You will need to edit the app.py file to add your custom code to serve your model. Some of the code has been written for you. If you make changes outside of the ## EDIT CODE BELOW and ## EDIT CODE ABOVE marks, you will likely break the app and it will not run properly on heroku.
In the app.py you will find three spots for you to fill in your answers to the assignment questions. Delete the line Answered question x here and replace it with your answer. Feel free to use multiple lines, the """ is a multi line string marker.
If you don't have node installed or are unfamiliar with JS development, you can serve the JS app by going into the js/build folder and typing python -m http.server. After this open a browser window to localhost:8000
By default the JS page will connect to a sample I've put up at truck-classifier.heroku.com. To have it use your app, just enter the path of your server into the text box with no trailing /. The URL must be fully quaified (i.e. start with http:// or https://)
You can test your code locally before deploying to Heroku by going into the py directory and running python app.py, you can also just test it on Heroku if you prefer.
If you receive an error from Heroku that says no web process running run the following command: heroku ps:scale web=1
-
Use the ideas from the Lesson 2 notebook from https://course.fast.ai to download your dataset. Remember that there needs to be at least 4 classes: https://github.com/fastai/course-v3/blob/master/nbs/dl1/lesson2-download.ipynb. Also keep in mind the tips for cleaning your dataset in case there are bad or anomalous images.
-
Using your downloaded dataset, train a deep learning model that will classify the images you downloaded. When you're done, export the model to be production ready. If you don't know how to do this, please watch Lesson 2 of https://course.fast.ai. Make sure you put the model inside the
pydirectory. -
Open up the
app.pyfile in thepydirectory and change the necessary code inside so that you can take in a URL of an image, get the actual image data, perform inference on it and return the prediction. Comments in the file will show you where to modify. -
Sign up for a Heroku account: https://heroku.com. When you finally sign up:
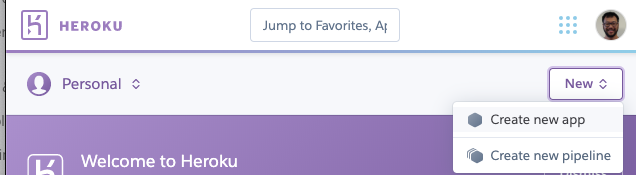
a. Go to the top right corner and click on New, then Create New App.
b. Enter in a new name for your app and choose which region you want. You will also need to create a new pipeline for continuous deployment. Underneath Choose a region, click on "Add to Pipeline" and we'll add in a pipeline. You don't specifically need it for this homework assignment but it's required for deploying to Heroku. Choose Create new pipeline underneath Choose a region, and call it whatever you want. Also choose the stage to add the app to be
production. Click on Create app after you're done.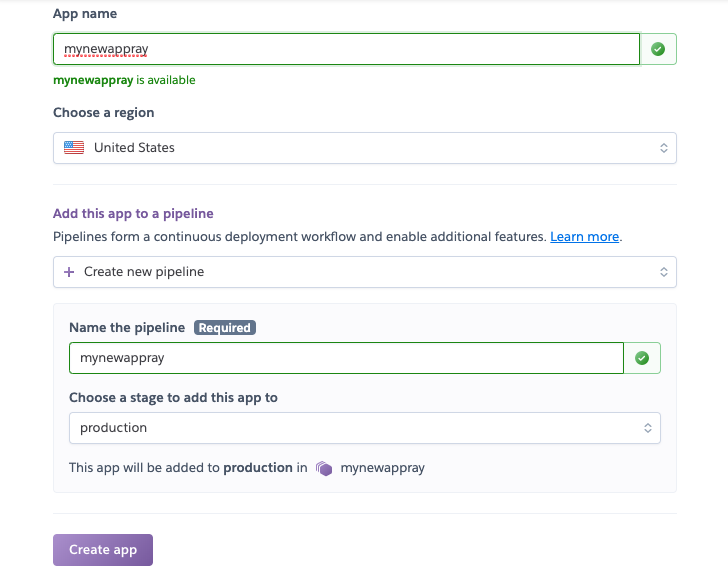
c. Once you're here, scroll down to the bottom and you will see how to deploy your model for testing it out. However to summarize, first download the Heroku CLI: https://devcenter.heroku.com/articles/heroku-command-line, then inside the
pydirectory, initialize a new Git repository here as you'll just be pushing the Python code up. You'll then need to set up a remote so that you can push your code to Heroku so it can be deployed. In your terminal, do:$ cd py $ git init $ heroku git:remote -a <yourappnamehere>Once you're done here, add everything inside this
pysubdirectory and push it to Heroku:$ git add . $ git commit -am "Deploying Model" $ git push heroku masterWhat is going to happen now is that setup will be performed so that your model can be hosted and can take in a URL to an image and outputs a prediction.
Once it's finished being deployed, your app will be hosted at
https://<yourappname>.herokuapp.com -
If you want to test your model now, you can either submit a CURL request directly by putting in the following in your terminal:
$ curl -d '{"url": "<url image here>"}' -H "Content-Type: application/json" -X POST <url to server here>/api/classifyor you can use the sample Javascript application by going into the
js/builddirectory and doing:$ python -m http.serverYou can now open up your browser to
localhost:8000and view the application. If you use the Javascript application, there will be two fields where the first field is the URL to your model running on Heroku so type in the URL established at the end of step 4. The second field is the URL to the image you want to classify. Click on the Predict! button and observe what is returned which should be the predicted class. -
If you want to test locally, that is possible. First go into the
pydirectory and assuming all of your changes are finalized, do:$ export PORT=5000 $ python app.pyThis will run the model locally on your machine. You can then use CURL to submit a request using
localhost:5000as the URL to your server or you can use the Javascript application and specifylocalhost:5000as the location of the server.

