This module is a brief introduction to using the Angular.js framework. As your dynamic visualizations grow in complexity, you'll need to keep track of a slew of variables, data sources, and user interactions. Angular provides an incredibly useful structure for tracking information and organizing web applications, but requires that you understand how its components fit together. This module only scratches the surface of the framework, but should give you enough grounding to dive into the next module on building D3 visualizations in an Angular application. While there's a bit of overhead to get started, it's worth it.
Contents
Here are a few resources to get you started using Angular:
- Angular.js Website
- Angular.js Tutorial (Codecademy)
- Angular.js Tutorial (w3schools)
- Interactive Angular Activities (learn-angular.org)
- Model-View-Controller Architecture (wikipedia)
- CSV to JSON Converter Shan Carter
- Angular HTTP Service w3schools
Before we consider the reasons for using Angular, we'll need to discuss the reasons for using a JavaScript framework at all. Unlike a library, which provides a set of tools that makes web-development simpler, a framework provides an architecture in which you structure your code. A framework helps keep your code organized by isolating common tasks (querying data, manipulating the DOM, etc.), and taking care of how they fit together. Frameworks often abstract away tasks that are difficult to keep track of, such as the state of an application, event handlers, callback functions, etc.
As your visualizations scale in complexity, it becomes increasingly difficult to keep track of the state of your application -- which gender should be displayed on the chart? Which color encoding is currently being used? How do I move through a story? Did I propagate the data changes to all relevant charts? Tracking this information in a variety of JavaScript variables is error prone and tedious. The Angular framework will enforce a consistent state between your data and your DOM, relieving you of the responsibility of updating the DOM whenever your data or a selection is changed.
Angular uses a Model-View-Controller-like architecture that abstracts data from visual representations. The primary purpose of the MVC structure is ensure consistency throughout your application, alleviating the worry of figuring out when to update the DOM. At it's core, the concept is simple: when the data (model) is changed, that change should be reflected on the DOM (view). This way, anytime a variable changes that should change the output, that change is made automatically (and without you having to write the code to do it).
A huge advantage of this structure is that your data (model) can be connected to multiple different representations on the DOM (views). Now, instead of worrying about whether or not you've properly propagated changes to various DOM elements, all you have to do is make changes to your model, and Angular will take care of the rest.
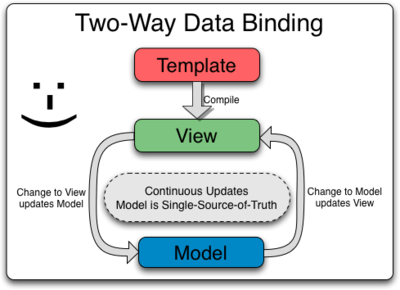
One way to think about Angular is as an extensive templating system. Given a set of element types and relationships between them, you construct the web-page you want. However, what makes Angular unique is two-way data binding. Rather than simply bind data to particular elements and then render them on the DOM, Angular allows you to use the DOM to change the underlying data structure. In other words, you can use your view to change your model. The documentation depicts the relationship as follows:
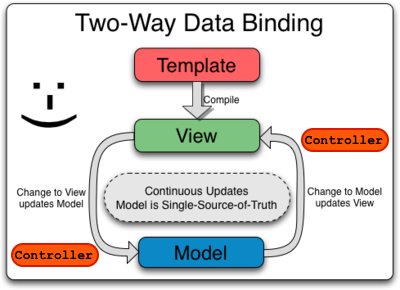
But wait, what about the C in MVC? The controller performs the necessary business logic for your application. It helps manage fetching and preparing your data (model), which may happen repeatedly, depending on your application. I like to think of the controller as sitting between the view and the model, performing necessary checks on the inputs/outputs as they're developed:
Importantly, your controller will manage the data of your application as part of a variable it will define, $scope. More on this below...
Enough theory -- let's get started. The basic structure of an Angular application requires that you define your application (app), and set up a controller for your application. Your apps and controllers be accessible as variables in both your HTML and JavaScript, but we'll begin by looking at the HTML syntax. Angular provides an extended HTML vocabulary that allows you to dictate element behavior by assigning attributes within HTML <tags>. These attributes all begin with the prefix ng-, and are referred to as directives.
Angular directives allow you to assign certain behaviors or styles to HTML elements on your DOM. When an Angular webpage is compiled, angular will identify these tags and manipulate the DOM appropriately. The documentation provides this high level description of directives:
At a high level, directives are markers on a DOM element (such as an attribute, element name, comment or CSS class) that tell AngularJS's HTML compiler (
$compile) to attach a specified behavior to that DOM element (e.g. via event listeners), or even to transform the DOM element and its children.
Note, when the page is compiled, Angular may "transform the DOM element and it's children". This allows you to use concise syntax to render a variety of HTML elements (without even writing JavaScript, yet). In order to signify to the Angular compiler which part of the DOM to scan and manipulate, we need to declare an Angular application with the ng-app directive:
ng-app: Declares an Angular application within the element. You may specify an application name, such as<div ng-app="myApp">, but in our first few examples, we don't have any defined applications, so we'll use a nameless app by declaring<div ng-app="">.
The second step in defining our MVC system is to declare a controller using the ng-controller directive:
ng-controller: Declares the Angular controller that manages the data (and corresponding logic) for your application. You can declare your controller in the same element as your application<div ng-app="myApp" ng-controller="myCtrl">or any child element. Because we haven't declare any named controllers in our JavaScript file yet, we can specify a nameless controller like this:<div ng-app="" ng-controller="">. While an app may have many controllers for different sections, simpler applications only have one controller.
Once we've established the area of the page for Angular to compile (using ng-app) and the desired data-source and corresponding logic (using ng-controller), we're able to start leveraging a variety of useful directives for declaratively building our DOM. First, we'll introduce the ng-model directive:
ng-model: Declares a specific angular model you would like to bind to the element. This directive is commonly used with<input>elements, as they allow the user to update the underlying model with the given name. For example, you may want an input element to represent someone's first-name, so you could say<input ng-model="firstName">. Anytime the user edits the input box, the underlying modelfirstNamewill be changed, and those changes will be propagated throughout your application.
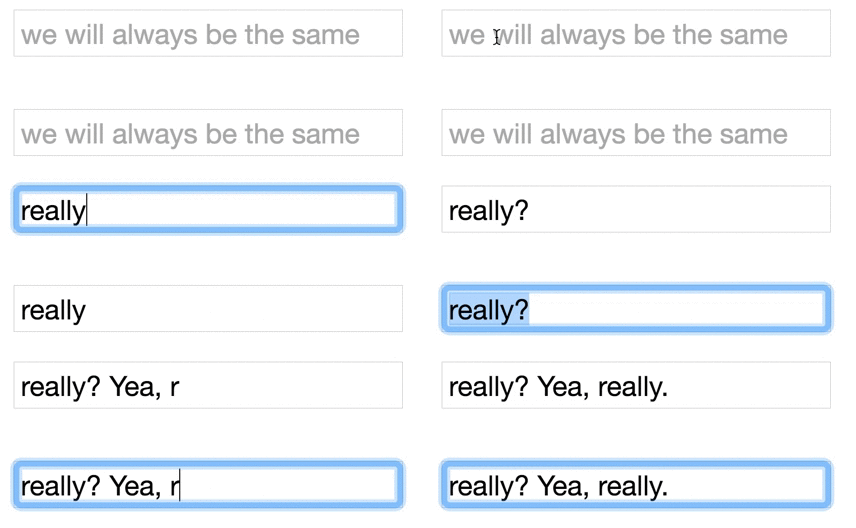
Here is a simple application in which multiple input elements have been bound to the same model.
<!-- Define an unnamed angular application in your div element. -->
<div ng-app-"" ng-controller="">
  <div>
    <input ng-model="text" placeholder="we will always be the same"></input>
  </div>
  <div>
    <input ng-model="text" placeholder="we will always be the same"></input>
  </div>
</div>
The result of the app is that, anytime changes are made in one input element, those changes are reflected in the other one.
There are myriad useful Angular directives (a few of which we'll introduce below), and as you progress through your familiarity with Angular, you can even write your own directives (which is super cool). We'll now introduce another HTML syntax, commonly used in conjunction with certain directives, called expressions.
Another foundational concept of the extended HTML vocabulary Angular provides is the use of Angular expressions. Expressions allow you to evaluate the value of an angular model in your HTML element. As we'll describe more in depth below, model values are contained within the scope of an applications controller. In other words, if you had multiple different controllers, the model values could differ across them.
Expressions use double curly braces ({{}}) to indicate a model that Angular should evaluate. For example, if you had a model firstName that was set to James, the expression {{firstName}}, the Angular compiler would render James in your HTML. Here is a quick example. Note, ng-bind is similar to ng-model, but only renders the value (as opposed to allowing the view to update it).
<!-- Define an unnamed angular application in your div element. -->
<div ng-app="" ng-controller="">
  <div>
    <input ng-model="greeting"></input>
  </div>
  <p>{{greeting}}</p>
</div>
That expression would render the following responsive DOM elements:
Here's one more exciting directive that will help showcase the value of using expressions: ng-repeat. This directive allows you to loop through elements in your HTML! An ng-repeat statement reads like a loop, where you specify a variable and pass in a set of values for that variable to take on. For example:
<!-- Define an unnamed angular application in your div element. -->
<div ng-app="" ng-controller="">
  <p ng-repeat="name in ['Jim', 'Sarah', 'Maria']">Hello, my name is {{name}}</p>
</div>
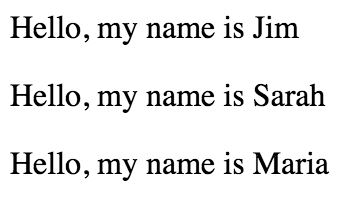
That code section would evaluate the value of {{name}}, which would iterate through the array ['Jim', 'Sarah', 'Maria'], creating a new paragraph element for each element in the array:
While this is a powerful start, the real value of using Angular is the way in which it connects elements in your JavaScript code to elements in the DOM.
Don't worry -- Angular isn't just a new way to write HTML code -- it provides a way to translate from elements in your JavaScript code to elements in the DOM. In your JavaScript code, you can create elements such as applications and controllers, which you can reference in your HTML.
Using JavaScript, you can create the applications that you reference in your HTML using the ng-app directive. The basic syntax for creating an application is to use the angular.module method which takes in two parameters: an application name, and an array of dependencies. We won't be using any dependencies for our applications in this learning module, though it's important to understand how Angular uses dependency injection to provide an application (or any other component) with the necessary building blocks. Here is an example of specifying an Angular module called my-app that has no dependencies:
// Declare an Angular module `my-app` with no dependencies, store it in a variable for reference
var app = angular.module('my-app', []); // note the empty array of dependencies is required
Bote the empty array of dependencies is required for this to execute properly. Once we have a module defined, we can define a controller for our module. Note, Angular supports method chaining, so there's technically no need to keep the module defined in a variable:
// Declare an Angular module `my-app` with no dependencies, store it in a variable for reference
var app = angular.module('my-app', []); // note the empty array of dependencies is required

// Assign a controller `my-ctrl` to our application
app.controller('my-ctrl', function($scope) {
  // Set initial application state in here by attaching properties to $scope -- see below
});
Our controller takes in two parameters: a name (my-ctrl), and a constructor function that has access to a number of variables, most importantly $scope.
The $scope variable is what will allow you to expose data from your model to your view. By attaching properties to the $scope variable, these properties become accessible as model element in your HTML. For example, imagine we had simple profit calculator in our HTML:
<!-- Initiate a nameless application and controller -->
<div ng-app="" ng-controller="">
  <!-- Create an input for quantity, bound to the model `quantity` -->
  <label>Quantity:<input type="number" ng-model="quantity"></input></label><br/>

  <!-- Create an input for price, bound to the model `price` -->
  <label>Price:<input type="number" ng-model="price"></input></label><br/>

  <!-- Display the profit by using an expression that multiples together `quantity` and `price` -->
  <p><strong>Profit:</strong>{{quantity * price}}</p>
This would work just fine, but doesn't allow us to set initial values. However, if we specify the values for price and quantity as part of the $scope variable, those will be exposed to our HTML elements. We can even do our computation in our $scope variable, and expose it in our JavaScript. We, of course, would have to use the application and controller names in our ng-app and ng-controller tags.
<!-- Initiate a nameless application and controller -->
<div ng-app="profit-app" ng-controller="profit-ctrl">
  <!-- Create an input for quantity, bound to the model `quantity` -->
  <label>Quantity:<input type="number" ng-model="quantity"></input></label><br/>

  <!-- Create an input for price, bound to the model `price` -->
  <label>Price:<input type="number" ng-model="price"></input></label><br/>

  <!-- Display the profit by using an expression that runs the `getProfit` function -->
  <p><strong>Profit:</strong> {{getProfit()}}</p>
// Declare an Angular module `profit-app` with no dependencies, store it in a variable for reference
var app = angular.module("profit-app", []);
// Declare an Angular controller `profit-ctrl`, and attach values onto the $scope
app.controller('profit-ctrl', function($scope){
// Set initial values
$scope.quantity = 5;
$scope.price = 100;
// Define a function that computes the profit
$scope.getProfit = function() {
return $scope.quantity * $scope.price;
}
});The Angular compiler watches for changes to the models, so the getProfit function will be fired automatically, and the changes will be reflected in the DOM.
If you're doing data-visualization, you'll likely need to read some data into your application. Angular provides a variety of approaches for reading in data, but we'll focus on the $http service in this section.
Similarly to $scope, $http is a predefined variable in Angular with specific behaviors. In order to leverage the variable within your controller, you need to include it in your constructor function:
app.controller('my-ctrl', function($scope, $http){
  // Set up controller
});
The $http variable functions quite similarly to an AJAX request that fetches data from a URL and returns a promise. This means that you need to wait until the promise completes in order to use the data and execute your code. Here is an example of fetching data in an application that only needs to make one call to the server for data:
app.controller('my-ctrl', function($scope, $http){
  // Read in JSON data, then execute the function on success
  $http.get('my-file.json').then(function(response){
    $scope.data = response.data.nodes;
  })
});
The response variable is an object containing information about the request, and the .data property contains the object returned by the request. As you might expect, the $http method is also great for querying data from APIs.
Unfortunately, $http does not have built in ways for dealing with .csv data. A simple work around is to convert your csv to json, or, as suggested here, parse your csv in your browser (blog post on the topic).
Again, this learning module just scratches the surface of working with Angular. The framework provides a variety of other methods for building robust web applications, and there is excellent extensibility for multipage architecture.


