Drew A. Hudson & Christopher D. Manning
Please note: We have updated the GQA challenge deadline to be May 15. Best of Luck! :)
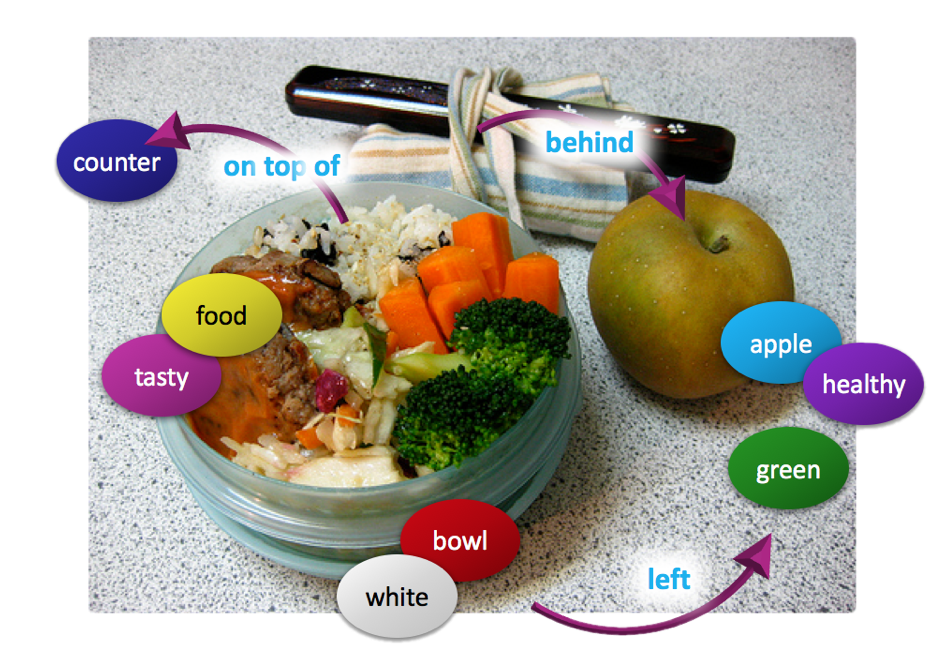
This is the implementation of Compositional Attention Networks for Machine Reasoning (ICLR 2018) on two visual reasoning datasets: CLEVR dataset and the New GQA dataset (CVPR 2019). We propose a fully differentiable model that learns to perform multi-step reasoning. See our website and blogpost for more information about the model!
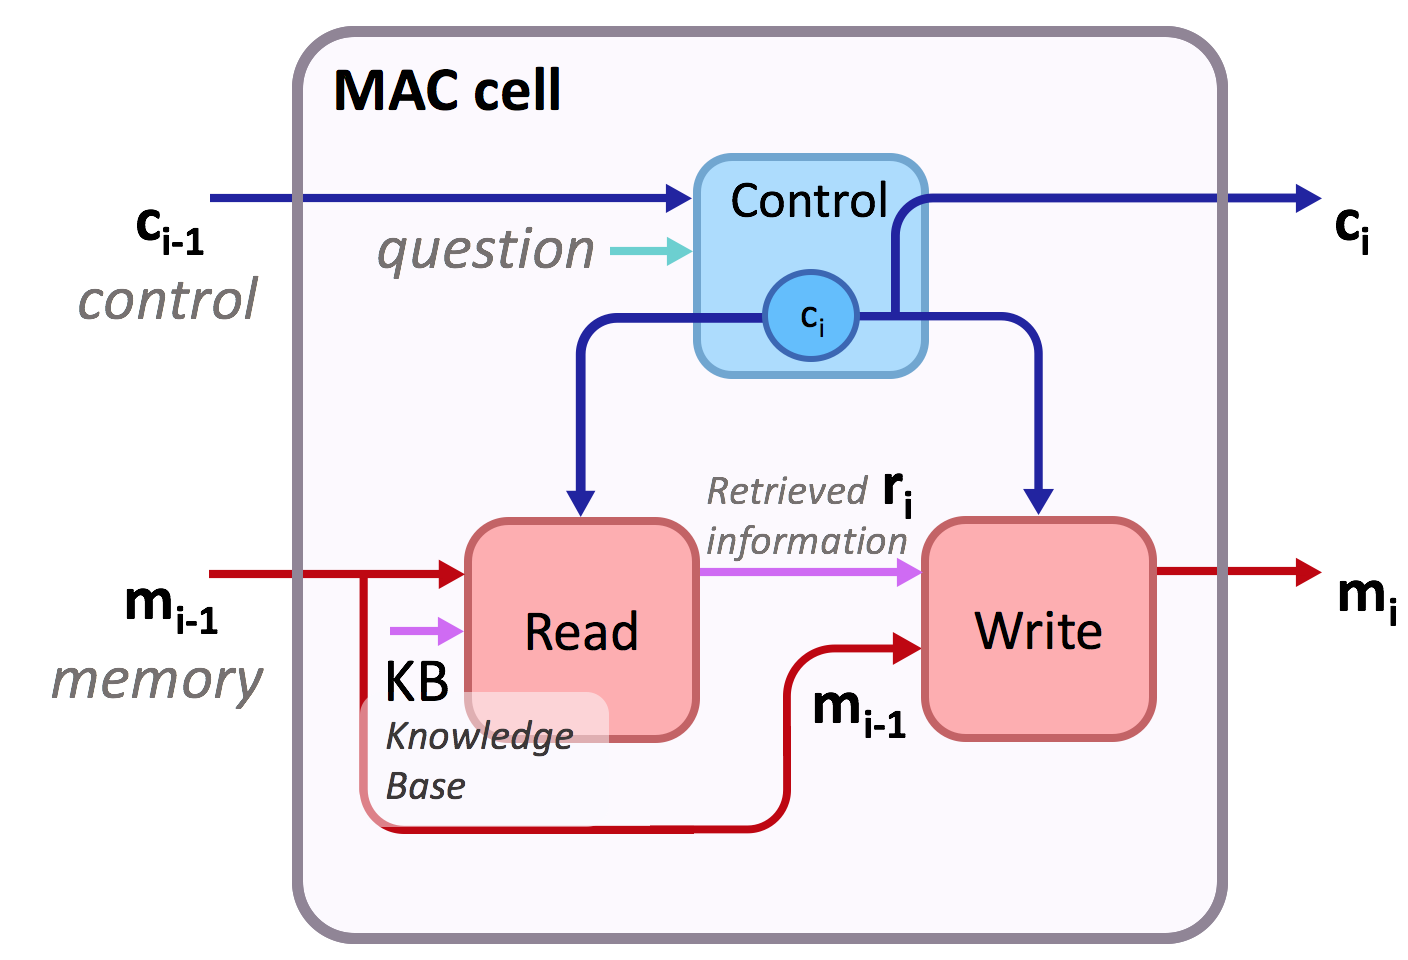
In particular, the implementation includes the MAC cell at mac_cell.py. The code supports the standard cell as presented in the paper as well as additional extensions and variants. Run python main.py -h or see config.py for the complete list of options.
The adaptation of MAC as well as several baselines for the GQA dataset are located at the GQA branch.
For MAC:
@inproceedings{hudson2018compositional,
  title={Compositional Attention Networks for Machine Reasoning},
  author={Hudson, Drew A and Manning, Christopher D},
  journal={International Conference on Learning Representations (ICLR)},
  year={2018}
}
For the GQA dataset:
@article{hudson2018gqa,
  title={GQA: A New Dataset for Real-World Visual Reasoning and Compositional Question Answering},
  author={Hudson, Drew A and Manning, Christopher D},
  journal={Conference on Computer Vision and Pattern Recognition (CVPR)},
  year={2019}
}- Tensorflow (originally has been developed with 1.3 but should work for later versions as well).
- We have performed experiments on Maxwell Titan X GPU. We assume 12GB of GPU memory.
- See
requirements.txtfor the required python packages and runpip install -r requirements.txtto install them.
Before training the model, we first have to download the CLEVR dataset and extract features for the images:
To download and unpack the data, run the following commands:
wget https://dl.fbaipublicfiles.com/clevr/CLEVR_v1.0.zip
unzip CLEVR_v1.0.zip
mv CLEVR_v1.0 CLEVR_v1
mkdir CLEVR_v1/data
mv CLEVR_v1/questions/* CLEVR_v1/data/
The final command moves the dataset questions into the data directory, where we will put all the data files we use during training.
Extract ResNet-101 features for the CLEVR train, val, and test images with the following commands:
python extract_features.py --input_image_dir CLEVR_v1/images/train --output_h5_file CLEVR_v1/data/train.h5 --batch_size 32
python extract_features.py --input_image_dir CLEVR_v1/images/val --output_h5_file CLEVR_v1/data/val.h5 --batch_size 32
python extract_features.py --input_image_dir CLEVR_v1/images/test --output_h5_file CLEVR_v1/data/test.h5 --batch_size 32To train the model, run the following command:
python main.py --expName "clevrExperiment" --train --testedNum 10000 --epochs 25 --netLength 4 @configs/args.txtFirst, the program preprocesses the CLEVR questions. It tokenizes them and maps them to integers to prepare them for the network. It then stores a JSON with that information about them as well as word-to-integer dictionaries in the ./CLEVR_v1/data directory.
Then, the program trains the model. Weights are saved by default to ./weights/{expName} and statistics about the training are collected in ./results/{expName}, where expName is the name we choose to give to the current experiment.
- The number of examples used for training and evaluation can be set by
--trainedNumand--testedNumrespectively. - You can use the
-rflag to restore and continue training a previously pre-trained model. - We recommend you to try out varying the number of MAC cells used in the network through the
--netLengthoption to explore different lengths of reasoning processes. - Good lengths for CLEVR are in the range of 4-16 (using more cells tends to converge faster and achieves a bit higher accuracy, while lower number of cells usually results in more easily interpretable attention maps).
We have explored several variants of our model. We provide a few examples in configs/args2-4.txt. For instance, you can run the first by:
python main.py --expName "experiment1" --train --testedNum 10000 --epochs 40 --netLength 6 @configs/args2.txtargs2uses a non-recurrent variant of the control unit that converges faster.args3incorporates self-attention into the write unit.args4adds control-based gating over the memory.
See config.py for further available options (Note that some of them are still in an experimental stage).
To evaluate the trained model, and get predictions and attention maps, run the following:
python main.py --expName "clevrExperiment" --finalTest --testedNum 10000 --netLength 16 -r --getPreds --getAtt @configs/args.txtThe command will restore the model we have trained, and evaluate it on the validation set. JSON files with predictions and the attention distributions resulted by running the model are saved by default to ./preds/{expName}.
- In case you are interested in getting attention maps (
--getAtt), and to avoid having large prediction files, we advise you to limit the number of examples evaluated to 5,000-20,000.
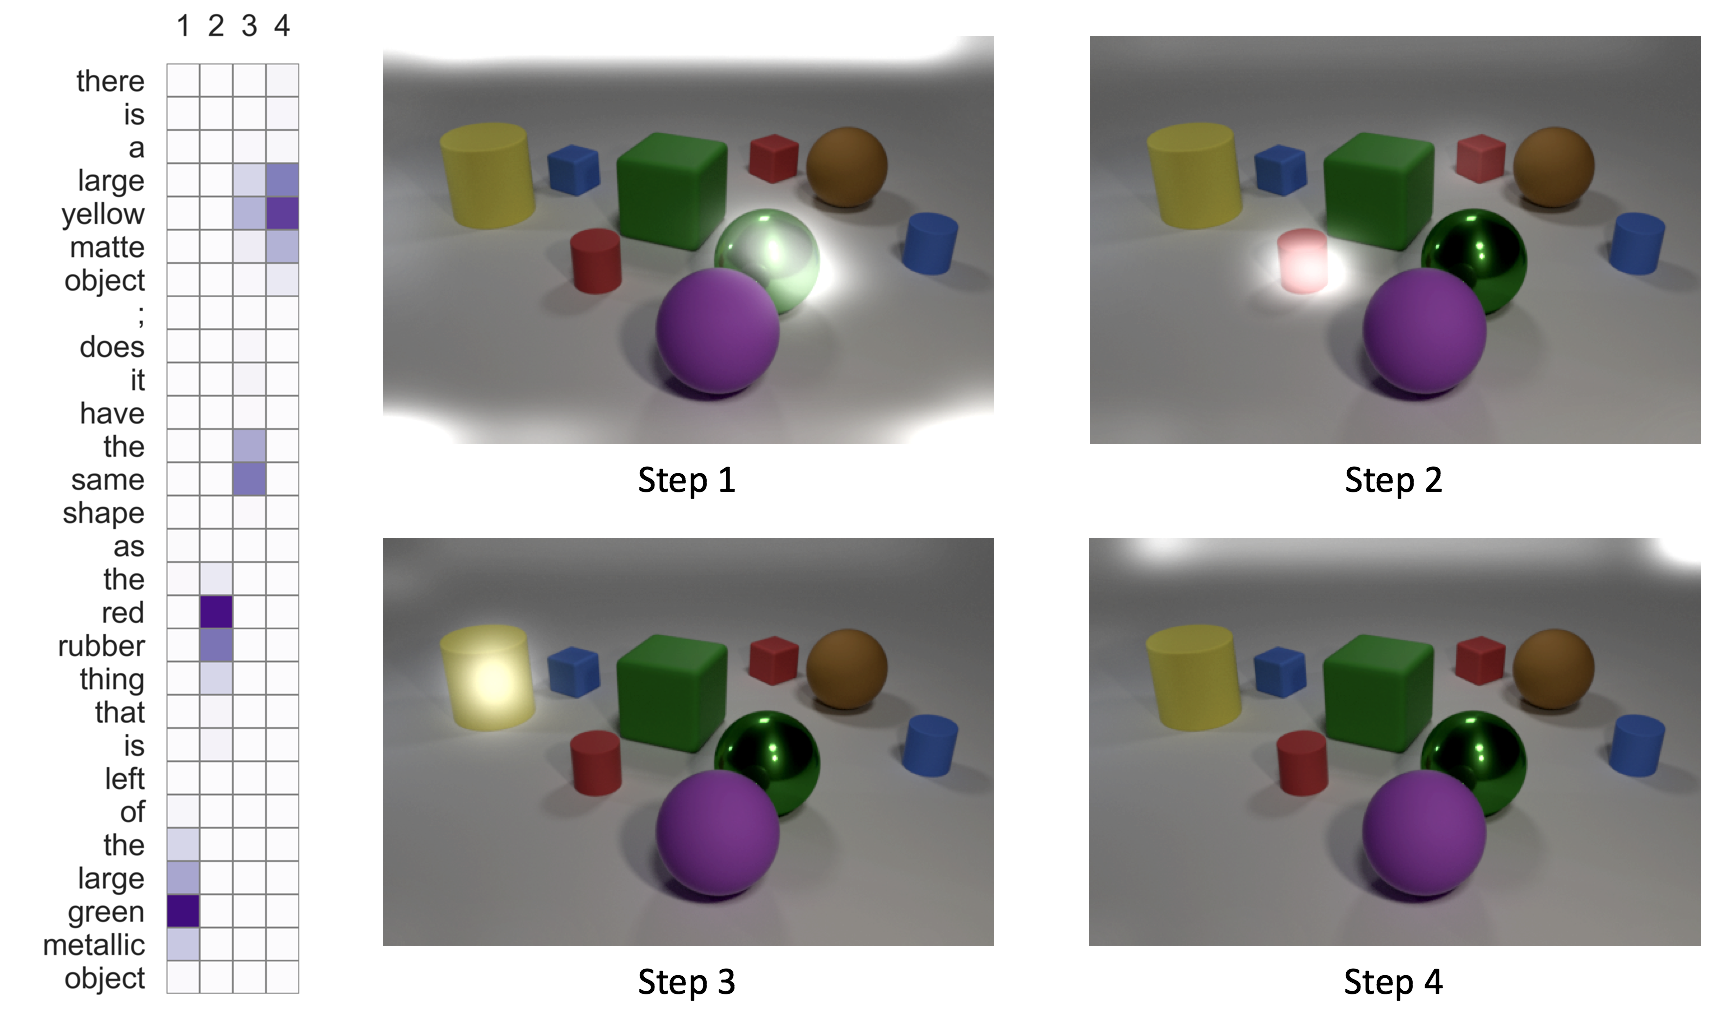
After we evaluate the model with the command above, we can visualize the attention maps generated by running:
python visualization.py --expName "clevrExperiment" --tier val (Tier can be set to train or test as well). The script supports filtering of the visualized questions by various ways. See visualization.py for further details.
To get more interpretable visualizations, it is highly recommended to reduce the number of cells to 4-8 (--netLength). Using more cells allows the network to learn more effective ways to approach the task but these tend to be less interpretable compared to a shorter networks (with less cells).
Optionally, to make the image attention maps look a little bit nicer, you can do the following (using imagemagick):
for x in preds/clevrExperiment/*Img*.png; do magick convert $x -brightness-contrast 20x35 $x; done;
Thank you for your interest in our model! Please contact me at dorarad@cs.stanford.edu for any questions, comments, or suggestions! :-)