spring22-TomDemont
Repository for Tom Demont semester project: Privacy Competition Platform for SecretStroll project in CS-523.
Introduction and purpose
In the last part of SecretStroll project in CS-523 course, students are asked to test the limits of the system they built. To do so, they must simulate the execution of the software and collect the generated network trace. More information on the Secretstroll original system can be found in the handout of the initial project. Here's a schematic representation of the final system: 
In this context, students are expected to use the collected trace to extract features and create a classifier that will learn how to associate tor network trace to a grid cell id queried for in the Secretstroll application.
It is possible, in the initial version of the application, to obtain a very efficient and accurate classifier. Students must provide a reflection on issues and counter-measures to avoid the privacy leakage due to website fingerprinting. The current project takes place at this point: to extend Secretstroll, we aim to create a privacy competition platform where students could try different implementation and countermeasures, observe and measure the utility cost, and, afterward, attack other student's implementations to see the remaining privacy leakage after machine learning based attacks.
This fulfils multiple pedagogical goals:
- Provides students utility measures for different implementations and observe the utility/privacy trade-off interactively
- Assign matches to students with train and test sets to train a model and get meaningful performance metrics for the quality of their classifier against other implementations
- Give students a taste of an interactive and live attack-defence based study of privacy preserving mechanism implementations
- Provide to the course team with an automated tool to observe and manage student's competition
This platforms aims to gather the interactive competition aspects of Kaggle or AICrowd platforms, while adding the inter-students match aspect to multiply the variety of network traces to attack and evaluate on both the utility and privacy metrics to observe the trade-off inherent to PETs.
In order to allow development on top of this project, here's a quick description of some aspects of the architecture of the software.
Timeline
The software is developed following the idea of the timeline depicted as follows:
 Note that the multiple round feature has not been included in the score computation: the current implementation considers each round to be independent and resets the leaderboard between each round. However it's totally possible to augment this and consider aggregation of multiple round scores for the total score computation. The main modification that should be done is the implementation of a scoring aggregation for multiple rounds in
 app/routes.py and app/models.py.
This timeline suggests that we separate strictly the attack and defence phases. Indeed, the software could support both being available at the same time, but our consideration of the pedagogical impact lead us to think that this could overwhelm students. Therefore, splitting both phases allows to focus on the improvement and implementation of the specific part. Students will be able to clearly see both aspects evolving one after the other, earning points with good utility score but taking care of not being "too easy to attack", and leading to giving "privacy leakage" points to adversaries.
Data model
The database model can be found under srs_model.xml and can be visualized on the tool https://ondras.zarovi.cz/sql/demo/.

This describes the current relational model between the entities defined with SQLAlchemy ORM module in the app/models.py file. This model allows us to follow the constructive structure of the software's entities: we create user, belonging to team, uploading their Defence. After that, we assign matches where we'll produce eventually many instances of attacks per match, in order to maximize the score obtained in the match.
Code hierarchy
The hierarchy of this code follows the standard hierarchy of Flask application, without the need for Blueprint patterns. Here's a quick description of the different files and their purposes:
srs.py: the application's location, loaded with the commandflask runtest.py: the unit tests for the applicationconfig.py: theConfigobject, passed at app module initializationdb_scripts.py: the scripts used for flushing db and putting test users. See Testing and toy examplesrun-redis.sh: scripts dealing with installation and running of Redis message brokerrun-srs.sh: launch script. See Launch instructionsapp.db: the sqlite database file holding the database.flaskenv: file holding Flask related environment variables. See Changing parametersmigrations: folder created at database initialization. This post is helpful to understand its purpose and how to initialize/migrate the database.logs: holds the logs created by the appattack_defence_test_scripts: contains scripts to test the functioning of system in real conditions. See Testing and toy examplesattack_defence_test_scripts/capture.sh: shell script managing the capture of network trace in the Secretstroll client container. Captures once the queries on each grid cellattack_defence_test_scripts/fingerprinting.py: python script using a Random Forest classifier to determine the grid cell hidden behind the features of some test set vectorsattack_defence_test_scripts/test_defence.csv.zip: compressed csv file containing the capture data in the correct format for being uploaded as defence trace
app: the module containing all the app systemapp/__init__.py: initializes the app module and all the flask extension modules it usesapp/routes.py: main router for the application. Entrypoint for all the HTTP queries made to the serverapp/models.py: creation with SQLAlchemy of the object relational model for the application's entities, along with the creation of database interaction functionsapp/forms.py: creation of the web forms with Flask WTForm moduleapp/errors.py: handlers of HTTP errors for Flask appapp/cached_items.py: contains the objects used for caching (currently, only the leaderboard items in order to prevent triggering re-computation)app/tasks_control.py: contains the celery tasks for handling control message, currently, email sendingapp/tasks_defence.py: contains the celery tasks for handling the student's upload of defence traceapp/tasks_attack.py: contains the celery tasks for handling the student's upload of attack classificationapp/templates: contains the HTML templates rendered with the flask Jinja engine.app/uploadsandapp/temp_uploads: contains the files uploaded by students.uploadsaims to keep the train, test and verification sets for the whole competition.temp_uploadsonly holds the raw uploaded files in order to let the celery workers have access to it and perform their tasks. No file should be kept after the tasks
Launch instructions
Quick launch
First, install the project:
git clone git@github.com:spring-epfl/spring22-TomDemont.git
cd spring22-TomDemont
In order to run this project, you need to have Python 3.9 installed. You are advised to create a virtual environment for this, in order to have a clean install of the requirements:
python3 -m venv venv
source venv/bin/activate
pip install -r requirements.txt
Mail support is an important part of the feedback given on uploaded files by students. In order to benefit from these, you can set the following environment variable this way (see changing parameters for more details), change the parameters between [] to yours for a config with EPFL email:
echo -e 'MAIL_SERVER="mail.epfl.ch"\nMAIL_PORT=465\nMAIL_USE_SSL=True\nMAIL_USERNAME="[gaspar-username]"\nMAIL_PASSWORD="[gaspar-password]"\nMAIL_DEFAULT_SENDER="[your_first_name.your_family_name]@epfl.ch"\nMAIL_TEST_RECEIVER_FORMAT="[your_first_name.your_family_name]+{}@epfl.ch"' > .envFinally, the next script starts (and installs in the folder redis-stable if not already installed) the Redis message broker, starts the Celery distributed task queue and the Flask web server in development mode:
./run-srs.shAfter a few seconds, the server should be running on http://localhost:5000. All the processes can be stopped with a Ctrl-C SIGINT signal.
Changing parameters
You can freely change the parameters of the application to adapt it to your needs. We sorted those by categories. In order to avoid having to export manually all these variables with export FLASK_ENV=development, you can create 2 files:
.flaskenv: contains the public environment variables likeFLASK_ENV. Should be versioned..env: contains all the other environment variables. Should not be versioned and kept private.
Writing your environment variables there will let them be loaded with the python dotenv module and you won't have to export them on every Shell session. See flask environment variables documentation. In order to fully run the application, you only have to set your mail parameters in the .env file, see quick launch.
Technical parameters
FLASK_ENV: either development, testing or production. See FLASK_ENV docSECRET_KEY: used to sign session cookies. See SECRET_KEY docDATABASE_URL: the URL of the Database. See SQLALCHEMY_DATABASE_URI docCELERY_BROKER_URLandRESULT_BACKEND: URLs of the message broker and result backend to use. Initially works with Redis.UPLOAD_FOLDERandTEMPORARY_UPLOAD_FOLDER: the names of the folders to save students files to.
Mail support parameters
MAIL_SERVERandMAIL_PORT: the server and port to use for outgoing email support.MAIL_USE_TLS: whether the outgoing email should be sent using STARTTLS. True if the variable is set to anything non-empty.MAIL_USE_SSL: whether the outgoing email should be sent using SSL. True if the variable is set to anything non-empty.MAIL_USERNAMEandMAIL_PASSWORD: credentials to use for connection to the email server.ADMIN: the admin email address for sending logging errorsMAIL_DEFAULT_SENDER: the email sender for email support. See Flask-MailMAIL_TEST_RECEIVER_FORMAT: a Python format string for an email address using plussed addressed email. Only used for development and user generation, to test receive student user email addresses.
Appearance
MATCHES_PER_PAGE: determines the number of matches to display on the/indexpage
Competition design
MATCHES_PER_TEAM: determines how many matches each team will be assigned at every round (should be strictly less than the number of teams)NB_CLASSES: the number of possible classes the students are expected to make classifications for (the number of grid cells for Secretstroll).NB_TRACES_TO_CLASSIFY: the number of traces students should make a classification for, the size of the test set.
Trace verification
MAX_CONTENT_LENGTH: the maximum number of mega bytes any uploaded archives should not exceed.MEAN_NB_REP_PER_CLASS: the expected mean amount of network traces to collect per grid cell id query in the Secretstroll system. Corresponds to the number of times the scriptattack_defence_test_scripts/capture.shshould be run by a student.DEVIATION_NB_REP_PER_CLASS: the accepted number of amount of traces traces per grid cell id deviating from the mean. Captures being difficult and not always perfect, students havingMEAN_NB_REP_PER_CLASS±DEVIATION_NB_REP_PER_CLASSnetwork traces for the capture on grid cell idihave capture accepted by the system.ROWS_PER_CAPTURE: the minimum number of rows the file holding network trace capture should have for each capture. Can be seen as the minimum number of packets we require to accept a network trace as valid.
Leaderboard
LEADERBOARD_CACHE_TIME: the number of seconds we should cache the leader-board.
Data formats
DEFENCE_COLUMNS: a string with the comma separated column names the uploaded network traces should have.ATTACK_COLUMNS: a string with the comma separated column names the uploaded trace classification should have. Will be appended withproba_class_iforiin{1..NB_CASSES}to hold the probability classification that should output the classifier.
User (student) guide
Students should first create an account on the http://127.0.0.1:5000/register page. They can select a team among the already existing ones or create a new one. They won't be able to change their team later. Once done, they can login and reach all the website's content.
- They can navigate through pages with the upper navigation bar. We'll see the available menus from left to right.
- In the home page
http://127.0.0.1:5000/index, they can see, when available, the matches assigned to them once generated.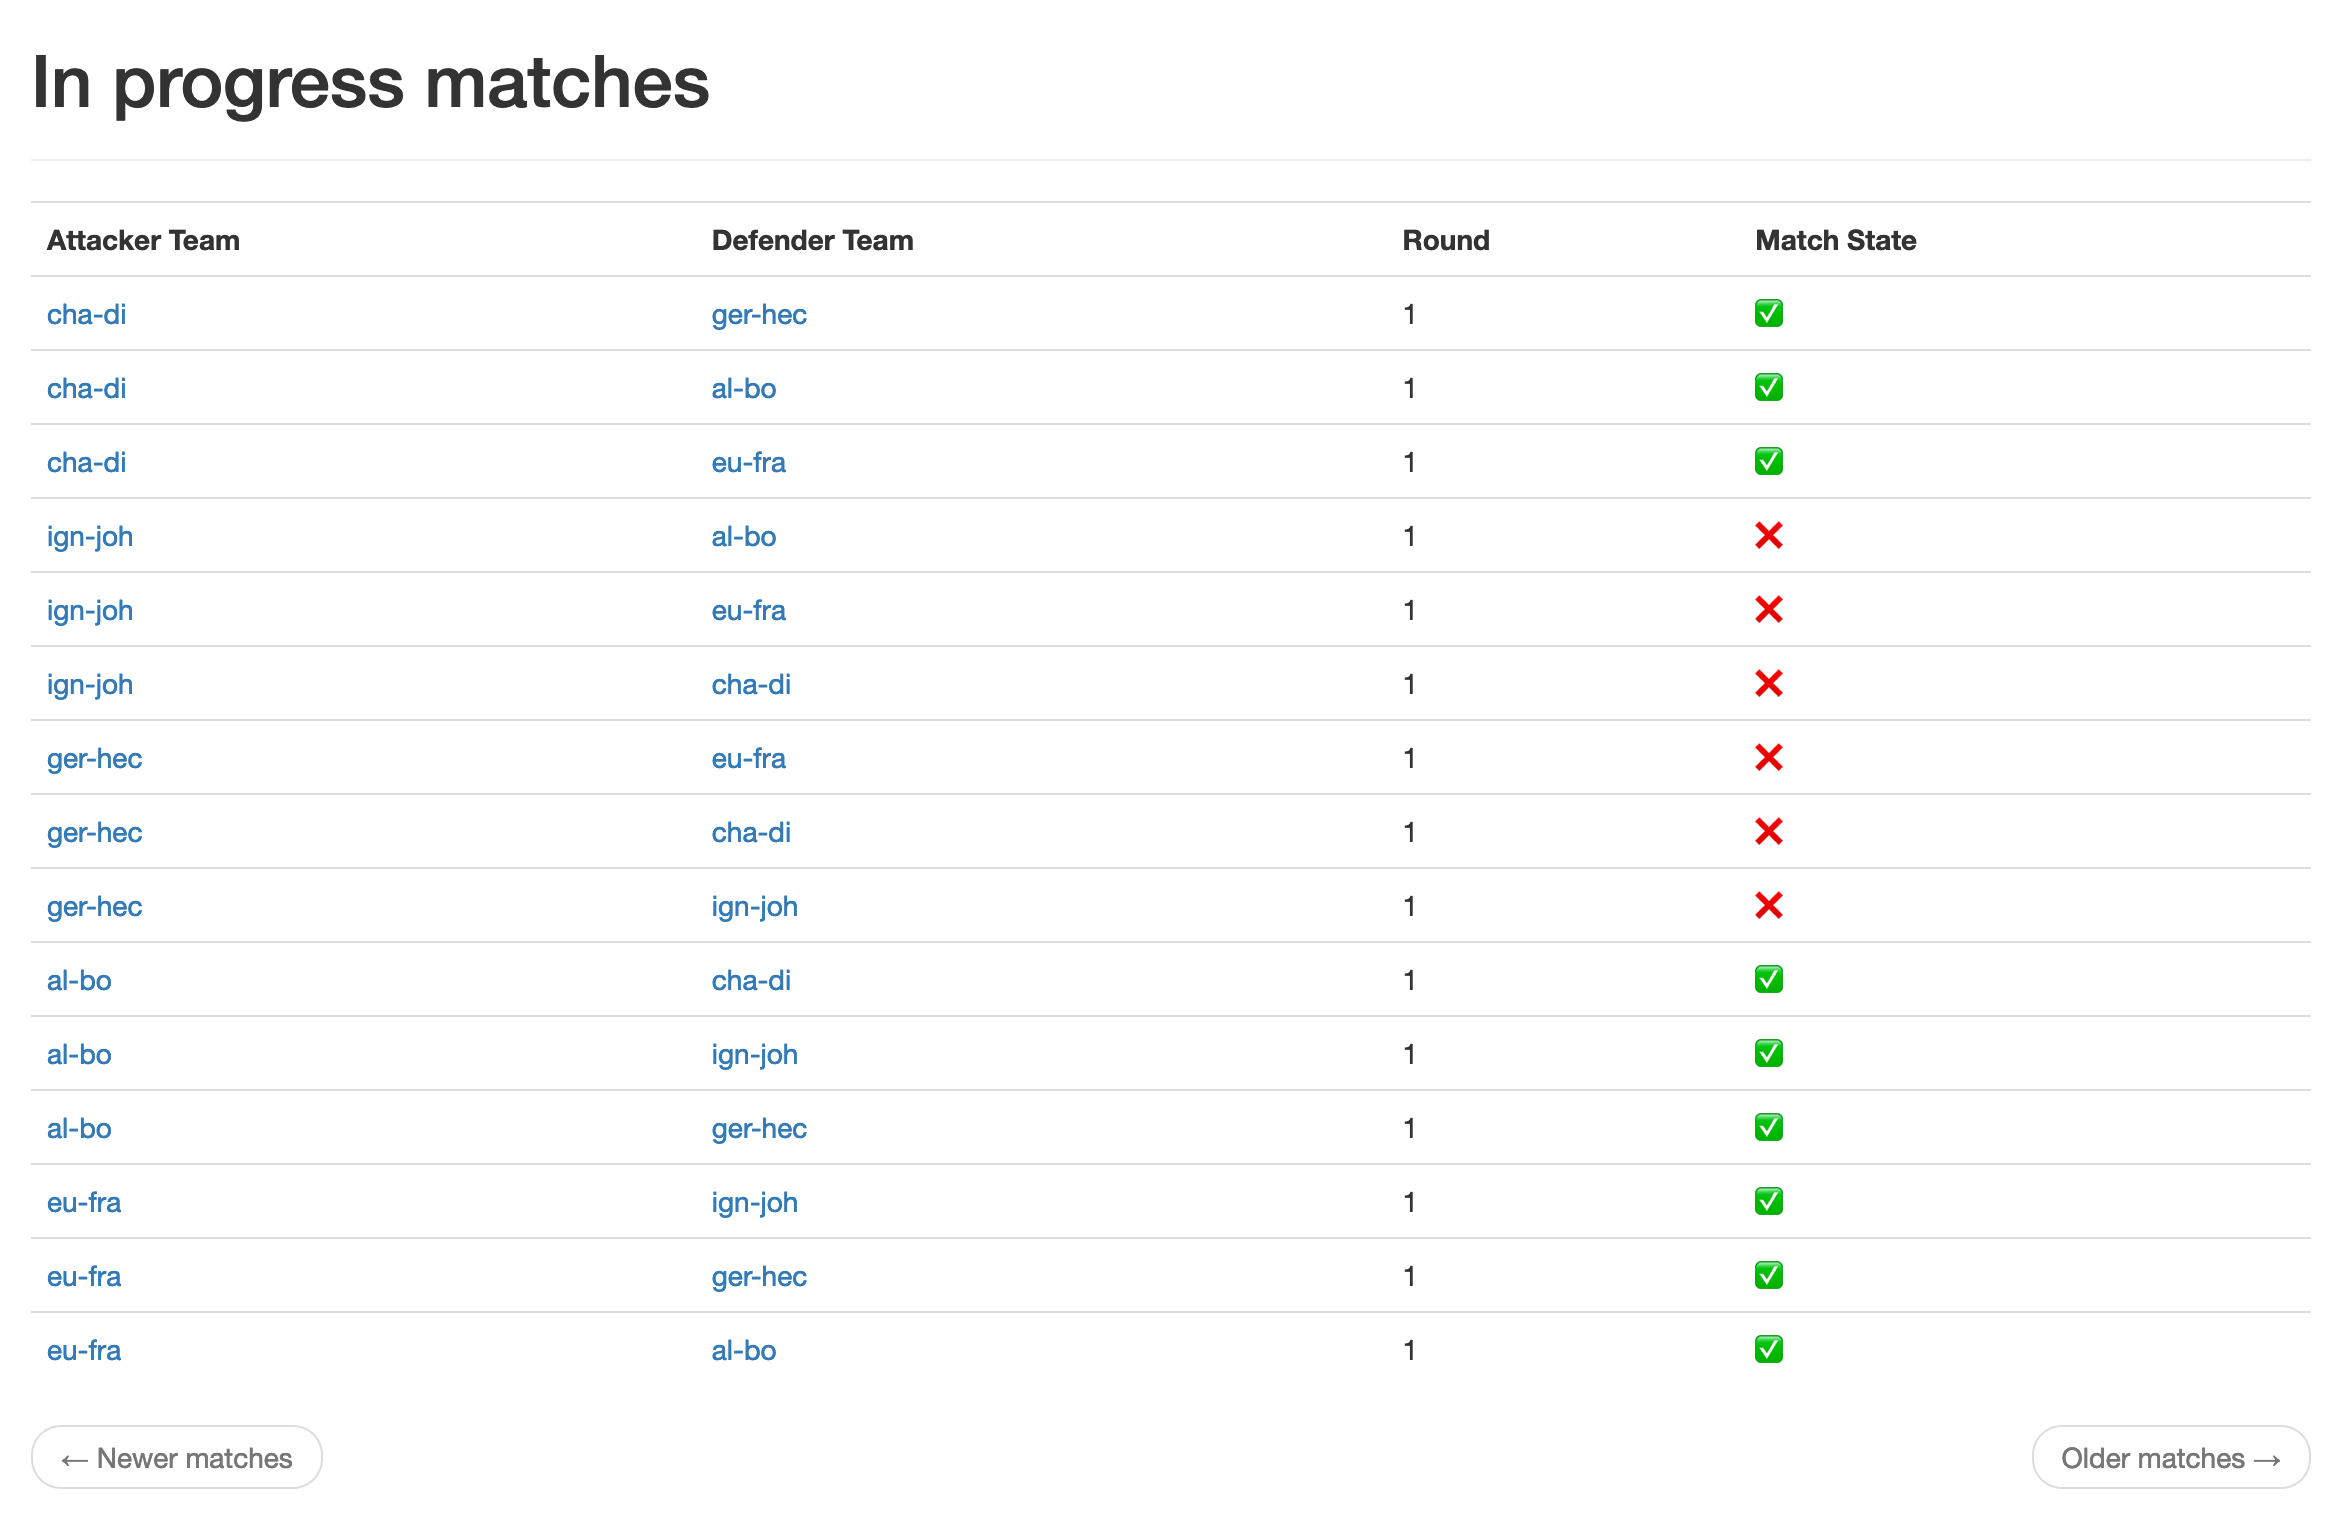
- The
Round: 1indicates the current round students are in. See Timeline. - The leaderboard page allow students to see their score and ranking
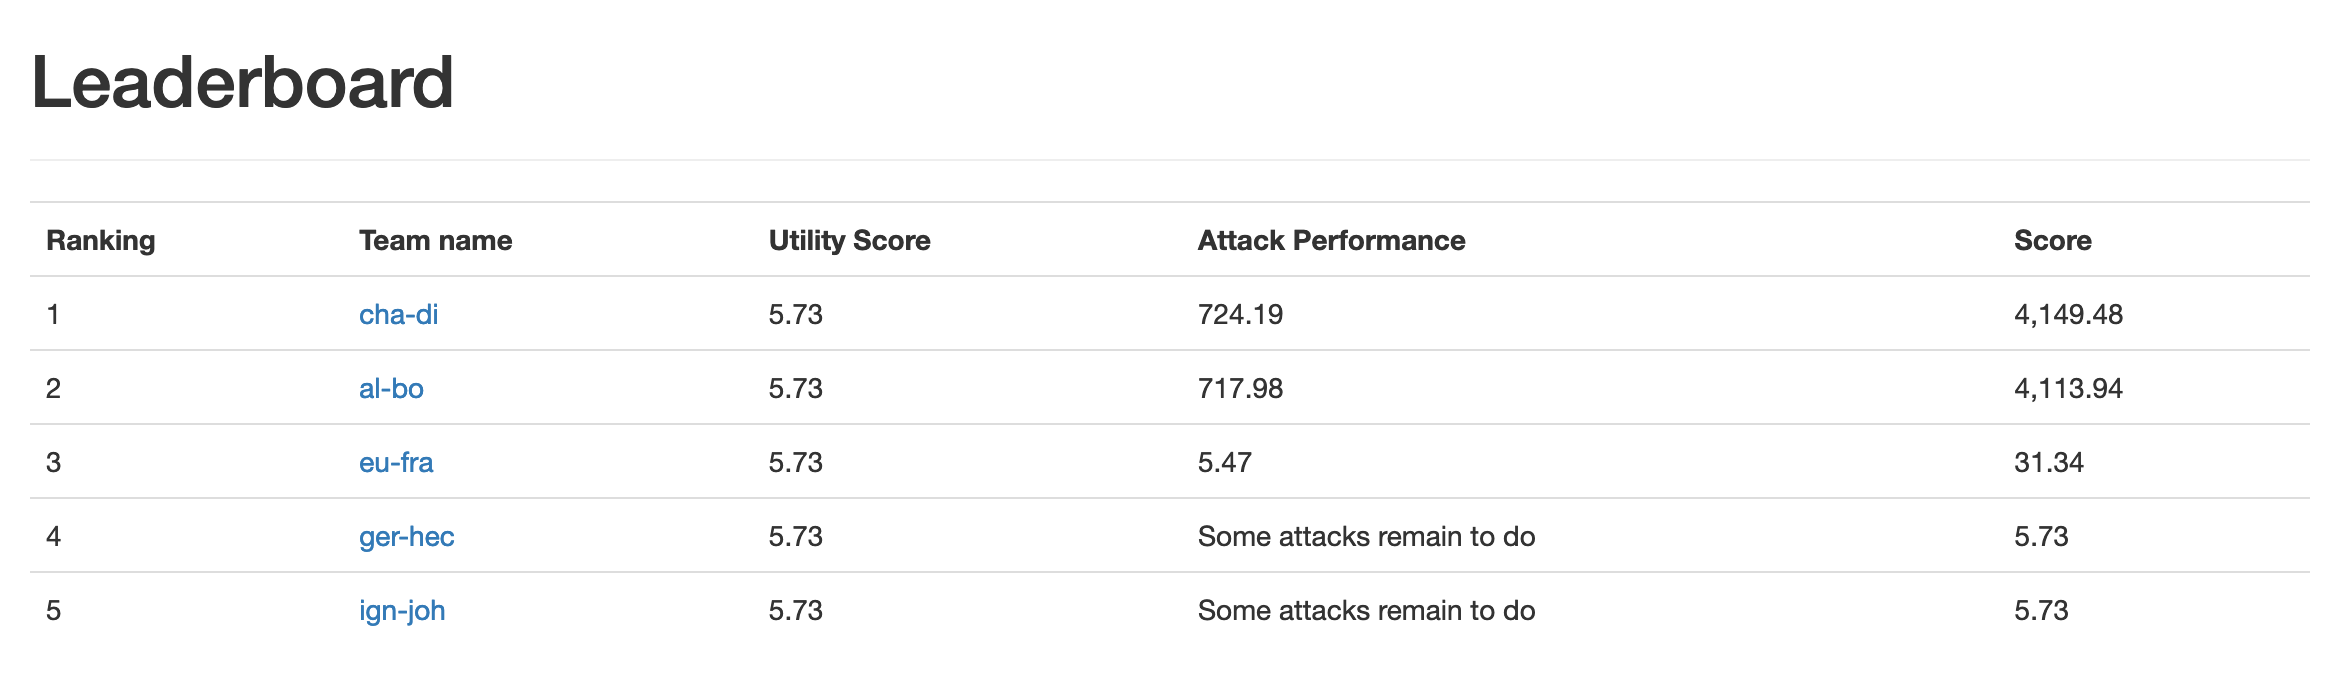
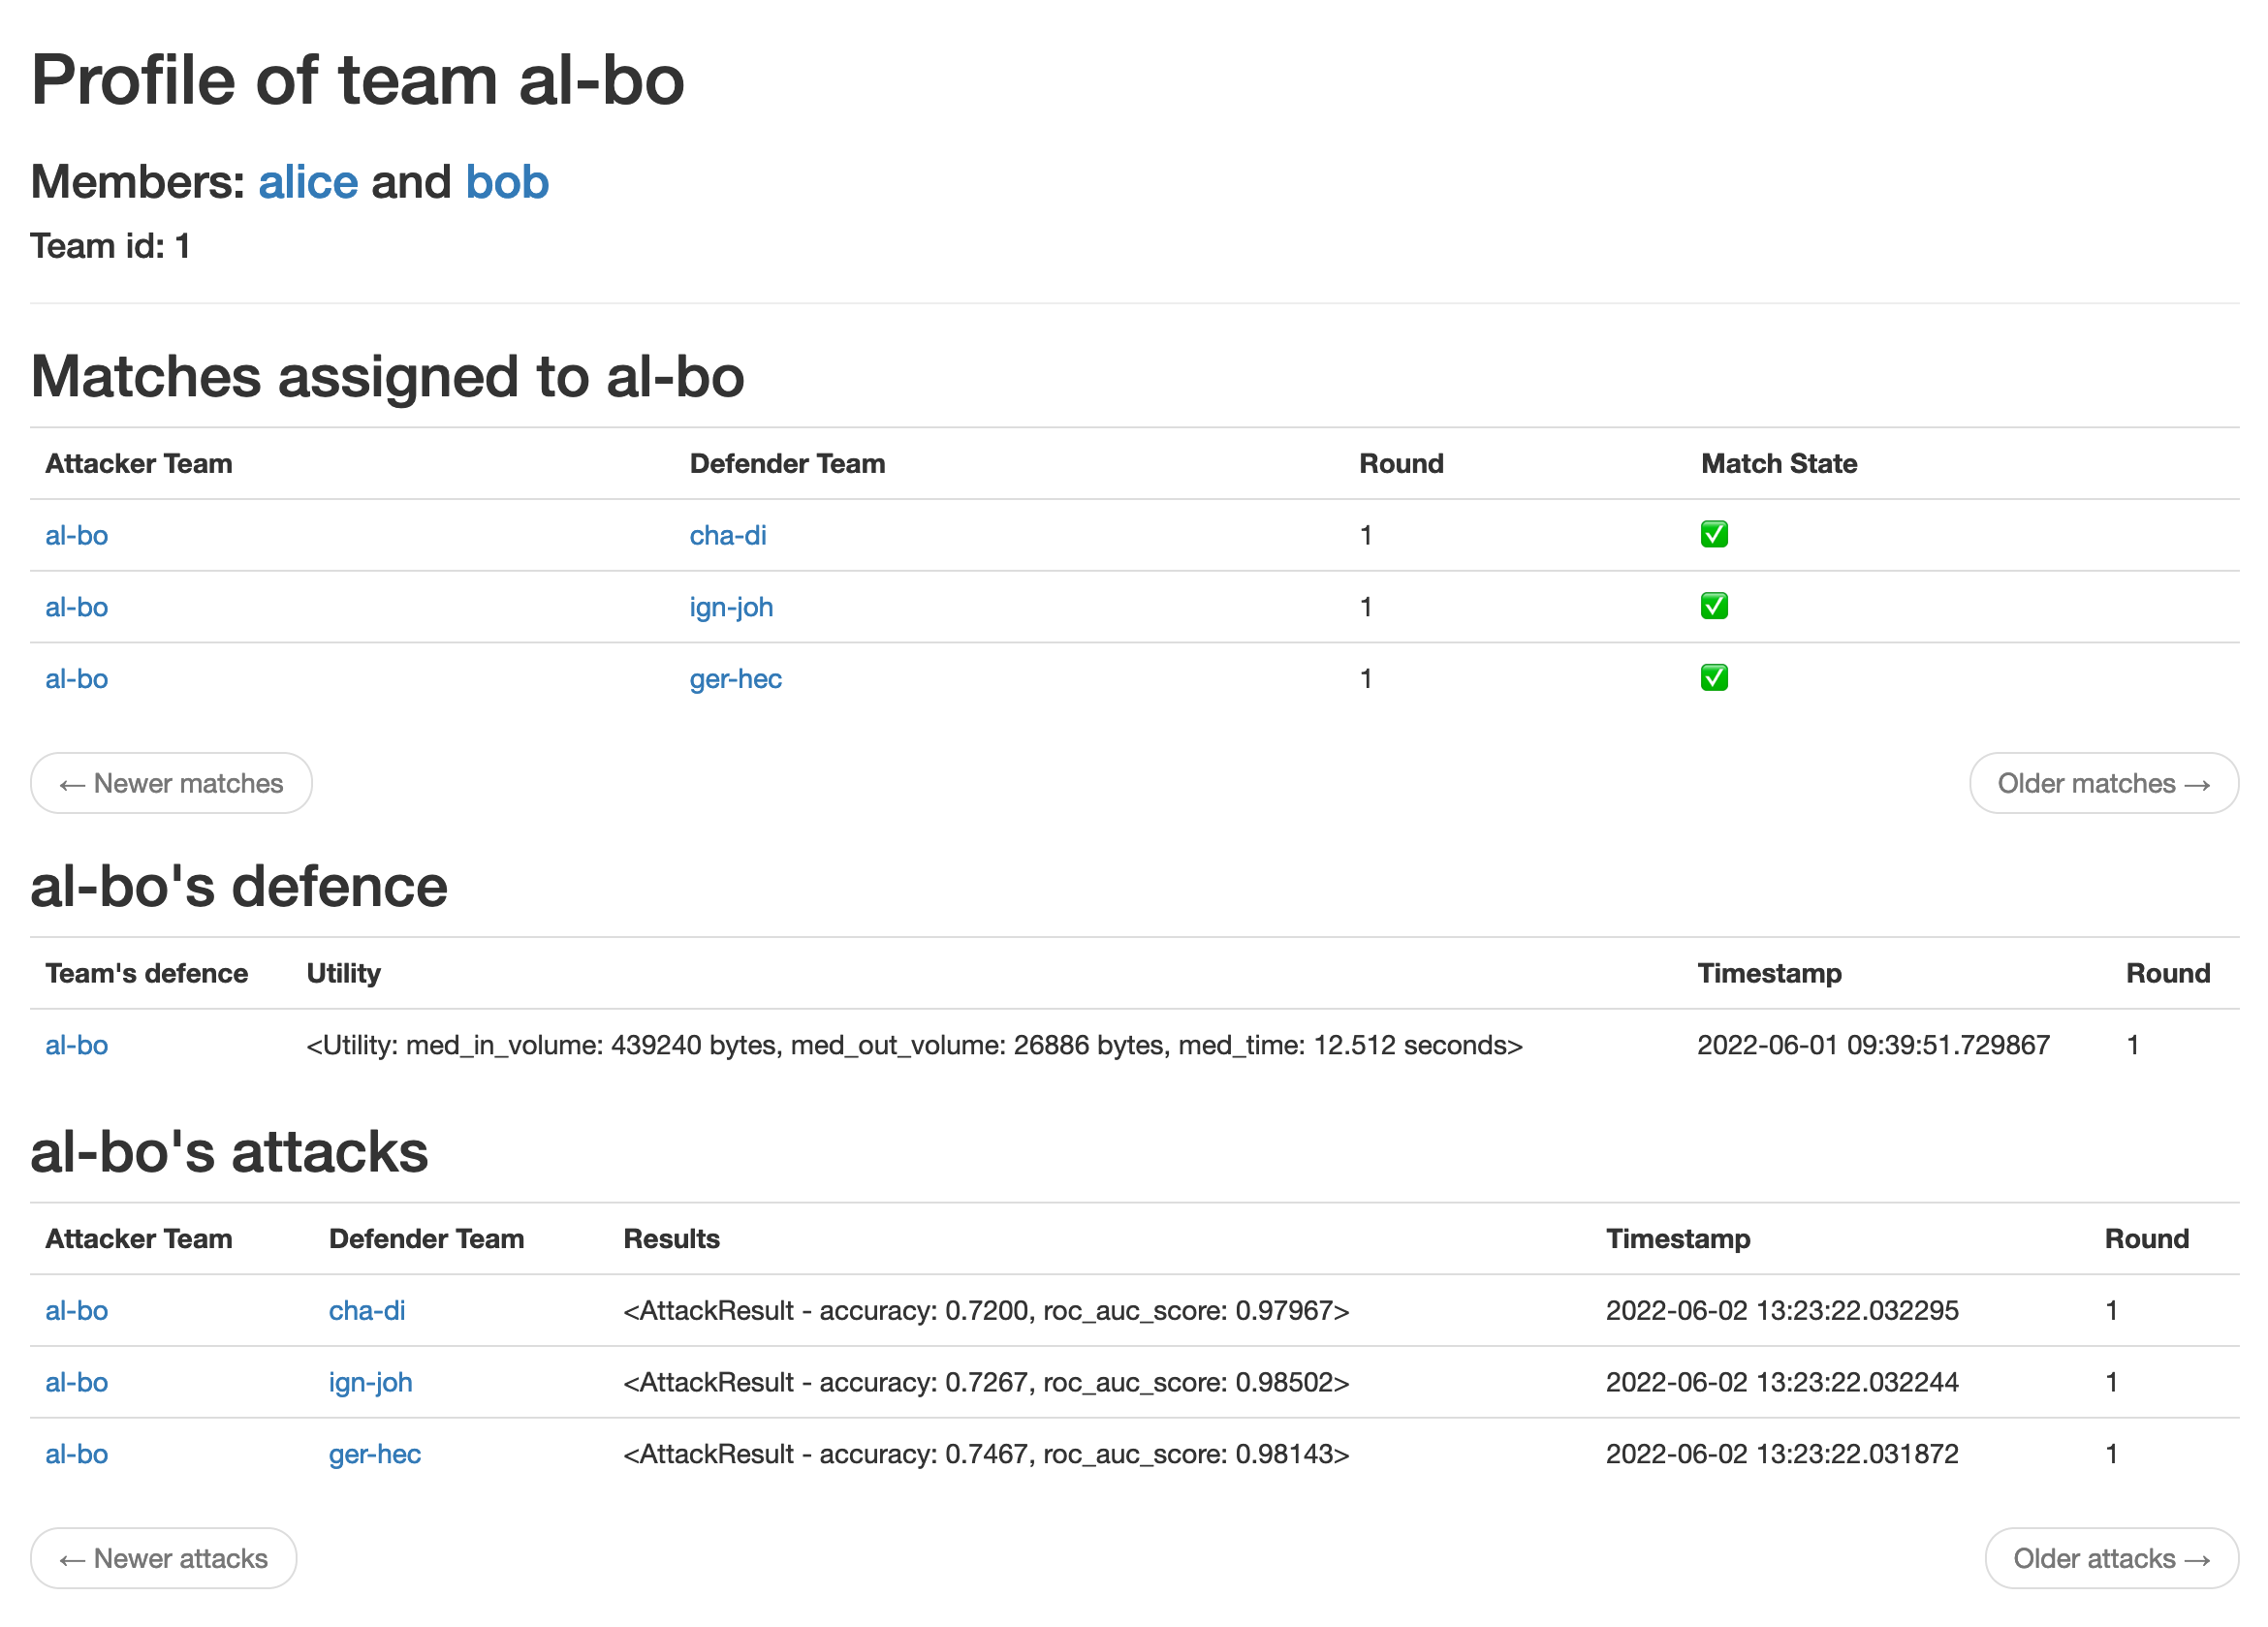
- The profile page gives access to either, the user information if they have no team, or the team's information.
- When made available by the admin, users will see an
Upload Defencebutton on the top of each page. Students will there have a file upload form where they can send their compressed csv containing the dataframe of their capture in the correct format.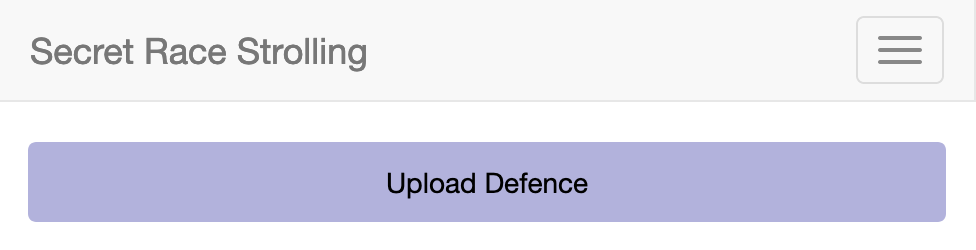
- When made available by the admin, students will see an
Attackbutton on the top of each page. . There will there be 2 possible actions:
Download attack, where they will get a zip file containing zip files for each train set and test set they should provide a classification for- Another file upload form where they should be able to upload their classification for the test sets they attacked
- For both attack and defence, see Testing and toy example part to learn how to play with these.


User (admin) guide
If you use the script described in test db population, you will already have an admin account named admin with password admin. Otherwise, the admin account should be created directly on the server side. This can be done with:
flask shellWhich launch the Python3 command line interpreter with the flask context already imported.
admin = User(username="admin", email=app.config["MAIL_TEST_RECEIVER_FORMAT"].format("admin"), sciper=1000, is_admin=True)
db.session.add(admin)
db.session.commit()
admin.set_password("put-the-admin-password")
Adds an admin named admin and password put-the-admin-password. This user can log in as a student user would do. This admin has an augmented navigation bar with 2 more menus: 
- Generate Matches brings to the guide page for generating the matches for a new round. Once the GET request is made, the matches are pushed to the database and students can see those on the home page. Note that currently, the leaderboard is only round-wise: when going to the next round, the leaderboard will be reset (the data is not erased from the database though).

- Set Phase allows to change the phase between "attack", "defence", none or both. When reaching the Set Phase page, the phase is automatically set to
"None": no student can upload attack or defence, to have a buffer state and avoid having inconsistencies.


Testing and toy examples
In order to have an experience of the running of the competition, the scripts in db_scripts.py and in the folder attack_defence_test_scripts provides scripts, data and code snippets to test the platform. Unit tests are also available to test the model entities and functions, those can be run with:
python3 test.pyTest db population
The following commands allow to properly flush all the database data and populate 10 fake users in 5 different teams plus and admin user named admin (in no team), all with password admin.
flask shellLaunches the python CLI with the app context.
populate_test_users()Test defence upload
The file attack_defence_test_scripts/test_defence.csv.zip contains a csv file in the correct format and is ready to be uploaded as is in the upload defence form. The csv file has the following shape 
You can try to log in as one of the fake user (alice for example) upload it and receive the success email if you configured the MAIL_TEST_RECEIVER_FORMAT variable as described in launch instructions to your.email+{}@yourdomain.tld. Feel free to change this file and test the failing conditions. The file can be loaded with pandas with pandas.read_csv("attack_defence_test_scripts/test_defence.csv.zip") (that will automatically uncompress the file).
Test attack upload
Once every fake user uploaded a test_defence_set (the same can be used multiple times, it will be split differently), you can login as any non-admin user and start attack. To do so, you can click the Download attack button as described in user (student) guide, save the file, uncompress it and put all the zip file inside the archive into the folder attack_defence_test_scripts.
The script fingerprint.py can read the provided files and output a classification of the test set in the desired compressed csv format.
# usage
python3 fingerprint.py "[int id of the first to attack]" "[int id of the second to attack]" "..."
example, if the folder contains train and test files for team_1, team_4 and team_5:
python3 fingerprint.py 1 4 5This will create a file named my_classification.csv.zip that can be uploaded to the attack upload form. As in Test defence upload, you can receive the confirmation email and see your results on the team page.
Credits
The Flask app is created following the useful and very detailed guides from Miguel Grinberg