2021-ARMessaging - SkyWrite
Summary
SkyWrite is an Android app that will allow a sender to select an appropriate message (eg Happy Birthday, Merry Christmas etc) to a postcode. The message will appear in augmented reality 100ft above the ground. Those with the app/service will be notified that a message exists in a nearby postcode.
WARNING: This project is no longer maintained and so it may no longer work as expected.
WARNING: The Firebase Cloud Messaging Service has an updated key and so Notifications will no longer function correctly.
Table of Contents
- 2021-ARMessaging - SkyWrite
User Guide
How to run
- Make sure you have a compatible mobile device
- Download the apk file from here
- Navigate to Settings and make sure to give permissions to install unknown apps from unknown sources
- Locate the apk file in your files and tap on it to install it
- Open the app and accept all permissions - if you do not have Google Play Services for AR installed already, SkyWrite will ask you to install it
Developer Guide
Prerequisites
- Java 11
- Gradle
- Android Studio
Set up
- Install the prerequisites
- Clone the repository:
git clone git@github.com:spe-uob/2021-ARMessaging.git
Getting Started
This project uses the Gradle build system. To build the project use gradlew build in the terminal or import the project in Android Studio.
To run tests, run gradlew test or navigate to the tests on Android Studio and run from there.
It is recommended to run the app using the Android Emulator but it is also possible to run the app on a hardware device.
Watson Text-to-Speech
SkyWrite uses Watson Text-to-Speech (Lisa voice). To create your own audio files using Watson Text-to-Speech, make sure you have curl installed and follow the instructions below:
- Navigate to the IBM Cloud Catalogue and click on the menu in the top-left corner
- Scroll down until you see
Watsonand click on it - Scroll down until you see
Watson Text-to-Speechand click on it - Configure and create your resource
- You will be directed to the
Getting Startedpage. On there, click on theManagetab on the left column - Copy your API key and the URL
- Use the following command in your terminal, and replace the API key and the URL with the ones you copied previously:
-
On Windows:
curl -X POST -u "apikey:{apikey}" ^ --header "Content-Type: application/json" ^ --header "Accept: audio/wav" ^ --data "{\"text\":\"hello world\"}" ^ --output hello_world.wav ^ "{url}/v1/synthesize?voice=en-US_MichaelV3Voice" -
On Mac/Linux:
  curl -X POST -u "apikey:{apikey}" \
  --header "Content-Type: application/json" \
  --header "Accept: audio/wav" \
  --data "{\"text\":\"hello world\"}" \
  --output hello_world.wav \
  "{url}/v1/synthesize?voice=en-US_MichaelV3Voice"
-
For more information, refer to the guide found in Getting Started
Deployment
Client-side Deployment
Since the front-end is an Android App, deployment is done via APK release. The CircleCI script includes a release-build which updates with every push to the master branch and produces an APK. Our website below contains a table of previous APK releases made during development.
Via Android Studio
If you want to build an APK from Android Studio, Android Studio documentation for release builds can be found here: https://developer.android.com/studio/run.
Via command line
If you want to build an APK from the command line, use one of the following commands:
- Windows:
gradlew TASK-NAME - Mac/Linux:
./gradlew TASK-NAME
Common build tasks are:
assembleRelease- for release builds (NOTE: To create a release build, you will need to sign your app with your private key. This can be done by following the instructions here)assembleDebug- for debug builds
More information can be found here: https://developer.android.com/studio/build/building-cmdline
Server-side Deployment
Server-side deployment is recommended through IBMCloud and a Kubernetes toolchain, which can be set up using the Dockerfile and shell script provided.
Local Server Deployment
Alternatively, a local environment can be set up for personal development; the SpringBoot server running on localhost with a connection to a local PostgreSQL server will suffice.
To use your own server, follow the steps:
- Update the current
BASE_URLfound inApp/app/src/main/java/.../util/database/server/ServiceGenerator- For locally hosted servers, make sure to change the BASE URL to the local IPv4 address of your server, including the port 8080, e.g. "http://192.168.x.x:8080/"
- Update
application.propertiesfound inDBServer/src/main/resourcesto use the appropriate database, username and password - Run the server locally, and check that it works by visiting the URL of your server on your browser first
- Finally run the app on your phone
PostgreSQL Database
If you have any problems with the database, you can access the database by entering the following on your terminal: psql -U USER_NAME DATABASE_NAME
Here are some handy snippets of code that might help you:
DROP TABLE banners;
CREATE TABLE banners (
   postcode VARCHAR(255),
	create_at TIMESTAMP,
	message_id INT
);
DROP TABLE messages;
CREATE TABLE messages (
id SERIAL PRIMARY KEY,
message VARCHAR(255),
objfilename VARCHAR(255)
);INSERT INTO messages (id, message, objfilename) VALUES (1, 'Happy birthday', 'happy-birthday');
INSERT INTO messages (id, message, objfilename) VALUES (2, 'Merry Christmas', 'merry-christmas');
INSERT INTO messages (id, message, objfilename) VALUES (3, 'Congratulations', 'congratulations');
INSERT INTO messages (id, message, objfilename) VALUES (4, 'Good luck', 'good-luck');
INSERT INTO messages (id, message, objfilename) VALUES (5, 'Get well soon', 'get-well-soon');
INSERT INTO messages (id, message, objfilename) VALUES (6, 'Thank you', 'thank you');
INSERT INTO messages (id, message, objfilename) VALUES (7, 'Happy New Year', 'happy-new-year');
INSERT INTO messages (id, message, objfilename) VALUES (8, 'Happy Mother''s Day', 'happy-mothers-day');
INSERT INTO messages (id, message, objfilename) VALUES (9, 'Ramadan Kareem', 'ramadan-kareem');
INSERT INTO messages (id, message, objfilename) VALUES (10, 'Happy Diwali', 'happy-diwali');Firebase Cloud Messaging (FCM)
Firebase Cloud Messaging (FCM) is a Push Notification service that allows a server to send notifications to the users.
If you want to set up Firebase Cloud Messaging for personal use, read the following:
Client-side Set Up
SkyWrite has the NotificationFCMService class which handles incoming messages from the server and displays the relevant notifications, and so you do not need to modify any code. However, if you use a different package name to com.ajal.arsocialmessaging you will need to connect Firebase to your app. To do this, follow the instructions here: https://firebase.google.com/docs/android/setup
Server-side Set Up
To set up server-side you will need to first need to create a project on Firebase, if you haven't already done so.
The follow the steps to retrieve your configuration file with your service account's credentials:
-
In your project overview, look at the top-right corner, select the cog next to
Project Overview, then click onProject Settings.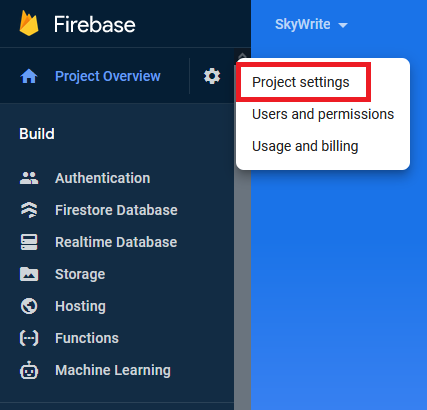
-
Click on
Service Accountsat the top
-
Click
Generate new private keyto retrieve your service account key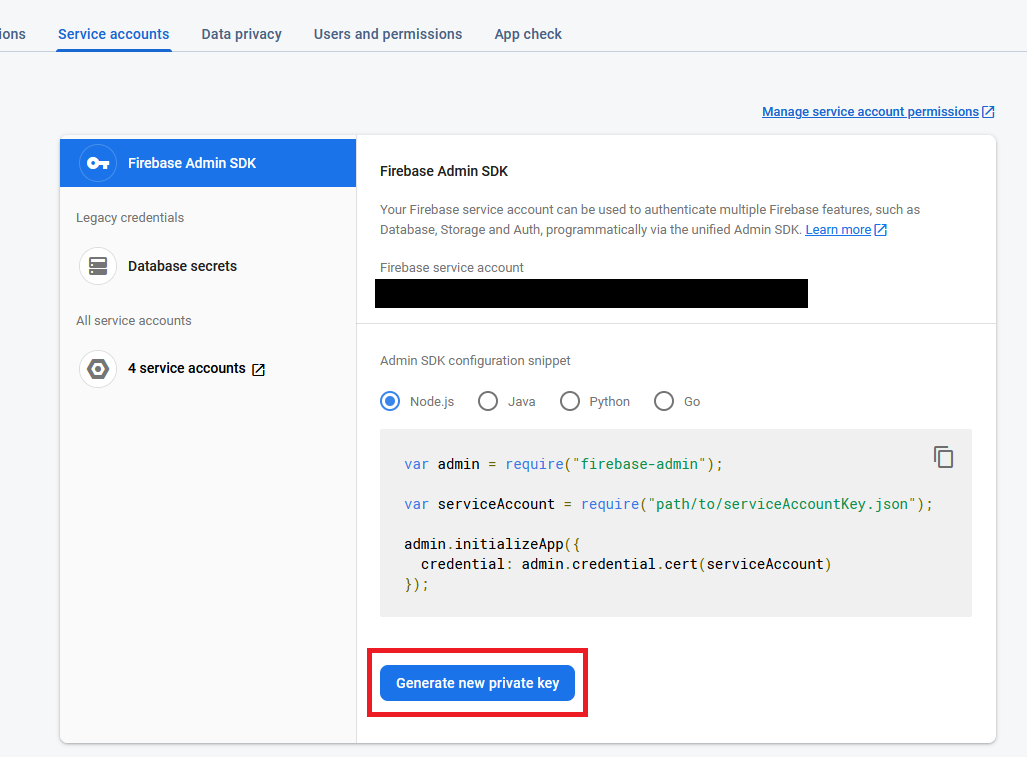


Once you have acquired the service account key file, update the current service-account-file.json to the new json file that you have acquired.
Blog
Our blog is regularly updated on the development process.
Documentation
You can find the documentation here: https://sky-write.github.io/docs