Skin cancer is one of the most common cancer in the world, it's estimated that one out of five Americans will develop skin cancer in their lifetime. There are several factors that came into consideration while evaluating skin lesion, a good early diagnoses usually has better prognosis for succesfull treament approach, in that sense it is critical to have a good tool to help dermatologists to make a good diagnosis.
This project is focused on building a model that can help dermatologists to make a better diagnosis of skin cancer. The model will be able to classify the type of skin cancer and identify the one that has the highest probability in our prediction.
The implementation of this model will be done using TensorFlow and the model will be deployed in AWS using lambda functions and API endpoint.
The solution to this problem is to build a model that can classify the type of skin cancer and identify the one that has the highest probability in our prediction. The model will be able to classify the type of skin cancer and identify the one that has the highest probability in our prediction.
The data was obtained from Kaggle datasets under the name Skin Cancer MNIST: HAM10000. The weight of the data is 7GB so it won't be provide in this repository, but it can be downloaded using the download button in the top right corner.
The description of the data is obtained from kaggle:
Training of neural networks for automated diagnosis of pigmented skin lesions is hampered by the small size and lack of diversity of available dataset of dermatoscopic images. We tackle this problem by releasing the HAM10000 ("Human Against Machine with 10000 training images") dataset. We collected dermatoscopic images from different populations, acquired and stored by different modalities. The final dataset consists of 10015 dermatoscopic images which can serve as a training set for academic machine learning purposes. Cases include a representative collection of all important diagnostic categories in the realm of pigmented lesions: Actinic keratoses and intraepithelial carcinoma / Bowen's disease (akiec), basal cell carcinoma (bcc), benign keratosis-like lesions (solar lentigines / seborrheic keratoses and lichen-planus like keratoses, bkl), dermatofibroma (df), melanoma (mel), melanocytic nevi (nv) and vascular lesions (angiomas, angiokeratomas, pyogenic granulomas and hemorrhage, vasc).
More than 50% of lesions are confirmed through histopathology (histo), the ground truth for the rest of the cases is either follow-up examination (follow_up), expert consensus (consensus), or confirmation by in-vivo confocal microscopy (confocal). The dataset includes lesions with multiple images, which can be tracked by the lesion_id-column within the HAM10000_metadata file.
The prediction model was build using a pre-trained model from Keras and we built customizable inner layers to improve the performance of the prediction. In this model we want it to create a model that is able to predict between different types of lesion and identify the one that has the highest probability in our prediction.
convert_model.py: Python file that converts the .h5 file into .tflite
Demonstration_notebook.ipynb: Notebook that runs the image classification model from AWS
Dockerfile: For deployment of the model in AWS as lambda function.
Notebook.ipynb: Notebook for exploratory data analysis, creating and exporting the model.
Pipfile and Pipfile.loc: contains the dependencies to run the project.
skin-lesion-class_v1_01_0.649.h5: Model with TensorFlow (can be directly downloaded from kaggle or saturn cloud)
skin-lesion-class.tflite: Model with TensorFlow lite
process_data.py: Python script to process an url with the image and return a prediction
test.py: Python script to test the prediction service using AWS.
- Clone the repo
- Download the data from kaggle
- Install the dependencies
pipenv install
- Activate the virtual enviroment
pipenv shell
Run the train.py file to obtain the best model for the training parameters as a .h5 file and convert to tflite file.
To make easier for you to run the training file you can go to this kaggle notebook that replicates the
train.pyfile, so you don't need to download the data
pipenv
Install pipenv in your machine:
pip install pipenv
set the python version that you want to use:
pipenv install --python 3.9
install the libraries that you want to use:
pipenv install pandas tensorflow numpy matplotlib
This would create a Pipfile and a Pipfile.lock
Run the docker file:
First build the model:
docker build -t skin-class-model .
Run the docker image
docker run -it --rm -p 8080:8080 skin-class-model:latest
Run the prediction service: Open a new command line (make sure you are running the docker file)
python test.py
The test.py already have an image link to return a prediction (feel free to add the URL you want to test)
AWS
pre-requisets needs to have AWS CLI installed which is command line to interact with AWS ( I have a windows and working with WSL, so I download the cli using the linux command)
Place to store your container
Create repo View push command
Go to security credentials and find the access key to configure your AWS
run in your command line: aws configure and type your credentials from the above step
run:
Create the repo to store the image
aws ecr create-repository --repository-name skin-class-images
Obtain the repositoryUri
924626007762.dkr.ecr.us-west-2.amazonaws.com/skin-class-images
Set at the command line
$(aws ecr get-login --no-include)

ACCOUNT=924626007762

REGION=us-west-2

REGISTRY=skin-class-images

PREFIX=${ACCOUNT}.dkr.ecr.${REGION}.amazonaws.com/${REGISTRY}

TAG=skin-class-model-v1-001

REMOTE_URI=${PREFIX}:${TAG}
Tag the image to AWS
docker tag skin-model:latest ${REMOTE_URI}
Push the docker image
docker push ${REMOTE_URI}

Browse the image

For deep learning task we need to increase the time of the response and the memory allocated to perform the function.
We need to go configuration -> General configuration and change the timeout to 30 seconds and the memory to 1024
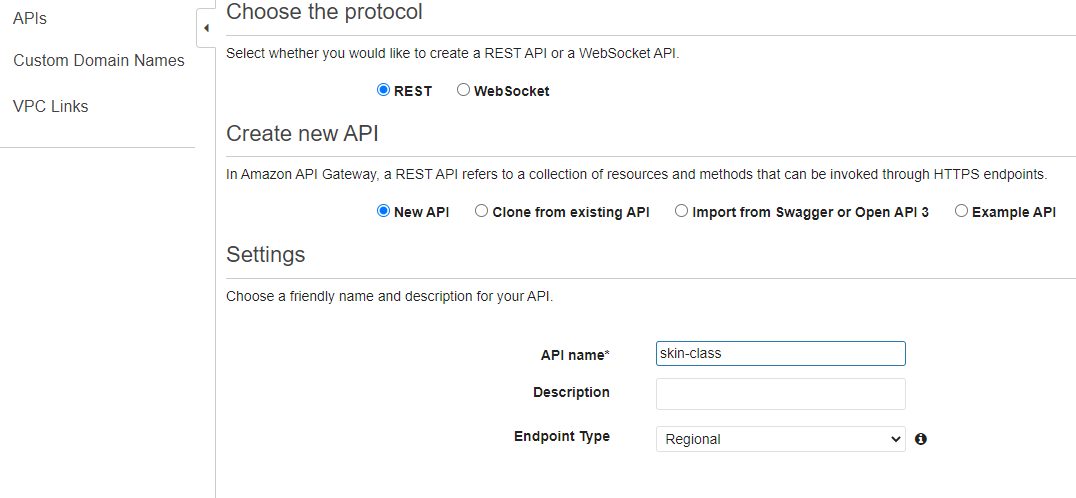
Create API

Build REST API

Choose the protocol -> Create API
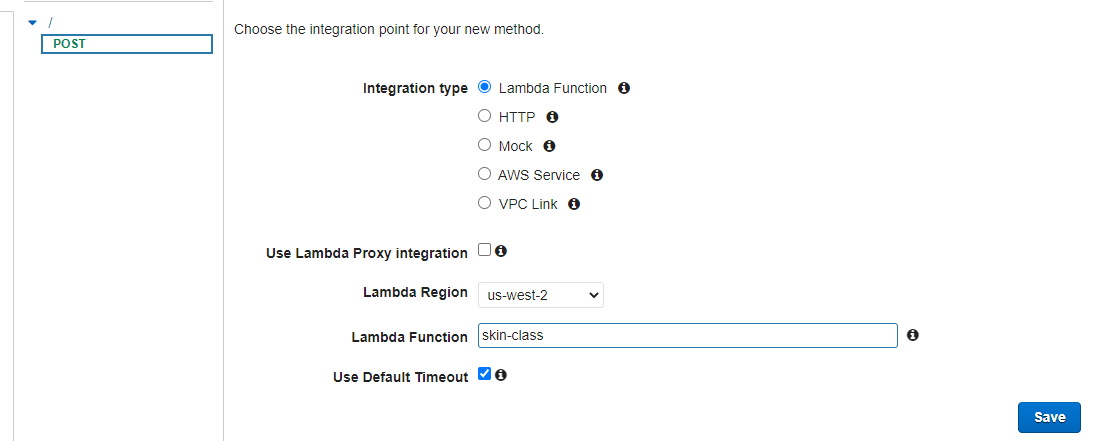
Create method -> select POST
Integration type: Lambda
Select the Lambda Function
Go to actions and click on Deploy API

Select the stage name

Now we just need to obtain the URL if you select a name for the POST you need to added at the end, if not you can use the url provided: 

The picture is a melanoma example from wikipedia (not use in the training)

The Endpoint allows getting the prediction by just providing the URL of the image and the prediction service.