=======================
This project is built on the Stamplay platform and AngularJS to show how to build a take-out food ordering application, let's say something similar to JustEat but done in the blink of an eye.
You can test it anytime simply creating a new project on Stamplay and uploading all the frontend assets with our client or our browser based code editor.
Feel free to implement more cool features (see the last paragraph for ideas), contribute to this repo or clone it to use it by your own scopes. For any question drop an email to giuliano.iacobelli@stamplay.com
This is a demo of what you can achieve with Stamplay.
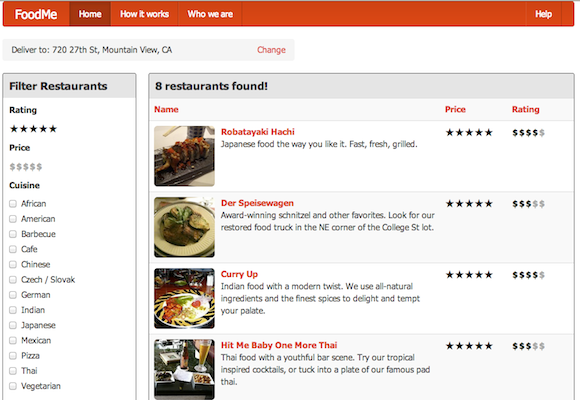
It's somewhat a clone of JustEat and here you can see it up and running http://foodme.stamplayapp.com
We love javascript and front end framework and this time we show you how you can create this app using AngularJS to implement the client side logic. We started from the very good workshop made by Igor Minar that can be seen here. Here are the user stories for this example:
- Guest users can signup with email and password
- Sort and filter restaurants by categories, rating and pricing
- Both logged and guest users can place an orders to listed restaurants
- Logged users can rate restaurants
- When an order is submitted, both restaurant owner and user are notified
- Admins can add more restaurants and meals using the "Admin" section
- Admins can review user's orders and manage them
Best of all, we used AngularJS :) Prepare to be amazed.
FoodMe is built around the following building blocks
Go to your account and create a new app.
After creating a new app on Stamplay let's start by picking the component we want to use in our app that are: User, Webhook, Email and Custom Objects.
Lets see one-by-one how they are configured:
the app use the classic email + password login. This is used by default by the user component as you can see from the image below.

Let's define the entities for this app, we will define Meals, Restaurants, and Orders that are defined as follows:
- Name:
name, Type:string, the name of the meal - Name:
photo, Type:file, the photo of the meal - Name:
description, Type:string, meal's description - Name:
price, Type:number, meal's price
- Name:
name, Type:string, Required:true, The name of the restaurant - Name:
description, Type:string, Requiredfalse, The descritpion of the restaurant - Name:
cusine, Type:string, The type of cousine for the restaurant - Name:
photo, Type:file, The restaurant photo - Name:
meals, Type:Custom Object reference to meal, The menu of the restaurant - Name:
price, Type:number, The price level for this restaurant - Name:
owner_email, Type:string, The restaurant owner email address
- Name:
email, Type:string, An email address related to the order - Name:
surname, Type:string, Name of the user making the order - Name:
address, Type:string, The address for order delivery - Name:
meals, Type:array_string, the meals included in the order - Name:
price, Type:number, the price of the order - Name:
delivered, Type:boolean, the develivery status for the order - Name:
notes, Type:string, Any additional note related to the order
After setting up this Stamplay will instantly expose Restful APIs for our newly resources the following URIs:
https://APPID.stamplayapp.com/api/cobject/v0/restauranthttps://APPID.stamplayapp.com/api/cobject/v0/mealhttps://APPID.stamplayapp.com/api/cobject/v0/order
This is a pretty new feature that we released, read more here. Webhooks can be a little overwhelming at first but they can be extremely powerful. The easiest way to think of webhooks is as notifications. When an event occurs, the source site makes an HTTP request to the URI configured for the webhook. At their simplest, they carry a payload of data which is usually a single record that has been created or modified.
We will use this as notification system for restaurant owners by sending them an email everytime the receive an order.
Here’s how to make sure you see them new payloads:
- Add Webhook module to your app and create one named "ordercomplete"
- Test it by making any request to URL created
- Return in your Stamplay app, go in the "Webhook Admin"
- Do you see the new values coming in? Congrats! You're using it properly :)
Ps: a good service to test your webhook is hurl

This component doesn't need any setup, couldn't be easier than that ;)
Now let's add the tasks that will define the server side of our app. For our app we want that:
Trigger : Custom Object - New
Action: Email - Send Email
Form submit configuration
Custom Object: Order
Send Email configuration
to: {{coinstance.email}} //The recipient address taken from the order info
from: foodme@stamplay.com
name: Stamplay FoodMe
Subject: "Thanks for ordering with Stamplay FoodMe"
Body: "Hi {{coinstance.surname}}, <br/>
		your order are : {{coinstance.meals}} <br/>
		the final price is : {{coinstance.price}} € <br/>
		and it will be delivered at {{coinstance.address}}<br/>
		<br/>
		thanks for choosing Stamplay FoodMe<br/>
		regards"
Trigger : Webhook - Catch
Action: Email - Send Email
Form submit configuration
Webhook name: ordercomplete
Send Email configuration
to: {{incoming.body.restaurant_owner_email}}
from: foodme@stamplay.com
name: Stamplay FoodMe
Subject: "Thanks for ordering with Stamplay FoodMe"
Body: "Good news! <br/><br/>

		A new order has been placed via FoodMe for your restaurant.
		Here are the details:<br/><br/>

		Surname: {{incoming.body.order.surname}}  <br/>
		Email: {{incoming.body.order.email}} <br/>
		Meals: {{incoming.body.order.meals}} <br/>
		<br/><br/>
		Total: {{incoming.body.order.price}} <br/>

		Hurry up "
The whole app is written in two files: app.js e restaurantRating.js
App.js has all the controllers and two factories while restaurantRating.js has the directive to handle restaurant ratings.
This Factory is in charge of tracking user status via the User getStatus API call and expose it to controllers who require it. It acts as a simple caching layer between user status and controllers
Whenever one or more controller on the same page are in need to know the user status the API call would be effectively done only one time
This component provides access to global functionalities and variables to avoid code duplication.
This controller is the only one present in every view of this app since it's binded to the main navigation bar of the app.
It must be able to recognize user status showing Login/Logout button, and moreover it is responsible of understanding the current page visited by the user to highlight it on the navigation bar (check function RouteIs).
This is the controller in charge to make the API call to the login endpoint for email+password authentication.
This controller is in charge for to make the API requests to the signup endpoint for email+password authentication.
This controller handles the restaurant list. It listens for filter selection on the home page and update the list accordingly. It has also expose sorting functionalities to rank restaurant by Name, rating or price.
This controller is in charge for orders and displaying menu details of the restaurant.
getRestaurant retrieves params from the URL and lookup for the restaurant instance by _id.
Once loaded it:
- check the userstatus (if he is logged, we need to know if he already rated this restaurant)
- loads the meals related to the current restaurant and retrieves details for each one
addToCartandremoveToCartfunctions are responsible to add or remove items from the cartcheckoutfunction triggers the order completion process. It validates every field before sending the data to the server.
AngularJS directives are what controls the rendering of the HTML inside an AngularJS application.
It is possible to implement your own directives too. This is what AngularJS refers to as "teaching HTML new tricks". Here a custom directive called fm-rating has been declard and it will display the rating controls. Rating controls are displayed to filter restaurants in the homepage or to let users assign a rating in the restaurant profile page.
####Triggering the webhoook
After a succesfull order we will send a POST request to the webhook ordercomplete containing the order data and the restaurant owner infos $scope.checkout = function(restaurant){...}. This is easily done by the few lines showed below:
var hookData = {
        restaurant_owner_email : restaurant.owner_email,
        order: data
      }

      $http({method:'POST',data: hookData, url:'/api/webhook/v0/ordercomplete/catch'})
        .success(function(data, status){})
        .error(function(data, status){
          $scope.modal.error = 'Ops Something went Wrong'
       	})
Everytime you create reasource using Custom Object you can manage instances of the entities in the Admin section. This will let you to easily add edit and delete restaurant, meals and orders.

First, clone this repository :
git clone git@github.com:Stamplay/stamplay-foodme
Or download it as a zip file
https://github.com/Stamplay/stamplay-foodme/archive/master.zip
After launching bower install you need to upload the frontend files in your app by using the CLI tool:
cd your/path/to/stamplay-hackenews
stamplay init
/*
 * You will need to insert your appId and your API key
 */
stamplay deployHere are a few ideas for further improvement :
- bring together login and registration controllers by creating a single page to handle both user login and signup
- add social login like Facebook or Google to enrich user's identity
- if the cart contains more occurencies of a meal, group them
- let users to comment on the restaurants
- Stripe integration
- Your idea here… ?
Again, for any questions drop an email to giuliano.iacobelli@stamplay.com :)
Ciao!