![]()


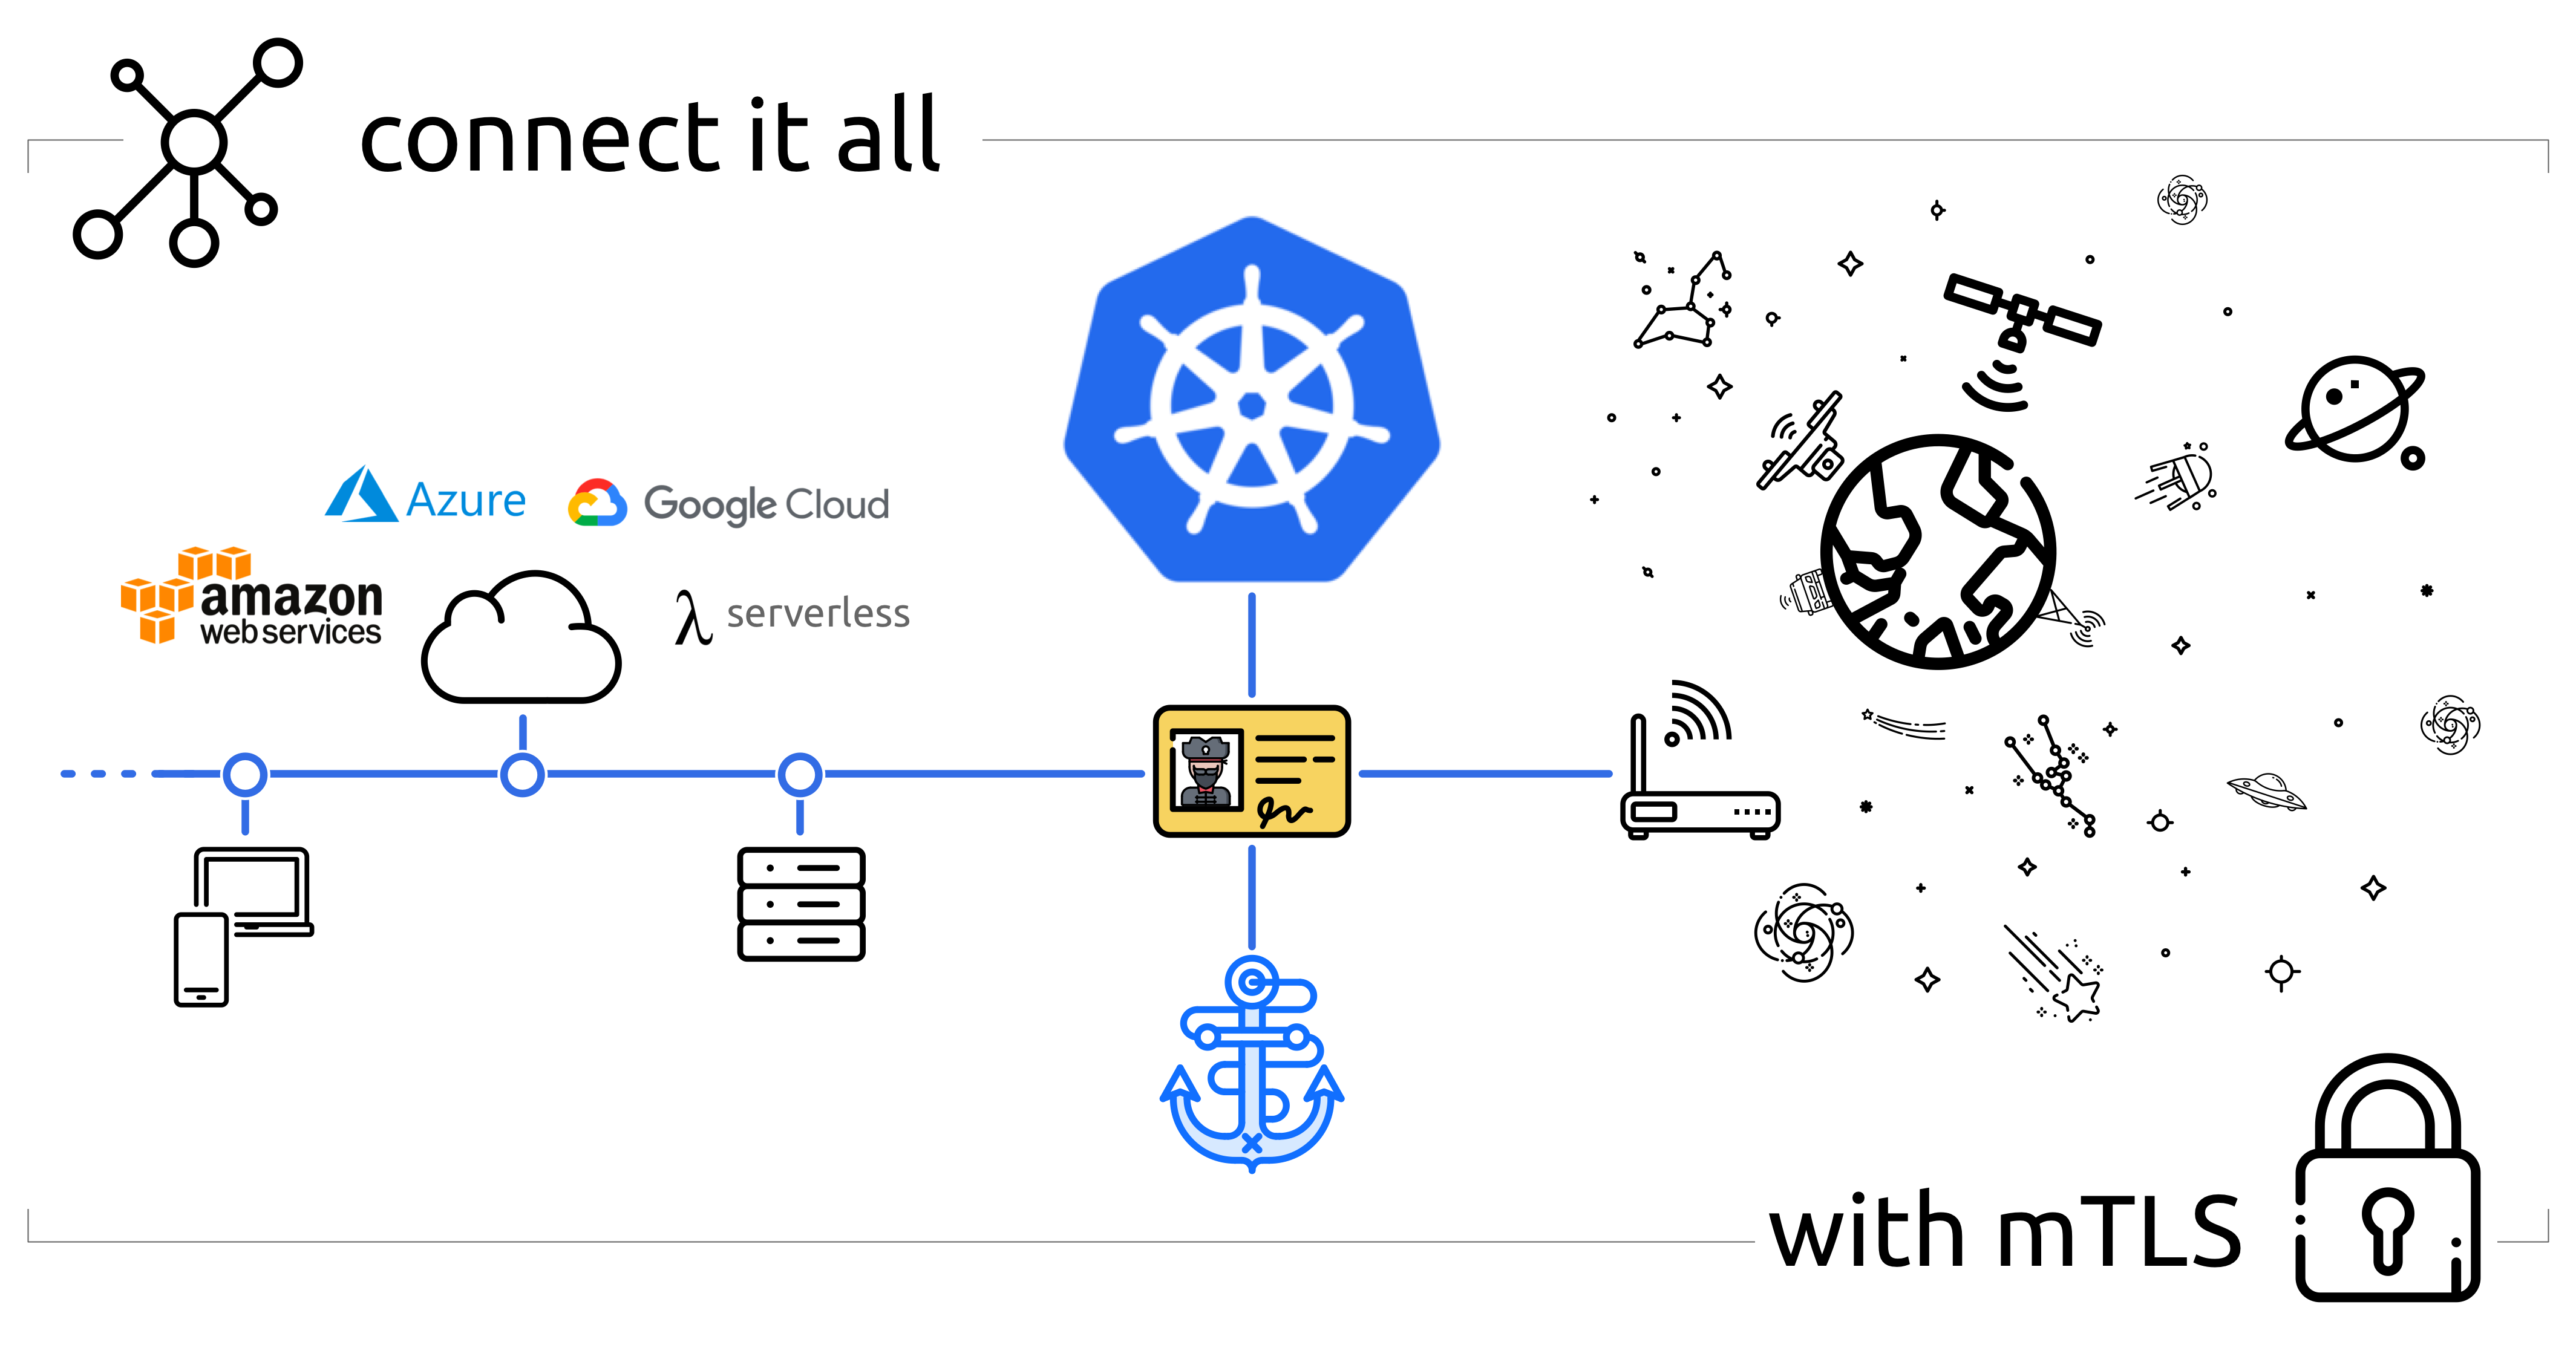
Autocert is a Kubernetes add-on that automatically injects TLS/HTTPS certificates into your containers, so they can communicate with each other securely.
To get a certificate simply annotate your pods with a name. An X.509 (TLS/HTTPS) certificate is automatically created and mounted at /var/run/autocert.step.sm/ along with a corresponding private key and root certificate (everything you need for mTLS).
The certificates are signed by an internal step-ca Certificate Authority (CA) or by Certificate Manager (see Tutorial & Demo).
By the way, we also have a cert-manager Certificate Issuer called step-issuer that works directly with either your step-ca server or our cloud CA product. While Autocert volume mounts certificates and keys directly into Pods, step-issuer makes them available via Secrets.
We ❤️ feedback, bugs, and enhancement suggestions. We also have an #autocert channel on our Discord.
Autocert exists to make it easy to use mTLS (mutual TLS) to improve security within a cluster and to secure communication into, out of, and between kubernetes clusters.
TLS (and HTTPS, which is HTTP over TLS) provides authenticated encryption: an identity dialtone and end-to-end encryption for your workloads. It makes workloads identity-aware, improving observability and enabling granular access control. Perhaps most compelling, mTLS lets you securely communicate with workloads running anywhere, not just inside kubernetes.
Unlike VPNs & SDNs, deploying and scaling mTLS is pretty easy. You're (hopefully) already using TLS, and your existing tools and standard libraries will provide most of what you need.
There's just one problem: you need certificates issued by your own certificate authority (CA). Building and operating a CA, issuing certificates, and making sure they're renewed before they expire is tricky. Autocert does all of this for you.
First and foremost, autocert is easy. You can get started in minutes.
Autocert runs step-ca to internally generate keys and issue certificates. This process is secure and automatic, all you have to do is install autocert and annotate your pods.
Features include:
- A fully featured private CA for workloads running on kubernetes and elsewhere
- RFC5280 and CA/Browser Forum compliant certificates that work for TLS
- Namespaced installation into the
stepnamespace so it's easy to lock down your CA - Short-lived certificates with fully automated enrollment and renewal
- Private keys are never transmitted across the network and aren't stored in
etcd
Because autocert is built on step-ca you can easily extend access to developers, endpoints, and workloads running outside your cluster, too.

In this tutorial video, Smallstep Software Engineer Andrew Reed shows how to use autocert alongside Smallstep Certificate Manager hosted CA.
All you need to get started is kubectl and a cluster running kubernetes with admission webhooks enabled:
$ kubectl version
Client Version: v1.26.1
Kustomize Version: v4.5.7
Server Version: v1.25.3
$ kubectl api-versions | grep "admissionregistration.k8s.io/v1"
admissionregistration.k8s.io/v1To install autocert run:
kubectl run autocert-init -it --rm --image cr.step.sm/smallstep/autocert-init --restart Never💥 installation complete.
You might want to check out what this command does before running it. You can also install
autocertmanually if that's your style.
Autocert can also be installed using the Helm package
manager, to install the repository and autocert run:
helm repo add smallstep https://smallstep.github.io/helm-charts/
helm repo update
helm install smallstep/autocert
You can see all the configuration options at https://hub.helm.sh/charts/smallstep/autocert.
Using autocert is also easy:
- Enable
autocertfor a namespace by labelling it withautocert.step.sm=enabled, then - Inject certificates into containers by annotating pods with
autocert.step.sm/name: <name>
To enable autocert for a namespace it must be labelled autocert.step.sm=enabled.
To label the default namespace run:
kubectl label namespace default autocert.step.sm=enabledTo check which namespaces have autocert enabled run:
$ kubectl get namespace -L autocert.step.sm
NAME          STATUS   AGE   AUTOCERT.STEP.SM
default       Active   59m   enabled
...To get a certificate you need to tell autocert your workload's name using the
autocert.step.sm/name annotation (this name will appear as the X.509 common
name and SAN).
It's also possible to define the duration of the certificate using the
annotation autocert.step.sm/duration, a duration is a sequence of decimal
numbers, each with optional fraction and a unit suffix, such as "300ms", "1.5h"
or "2h45m". Valid time units are "ns", "us" (or "µs"), "ms", "s", "m", "h". Take
into account that the container will crash if the duration is not between the
limits defined by the used provisioner, the defaults are 5m and 24h.
By default the certificate, key and root will be owned by root and world-readable (0644).
Use the autocert.step.sm/owner and autocert.step.sm/mode annotations to set the owner and permissions of the files.
The owner annotation requires user and group IDs rather than names because the images used by the containers that create and renew the certificates do not have the same user list as the main application containers.
Let's deploy a simple mTLS server
named hello-mtls.default.svc.cluster.local:
cat <<EOF | kubectl apply -f -
apiVersion: apps/v1
kind: Deployment
metadata: {name: hello-mtls, labels: {app: hello-mtls}}
spec:
  replicas: 1
  selector: {matchLabels: {app: hello-mtls}}
  template:
    metadata:
      annotations:
        # AUTOCERT ANNOTATION HERE -v ###############################
        autocert.step.sm/name: hello-mtls.default.svc.cluster.local #
        # AUTOCERT ANNOTATION HERE -^ ###############################
      labels: {app: hello-mtls}
    spec:
      containers:
      - name: hello-mtls
        image: smallstep/hello-mtls-server-go:latest
EOF
In our new container we should find a certificate, private key, and root
certificate mounted at /var/run/autocert.step.sm:
$ export HELLO_MTLS=$(kubectl get pods -l app=hello-mtls -o jsonpath='{$.items[0].metadata.name}')
$ kubectl exec -it $HELLO_MTLS -c hello-mtls -- ls /var/run/autocert.step.sm
root.crt  site.crt  site.key
We're done. Our container has a certificate, issued by our CA, which autocert
will automatically renew.
Now let's deploy another server with a autocert.step.sm/duration, autocert.step.sm/owner and autocert.step.sm/mode:
cat <<EOF | kubectl apply -f -
apiVersion: apps/v1
kind: Deployment
metadata: {name: hello-mtls-1h, labels: {app: hello-mtls-1h}}
spec:
  replicas: 1
  selector: {matchLabels: {app: hello-mtls-1h}}
  template:
    metadata:
      annotations:
        autocert.step.sm/name: hello-mtls-1h.default.svc.cluster.local
        autocert.step.sm/duration: 1h
        autocert.step.sm/owner: "999:999"
        autocert.step.sm/mode: "0600"
      labels: {app: hello-mtls-1h}
    spec:
      containers:
      - name: hello-mtls
        image: smallstep/hello-mtls-server-go:latest
EOF
The container will have the certificates and key owned by user/group 999 with permission to read/write restricted to the owner, and the certificate duration will be valid for one hour and will be autorenewed:
$ export HELLO_MTLS_1H=$(kubectl get pods -l app=hello-mtls-1h -o jsonpath='{$.items[0].metadata.name}')
$ kubectl exec -it $HELLO_MTLS_1H -c hello-mtls -- ls -ln /var/run/autocert.step.sm
-rw------- 1 999 999  623 Jun  6 21:17 root.crt
-rw------- 1 999 999 1470 Jun  6 21:37 site.crt
-rw------- 1 999 999  227 Jun  6 21:17 site.key
$ kubectl exec -it $HELLO_MTLS_1H -c hello-mtls -- cat /var/run/autocert.step.sm/site.crt | step certificate inspect --short -
X.509v3 TLS Certificate (ECDSA P-256) [Serial: 3182...1140]
  Subject:     hello-mtls-1h.default.svc.cluster.local
  Issuer:      Autocert Intermediate CA
  Provisioner: autocert [ID: A1lX...ty1Q]
  Valid from:  2020-04-30T01:58:17Z
          to:  2020-04-30T02:58:17Z
Durations are specially useful if the step-ca provisioner is configured with a
maximum duration larger than the default one, it can be used by services that
cannot handle the reload of the certificates in a graceful way.
✅ Certificates.
It's easy to deploy certificates using autocert, but it's up to you to use them correctly. To get you started, hello-mtls demonstrates the right way to use mTLS with various tools and languages (contributions welcome :). If you're a bit fuzzy on how mTLS works, the hello-mtls README is a great place to start.
To finish out this tutorial let's keep things simple and try curling the server we just deployed from inside and outside the cluster.
First, let's expose our workload to the rest of the cluster using a service:
kubectl expose deployment hello-mtls --port 443
Now let's deploy a client, with its own certificate, that curls our server in a loop:
cat <<EOF | kubectl apply -f -
apiVersion: apps/v1
kind: Deployment
metadata: {name: hello-mtls-client, labels: {app: hello-mtls-client}}
spec:
  replicas: 1
  selector: {matchLabels: {app: hello-mtls-client}}
  template:
    metadata:
      annotations:
        # AUTOCERT ANNOTATION HERE -v ######################################
        autocert.step.sm/name: hello-mtls-client.default.pod.cluster.local #
        # AUTOCERT ANNOTATION HERE -^ ######################################
      labels: {app: hello-mtls-client}
    spec:
      containers:
      - name: hello-mtls-client
        image: smallstep/hello-mtls-client-curl:latest
        env: [{name: HELLO_MTLS_URL, value: https://hello-mtls.default.svc.cluster.local}]
EOF
Note that the authority portion of the URL (the
HELLO_MTLS_URLenv var) matches the name of the server we're connecting to (both arehello-mtls.default.svc.cluster.local). That's required for standard HTTPS and can sometimes require some DNS trickery.
Once deployed we should start seeing the client log responses from the server saying hello:
$ export HELLO_MTLS_CLIENT=$(kubectl get pods -l app=hello-mtls-client -o jsonpath='{$.items[0].metadata.name}')
$ kubectl logs $HELLO_MTLS_CLIENT -c hello-mtls-client
Thu Feb  7 23:35:23 UTC 2019: Hello, hello-mtls-client.default.pod.cluster.local!
Thu Feb  7 23:35:28 UTC 2019: Hello, hello-mtls-client.default.pod.cluster.local!
For kicks, let's exec into this pod and try curling ourselves:
$ kubectl exec $HELLO_MTLS_CLIENT -c hello-mtls-client -- curl -sS \
       --cacert /var/run/autocert.step.sm/root.crt \
       --cert /var/run/autocert.step.sm/site.crt \
       --key /var/run/autocert.step.sm/site.key \
       https://hello-mtls.default.svc.cluster.local
Hello, hello-mtls-client.default.pod.cluster.local!
✅ mTLS inside cluster.
Connecting from outside the cluster is a bit more complicated. We need to handle DNS and obtain a certificate ourselves. These tasks were handled automatically inside the cluster by kubernetes and autocert, respectively.
That said, because our server uses mTLS only clients that have a certificate issued by our certificate authority will be allowed to connect. That means it can be safely and easily exposed directly to the public internet using a LoadBalancer service type:
kubectl expose deployment hello-mtls --name=hello-mtls-lb --port=443 --type=LoadBalancer
To connect we need a certificate. There are a couple different ways to get one, but for simplicity we'll just forward a port.
kubectl -n step port-forward $(kubectl -n step get pods -l app=ca -o jsonpath={$.items[0].metadata.name}) 4443:4443
In another window we'll use step to grab the root certificate, generate a key pair, and get a certificate.
To follow along you'll need to
install stepif you haven't already. You'll also need your admin password and CA fingerprint, which were output during installation (see here and here if you already lost them :).
$ export CA_POD=$(kubectl -n step get pods -l app=ca -o jsonpath='{$.items[0].metadata.name}')
$ step ca root root.crt --ca-url https://127.0.0.1:4443 --fingerprint <fingerprint>
$ step ca certificate mike mike.crt mike.key --ca-url https://127.0.0.1:4443 --root root.crt
✔ Key ID: H4vH5VfvaMro0yrk-UIkkeCoPFqEfjF6vg0GHFdhVyM (admin)
✔ Please enter the password to decrypt the provisioner key: 0QOC9xcq56R1aEyLHPzBqN18Z3WfGZ01
✔ CA: https://127.0.0.1:4443/1.0/sign
✔ Certificate: mike.crt
✔ Private Key: mike.key
Now we can simply curl the service:
If you're using minikube or docker for mac the load balancer's "IP" might be
localhost, which won't work. In that case, simplyexport HELLO_MTLS_IP=127.0.0.1and try again.
$ export HELLO_MTLS_IP=$(kubectl get svc hello-mtls-lb -ojsonpath={$.status.loadBalancer.ingress[0].ip})
$ curl --resolve hello-mtls.default.svc.cluster.local:443:$HELLO_MTLS_IP \
       --cacert root.crt \
       --cert mike.crt \
       --key mike.key \
       https://hello-mtls.default.svc.cluster.local
Hello, mike!
Note that we're using
--resolveto tellcurlto override DNS and resolve the name in our workload's certificate to its public IP address. In a real production infrastructure you could configure DNS manually, or you could propagate DNS to workloads outside kubernetes using something like ExternalDNS.
✅ mTLS outside cluster.
To clean up after running through the tutorial remove the hello-mtls and hello-mtls-client deployments and services:
kubectl delete deployment hello-mtls
kubectl delete deployment hello-mtls-client
kubectl delete service hello-mtls
kubectl delete service hello-mtls-lb
See the runbook for instructions on uninstalling autocert.
Autocert is an admission webhook that intercepts and patches pod creation requests with some YAML to inject an init container and sidecar that handle obtaining and renewing certificates, respectively.
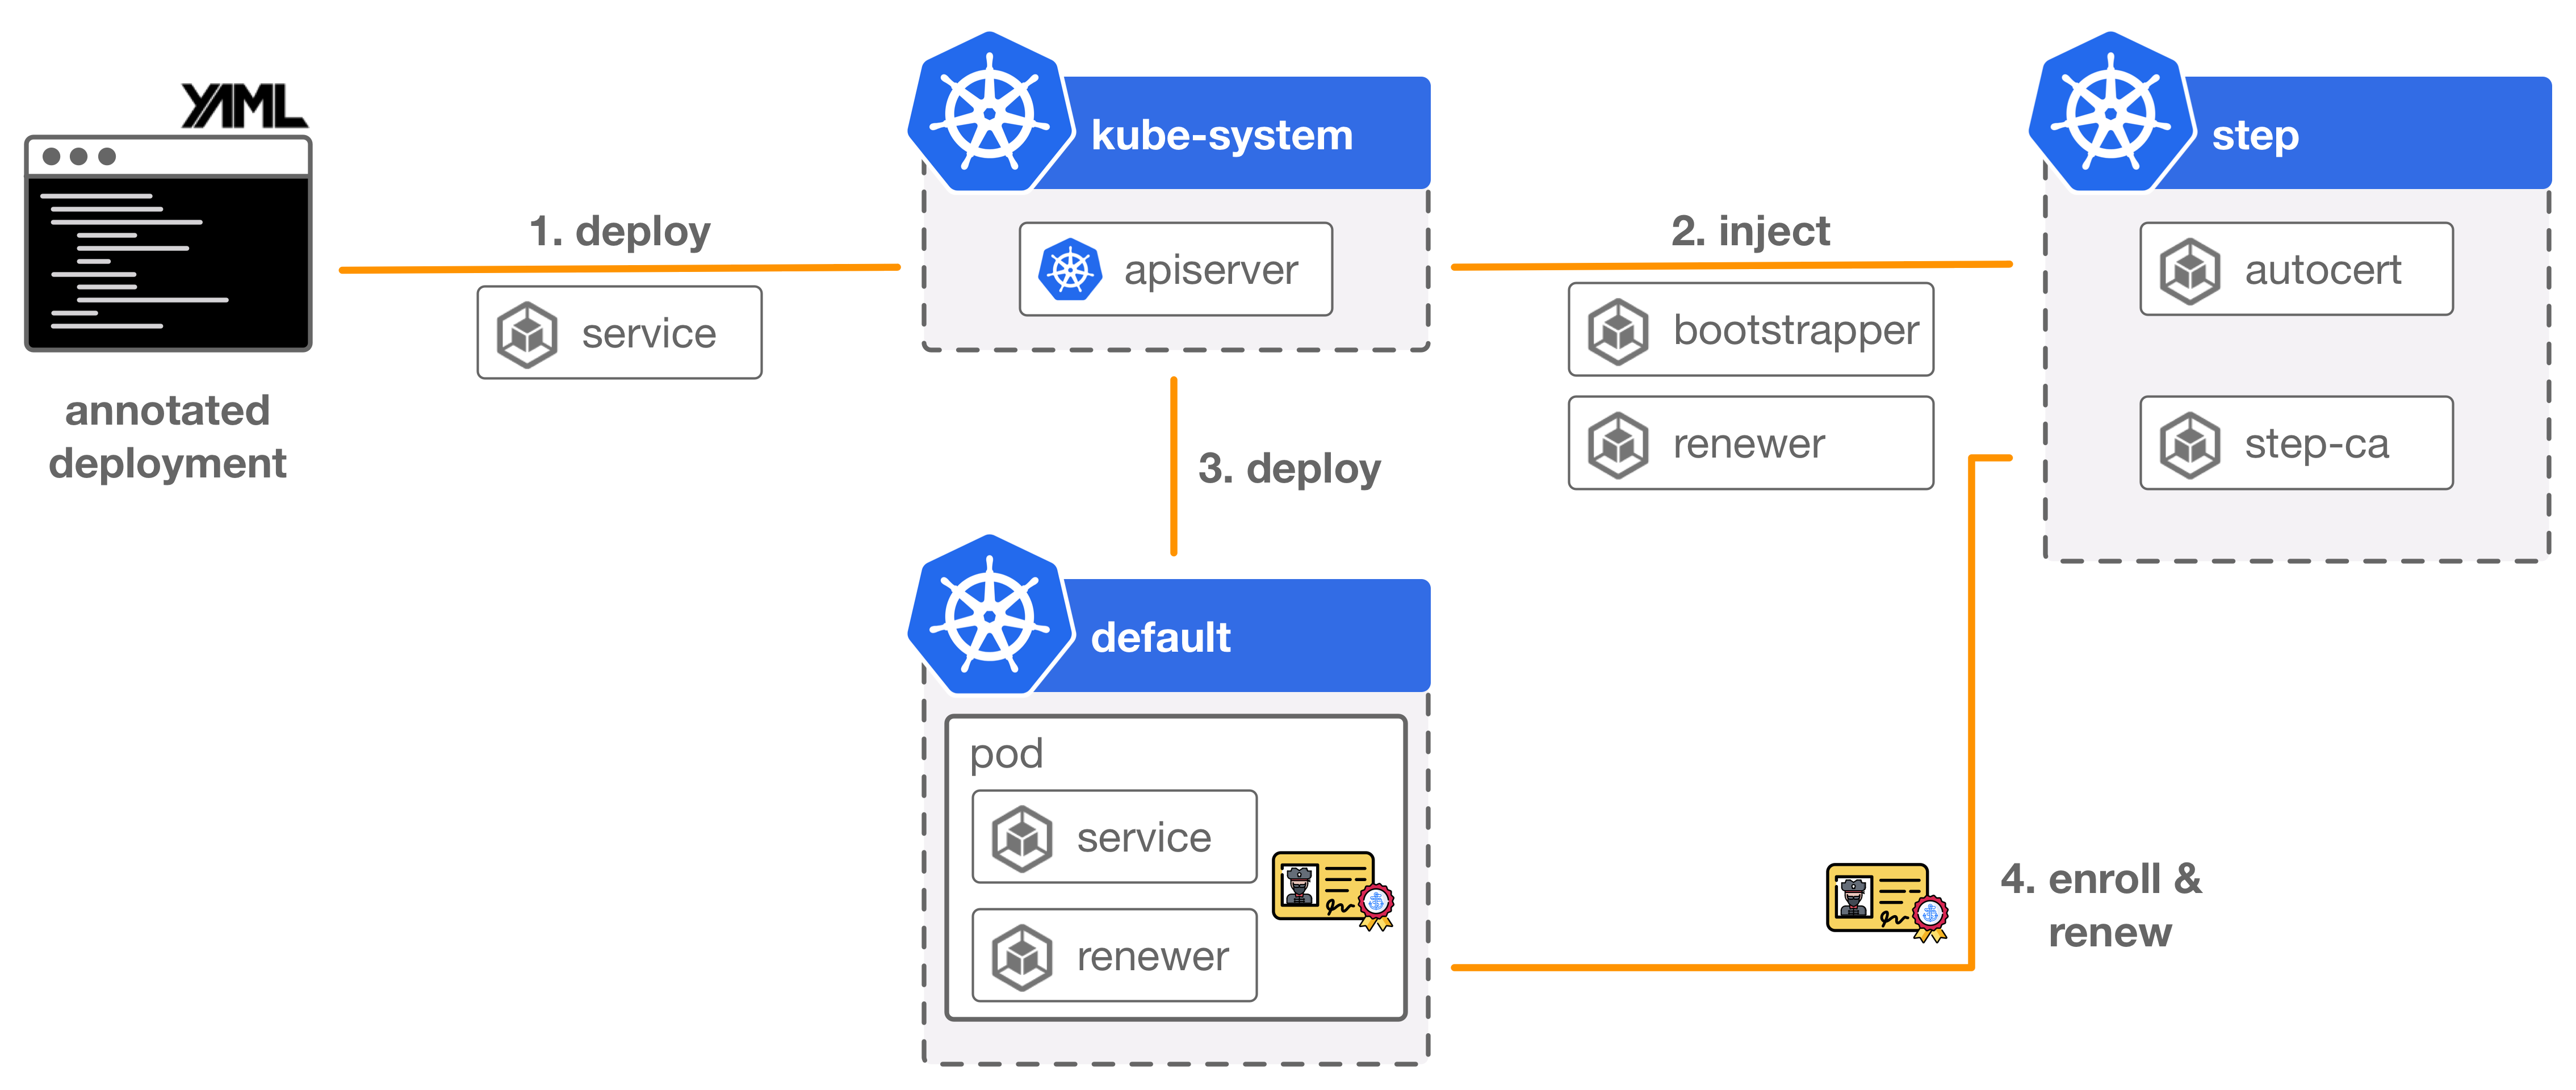
It integrates with step certificates and uses the one-time token bootstrap protocol from that project to mutually authenticate a new pod with your certificate authority, and obtain a certificate.
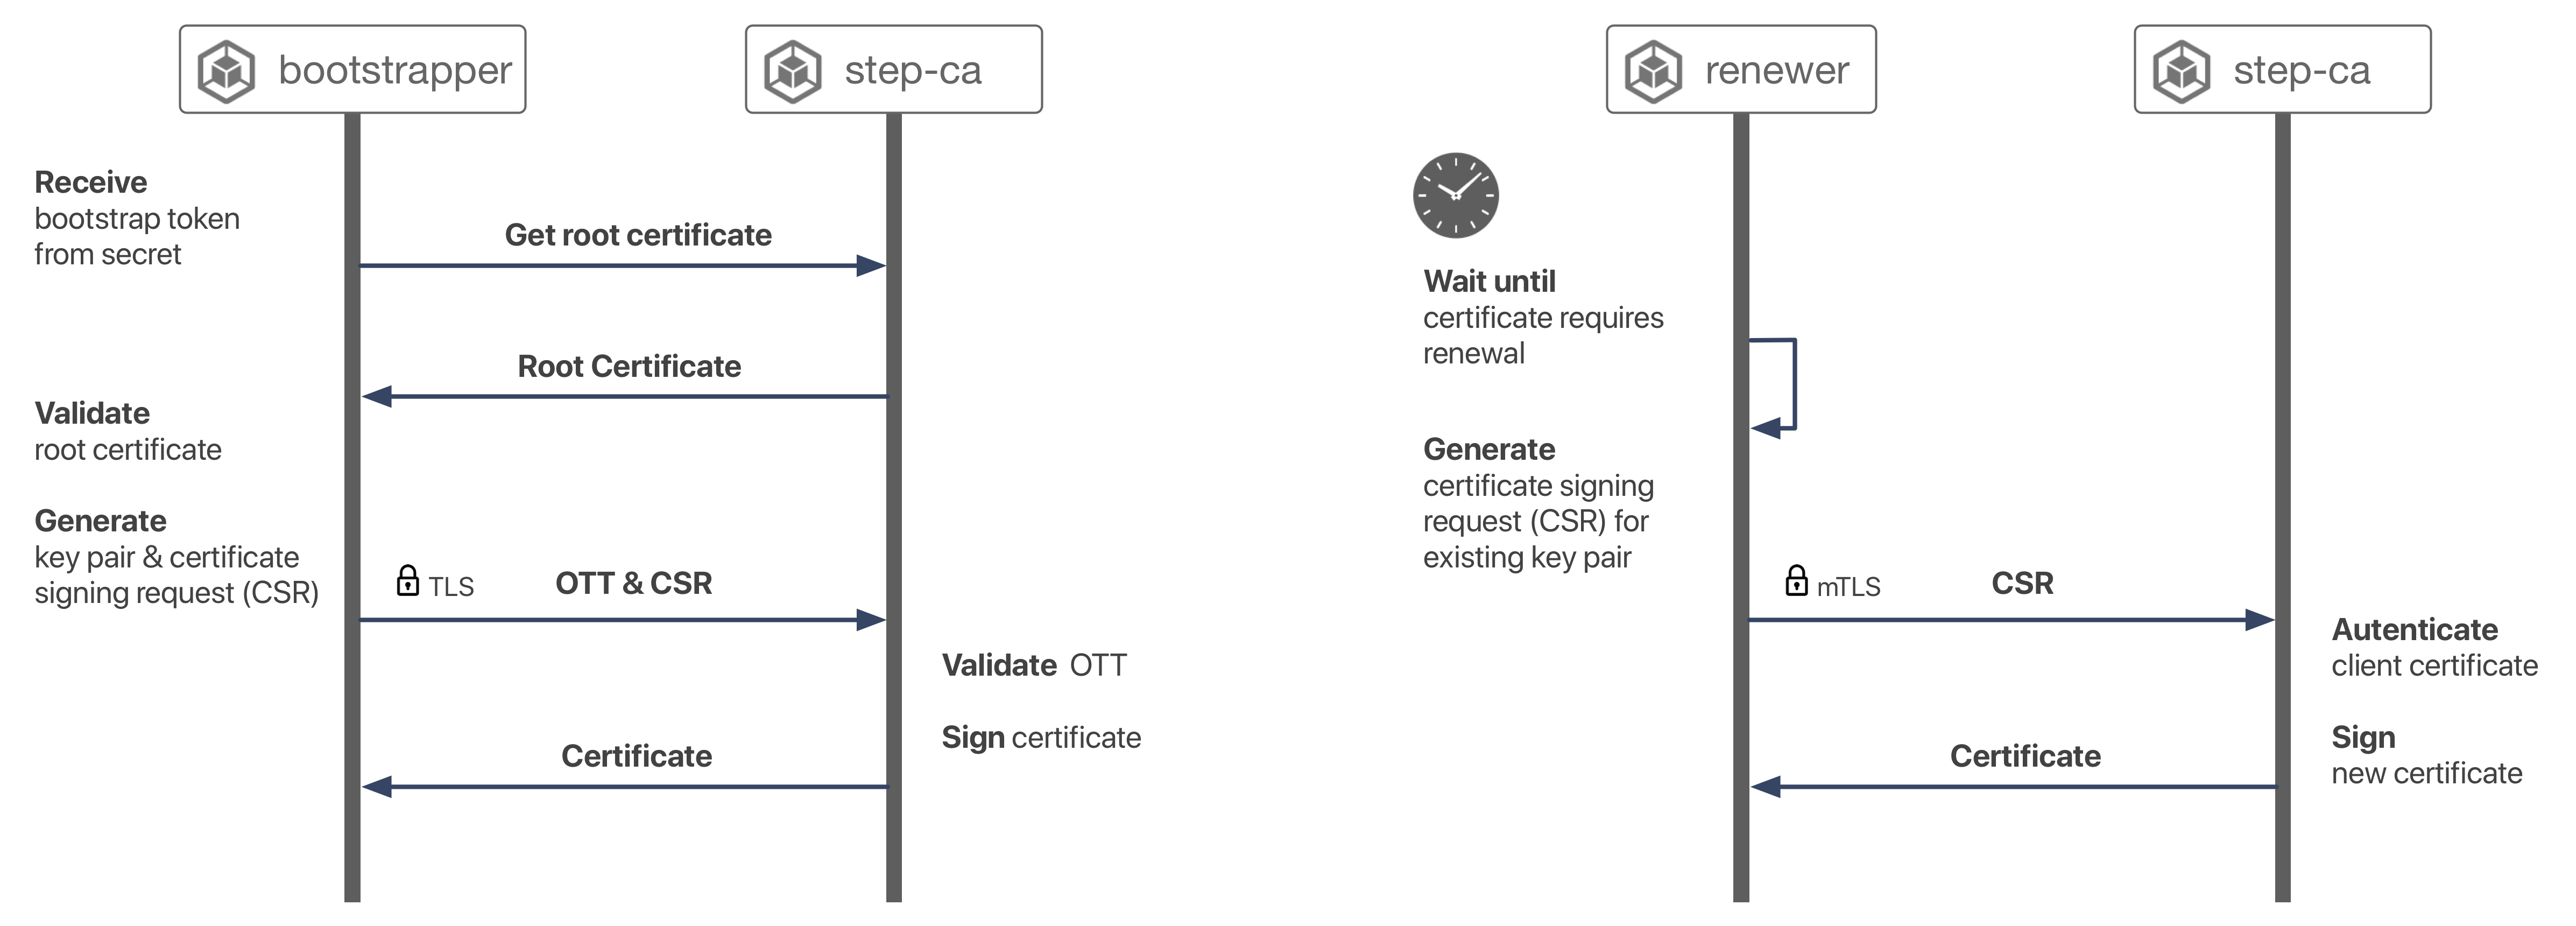
Tokens are generated by the admission webhook and transmitted to the injected init container via a kubernetes secret. The init container uses the one-time token to obtain a certificate. A sidecar is also installed to renew certificates before they expire. Renewal simply uses mTLS with the CA.
- Don't give people
kubectlaccess to your production clusters - Use a deploy pipeline based on
gitartifacts - Enforce code review on those
gitartifacts
If that doesn't work for you, or if you have a better idea, we'd love to hear! Please open an issue!
Why do I have to tell you the name to put in a certificate? Why can't you automatically bind service names?
Mostly because monitoring the API server to figure out which services are associated with which workloads is complicated and somewhat magical. And it might not be what you want.
That said, we're not totally opposed to this idea. If anyone has strong feels and a good design please open an issue.
Kubernetes needs several certificates for different sorts of control plane communication. It ships with a very limited CA and integration points that allow you to use an alternative CA.
The built-in Kuberenetes CA is limited to signing certificates for kubeconfigs and kubelets. Specifically, the controller-manager will sign CSRs in some cases.
See our blog Automating TLS in Kubernetes The Hard Way to learn a lot more.
While you could use the Kubernetes CA for service-to-service data plane and ingress certificates, we don't recommend it. Having two CAs will give you a crisp cryptographic boundary.
Autocert needs permission to create and delete secrets cluster-wide. You can check out our RBAC config here. These permissions are needed in order to transmit one-time tokens to workloads using secrets, and to clean up afterwards. We'd love to scope these permissions down further. If anyone has any ideas please open an issue.
The autocert admission webhook needs to securely transmit one-time bootstrap tokens to containers. This could be accomplished without using secrets. The webhook returns a JSONPatch response that's applied to the pod spec. This response could patch the literal token value into our init container's environment.
Unfortunately, the kubernetes API server does not authenticate itself to admission webhooks by default, and configuring it to do so requires passing a custom config file at apiserver startup. This isn't an option for everyone (e.g., on GKE) so we opted not to rely on it.
Since our webhook can't authenticate callers, including bootstrap tokens in patch responses would be dangerous. By using secrets an attacker can still trick autocert into generating superflous bootstrap tokens, but they'd also need read access to cluster secrets to do anything with them.
Hopefully this story will improve with time.
Great idea! This should be pretty easy to add using the TokenRequest API.
If you're facing deployment times longer than five minutes, use the annotation autocert.step.sm/init-first: "true", which will force the bootstrapper to run before any other initContainer. As long as the CA is available, you will get a certificate valid for 24h that should be enough for initializing the rest of the deployment. After the bootstrapper, it will run the rest of the initContainers that can wait for the dependencies to be ready. See smallstep/autocert#108 for more details.
We don't. It's just easier for you. Your containers can generate key pairs, exchange them for certificates, and manage renewals themselves. This is pretty easy if you install step in your containers, or integrate with our golang SDK. To support this we'd need to add the option to inject a bootstrap token without injecting these containers.
That said, the init container and sidecar are both super lightweight.
Why are keys and certificates managed via volume mounts? Why not use a Secret or some custom resource?
Because, by default, kubernetes Secrets are stored in plaintext in etcd and might even be transmitted unencrypted across the network. Even if Secrets were properly encrypted, transmitting a private key across the network violates PKI best practices. Key pairs should always be generated where they're used, and private keys should never be known by anyone but their owners.
That said, there are use cases where a certificate mounted in a Secret resource is desirable (e.g., for use with a kubernetes Ingress). For that, we recommend step-issuer.
(Add a 👍 to #48 I'd like autocert to expose Secrets in the future.)
How is this different than cert-manager
Cert-manager is a great project, but it's design is focused on managing Web PKI certificates issued by Let's Encrypt's public certificate authority. These certificates are useful for TLS ingress from web browsers. Autocert is purpose-built to manage certificates issued by your own private CA to support the use of mTLS for service-to-service communication.
Autocert builds on step certificates which issues ECDSA certificates using the P256 curve with ECDSA-SHA256 signatures by default. If this is all Greek to you, rest assured these are safe, sane, and modern defaults that are suitable for the vast majority of environments.
https://golang.org/pkg/crypto/
This project is based on four container images:
autocert-controller(the admission webhook)autocert-bootstrapper(the init container that generates a key pair and exchanges a bootstrap token for a certificate)autocert-renewer(the sidecar that renews certificates)autocert-init(the install script)
They use multi-stage builds so all you need in order to build them is docker.
To build all of the images, run:
docker build -t smallstep/autocert-controller:latest -f controller/Dockerfile .
docker build -t smallstep/autocert-bootstrapper:latest -f bootstrapper/Dockerfile .
docker build -t smallstep/autocert-renewer:latest -f renewer/Dockerfile .
docker build -t smallstep/autocert-init:latest -f init/Dockerfile .
If you build your own containers you'll probably need to install manually. You'll also need to adjust which images are deployed in the deployment yaml.
If you have improvements to autocert, send us your pull requests! For those just getting started, GitHub has a howto. A team member will review your pull requests, provide feedback, and merge your changes. In order to accept contributions we do need you to sign our contributor license agreement.
If you want to contribute but you're not sure where to start, take a look at the issues with the "good first issue" label. These are issues that we believe are particularly well suited for outside contributions, often because we probably won't get to them right now. If you decide to start on an issue, leave a comment so that other people know that you're working on it. If you want to help out, but not alone, use the issue comment thread to coordinate.
If you've identified a bug or have ideas for improving autocert that you don't have time to implement, we'd love to hear about them. Please open an issue to report a bug or suggest an enhancement!
- We tweet @smallsteplabs
- Read our blog
- Check out the runbook
- Check out
stepCLI
Copyright 2023 Smallstep Labs
Licensed under the Apache License, Version 2.0