FrenchKit 2022
Swift concurrency and state machines: The path to modern and reliable features
Welcome to this classroom!
The main goal is to develop your very own state machine engine thanks to Swift concurrency and use it in a SwiftUI feature. Of course, our time together is limited today, so I have pre-cooked some things for you but you will have to fill-in the gaps.
As you can see, this project is divided into a main target (the FrenchKit2022 application) and a local package (the StateMachinePackage).
The FrenchKit2022 application consists in one screen where you can put items in your shopping cart and go to the cashier to pay the bill.
The StateMachinePackage exposes the tools to build and execute any state machine. For now it does not compile.
If at any step of the exercice you are stuck, you can give a look at the fully functional implementation here.
Step 1
Go to the StateMachinePackage folder and read the README. It contains all the instructions to make the state machine engine work.
Step 2
Come back to this README 😄 and follow the next steps.
Step 3
In Supermarket/StateMachine/Outputs:
Implement the ExecuteTransaction outputs, based on what is done in UpdateStock or in UpdateCustomerQueue. Those outputs do not leak any implementation details and are meant to map the result of a side effect's execution to an optional Event that will be given back to the state machine.
Step 4
In Supermarket/StateMachine/StateMachine.swift:
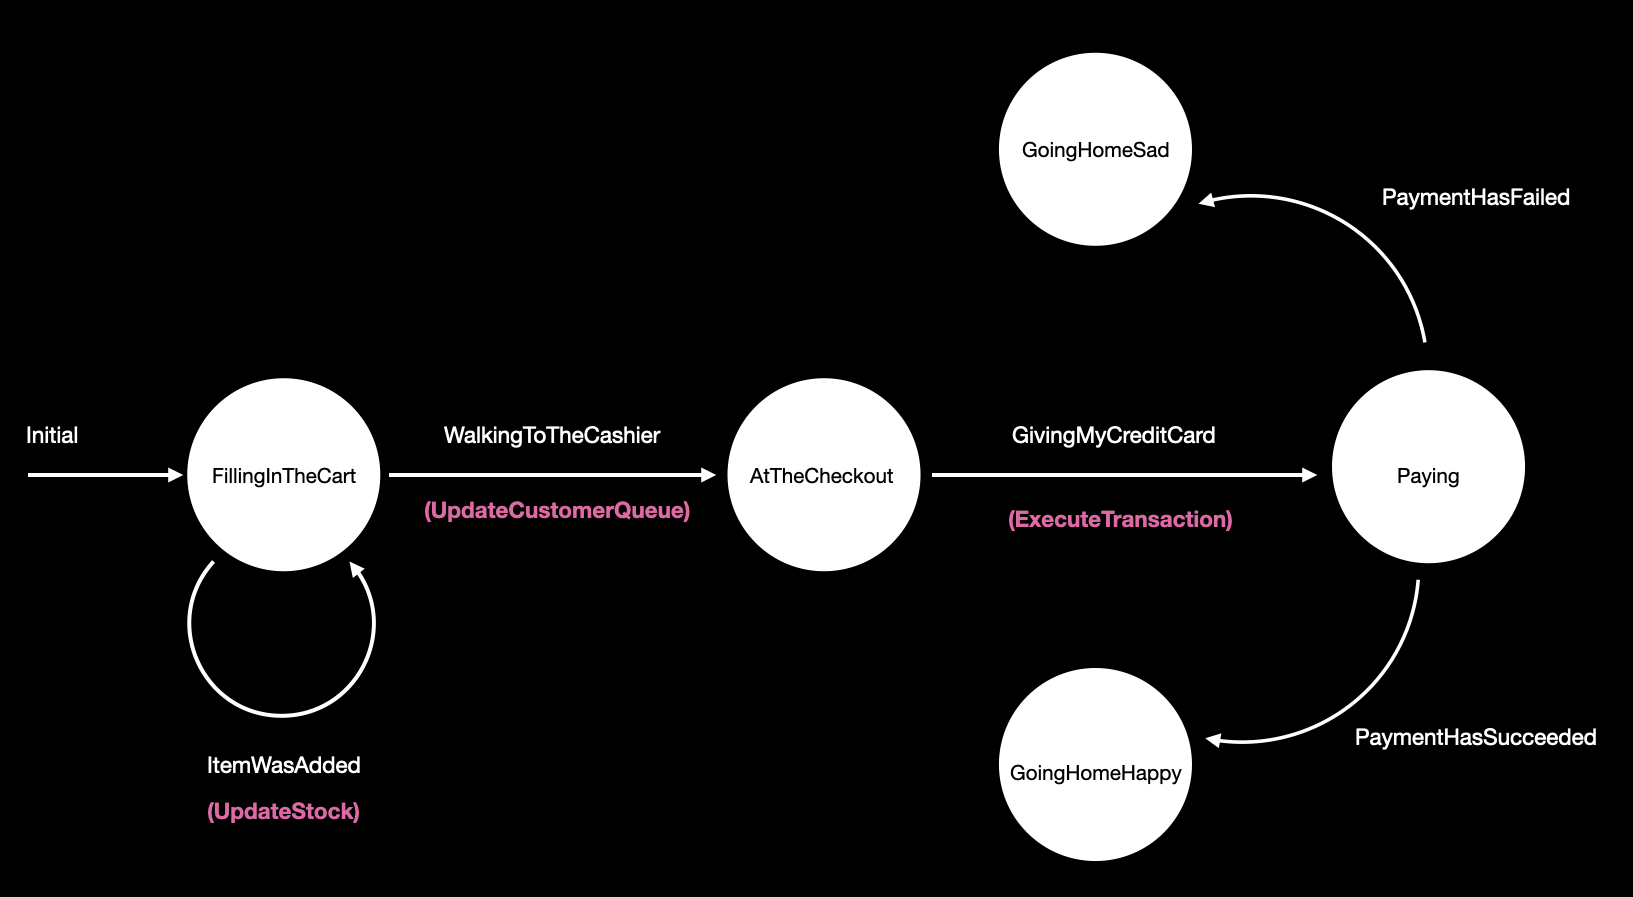
Finish the implementation of the state machine to implement all the meaningful transitions. A first transition is implemented as an example. You can refer to this diagram:
Step 5
We now have described our state machine. We have an initial state, the transitions and the side effects to execute.
At this point you can give a look at FrenchKit2022Tests/SupermarketTests.swift and execute the test. If you have implemented your transitions the right way the test should pass 🟢.
Step 6
In FrenchKit2022App.swift:
It is now time to implement our concrete/real-world side effects and assemble everything into a ViewStateMachine that the view can use.
The makeViewStateMachine function takes care of that. You just have to provide an implementation for the ExecuteTransaction side effect. You can fake any long running operation with a try? await Task.sleep(nanoseconds:) statement and add some logging instructions.
Step 7:
Hold on, we're almost there.
In Supermarket/Views/ContentView.swift:
We have to fire some events to feed the state machine:
- when the user clicks on the arrow to go to the cashier (line 100)
- when the user clicks on the $ at the checkout (line 79)
The state machine will automatically start when the view starts thanks to the .task {} modifier.
Now that every event is wired up, you can give it a try ! (you can reset your state at any moment by pressing the "reset" button in the navigation bar)
Congratulations 🥳!
Extra steps:
For those of you that have some time left before leaving, here's a bunch of improvements you can work on:
-
Keep track of the ongoing tasks in
SideEffectExecutor -
Cancel those tasks when the
AsyncStateMachineroot task is cancelled (you can use awithTaskCancellationHandlerin thenext()function to catch the cancellation) -
Add some meta data in the
SideEffectstructure to handle theTaskPrioritywhen executing a side effect inSideEffectExecutor -
Make
SideEffectreturn anAsyncSequenceofEventand not only an optionalEvent. That way we could have long running side effects that would emit events over time instead of a single one -
Introduce a mapper function from the
StateTo aViewStateinViewStateMachine. Doing so would allow us to compute a "ready to display" view state without having to add computed properties on the state
Slides
You can find the slides presented in this classroom here.
