By Joey and Fancy from Cryosphere Lab, ESSC, CUHK.
- Geo SAM
Geo SAM is a QGIS plugin that aims to help people segment, delineate or label landforms efficiently when using large-size geospatial raster images. Segment Anything Model (SAM) is a foundation AI model with the superpower, but the model size is huge, and using it to process images can take a long time, even with a modern GPU. Our tool uses the strategies of encoding image features in advance and trimming the SAM model. The interactive segmentation process can be run in real-time on a laptop by only using a CPU, making it a convenient and efficient tool for dealing with satellite images.
The Geo SAM plugin includes two separate tools, the encoding tool, and the segmentation tool. The encoding tool is designed to generate and save the image features using the SAM image encoder, and the encoding process only needs to run once per image. The segmentation tool is for interactively segmenting landforms, and it can only be used to segment preprocessed images (whose features have been generated in advance using the encoding tool, as the included demo image).
You are suggested to install the latest version of QGIS since the plugin has only been tested on versions newer than QGIS 3.30.
Open the OSGeo4W Shell
 application from the Start menu, which is a dedicated shell for the QGIS. Then run the following command to install the libraries.
pip3 install torch torchvision
pip3 install torchgeo
pip3 install segment-anything
Our encoder tool now supports using CUDA GPU to accelerate the encoding process. If your PC has dedicated CUDA GPUs, you can install the CUDA library first and then install the gpu-version pytorch using the following command (using CUDA version 11.7 as an example):
# add `--force-reinstall` if you installed the cpu version before.
pip3 install torch torchvision torchaudio --index-url https://download.pytorch.org/whl/cu117Open your own terminal application, and change the directory to where the QGIS Python binary file locates.
# Mac
cd /Applications/QGIS.app/Contents/MacOS/bin
# Linux (Please confirm the python env by "import qgis")
cd /usr/bin
To confirm the QGIS Python environment:
./python3
>>> import qgis
Then install the libraries.
# !important, add ./ to avoid using your default Python in the system
./pip3 install torch torchvision
./pip3 install torchgeo
./pip3 install segment-anything
For Linux users, if pip3 is not found in /usr/bin, try the following commands:
sudo apt-get update
sudo apt-get install python3-pip
For Linux users, if your computer got available CUDA GPUs and with CUDA library installed, the above commands should have helped you install the gpu-version pytorch. You can reach pytorch official website for more information.
Download the plugin zip file, unzip it, and rename the folder as Geo-SAM (be aware of undesired nested folders after unzipping).
In QGIS, Go to the menu Settings > User Profiles > Open active profile folder. You'll be taken straight to the profile directory. Under the profile folder, you may find a python folder; the plugins folder should be right inside the python folder (create the plugins folder if it does not exist). Put the entire Geo-SAM folder inside the plugins folder, then restart QGIS. The directory tree structure should be the same as the following.
python
└── plugins
    └── Geo-SAM
        ├── checkpoint
        ├── docs
        ├── ...
        ├── tools
        └── ui
Below are some general paths of the plugin folder for your reference.
# Windows
%APPDATA%\QGIS\QGIS3\profiles\default\python\plugins
# Mac
~/Library/Application\ Support/QGIS/QGIS3/profiles/default/python/plugins
# Linux
~/.local/share/QGIS/QGIS3/profiles/default/python/pluginsAfter restarting QGIS, go to the menu Plugins > Manage and Install Plugins, and under Installed, you may find the Geo SAM plugin; check it to activate the plugin.
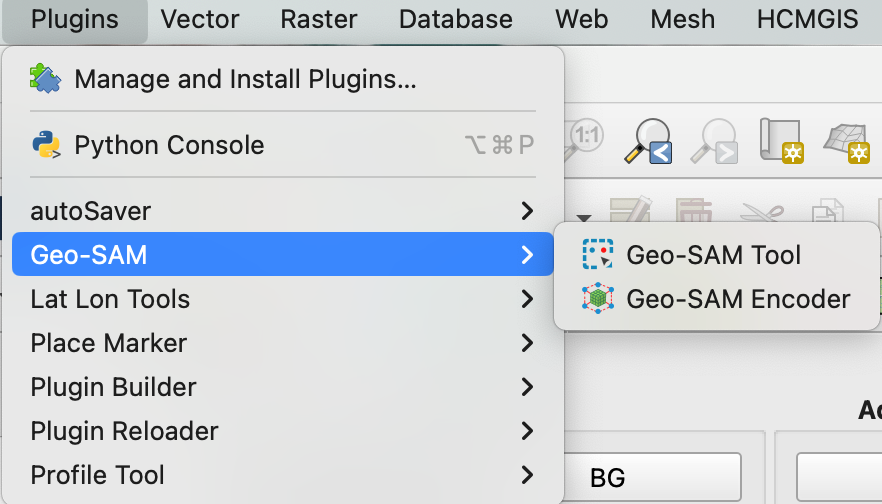
After activating the Geo SAM plugin, you may find the Geo SAM tools under the Plugins menu,
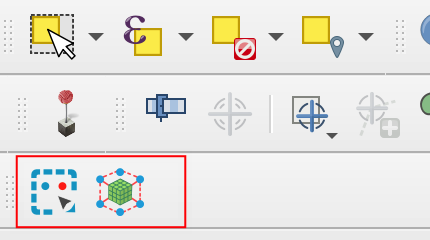
You may also find a new toolbar, including two icons.
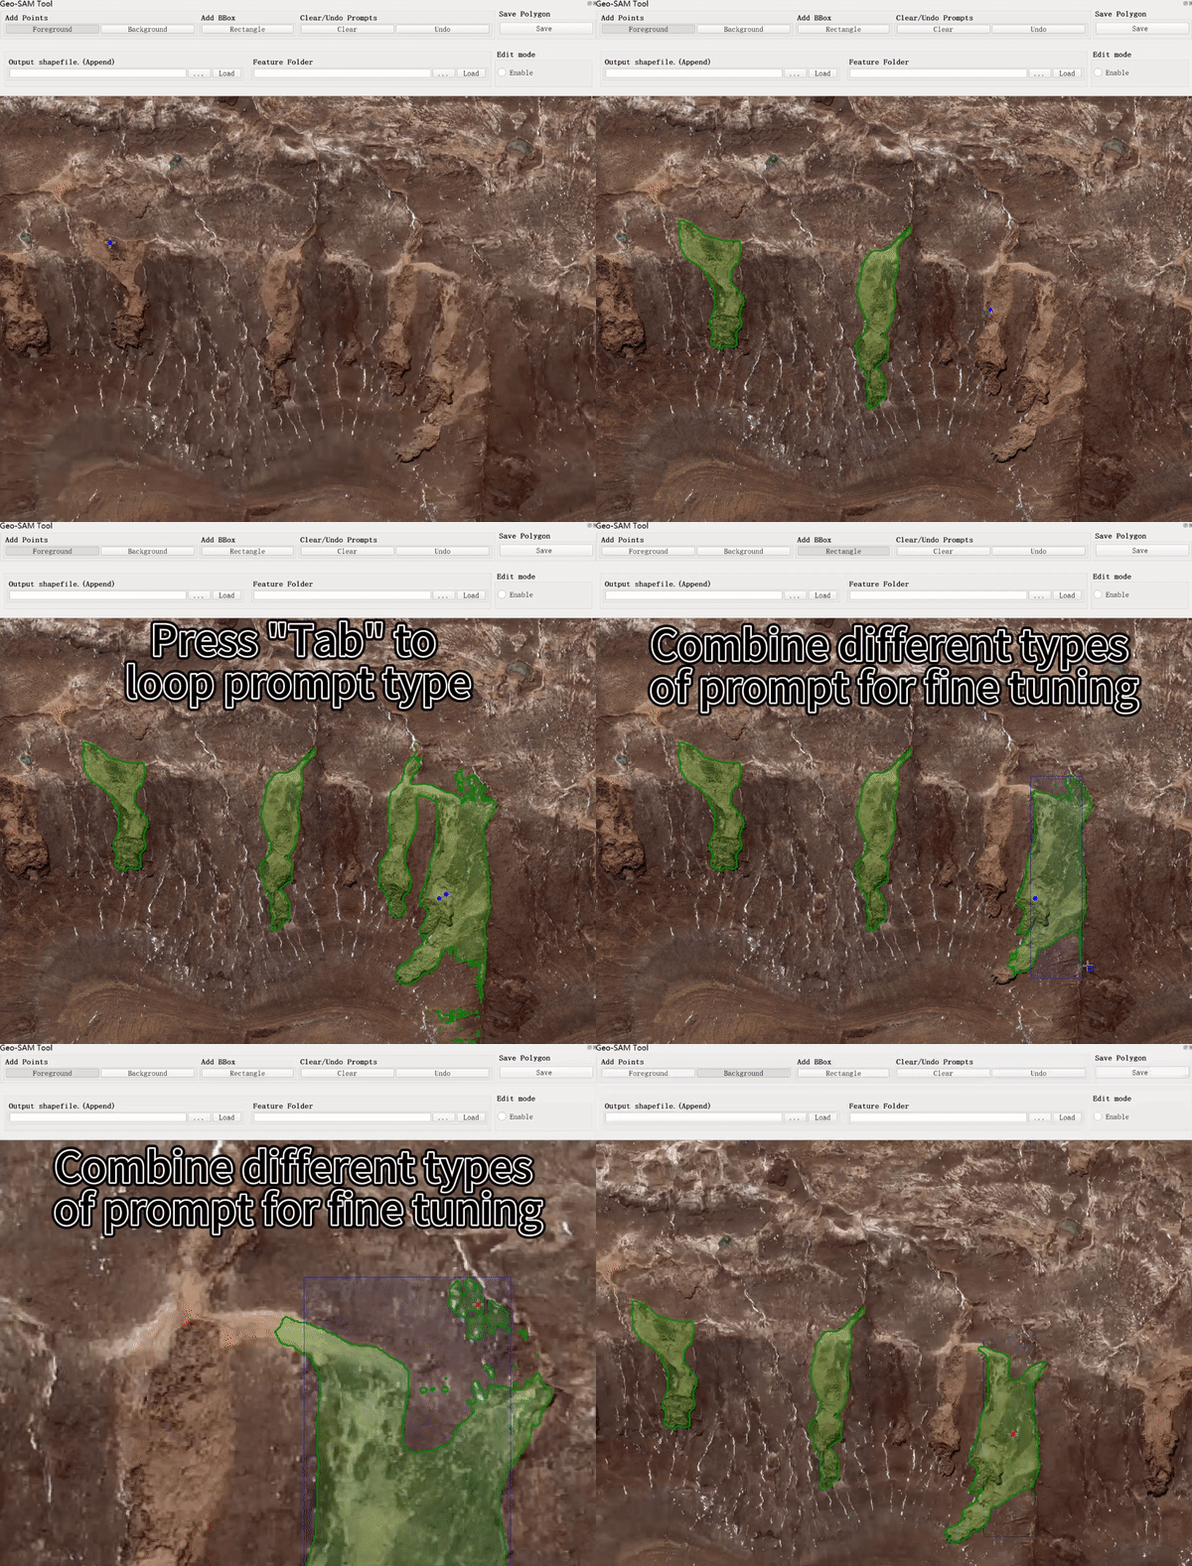
Click the Segmentation Tool icon to open the interactive segmentation widget. You will be shown a demo raster image with thaw slump and small pond landforms for you to try the tool. With a single click on the map, a segmentation result will be generated.
A user interface will be shown below.
Click the buttons to select between the Foreground(FG) and Background(BG) points. Use FG points to add areas you desire, and use BG points to remove areas you don't want.
Click the BBox button to choose to add a bounding box (BBox) on the canvas by pressing and dragging the mouse. BBox can be used together with adding points or independently.
After adding points and a BBox for segmenting a subject, you can save the segmentation results by clicking the Save button.
You can use the Undo button to undo the last point or BBox prompt.
You can use the Clear button to clear the added points and BBox.
You can uncheck the Enable button to temporally disable the tool and navigate on the map.
The plugin is initialized with features for demo purposes, and you can use the Feature Folder selection button to select the folder that includes the image features you need.
Then, press the Load button to load the selected image features. Remember to add the corresponding raster image to the QGIS project.
Tab: loop between 3 prompt types (the cursor will also change to the corresponding types)C: clear all prompts in canvas [same asClearbutton]Z: undo the last prompt in canvas [same asUndobutton]S: save SAM output features into polygon [same asSavebutton]Ctrl+Zorcommand+Z: undo the last saved segmentation results
- Deal with only One Subject each time
- Use Background Points to exclude unwanted parts
- Use Bounding Box (BBox) to limit the segment polygon boundary
- The BBox should cover the entire subject
- Remember to press the
Savebutton after the segmentation of the chosen subject
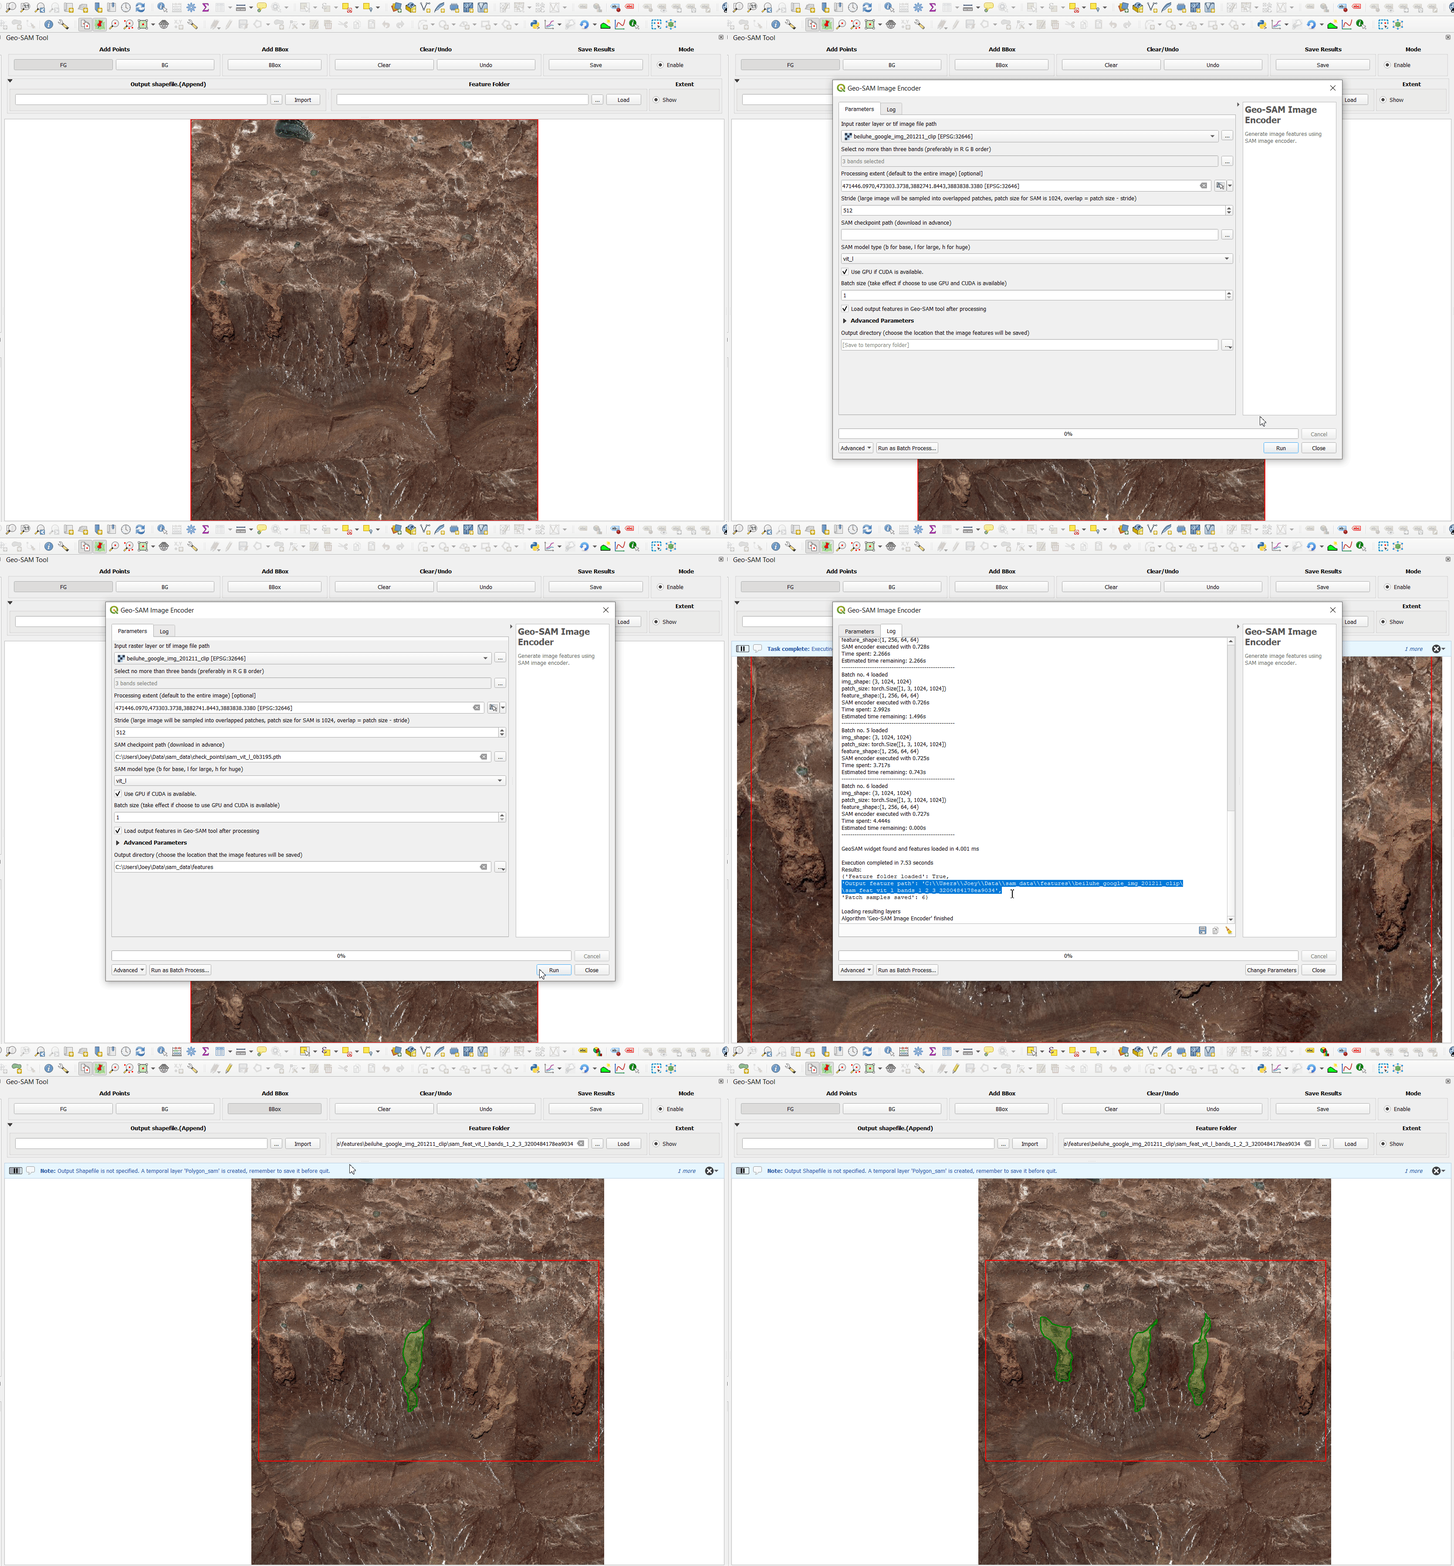
If you want to try your own images, you can use the Encoding Tool. This tool helps to preprocess geospatial images and generate image features using the SAM image encoder. The generated image features can then be used in our Geo-SAM tool to label the landforms by adding points and bounding box prompts.
SAM model checkpoints should be downloaded in advance, and three versions (huge, large, and base) are available. The large version "vit_l" is recommended to try first. You need to specify the model type that matches the checkpoint version. Using the following links to download the checkpoints.
vit_h: ViT-H SAM model.vit_l: ViT-L SAM model.vit_b: ViT-B SAM model.
After selecting the raster layer or image file you want to process, you should also choose the proper bands. The SAM natively supports only three-band RGB images, but we have adapted the tool to support one or two-band images so that you can try grayscale images or NDVI spectral index images.
The values of the image input to the SAM should range from 0 to 255, and you may need to specify the value range (in Advanced Parameters) to be rescaled to [0, 255]. By default, the tool will help you to find the min and max values of the image data and rescale the value range of [min, max] to [0, 255].
Since SAM only supports input images with sizes of (1024, 1204), small images will be resized to match the input size, while large images will be sampled into overlapped patches (patch_size=1024) in a grid-like fashion. The stride parameter will determine the overlap behavior, overlap = patch_size - stride.
The following animation shows how to use the encoder tool.
After processing the image, by default, the generated features will automatically be loaded in the segmentation tool for you to start labeling. Or you can choose to load the image features manually afterward.
- Choose a smaller processing extent
- Reduce target resolution (in
Advanced Parameters) - Increase stride to minimize overlap
- Choose a smaller version of SAM model
- Use GPU
- Increase batch_size when using a GPU with sufficient GPU memory
- Existing polygon refinement
Zhao, Zhuoyi, Fan, Chengyan, & Liu, Lin. (2023). Geo SAM: A QGIS plugin using Segment Anything Model (SAM) to accelerate geospatial image segmentation (1.1.0). Zenodo. https://doi.org/10.5281/zenodo.8191039
@software{zhao_zhuoyi_2023_8191039,
  author       = {Zhao, Zhuoyi and Fan, Chengyan and Liu, Lin},
  title        = {{Geo SAM: A QGIS plugin using Segment Anything Model (SAM) to accelerate geospatial image segmentation}},
  month        = jul,
  year         = 2023,
  publisher    = {Zenodo},
  version      = {1.1.0},
  doi          = {10.5281/zenodo.8191039},
  url          = {https://doi.org/10.5281/zenodo.8191039}
}This repo benefits from Segment Anything and TorchGeo. Thanks for their wonderful work.


