This workshop is important because:
Angular is built for Single Page Applications (SPAs). A SPA uses one main HTML page and dynamically updates its content, without reloading the page.
A Single Page App needs to handle user navigation between "pages" in the wireframe without loading new HTML pages. In a client-side framework like Angular, routing between views is not managed by the server but by the client itself. Angular associates the path of your URL with a controller and template.
In a MEAN stack app, the Express server will handle database interactions for our own API. Angular can handle routing and requests to most external APIs.
After this workshop, developers will be able to:
- Compare and contrast client-side and server-side routing.
- Add a module to an Angular project.
- Implement client-side routing with the
ngRoutemodule. - Display views (partial template files) with the
ng-viewdirective.
Before this workshop, developers should already be able to:
- explain how users navigate beteween different HTML pages.
- set up HTML routes in an Express server.
- explain parameterized urls.
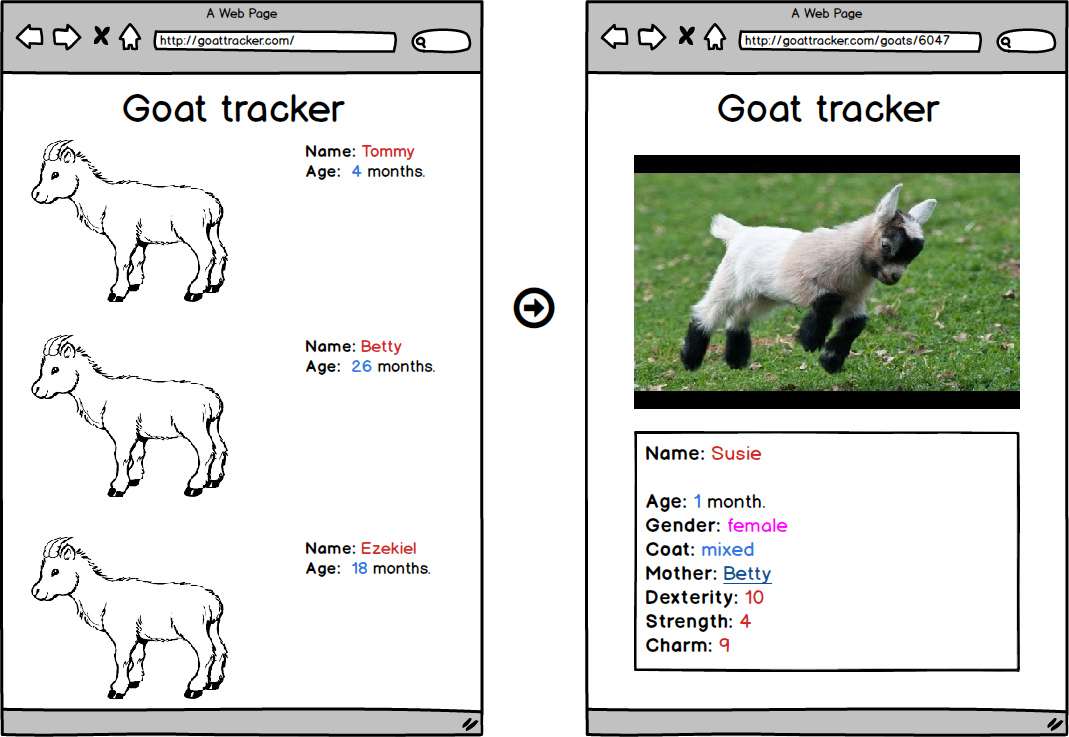
Imagine that you're a goat herder. You have an app to keep track of your goats (:goat::goat::goat:). Such an app might have:
- an index page that displays the list of goats.
- a show page that displays details about a specific goat.
Maybe it looks a little like this:
That seems alright, we can track each goat and we can click it to see more info about the goat.
- How would you serve the HTML for this site in Express?
click for idea
Since there are two different views with different HTML structures, the most straightforward way is to create two HTML files and two routes: - a `GET /` route to send the home page's HTML file, and - a `GET /goats/:goatId` route to send an HTML file that could be filled in with Handlebars for each individual goat.Note: This approach results in every page having its own URL, but their are many page reloads as the user navigates the site. Since HTML files are sent over mostly complete, it's easy for search engines to crawl their content.
- How would you build this site's front end if you were only serving one HTML file? (That is, how would you handle changing the appearance of the page when the user clicked on an individual goat?)
click for idea
Using jQuery, the "index" sections of the HTML page could be hidden. The single goat's information could be templated and shown on the page.Note: this approach removes page reloads, but the simplest implementation results in all pages having the same URL. Since HTML files are sent over in chunks, the time to retrieve any one view is shorter.
- What if your goat tracker could look like a multi-page app without page reloads?
- What if each view in your app had a unique browser URL depending on what the user was looking at?
- What if the state of the page was reflected in the URL?
- What if the user could use the back and forward buttons in the browser to smoothly navigate your site?
Now you can!
Notice how the urls in the wireframes above indicate where we're at? And how some of the page content stays the same?
Client-side routing:
- ties the URL in the browser to the state of the current page. If a user comes back to the same URL, they get to see the same content on the page.
- ensures that familiar browser navigation works.
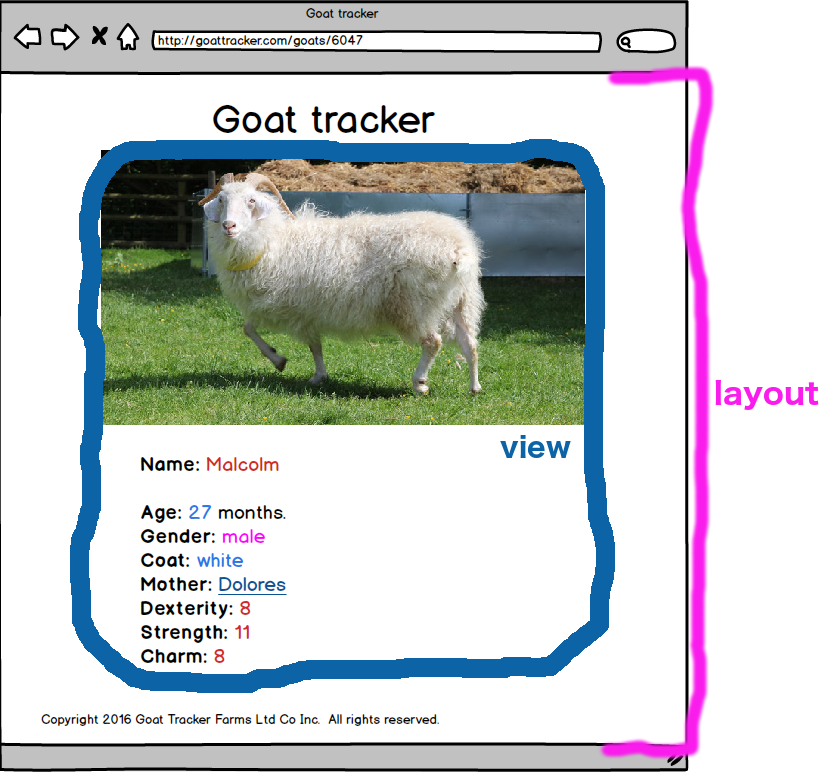
- lets us have modular front-end views that are made up of partials inside of layouts.
Most apps have a certain amount of content that appears on every page. It might be:
- a menu
- a header
- a sidebar
- a footer
Using a partial view template, we can keep the content that changes in each page separate from the static content.
The content that stays the same will live in our layout. In other words, maybe our sidebar, footer, and header all stay the same. We keep those in the layout. Any content that changes when the URL changes goes into a partial or view template.
In our goat app above, we have a "Goat Tracker" title on each page. That can be in our main layout. Then we just apply a different partial when viewing the index of goats or a goat show page.
Note: Some client-side routers allow you to have multiple views per layout. (
ui-router,Component Router). Others do not (ngRoute).
Angular first shipped with simple routing code that let you connect one URL with one controller and one template.
Very quickly, developers in the Angular community wanted to go beyond this simple coupling and nest controllers, views, and scopes together to make more complex and modular client-side applications.
The Angular community decided to decouple the core Angular features from this early routing solution so that an alternative approach could be developed.
They extracted the initial Angular routing code into its own separate module called ngRoute.
Angular's built-in ngRoute will most likely have all the routing features you need for your apps as you're first learning Angular. As your Angular apps become more robust, you might find yourself moving toward other solutions like the third-party ui-router module, which supports nested views, multiple named views, and "states".
Modules group together various components. Here are ngRoute's directives, provider, and services:
ngView (ng-view) directive: includes the rendered template of the current route into the main layout (index.html) file. Every time the current route changes, the included view changes with it according to the configuration of the $route service.
$routeProvider provider: used for configuring routes.
$route (service): used for deep-linking URLs to controllers and views (HTML partials). It watches $location.url() and tries to map the path to an existing route definition. The main behind-the-scenes workhorse of ngRoute.
$routeParams (service): allows you to retrieve the current set of route parameters.
- Include the script tag for
ngRoutein yourindex.html, after the Angular script tag:
<!-- index.html -->

<!DOCTYPE html>
<html ng-app="sampleApp">
<head>

  <!-- angular -->
  <script type="text/javascript" src="https://cdnjs.cloudflare.com/ajax/libs/angular.js/1.5.3/angular.js"></script>

  <!-- angular route -->
  <script type="text/javascript" src="https://cdnjs.cloudflare.com/ajax/libs/angular.js/1.5.3/angular-route.js"></script>

  <!-- custom script (angular app) -->
  <script type="text/javascript" src="app.js"></script>

</head>
...- Include the
ngRoutemodule in your Angular app's list of dependencies:
// app.js

var app = angular.module('sampleApp', ['ngRoute']);You're going to turn your index.html file into a "layout template." Depending on the current url path, the Angular router (ngRoute) will include the correct partial template in the layout to be displayed to the user.
- Create a folder in your application called
templates.
➜ mkdir templates- Create some partial template files for the different "views" in your application. We'll use the example of templates for the homepage and the about page. Make sure to create your templates inside the
templatesfolder.
➜  touch templates/home.html
➜ touch templates/about.html- In
index.html, add a div with theng-viewdirective inside the<body>tag. Theng-viewshows where our template HTML will go when the page is rendered.
<!-- index.html -->

<body>
  <div ng-view></div>
</body>- Right after you define your Angular app in your code, use the
.configmethod to set up your routes. Configure your routes using$routeProviderinjected intoconfig.
// app.js

angular.module('sampleApp', ['ngRoute'])
	.config(config);


config.$inject = ['$routeProvider', '$locationProvider'];
function config(   $routeProvider,   $locationProvider   ) {
  $routeProvider
    .when('/', {
      templateUrl: '/templates/home',
      controller: 'HomeController',
      controllerAs: 'homeCtrl'
    })
    .when('/about', {
      templateUrl: '/templates/about',
      controller: 'AboutController',
      controllerAs: 'aboutCtrl'
    })
    .otherwise({
      redirectTo: '/'
    });

  $locationProvider.html5Mode({
    enabled: true,
    requireBase: false
  });
};Each route that you just set up points to its own controller, which contains its own scope. Following the homepage and about page example above, you'll need two controllers, HomeCtrl and AboutCtrl.
- After configuring your routes, define your controllers in
app.js:
// app.js

angular.module('sampleApp', ['ngRoute'])
  .config(config)
  .controller('HomeController', HomeController)
  .controller('AboutController', AboutController);


config.$inject = ['$routeProvider', `$locationProvider`];
function config(   $routeProvider,   $locationProvider  ) {
  ...
}

HomeController.$inject = [];
function HomeController() {
  ...
};

AboutController.$inject = [];
function AboutController() {
  ...
};
If you're having trouble getting your routes to work, the first thing to check is the spelling and file path of the templateUrl and the spelling of your controller (also double check that you properly defined the controller).
In some cases, you'll want to access URL parameters in an Angular controller. We do this by injecting the $routeParams provider into the controller.
Back to goats! The route /goats/:goatId should show one particular goat based on the goatId.
angular.module('sampleApp', ['ngRoute'])
	.config(config);

config.$inject = ['$routeProvider', `$locationProvider`];
function config(   $routeProvider,   $locationProvider  ) {
  $routeProvider
    .when('/goats/:goatId', {
      templateUrl: '/templates/goats/show',
      controller: 'GoatsShowController',
      controllerAs: 'goatsShowCtrl'
    });
  $locationProvider.html5Mode({
    enabled: true,
    requireBase: false
  });
}

GoatsShowController.$inject = ['$routeParams'];
function GoatsShowController(   $routeParams   ) {
  var vm = this;

  var goatId = $routeParams.goatId;
  // use `goatId` to find specific goat
};What if you want to link to another view from one of your partials? Maybe you'd like users to be able to click a goat in the GoatsIndexController's view's list of goats and be taken to that goat's show page.
-
In your HTML for each goat, you should use
ng-href.<!-- templates/goats/index.html --> <div ng-repeat="goat in goatsIndexCtrl.goats"> <a ng-href="/goats/{{goat.id}}">{{goat.name}}</a> </div>
###Closing Thoughts
-
How is client-side routing different from server-side routing (for HTML endpoints)?
-
What is a benefit of client-side routing with
ngRoute? What is a benefit of server-side HTML endpoint routing with Express?
- Built-in Directives
ngRouteModule$locationProvider


