A (hopefully) simple to setup and replicate home sensor logger setup using ESP8266 nodes which log sensor readings to a central aggregator over MQTT. Aggregator lives on a Raspberry Pi and uses Node RED, InfluxDB, and Grafana to route, store and visualize the data.
Initial sensor design is for temperature, humidity and ambient light levels (log scale). Additional interesting measures include barometric pressure, HVAC state, state of smart home switches, &c. Usage of the DarkSky API allows for direct comparison of outdoor weather conditions in lieu of a weather resistent sensor node.
Note: These instructions are macOS X-centric, however everything has analogs on Linux and Windows as well. All instructions on the Raspberry Pi are universal.
On your computer, install balenaEtcher (e.g. brew cask install balenaetcher) then write image to SD card. Re-mount image and touch /Volumes/boot/ssh to enable SSH on first-boot. First boot may take a few miniutes. When it's up, SSH in with ssh pi@raspberrypi.local.
Run the device-level setup, going through the menus as follows.
sudo raspi-config
#   >> Network Options > Hostname --> Set to `logger`
#   >> Localisation Options > Change Locale --> set locale to en_us.UTF-8
#   >> Interfacing Options > Serial --> Login shell over serial: NO, Serial port hardware: YES
#   >> Update --> Run the update
Install various pre-requisites for use later, as well as configuring the Raspberry Pi for easier maintenance in the future.
sudo apt-get update && sudo apt-get upgrade && sudo apt-get autoremove
sudo apt-get install -y avahi-daemon vim python python-pip git apparmor-utils apt-transport-https \
  avahi-daemon ca-certificates curl dbus jq network-manager socat
sudo systemctl disable ModemManager
sudo apt-get purge -y modemmanager
echo gpu_mem=16 | sudo tee -a /boot/config.txt
echo hdmi_force_hotplug=1 | sudo tee -a /boot/config.txt
echo hdmi_drive=2 | sudo tee -a /boot/config.txt
Note: This is no longer needed - For Z-Wave usage, ensure the zwave USB stick is aliased for later use.
echo 'MODE="0666", SUBSYSTEM=="tty", ATTRS{idVendor}=="0658", ATTRS{idProduct}=="0200", SYMLINK+="zwave"' | sudo tee -a /etc/udev/rules.d/99-usb-serial.rulesLastly, reboot the system so all the changes can take effect.
sudo rebootConnect the external hard drive and run the following commands in order to reformat the drive, build a new partition suitable for use, copy over all existing data, and configure the boot partition to use the new drive after bootstrapping to run the OS.
WARNING: This will completely erase the hard drive and replace it's contents with the data currently on the Raspberry Pi SD card. This is a permanent action!
sudo fdisk -l # ensure /dev/sda is the external drive
sudo parted /dev/sda mklabel gpt
sudo parted /dev/sda mkpart primary ext4 0G 100%
sudo mkfs.ext4 /dev/sda1
sudo mkdir /media/usbdrive
sudo mount /dev/sda1 /media/usbdrive
sudo rsync -avx / /media/usbdrive
sudo sed -i '1!b;s/$/ root=\/dev\/sda1 rootfstype=ext4 rootwait/g' /boot/cmdline.txt
sudo reboot
Note: You still need the SD Card and the HDD plugged in to boot. Either missing will cause it to fail to boot or kernel panic.
SSH back in with ssh pi@logger.local
curl -sSL https://get.docker.com | sh
sudo usermod -aG docker pi
sudo systemctl enable docker
sudo systemctl start docker
sudo apt-get install docker-composeFirst, be sure the Z-wave controller USB device is plugged in before proceeding.
curl -sL "https://raw.githubusercontent.com/home-assistant/hassio-installer/master/hassio_install.sh" | sudo bash -s -- -m raspberrypi3- Follow the onboarding steps according to the on-screen prompts
- When the page asking to set up additional services, clic the
(...)more button - In the modal, search for
zwaveand select the option - In the new modal, enter
/dev/ttyACM0in the "USB Path" entry - Click "Finish" to finalize setup and go to the home screen
- Go to "Configuration", click "Z-Wave" and then click "Start" to start the Z-wave network
To toggle on and off the Aeotec "Disco Mode" lights on the USB stick, run the following command:
# Toggle off
echo -e -n "\x01\x08\x00\xF2\x51\x01\x00\x05\x01\x51" > /dev/serial/by-id/usb-0658_0200-if00

# Toggle on
echo -e -n "\x01\x08\x00\xF2\x51\x01\x01\x05\x01\x50" > /dev/serial/by-id/usb-0658_0200-if00
Now, pair devices and build your network.
For backups, all HomeAssistant files are stored in /usr/share/hassio/ with config files in /usr/share/hassio/homeassistant.
- HomeKit Integration
- Caddy Server
- Github Backup
- Determine whether to use add-on versions of MQTT, Node-RED, Grafana, InfluxDB, etc.
TODO: Prefer git pull on Raspberry Pi to divorce direct syncing to update.
From your local machine:
git clone git@github.com:sethvoltz/data-logger.git logger
cd logger
./bin/sync
From the Raspberry Pi:
cd ~/logger
./bin/setup
sudo reboot- Go to hamburger in upper right, click menu and choose "Manage Palette"
- Go to the search tab, search and install:
- InfluxDB,
node-red-contrib-influxdb - DarkSky,
node-red-node-darksky
- InfluxDB,
- Add "InfluxDB" source, using URL
http://influxdb:8086, no credentials, database nameiot - Default Grafana u/p is
admin/admin, you'll be required to change password to something else, e.g.raspberry;)
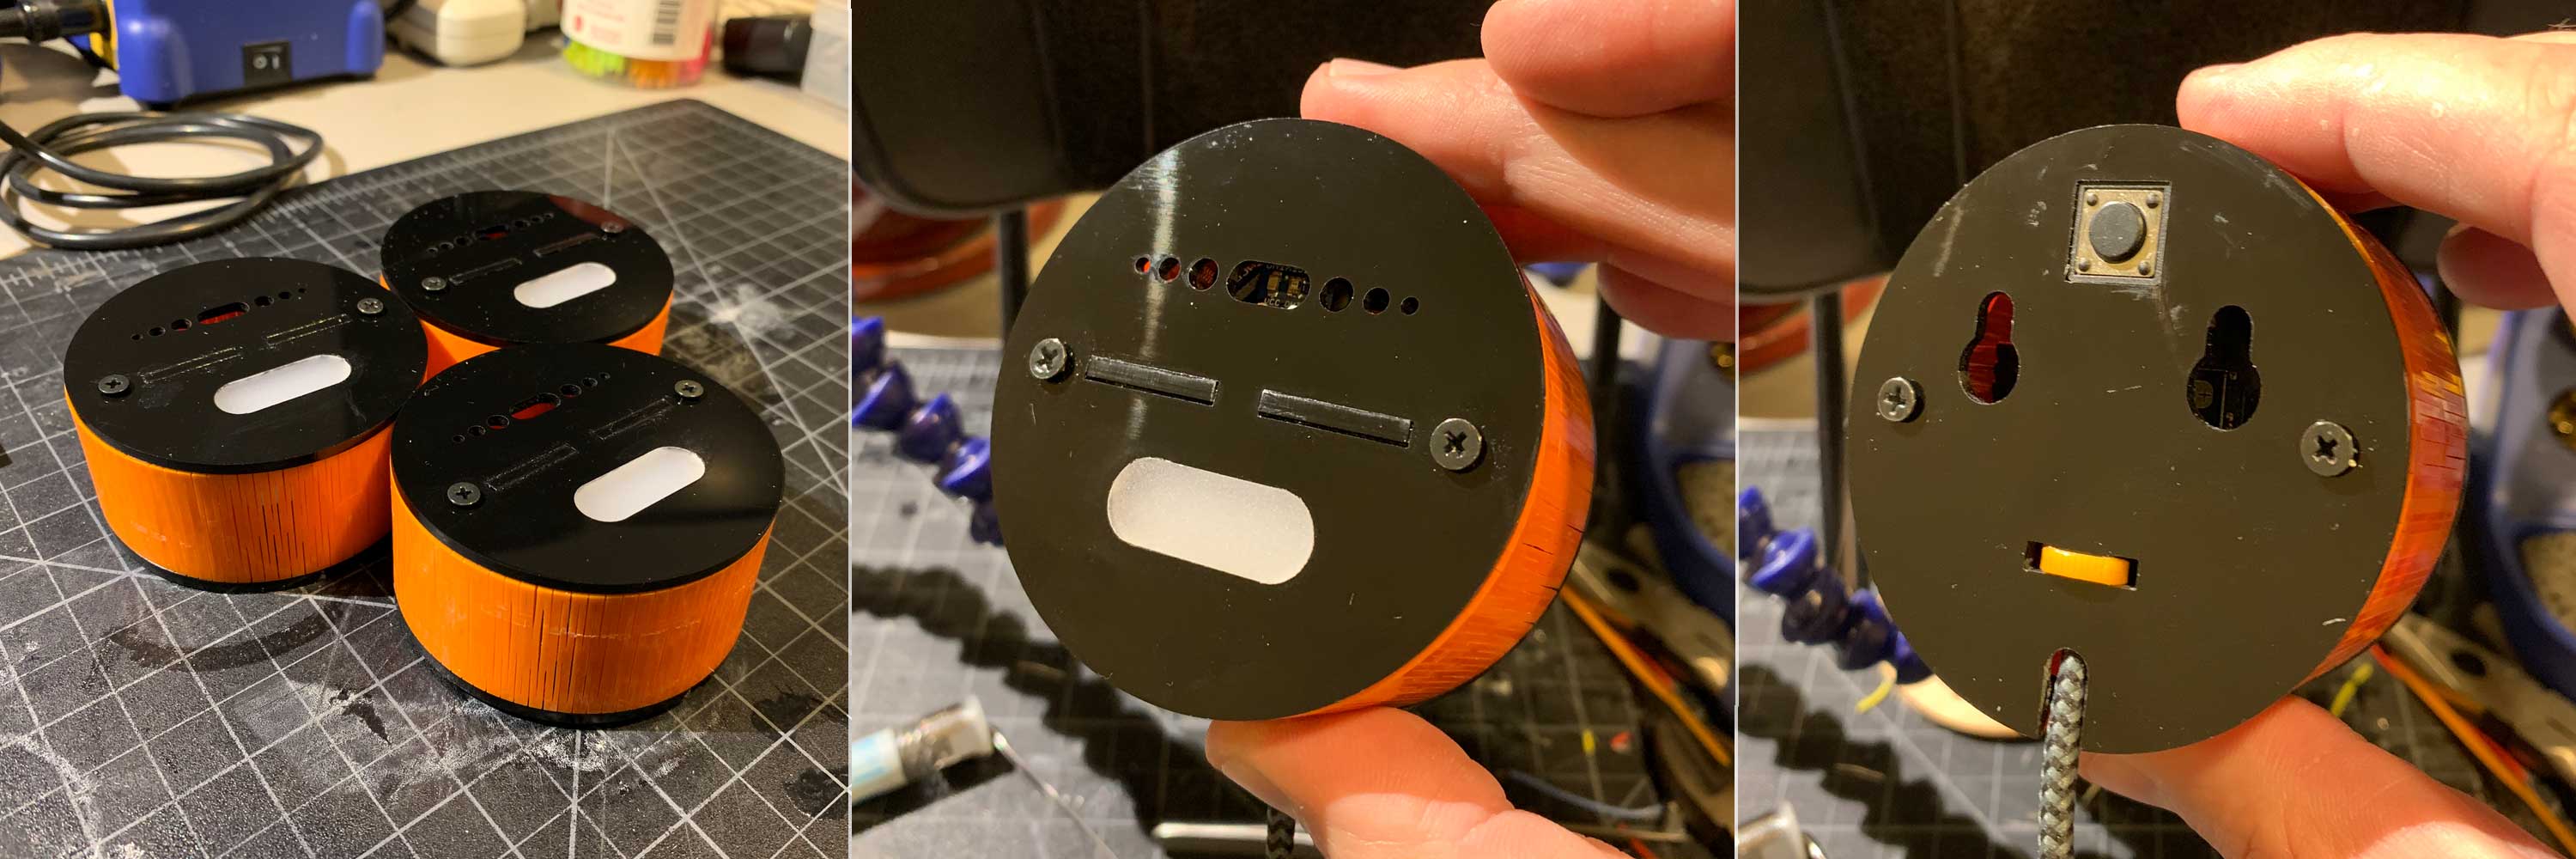
The individual nodes are composed of an Adafruit ESP8266 Huzzah and a series of sensors to measure temperature, humidity and ambient light levels (lux).
The hardware will be described in a future blog post, including how the case was assembled and wired. The cad/ directory includes an SVG file for the case, with layers for the main body, living hinge shell and the diffuser. Note that the diffuser is roughly 0.2mm larger to compensate for standard laser cutter kerf. You will likely need to sand or file it down for a tight fit before securing with acrylic cement.
To load the firmware onto the Huzzah, load the firmware/ directory in the PlatformIO, which can be installed standalone, or on a number of other editors, such as [VS Code][vs-pio]. From there, plug in your Huzzah with a serial cable, press the button sequence to put it in firmware loading mode, and run the PlatformIO: Upload command. Once loaded:
- Enter Captive Portal mode. If this is your first install, it will automatically be there. If not, press and hold the button for roughly 3 seconds. You are in captive portal mode when the indicator lights are a steady deep blue.
- Connect to the network starting with "Setup Data Collector" -- the value following is the deviceID
- Choose your wifi network and enter credentials, as well as the MQTT server IP and port, and a name describing where the device is, e.g. 'living-room'. Avoid spaces.
- Press save. This will save your information to the onboard memory and reload the config, attempting to connect to the wifi network and MQTT server.
As soon as it is successful, you will be greeted with a breathing white indicator. It is now collecting sensor data and reporting to the MQTT server as a JSON payload, perfect for NodeRED to parse and consume.