Babel is a transpiler that converts our js code in any modern version (e.g. ES2016, ES2017) to ES5, which is universally supported by browsers. It also converts jsx to js.
There are 2 module systems in JS:
- JS ES2015 Modules use the
importkeyword. (this is the one we typically use) - Common Modules use the
requirekeyword.
- Explained through an example:
import React from 'react'looks for the 'react' folder insite thenode_modulesand assigns all the code to theReactvariable in my file (I can name it whatever I want). - We could also import from a path
import MyLibrary from 'a/path'.
React is a library that contains how al components work. ReactDOM is a library that deals with putting those components on the DOM. If we were using React Native, then there would be a library to render the components inside the app.

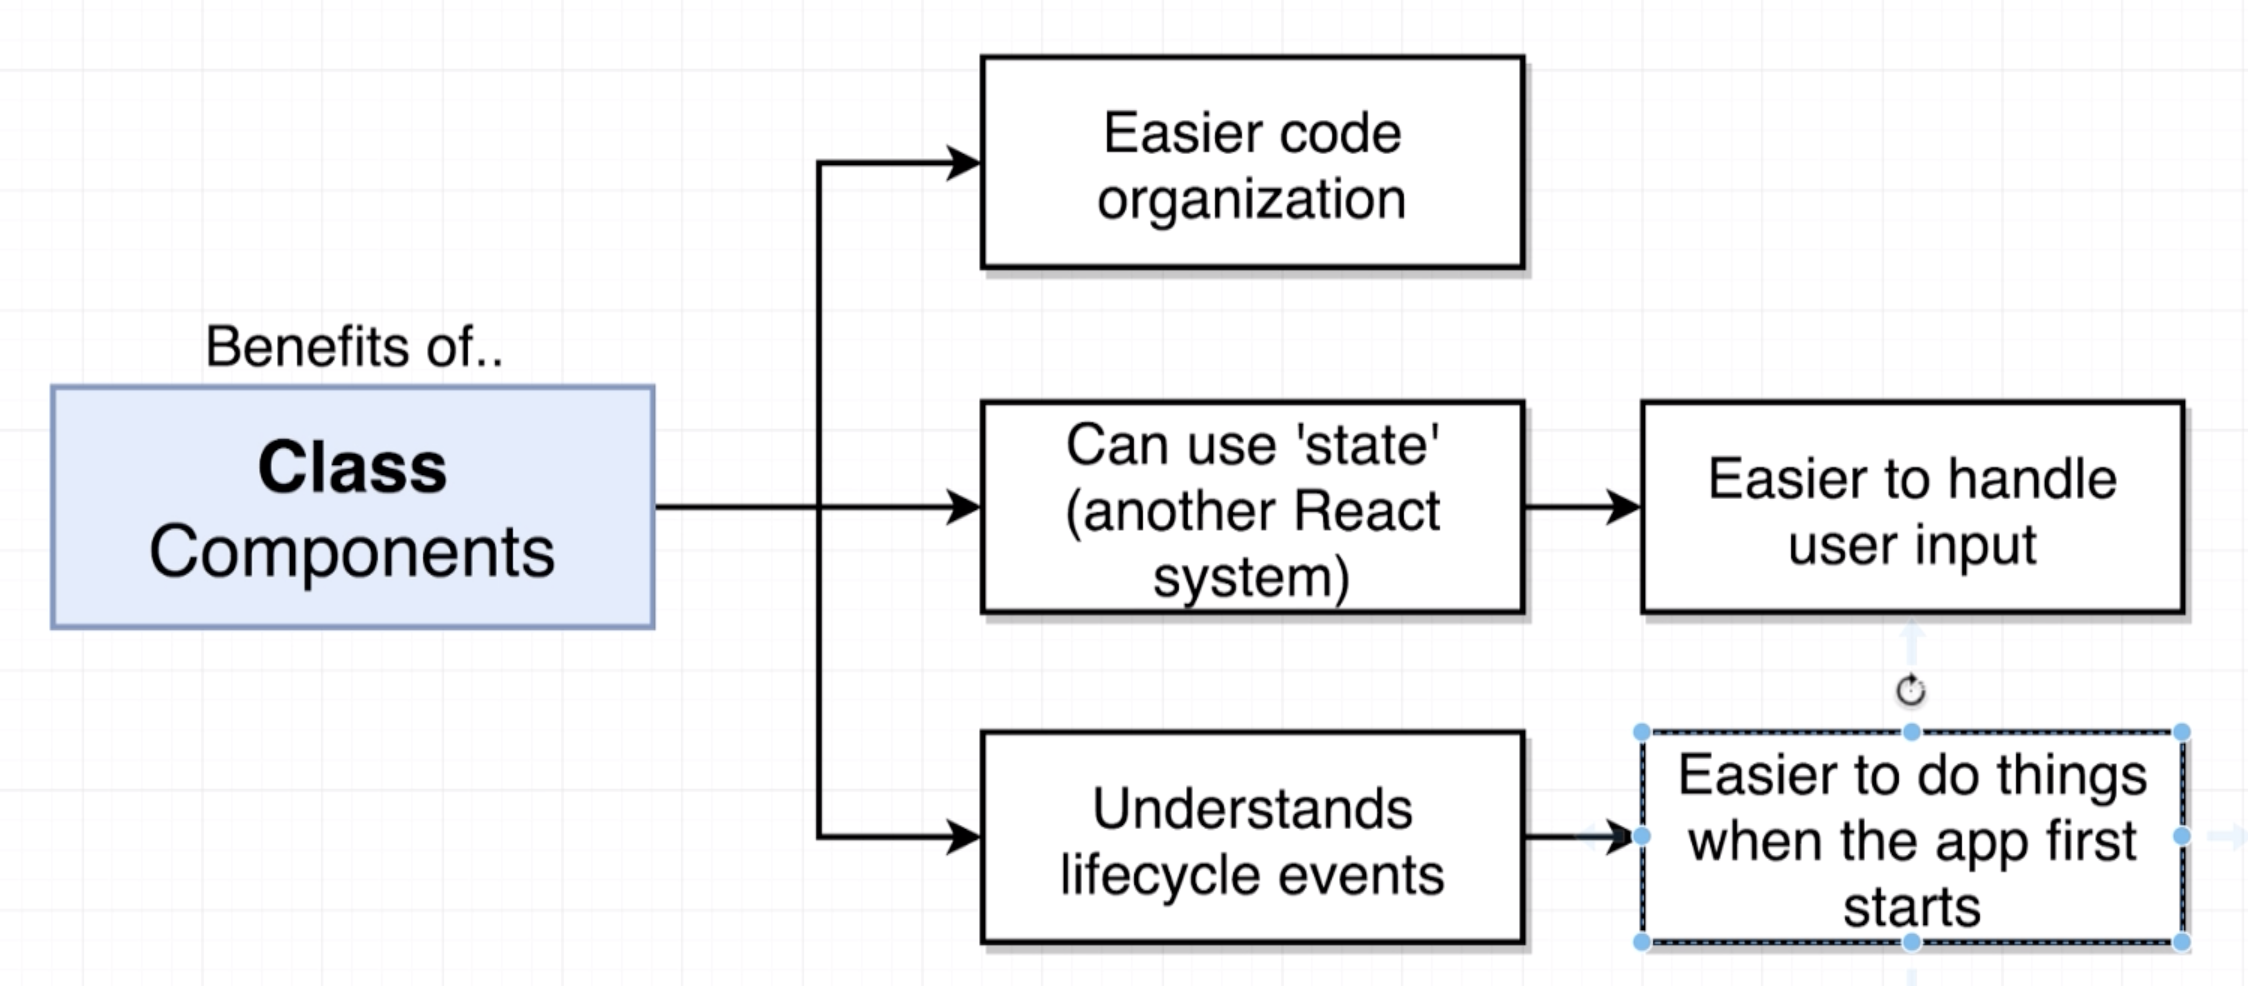
- Use Functional Components for very simple content (e.g. only render HTML using some props passed to it).
- Use Class Components for everything else (e.g. complex logic, handling any user interaction).

 Customization can be either to:
- Customize how a component looks.
- Customize how a user interacts with it.
Children cannot pass props to the parent (only parent to child).
You can use the create-react-app command line tool. You install it using npm install -g create-react-app.
- src: where all the code goes (js and css).
- There is a special file
index.jswhich is the "root" of your react application.
- There is a special file
- public: where static HTML and assets go.
- node_modules: all of the dependencies of the project (we never want to manually go inside it).
- package.json: analogous to the gemfile
npm start
- React component files are named using CamelCase. For example
CommentDetails.jsfor theCommentDetailcomponent.
- Custom inline styling
<!-- HTML -->
<div style="background-color: red;"></div>
// JSX - Note: 1) JS object for properties, 2) CamelCase for dashed properties.
// Outer curly braces represent JS interpolation, Inner {} represent a JS object
<div style={{backgroundColor: 'red'}}></div>-
The HTML class in a tag
<label class="foo">...turns into<label className="foo">... -
Referencing JS variables in JSX
const App = () => {
	const buttonText = 'Click Me!';
	return (
		<button>{buttonText}</button>
	);
}
We can use {}to interpolate any JS within JSX. The only limitation is: we cannot use a JS object to print it out as text. For example, the next snippet will result in a "Objects are not valid as a react child" error.
// Wrong
const App = () => {
	const buttonText = {text: 'Click Me'};
	return (
		<button>{buttonText}</button>
	);
}

// Right
const App = () => {
	const buttonText = {text: 'Click Me'};
	return (
		<button>{buttonText.text}</button>
	);
}- There are other differences in property names like
<label for="foo">...turns into<label htmlFor="foo">. Many of these won't crash your app. As a general rule, if you see a did you mean X warning message in the browser console, it is because you are using an invalid property name from React's point of view.

Props can only be passed from the parent to a child (not the other way around).
// Passing: Just like custom HTML attributes
const App = () => {
    return (
        <div className="ui container comments">
            <CommentDetail author='Sam'  body='This is comment 1'  avatarUrl={faker.image.avatar()}/>
        </div>
    );
};
// Receiving props in functional components: passed as an object as the first argument.
const CommentDetail = (props) => {
return (
<div className="comment">
<a className="avatar" href="/">
<img alt="avatar" src={props.avatarUrl}/>
</a>
<div className="content">
<a href="/" className="author">{props.author}</a>
<div className="text">{props.body}</div>
</div>
</div>
);
};
// Receiving props in class based component: added to a property this.props
class CommentDetail extends React.Component {
someFunction() {
console.log(this.props.author);
}
}We will use the following example to illustrate:

// index.js
// ApprovalCard gets injected the custom CommentDetail component
const App = () => {
    return (
        <div className="ui container comments">
            <ApprovalCard>
                <CommentDetail author='Sam' body='This is comment 1' avatarUrl={faker.image.avatar()}/>
            </ApprovalCard>
        </div>
    );
};
// ApprovalCard.js
// Injected children get assigned by react to props.chilren
const ApprovalCard = (props) => {
return (
<div className="ui card">
<div className="content">{props.children}</div>
{/*...*/}
</div>
);
};Class based components must comply 3 rules:
- Must be a JS Class
- Must extend React.Component
- Must define a
rendermethod that returns some JSX. This method defines how the component renders itself.
-
Only usable with class components.
1.1 Note: Now it can technically by used with functional components through the 'hooks' system.
-
You will confuse props with state.
-
'State' is a JS object that contains data relevant to a singular component.
-
Updating 'state' on a component causes the component to (almost) instantly re-render. Re-rendering also triggers the re-rendering of ALL CHILD components.
-
State must be initialized when a component is created. This can be done in 2 equivalent ways (They are equivalent once Babel transpiles the code.)
// Option 1: Explicitly initialize inside the constructor method
class App extends React.Component {
    // The constructor takes props as an argument
    constructor(props) {
        super(props); // We always have to call super inside the constructor
        // This is the ONLY time we directly assign this.state (for any other time use setState)
        this.state = { lat: null };
    }
    // ...
}

// Option 2: Use shorthand class property initialization
class App extends React.Component {
     state = { lat: null };
    // ...
}- State can only be updated using the function
setState.
class App extends React.Component {
    myFunction() {
        myAsyncFunction(
            // On Success
            (myArg) => {
                // We use setState, NOT this.state.lat = ....
                this.setState({ lat: myArg})
            },
            // On Failure
            (err) => console.log(err)
        );
    }
}The render method is called by React VERY frequently. If we put any API calls or heavy logic inside it, we might
be doing unnecessary extra work.
Using a errorMessage property inside the component's state is a simple and nice way to handle errors. For this
we also need to define how the component renders when the errorMessage property is present. Here is a simple example
(note there are more elegant ways to do the conditional rendering):
class App extends React.Component {

    constructor(props) {
        super(props);
        this.state = { lat: null, errorMessage: '' };
    }
    // ...
    render() {
        if (this.state.errorMessage && !this.state.lat) {
            return <div>Error: {this.state.errorMessage}</div>
        }
        if (!this.state.errorMessage && this.state.lat) {
            return <div>Latitude: {this.state.lat}</div>
        }
        return <div>Loading...</div>
    }
}
constructor: when the component is instantiated.render: compulsory to define it.componentDidMount: called ONE time when the component first shows on the screen.- Updates are caused by changes in state through the
setStatemethod. componentDidUpdate: called every time the component gets updated. It is called AFTERrenderwhen the state changes.componentWillUnmount: called when the component is going to be removed from the screen. Typically used for cleanup.
When we need to get some text, class names (etc) based on a condition, configuration objects are a better alternative
than if..else statements. See example:
//  This is the configuration object
const seasonConfig = {
    summer: {
        text: 'Let\'s hit the Beach',
        iconName: 'sun'
    },
    winter: {
        text: 'Burr, it is chilly',
        iconName: 'snowflake'
    }
};
// ...
const SeasonDisplay = (props) => {
    const season = getSeason(props.lat, new Date().getMonth()); // returns either 'summer' or 'winter'
    const {text, iconName} = seasonConfig[season]; // Destructurizing a JS object
    return (
        <div>
            <i className={`icon ${iconName}`} />
            <h1>{text}</h1>
            <i className={`icon ${iconName}`} />
        </div>
    );
};A common pattern is to create a dedicated stylesheet for each component which is in charge of defining the styles
of the component. For example, for the SeasonDisplay.js, we create a SeasonDisplay.css.
Inside the SeasonDisplay.js we:
import SeasonDisplay.cssand Babel will make that the stylesheet gets correctly imported in the HTML.- Add a matching
season-displayclass to the root of the returned JSX so that we can specifically target elements inside that component.
Example:
// SeasonDisplay.js
import './SeasonDisplay.css';

const SeasonDisplay = (props) => {
    // ...
    return (
        // Note the season-display class
        <div className={`season-display ${season}`}>
            {/* ... */}
        </div>
    );
};.season-display {
display: flex;
justify-content: center;
}
.season-display.winter i {
color: blue;
}
.season-display.summer i {
color: red;
}Default props are used when we want a component to have a props with a default value in case the parent component does not specify a particular prop.
const Spinner = (props) => {
    return(
        <div className="ui active dimmer">
            <div className="ui big text loader">{props.message}</div>
        </div>
    );
};

// Default Props is a JS object in the main body of the Spinner.js file
Spinner.defaultProps = {
    message: 'Loading...'
};As a general rule, we want to avoid having more than ONE return in the render method or having any heavy logic in it.
To avoid this, we can create custom helper methods that abstract better the conditional logic.
class App extends React.Component {
    //...
    // This is a helper method that unloads the conditional logic from the render method
    renderContent() {
        if (this.state.errorMessage && !this.state.lat) {
            return <div>Error: {this.state.errorMessage}</div>;
        }
        if (!this.state.errorMessage && this.state.lat) {
            return <SeasonDisplay lat={this.state.lat} />
        }
        return <Spinner message = 'Determining your Location...'/>;
    }

    render() {
        return (
            <div className="some-class-that-is-always-needed">
                {this.renderContent()}
            </div>
        );
    }
}We can detect user interaction through special props like onChange. It is our job
to define a callback function that will handle the event with any custom logic we need.
The most used special properties are:
onClick: any HTML element can be wired up withonClick.onChange: triggered when a user changes an input. Only input fields triggeronChange.onSubmit: only forms triggeronSubmit.
Here is an example for handling onChange on a Search Bar.
class SearchBar extends React.Component {
    // Used as a callback function to handle the change
    // "event" is passed by default to all event handlers
    onInputChange(event) {
        // Whatever logic I need
        console.log(event.target.value);
    }

    render() {
        return (
            <form>
                <label>Image Search</label>
                {/* onChange is a special property name that gets triggered when the input changes. */}
                {/* We provide the callback function to handle the change */}
                {/* Note that this example shows an uncontrolled element for simplicity. We prefer controlled elements */}
                <input type="text" onChange={this.onInputChange}/>

                {/* An alternative frequently used syntax is using arrow functions when the handlers are small */}
                <input type="text" onChange={ (e) => console.log(e.target.value) }/>
            </form>
        );
    }
}Depending on how we wire up them, HTML input elements can be classified as controlled or uncontrolled.
Uncontrolled elements are elements in which the "truth" of the data is sitting inside the HTML. In the following
example, if we wanted to find the text in the input field from an arbitrary point in the component (e.g. from
componentDidUpdate), we have no choice but to reach out to the HTML input element and read the value.
class SearchBar extends React.Component {
    onInputChange(event) { /* Whatever logic I need  */ }

    componentDidUpdate() {
        // To find out the search term, we have no option but to reach out to the HTML input.
    }

    render() {
        return (
            <form>
                <label>Image Search</label>
                <input type="text" onChange={this.onInputChange}/>
            </form>
        );
    }
}
If we wire things differently we can make sure that the JS Component contains all the data and drives the HTML (not the other way around). We always prefer controlled elements.
class SearchBar extends React.Component {
    // We use component state to store the search term.  In this way, we can reach for the state
    // at any arbitrary point to figure out the term.
    state = { term: ''};

    render() {
        return (
            <form className="ui form">
                <label>Image Search</label>
                {/* We fix (control) the value of the input through the state to make sure that */}
                {/* react DRIVES the HTML and not the other way around */}
                <input
                    type="text"
                    value={this.state.term}
                    onChange={ (e) => this.setState({term: e.target.value}) } />
            </form>
        );
    }
}Note: this is a complex issue, to get a full understanding of the problem, re-watch videos "84. Understanding 'this' in Javascript" and "85. Solving Context Issues" from Stephen Grider's Udemy course.
The error is caused by how the context system works in JS (i.e. what value is assigned to this at runtime).
The next code exemplifies the problem:
class SearchBar extends React.Component {
    state = { term: ''};

    render() {
        return (
            /* Here we 'rip out' onFormSubmit from the SearchBar instance and give it to `onSubmit` */
            <form className="ui form" onSubmit={ this.onFormSubmit }>
                    <label>Image Search</label>
                    <input
                        type="text"
                        value={this.state.term}
                        onChange={ (e) => this.setState({term: e.target.value}) } />
            </form>
        );
    }

    onFormSubmit(event) {
            event.preventDefault();
            // Here `this` causes the problem because the function is called outside the scope of the
            // SearchBar instance.  In that context `this = undefined`.
            console.log(this.state.term);
        }
}
Rule of thumb: the value of this inside a JS function
this inside a function takes the value of the instance on which the function is being called
(i.e. what is left of the dot). For example, given an arbitrary function myFun that contains this inside it.
myCar.myFun(); // `this` refers to the myCar instance
myTruck.myFun(); // `this` refers to the myTruck instance
myFun2 = myCar.myFun; // Rip out myFun and assign it to myFun2.
myFun2(); //`this` refers to `undefined` since myFun2 is not being called on any instance.
Solutions to the this context problem
There are many solutions to this problem, we name the most popular.
- Solution 1: Fix the value of
thisinside the problematic function by binding it inside theconstructor
class SearchBar extends React.Component {
    state = { term: ''};

    constructor(props) {
        super(props);
        // Bind returns a new version of the function with the `this` keyword fixed to the current SearchBar instance.
        this.onFormSubmit = this.onFormSubmit.bind(this);
   }

    render() {
        return (
            <form className="ui form" onSubmit={ this.onFormSubmit }>
                    <label>Image Search</label>
                    <input
                        type="text"
                        value={this.state.term}
                        onChange={ (e) => this.setState({term: e.target.value}) } />
            </form>
        );
    }

    onFormSubmit(event) {
            event.preventDefault();
            // Once binded, `this` will always refer to the SearchBar instance
            // (i.e. it is no longer context dependent).
            console.log(this.state.term);
        }
}- Solution 2: Use ES6 arrow functions to declare instance methods.
Arrow functions automatically bind the value of
this. This is the most common method.
class SearchBar extends React.Component {
    state = { term: ''};

    render() {
        return (
            <form className="ui form" onSubmit={ this.onFormSubmit }>
                    <label>Image Search</label>
                    <input
                        type="text"
                        value={this.state.term}
                        onChange={ (e) => this.setState({term: e.target.value}) } />
            </form>
        );
    }

    onFormSubmit = (event) => {
        event.preventDefault();
        // Here `this` would cause the problem.  However, arrow functions automatically bind this to the instance.
        console.log(this.state.term);
    };
}- Solution 3: Wrap callback inside an arrow function (that automatically binds
this).
class SearchBar extends React.Component {
    state = { term: ''};

    render() {
        return (
            // Wrapping the callback with an arrow function automatically binds `this`
            <form className="ui form" onSubmit={ (e) => this.onFormSubmit(e) }>
                    <label>Image Search</label>
                    <input
                        type="text"
                        value={this.state.term}
                        onChange={ (e) => this.setState({term: e.target.value}) } />
            </form>
        );
    }

    onFormSubmit(event) {
            event.preventDefault();
            console.log(this.state.term);
        }
}By design, React only allows data to be pushed DOWN from parents to children through the props system. If we want to communicate from a child to a parent, the parent needs to provide a callback function and the child will hold it as a prop to use it when necessary.

// Parent
class App extends React.Component {

    // The callback function for communication
    onSearchSubmit = (term) => {
        console.log(`From app: ${term}`);
    };

    render() {
        return  (
            <div className="ui container" style={{marginTop: '10px'}}>
	        {/* Pass down callback function as prop */}
                <SearchBar onSearchSubmit={this.onSearchSubmit}/>
            </div>
        );
    }
}

// Child
class SearchBar extends React.Component {
    state = { term: ''};

    onFormSubmit = (event) => {
        event.preventDefault();
        // Use Callback function to notify parent
        this.props.onSearchSubmit(this.state.term);
    };
}React itself does NOT do network requests. For this we need to use an external library like axios or
the built-in function fetch.
fetchis a built-in function to do network requests that does not add any overhead. However, it is very basic and requires coding some boilerplate code.axiosis a higher level 3rd party library that handles requests in a very predictable way. Axios is recommended to perform the API requests on react apps.npm install --save axios
A promise is an object that represents the eventual completion or failure of an asynchronous operation. Promises are frequently used in JS for network requests and it is up to the developers to code what should happen when the promise succeeds or fails.
In the context of API requests, there are 2 options for handling promises: 1) promise.then, 2) async, await
Note: more information can be found on video "92. Handling Requests with Async Await" from Stephen Grider's course.
The then method allows us to give the promise a callback to execute once the promise succeeds.
class App extends React.Component {

    // Callback for making a network request when the search term changes.
    onSearchSubmit = (term) => {
        axios.get('https://api.unsplash.com/search/photos', {
            params: { query: term},
            headers: {
                Authorization: 'Client-ID someRandomToken'
            }
        }).then((response)=>{
            // axios.get is async and returns a promise, so deal with it with `then` callback
            console.log(response.data.results);
            // Do whatever you need to do...
        })
    };

    render() { /*...*/ }
}This is a newer syntax that allows us to write simpler and cleaner code.
class App extends React.Component {

    // Callback for making a network request when the search term changes.
    // The network request is asynchronous, so we tag our function as `async` and
    // `await` to allow the promise to resolve
     onSearchSubmit = async (term) => {
         // axios.get is async and returns a promise, so we need to deal with the promise.
         const response = await axios.get('https://api.unsplash.com/search/photos', {
            params: { query: term},
            headers: {
                Authorization: 'Client-ID someRandomToken'
            }
        });
        this.setState({images: response.data.results});
    };

    render() { /*...*/ }
}With axios, we can create a dedicated client that is configured to make requests with whatever configuration we set it up. This allows us to extract all the configuration, and authentication logic for a particular service into a dedicated file.
For example, for communicating with the unsplash API we could:
// 1. Create a file in src/api/unsplash.js that will hold the dedicated unsplash client
import axios from 'axios';

export default axios.create({
    baseURL: 'https://api.unsplash.com',
    headers: {
        Authorization: 'Client-ID someRandomToken'
    }
});

// 2. Then we only use this pre-configured client in all other places we need to communicate with unsplash
import unsplash from "../api/unsplash";

class App extends React.Component {
    onSearchSubmit = async (term) => {
        // Here we use the pre-configured unsplash client
        const response = await unsplash.get('/search/photos', {
            params: { query: term},
        });
        // ...
    };
}
Rendering lists of information is very common in any application. The most common way of doing it is using
the JS map function over an array of elements that contain the data of what we want to display. For example:
const ImageList = (props) => {
    // In this example props.images = [
    //                                   {id: ..., url: ..., description: ...},
    //                                   {id: ..., url: ..., description: ...}
    //                                ]

    // The arrow function inside the map is making use of destructuring assignment of each image object.
    // That is equivalent to (image) => {... image.id   .... image.urls.regular ...}
    const images = props.images.map(({id, urls, description}) => {
        return <img key={id} src={urls.regular} alt={description} />;
    });
    return <div>{images}</div>;
};Warning:"Each child in array or iterator should have a unique key prop". This is a warning given by react
if we omit the 'key' prop on each element of the list.
- The
keyprop helps react figure out which changes need to be done on the DOM. - Giving a key increases the performance of the front-end, but it is solely a performance consideration.
- The
keyonly needs to be assigned to the outer-most / root HTML tag of each of the elements in the list. - Only collections require the
keyprop.
- Refs give access to a single DOM element.
- We create refs in the constructor, store them in an instance variables and assign them to a particular
jsx as props.
- Theoretically, we could save a ref to the state, but that is not necessary because refs don't change.
- Only things that change should be stored in
state.
this.myRef.currentis a handle to the HTML element that was rendered in the DOM.
class ImageCard extends React.Component {

    // 1. Refs need to be created in the constructor
    constructor(props) {
        super(props);
        // 2. Create a ref and store it in the `imageRef` instance variable
        this.imageRef = React.createRef();
    }

    componentDidMount() {
        // 4. Use ref to access the DOM element
        console.log(this.imageRef.current);
    }

    render () {
        const { description, urls } = this.props.image;
        return (
            <div>
                {/* 3. Assign  ref to jsx element */}
                <img ref={this.imageRef}
                     src={urls.regular}
                     alt={description} />
            </div>
        )
    }
}If we want our React app to change some styling, we need to do it as inline styles in the JSX elements. For example:
class ImageCard extends React.Component {
    // ...

    render () {
       // ...
        return (
            // Add CSS inline through React
            <div style={{gridRowEnd: `span ${this.state.spans}`}}>
                <img ref={this.imageRef}
                     src={urls.regular}
                     alt={description} />
            </div>
        )
    }
}- A state management library ("state" as in React state). Redux is in charge of handling the data inside our applications.
- Makes creating complex apps easier.
- NOT required to create a React app.
- NOT specifically design for React, can work with other frameworks.
Redux helps applications to keep complexity under control as they grow.

The Udemy course has a great detailed explanation of Redux by analogy using an insurance company. Watch that to get the full details. I put a summary of the analogy here to refresh your memory.


Action creators are the person dropping the form in our analogy. They are methods that take in some arguments and
return an action. Actions are the ONLY way we can change the state in our redux store (i.e. dispatching actions).
An action is just a JS Object that follows a very particular structure. It has a type that represents the
type of action it is (e.g. CREATE_CLAIM), and a payload, that contains all the extra information that
the action requires.
// ACTION CREATOR: People dropping off a form
// One action creator for each type of action in our app
const createPolicy = (name, amount) => {
  return {//Action (a from in our analogy)
    type: 'CREATE_POLICY',
    payload: {
      name: name,
      amount: amount
    }
  };
};
Reducers map to departments in our analogy. Each reducer:
- Receives all possible actions on the app and is in charge of listening to the actions of interest and creating a NEW
slice of state given the old sliceof state and the nature of the action.
- Note that the reducer receives its old SLICE of state, NOT the complete store.
- DO NOT mutate the old slice of state, create a NEW slice of state. See these patterns.
- Must return ANY value besides
undefined(nullis ok). - A reducer must be a PURE FUNCTION. It must NOT reach "out of itself" to decide what to return.
- e.g. NOT network requests, NOT DOM traversing, NOT read from hard-drive.
- If the action is of no interest to the reducer, it needs to return the slice of old state unchanged.
- It needs to initialize the slice of state it manipulates with a reasonable value (e.g. an empty array).
// REDUCERS - Depatments in our analogy
// One reducer per department
// Always takes 2 args:
//   1. The existing piece of state for that reducer
//   2. An action (generated by an action creator) (a form in our analogy)
const claimsHistory = (oldListOfClaims = [], action) => {
  // In the first call, oldListOfClaims = undefined
  // oldListOfClaims = [] makes sure to initialize it to an empty array

  if (action.type === 'CREATE_CLAIM') {
    // This reducer cares about this action
    // ES6 syntax to create a NEW array out of the old list and append the new one
    // In reducers we always want to return a NEW data structure, NOT mutate the old one
    return [...oldListClaims, action.payload];
  }

  // Reducer does not care about the action, do nothing
  return oldListOfClaims;
};

// const accounting = ...
A very common bug that is hard to trace is making a typo in the action type between the action creators and the
reducers. To fix this, we can use a dedicated file actions/types.js to centrally declare all action types and use
these in both action creators and reducers.
// ./src/actions/types
export const SIGN_IN = 'SIGN_IN';
export const SIGN_OUT = 'SIGN_OUT';

// ./src/actions/index.js
import {SIGN_IN, SIGN_OUT} from './types';

export const signIn = () => {
  return {
      type: SIGN_IN
  };
};
// ...

// ./src/reducers/authReducer.js
import {SIGN_IN, SIGN_OUT} from '../actions/types';

const INITIAL_STATE = { isSignedIn: null };

export default (signInState = INITIAL_STATE, action) => {
    switch (action.type) {
        case SIGN_IN:
            return {...signInState, isSignedIn: true};
        case SIGN_OUT:
            return {...signInState, isSignedIn: false};
        default:
            return signInState;
    }
};The REDUX STORE is a a data store that holds a collection of reducers that define how the store reacts
to actions created by action creators.
- The ONLY way to modify the data in the store is through the
dispatchfunction (which in turn holds thereducers) we have defined.- We will NEVER write code like
store.state = {...}
- We will NEVER write code like
// From Redux, take createStore and combineReducers
import Redux from 'redux';
const { createStore, combineReducers } = Redux;

// Outline the collection of reducers that the store will need
// The name of the keys determine the name of the key in the store, the value is the reducer function
const ourDepartments = combineReducers({
  accounting: accounting,
  claimsHistory: claimsHistory,
  policies: policies
});

// Initialize the store using the combined reducers
const store = createStore(ourDepartments);


// Using the store
const myAction = createPolicy('Alex', 20);
store.dispatch(myAction); // Passes the action to all reducers
console.log(store.getState());
// => {accounting: 120, claimsHistory: [], policies: ['Alex']}We need the react-redux library to get both working together. Remember that Redux was no specifically designed
for React. Install it by doing npm install --save react-redux
- In general when using React with Redux, we will no longer require to store state within the components, since
the state is now stored within the Redux store.
- There are some use cases when we can need both Redux State and Component State. TODO: More on this later.
The react-redux library provides 2 "glue" components to help React and Redux interact.

Provider
- Holds the redux store, that in turn is created using the combined reducers.
- Is the top level component of the app. See Wiring up the provider
Connect
- Every time we need a component to communicate with the Redux Store (through the Provider),
we need to wrap it in a
Connectcomponent. - The connect component also provides the action creators to the wrapped components.
A React + Redux project typically has this structure
/src/actions: Contains all files related to action creators. Typically contains a mainindex.jsfile which is used as the import in other files./components: All component-related files./reducers: Reducer-related files. Also tend to include anindex.jsfile.index.js: Sets up BOTH the react and redux sides of the app.
Allows us to export multiple functions from a single file.
// Named Export - src/actions/index.js - We export 2 functions
export const selectSong = song => {
    return {
        type: 'SONG_SELECTED',
        payload: song
    };
};

export const someOtherActionCreator = () => {
    // ...
};
// Importing a named export - some_other_file.js
import { selectSong } from '../actions';- Combine reducers using the
combineReducersmethod from redux.
// ./reducers/index.js
import { combineReducers } from 'redux';

export const songsReducer = () => {
    // ...
};

export const selectedSong = (selectedSong=null, action) => {
 // ...
};

export default combineReducers({
    songs: songsReducer,
    selectedSong: selectedSong
});- Wrap the top level App component with a
Providercomponent and pass in a redux store created from the combined reducers.
import React from 'react';
import ReactDOM from 'react-dom';
import { Provider } from 'react-redux';
import { createStore } from 'redux';

import App from './components/App';
import reducers from './reducers';

ReactDOM.render(
    <Provider store={createStore(reducers)}>
        <App/>
    </Provider>,
    document.querySelector('#root')
);Connect needs to be wired up for every component that is dependent on some piece of state inside the
Redux Store OR that needs to trigger some action that updates the redux state (using action creators).
Note that components that have been wired up with Connect will be automatically re-rendered when the global
store changes.
There are 2 scenarios: Class bases components and Functional Components.
Class Based Components
There are 2 key things to wire up:
- How our component receives information from the global redux state: see
mapStateToPropsbelow. - The action creators that our component will use to update the global store: see 2nd argument of
connectbelow.
import React from 'react';
import { connect } from 'react-redux';
import {selectSong} from "../actions";

class SongList extends React.Component {
    // Helper method to render list
    renderList(){
        const songs = this.props.songs;
        const renderedSongs = songs.map( song => {
            return (
                <div className='item' key={song.title}>
                    <div className="right floated content">
                        <button className="ui button primary"
                                // This is the "wrapped" action creator function mentioned below
                                onClick={() => this.props.selectSong(song)}>
                            Select
                        </button>
                    </div>
                    <div className="content">{`${song.title} - ${song.duration}`}</div>
                </div>
            );
        });
        return renderedSongs
    }

    render() {
        return <div className='ui divided list'>{this.renderList()}</div>;
    }
}

// MAIN WIRING

// This is how we configure that we want to get this connect component to be notified of changes
// on a particular piece of state from the whole redux store.
// By convention we call this function `mapStateToProps`
const mapStateToProps = (state, ownProps) => {
    // This object is going to be mapped to the props inside the SongList.
    // i.e. Inside Songlist this.props === { songs: state.songs }
    return { songs: state.songs };
};

// `connect` takes 2 args:
// 1) The mapStateToProps function
// 2) An object with action creators (e.g. { selectSong:  selectSong }, abbreviated using ES6 syntax)
//    `connect` wraps all action creators in the `dispatch` function and maps this "wrapped" functions inside the
//     props. That is why we can call `this.props.selectSong()` directly without having to use `dispatch`
export default connect(mapStateToProps, {selectSong})(SongList);
Functional Components
Simpler than class-based. We only need to mapStateToProps and use the connect function.
import React from 'react';
import { connect } from 'react-redux';

const SongDetail = (props) => {
        return (
            <div>
                <div>{props.song.title}</div>
                <div>{props.song.duration}</div>
            </div>
        );
};

const mapStateToProps = state => {
  return {song: state.selectedSong};
};

export default connect(mapStateToProps)(SongDetail);In some cases, we need to do some bits of pre-calculation logic to map the redux global state into the
props a particular component cares about. mapStateToProps is a great place to do that pre-calculation and only
pass to the component the minimum data it needs.
The following example illustrates how we extract the particular user a component instance cares about form
an array of users.
import React from 'react';
import {connect} from 'react-redux';
//...

class UserHeader extends React.Component {
    // ...
    render(){
        // ...
        return <div>{user.name}</div>
    }
}

// mapStateToProps gets called with 2 args:
// 1) The complete redux store,
// 2) The props that have been injected to the particular instance of the component (e.g. <UserHeader userId=2/> )
// With those 2 pieces of information, we can do any pre-calculation needed to give the component just the right
// data from the redux store.
const mapStateToProps = (state, ownProps) => {
    const user = state.users.find( user => user.id === ownProps.userId);
    return { user: user };
};
export default connect(mapStateToProps, {fetchUser})(UserHeader);Redux Dev Tools is a Chrome / Firefox extension that is very helpful for debugging Redux applications.
- Install the Chrome / Firefox add-on named "Redux Dev Tools" through the extension marketplace.
- The dev tools require some wiring up on the code. Many sites like Airbnb leave the dev tools hooked in production. There is no problem on doing that and anybody with the devtools can use the tool on the site.
// ...
import { createStore, applyMiddleware, compose } from "redux";
// ...

const composeEnhancers = window.__REDUX_DEVTOOLS_EXTENSION_COMPOSE__ || compose;
const store = createStore(
    reducers,
    composeEnhancers(applyMiddleware())
);

ReactDOM.render(
    <Provider store={store}>
        <App/>
    </Provider>,
    document.querySelector('#root')
);
Two key features of the devtools are:
- The left panel of the devtools show a timeline of all the actions that have taken place. We can use "jump" to travel in time and revert the store to any of the moments. This will also change the app.
- With
debug_session(e.g.http://localhost:3000/?debug_session=my_sesh) we can persist the redux store across full browser reloads and store the session under a name that we can retrieve later (e.g.my_seshin this example).- We can have as many debug sessions stored as we want.
- To not use andy debug session, just ommit the
?debug_session=...param in the URL.
Redux Middlewares are functions that slightly change the behaviour of a Redux Store, adding new capabilities to it. The play a role in the Redux cycle.

- A middleware is a plain js function that gets called with every action that you
dispatch. - The middleware function has the ability to STOP, MODIFY or mess around with the action (e.g. print it to console).
- There are many open-source middlewares.
- Most popular middlewares are for dealing with async actions (like
redux-thunk).

This common pitfall also serves as a motivation for redux-thunk.
You may feel tempted to make the API network request on the action creator, but his is invalid redux code. The following code is invalid and will lead to the error shown below.
// actions/index.js
import jsonPlaceholder from "../apis/jsonPlaceholder";

export const fetchPosts = async () => {
    // This is invalid redux code. NO network requests in action creators.
    const response = await jsonPlaceholder.get('/posts');
    return {
        type: 'FETCH_POSTS',
        payload: response
    };
};
Error: Actions must be plain objects. Use custom middleware for async actions.
The code is invalid because in redux, action creators MUST return PLAIN JS OBJECT with a type property and an optional payload.
The async await in fetchPosts = async() => { await...} actually returns gets transpiled down into a
complicated function in ES2015 that, while the network request is being done returns a different thing
that has nothing to do with our intended plain JS object (to make it obvious, transpile it to ES2015).
To fix the previous code, you may want to directly do the request without async and await, like shown next.
// actions/index.js
import jsonPlaceholder from "../apis/jsonPlaceholder";

export const fetchPosts =  () => {
    // Remember, axios (or any network library) returns a PROMISE
    const promise =  jsonPlaceholder.get('/posts');
    return {
        type: 'FETCH_POSTS',
        payload: promise
    };
};
You won't see an error in this case, but the code won't work.
The code is invalid because by the time our action object get to a reducer we won't have fetched the data from the API and the payload is actually a promise (not data).
- Synchronous: a "vanilla" function that returns an action immediately.
- Asynchronous: some action creator that needs time to resolve. NEEDS middleware (not supported by default in Redux). All network requests fall into this category.
redux-thunkis a GENERAL PURPOSE middleware. It is NOT only for async requests.- All that
redux-thunkdoes is change the rules of what action creators can return. Withredux-thunk:- Action creators CAN return actions (i.e. play JS objects with a
typeproperty and optionally apayload). - OR they can return a function and redux-thunk will call it for us.

- Action creators CAN return actions (i.e. play JS objects with a

// src/index.js
import React from 'react';
import ReactDOM from 'react-dom';
import {Provider} from 'react-redux';
import {createStore, applyMiddleware} from 'redux';
import thunk from "redux-thunk";

import App from './components/App';
import reducers from './reducers';

const store = createStore(reducers, applyMiddleware(thunk));

ReactDOM.render(
    <Provider store={store}>
        <App/>
    </Provider>,
    document.querySelector('#root')
);// actions/index.js
import jsonPlaceholder from "../apis/jsonPlaceholder";
export const fetchPosts = () => {
// We are going to return a function so that redux-thunk uses it.
// This function will get called by redux-thunk with the dispatch and getState functions
// injected as arguments.
// We don't care about what the inner function returns, the only thing that we care is that the inner function
// dispatches an action.
return async (dispatch, getState) => {
const response = await jsonPlaceholder.get('/posts');
dispatch({ type: 'FETCH_POSTS', payload: response});
};
};Memoization can be used to 'cache' repeated outgoing requests and avoid an API getting called more than one time for a particular parameter.
This can also be accomplished manually by calling action creators within action creators, but the implications are different.
Pros
- Does not repeat requests for users that have already been fetched (no N+1)
Cons
- The memoized code is hard to understand.
- If we legitimately wanted to re-fetch a user (for example if his data changed on the server), we cannot do it.
export const fetchUser = id => {
    return dispatch => {
        return _fetchUser(id, dispatch);
    };
};
// _fetchUser is a memoized function. It gets memoized for every parameter combination.
// i.e. _fetchUser(1, myDispatch) ! will NOT memoize _fetchUser(2, myDispatch)
const _fetchUser = _.memoize((async (id, dispatch) => {
    const response = await jsonPlaceholder.get(`/users/${id}`);
    dispatch({type: 'FETCH_USER', payload: response.data});
}));An alternative and more standard pattern to memoization for avoiding repeated requests is to call action creators within other action creators.
Pros
- Re-use other smaller action creators in case we need to use them stand-alone
- Allow to re-fetch data if data in server changes.
Cons
- Can be tricky to understand but it makes sense. Revise the way redux-thunk works while looking at this code and everything should make sense.
In the following example, fetchPosts might return many posts from the same user and we want to make sure
we do not fetch the info for a given user more than once.
// This "combo" action creators allow us to do custom logic and control the amount of calls that we do
export const fetchPostsAndUsers = () => {
    return async (dispatch, getState) => {

        // Hard to understand: Whenever we call an action creator within another action creator, we need to manually
        // dispatch the action and let redux-thunk handle the rest.
        // (i.e. if it is a JS object, it will send them to  the reducers.  If it is a function, it will call it.)
        // In this example `fetchPosts()` returns an inner function. Redux-thunk will call it and that
        // function in turn will dispatch whatever it needs to dispatch.
        await dispatch(fetchPosts());
        // We await for the API call to be completed before continuing, since we need the
        // data from fetchPosts for doing the processing.

        // Do some processing. eg find only the unique user Ids
        const allUserIds = _.map(getState().posts, 'userId');
        const userIds = _.uniq(allUserIds);

        // Call another action creator to fetch users
        // We don't have to use await because we no longer care when the user actually get's fetched.
        userIds.forEach( id => dispatch(fetchUser(id)));
    }
};

export const fetchPosts =  () => {
    return async (dispatch, getState) => {
            const response = await jsonPlaceholder.get('/posts');
            dispatch({ type: 'FETCH_POSTS', payload: response.data });
    };
};

export const fetchUser = (id) => {
    return async (dispatch, getState) => {
        const response = await jsonPlaceholder.get(`/users/${id}`);
        dispatch({type: 'FETCH_USER', payload: response.data});
    };
};npm install --save react-router-dom.
Make sure the "-dom" is there. We NEVER want to install react-router by itself. We want a higher
level package:
react-router-dom: for DOM react (even if we use Redux).react-router-native: for react native.react-router-redux: Bindings between Redux and React Router. 100% not necessary, and not recommended. Stephen Grider recommends usingreact-router-domeven in Redux projects.
We interact with react-router-dom through 4 components given in the library:
- A
Router(e.g.BrowserRouter): internally keeps track of all your navigationhistoryand figures out thepathof the current URL. - A
historyobject that is held by the router and is in charge of storing and changing the URL. All routers except the plainRouterautomatically create their ownhistoryobjects (see types of routers and programmatic navigation). Route: compares the actual path with thepathprop to render one of our components.- Note that if multiple
Routecomponents match the URL, all matching components get rendered.
- Note that if multiple
Link: see navigation.
import React from 'react';
import { BrowserRouter, Route, Link } from 'react-router-dom';
import PageOne from './PageOne';
import PageTwo from './PageTwo';

const App = () => {
    return(
        <div>
            <BrowserRouter>
                { /* Browser Router can only take one child, hence the div */}
                <div>
                    <Route path="/" exact component={PageOne}/>
                    <Route path="/pagetwo" component={PageTwo} />
                </div>
            </BrowserRouter>
        </div>
    );
};
export default App;- Path matching is based on
currentPath.contains(pathInRoute)string matching.- e.g. For URL "foo.com/page/5", The current path is "/page/5". The matching would be
"/page/5".contains("/") => yes
- e.g. For URL "foo.com/page/5", The current path is "/page/5". The matching would be
- The
exactproperty in theRoutecomponent modifies the matching behaviour to exact matching.
i.e. when the user clicks a button
- We DON'T want to do a full page refresh to navigate, since it will trigger a full reload of all the JS.
- All React/Redux state data gets lost on a full-page reload.
- We make use of the
Linkcomponent provided by 'react-router-dom'.- Link still renders an
<a>but prevents default, changes the URL in the browser and updates theHistoryinside theBrowserRouter, triggering component re-rendering. Linkmay be used inside any of the router types, but it MUST be used inside a router. (i.e. it cannot be used in a component that is not nested inside a router).
- Link still renders an
import React from 'react';
import { BrowserRouter, Route, Link } from 'react-router-dom';

const PageOne = () => {
    return (
        <div>
            PageOne
            <Link to="/pagetwo">Navigate to Page Two</Link>
        </div>
    );
};

const PageTwo = () => {
    return (
        <div>
            PageTwo
            <Link to="/">Navigate to Page One</Link>
        </div>
    );
};

const App = () => {
    return(
        <div>
            <BrowserRouter>
                <div>
                    <Route path="/" exact component={PageOne}/>
                    <Route path="/pagetwo" component={PageTwo} />
                </div>
            </BrowserRouter>
        </div>
    );
};
Programmatic navigation is done through the history object. If we change the url in the history object,
the app will navigate.
Given that the history object is automatically created by the all types of routers, except
the plain Router, it can by tricky to get a handle to the history object within our code.
Every object that is rendered within a router, automatically gets the history object inside the
props (this.props.history). With that, we just need to do this.props.history.push('/some/path') to do programmatic
navigation.
Caveats: when submitting forms, we typically want to navigate the user AFTER the async request has succeeded, NOT after the user pushes the submit button. For this reason, we need to use approach 2.
class StreamCreate extends React.Component {
    // ...
    onSubmit = (formValues) => {
        this.props.createStream(formValues);
        // Navigation after submit: this.props.history.push('/streams');
        // This is a problem because the user async request might fail and we will be navigating the user
        // before the async request resolves. The action creator is a better place to do this.
    };
}We can create our own history object and inject it to plain Router to emmulate what the BrowserRouter component
would do, but getting a handle to history.
Creating our own history object:
// src/history.js
import { createBrowserHistory } from 'history';
export default createBrowserHistory(); //Auto installed by react-router-dom
Using a plain Router with our history object:
// src/components/App.js
import React from 'react';
import { Router, Route } from 'react-router-dom';
import history from "../history";

const App = () => {
    return(
        <div className="ui container">
            {/* Inject our history into a plain router */}
            <Router history={history}>
                <div>
                    <Route path="/streams/new" exact component={StreamCreate}/>
                    <Route path="/streams/edit" exact component={StreamEdit}/>
                    {/* ... */}
                </div>
            </Router>
        </div>
    );
};
Getting a handle of our history object to navigate programmatically from within an action creator:
// src/actions/index.js
import history from "../history";

export const createStream = (formValues) => {
    return async (dispatch, getState) => {
        const userId = getState().auth.userId;
        const response = await streams.post('/streams', {...formValues, userId });
        dispatch({type: CREATE_STREAM, payload: response.data});
        // Programmatic Navigation after the async request has finished and the action has been dispatched
        history.push('/');
    };
};There are 3 types of router in react-router-dom. They exist to cater for different configurations of how the backend server serves the React application bundle.js. Here is an illustration of the problem:

HashRouter: the client manages it's URLs by appending a #example.com/#/foo. In this format, the full page reloads always point to the root so the backend needs to be configured to return the SPA from the index.MemoryRouter: keeps state internally and does not modify the URL. If the user refreshes, the react app goes back to the root.
We can use react-router to support urls like /streams/edit/:id and pass the information of the wildcard
(id in this case) down to the component as a prop. To do that, we need to wire some things:
Configure the Route to support the wildcard parameter:
// src/components/App.js
const App = () => {
    return(
        <div className="ui container">
            <Router history={history}>
                <div>
                    { /* :id indicates a URL param passed using the key id: */}
                    <Route path="/streams/edit/:id" exact component={StreamEdit}/>
                    { /* ... */}
                </div>
            </Router>
        </div>
    );
};
Use the wildcard parameter inside the corresponding component (StreamEdit in this example).
- The
Routerautomatically passes thethis.props.matchobject to all elements rendered by it.this.props.match.paramscontains an object with all the wildcard matches.
- IMPORTANT: Each component than can be accessed through wildcard matching MUST be designed to work in isolation (i.e. it needs to fetch its own data).
- It cannot assume that the data it needs to function is magically there in the redux store.
import React from 'react';
import { connect } from 'react-redux';
import { fetchStream } from "../../actions";

class StreamEdit extends React.Component {
    componentDidMount() {
        // IMPORTANT: components that rely on wildcard navigation must be self-sufficient and
        // fetch the data that they need.  We cannot rely on the data being present on the redux store.
        const urlId = this.props.match.params.id;
        this.props.fetchStream(urlId);
    }

    render(){
        // On the first render, props.streams is undefined because things have not been loaded yet.
        if (!this.props.stream) {
            return <div>Loading...</div>;
        }
        return (<div>{this.props.stream.title}</div>);
    }
}

const mapStateToProps = (state, ownProps) => {
    // The Router in React-Router-Dom injects a match object as props that contains the wildcard matches
    // as params.
    const urlId = ownProps.match.params.id;
    return{
        stream: state.streams[urlId]
    };
};

export default connect(mapStateToProps, {fetchStream})(StreamEdit);
Link to routes that have wildcard matching:
import { Link } from 'react-router-dom';
// ...
<Link to={`/streams/edit/${stream.id}`}>Edit</Link>Vanilla wildcard URL matching can introduce false positive matching.
<Route path="/streams/new" exact component={StreamCreate}/>
<Route path="/streams/:id" exact component={StreamShow}/>
{/* ... */}
In the above example, when the user visits the url streams/new, BOTH routes will get matched with id = new in the
second one.
To limit the matching of a route to the first match, we use the Switch component.
import { Router, Route, Switch } from 'react-router-dom';
<Switch>
    {/* ... */}
    <Route path="/streams/new" exact component={StreamCreate}/>
    <Route path="/streams/:id" exact component={StreamShow}/>
    {/* ... */}
</Switch>

The Video 209. Creating OAuth Credentials from Udemy has a detailed step by step on how to create the credentials on the Google developer console.
To add the Google OAuth client library, you need to add it in the <head> of your HTML.
<head>
  <!-- ...  -->
  <script src="https://apis.google.com/js/api.js"></script>
</head>
That loads the google api gapi in the window scope of the browser.
In this example, we create a dedicated GoogleAuth component that will handle the authentication logic.
We use gapi.load to load the specific part of Google's API library we are interested in (gapi is very big so
developers need to download only the parts needed) and initialize the client with our configured credentials.
gapi.client.init is an async call that returns a promise, so we can use then to put some custom logic
for when the initialization process finishes.
Additionally, we use the provided auth.isSignedIn.listen listener to add a callback that updates our state
whenever the sign is status changes.
Finally, we wire 2 onClick event handlers for the sign it and sign out buttons.
import React from 'react';

class GoogleAuth extends React.Component {
    // When the app first loads we don't know if the user is signed in or not, so we should not assume anything
    state = { isSignedIn: null };

    componentDidMount() {
        // arg 1: What part of the gapi library we want to load
        // arg 2: Callback of what to do once the load has finished
        window.gapi.load('client:auth2', () => {
            window.gapi.client.init({
                // Given when you configure your console.developers.google.com console
                clientId: `${process.env.REACT_APP_GOOGLE_OAUTH_CLIENT_ID}`,
                // What info form the users do we want to get access to.
                scope: 'email'
            }).then(() => {
                // window.gapi.client.init returns a promise. We use `then` to get save a reference to the
                // auth instance in the component's state so that we can easily reference it later.
                // The authInstance contains many convenient methods like
                // - auth.signIn(): opens Google's authentication popup
                // - auth.isSignedIn.get(): true if the user is signed in
                // - auth.isSignedIn.listen(callback): a listener that is called when the isSignedIn status changes
                this.auth = window.gapi.auth2.getAuthInstance();
                this.setState({isSignedIn: this.auth.isSignedIn.get()});
                this.auth.isSignedIn.listen(this.onAuthChange);
            });
        });
    }

    // Needs to be arrow function to bind `this` since it will be used as a callback.
    onAuthChange = () => {
        this.setState({isSignedIn: this.auth.isSignedIn.get()});
    };

    // Callback function for when the user clicks sign in
    onSignInClick = () => {
      this.auth.signIn();
    };

    // Callback function for when the user clicks sign out
    onSignOutClick = () => {
      this.auth.signOut();
    };

    renderAuthButton() {
        if(this.state.isSignedIn === null) {
            return null; // A spinner could also work
        } else if (this.state.isSignedIn) {
            return (
                <button onClick={this.onSignOutClick} className="ui red google button">
                    <i className="google icon" />
                    Sign Out
                </button>
            );
        } else {
            return (
                <button onClick={this.onSignInClick} className="ui red google button">
                    <i className="google icon" />
                    Sign In with Google
                </button>
            );
        }
    }

    render() {
        return (
            <div>{this.renderAuthButton()}</div>
        );
    }
}

export default GoogleAuth;
Storing whether a user is signed in or not inside the state of a single component can potentially be a problem if there are other components that need to know that information. To fix this we can use Redux to store that information in the central redux store.
- Motivation: We want to store whether a user is sign in or sign out in the redux store to allow any component to know if a user is signed in or sign out.
- There are 2 approaches to add OAuth to react-redux projects
- (+) All Auth logic is centralized into a single component. Less wiring and good for future reference.
- (-) It does not follow Redux conventions closely. In theory, only action creators should be responsible for changing
the app's state. With this approach, the GoogleAuthComponent is changing the state of our app through
the interaction with
gapi. - This is the approach this course uses favoring future reference.


Compared to the vanilla react approach, the GoogleAuthComponent needs some changes:
- The notion of a user being signed in or not needs to be injected from the redux store using
mapStateToProps. This entails thatisSignedInwill no live inside the component's props - When a user attempts to sign in or sign out,
GoogleAuthComponentmust update the redux store by dispatching actions using the action creators.
import React from 'react';
import { connect } from 'react-redux';
import {signIn, signOut} from "../actions";


class GoogleAuth extends React.Component {

    componentDidMount() {
        // arg 1: What part of the gapi library we want to load
        // arg 2: Callback of what to do once the load has finished
        window.gapi.load('client:auth2', () => {
            window.gapi.client.init({
                // Given when you configure your console.developers.google.com console
                clientId: `${process.env.REACT_APP_GOOGLE_OAUTH_CLIENT_ID}`,
                // What info form the users do we want to get access to.
                scope: 'email'
            }).then(() => {
                // window.gapi.client.init returns a promise. We use `then` to get save a reference to the
                // auth instance in the component's state so that we can easily reference it later.
                // The authInstance contains many convenient methods like
                // - auth.signIn(): opens Google's authentication popup
                // - auth.isSignedIn.get(): true if the user is signed in
                // - auth.isSignedIn.listen(callback): a listener that is called when the isSignedIn status changes.
                //   The callback is called with a boolean that represents if the user is signed in
                this.auth = window.gapi.auth2.getAuthInstance();
                // Use action creators to update the redux store when the library finishes initialization
                this.onAuthChange(this.auth.isSignedIn.get());
                this.auth.isSignedIn.listen(this.onAuthChange);
            });
        });
    }

    // Needs to be arrow function to bind `this` since it will be used as a callback.
    onAuthChange = (isSignedIn) => {
        if (isSignedIn) {
            const userId = this.auth.currentUser.get().getId(); // Provides Google's userID
            this.props.signIn(userId);
        } else {
            this.props.signOut();
        }
    };

    // Callback function for when the user clicks sign in
    onSignInClick = () => {
      this.auth.signIn(); // Use wrapped-with-dispatch action creator
    };

    // Callback function for when the user clicks sign out
    onSignOutClick = () => {
      this.auth.signOut(); // Use wrapped-with-dispatch action creator
    };

    renderAuthButton() {
        if(this.props.isSignedIn === null) {
            return null; // A spinner could also work
        } else if (this.props.isSignedIn) {
            return (
                <button onClick={this.onSignOutClick} className="ui red google button">
                    <i className="google icon" />
                    Sign Out
                </button>
            );
        } else {
            return (
                <button onClick={this.onSignInClick} className="ui red google button">
                    <i className="google icon" />
                    Sign In with Google
                </button>
            );
        }
    }

    render() {
        return (
            <div>{this.renderAuthButton()}</div>
        );
    }
}

const mapStateToProps = (state, ownProps) => {
    return { isSignedIn: state.auth.isSignedIn };
};

export default connect(
    mapStateToProps,
    {signIn, signOut}
)(GoogleAuth);// src/actions/index.js
import {SIGN_IN, SIGN_OUT} from './types';
export const signIn = (userId) => {
return {
type: SIGN_IN,
payload: userId
};
};
export const signOut = () => {
return {
type: SIGN_OUT
};
};// src/reducers/authReducer
import {SIGN_IN, SIGN_OUT} from '../actions/types';
const INITIAL_STATE = { isSignedIn: null, userId: null };
export default (signInState = INITIAL_STATE, action) => {
switch (action.type) {
case SIGN_IN:
return {...signInState, isSignedIn: true, userId: action.payload};
case SIGN_OUT:
return {...signInState, isSignedIn: false, userId: null};
default:
return signInState;
}
};
// src/reducers/index.js
import { combineReducers } from "redux";
import authReducer from "./authReducer";
export default combineReducers({
auth: authReducer
});- (+) Follows Redux Convention by interacting with
gapiinside the action creators. - (-) The auth logic gets distributed among the action creators and the
GoogleAuthComponent, making it harder to trace for future reference. - The code for this approach is not given in the course.


The 8_streams/client/src/components/streams/StreamCreate.js file has a fully annotated example of a form component.
Without Redux, we use class-level state, event handlers and controlled elements to handle forms.
With Redux, we favor the use of the central redux store instead of class-level state. Redux form helps us with this.

Redux form documentation is outstanding and available at redux-form.com.
The main highlights are the examples, here are some that you might find interesting:
- Synchronous Validation: Client-side validation of form
- Asynchronous Blur Validation How to run asynchronous server-side onBlur validation on your form when certain fields lose focus.
- Wizard Form How to create a multi-page "wizard" form.
The only setup we need to do is wire the provided redux-form reducer to our combineReducers.
import { combineReducers } from "redux";
import { reducer as formReducer } from 'redux-form';
import authReducer from "./authReducer";

// We have to to assign the redux-form reducer to the 'form' key
export default combineReducers({
    auth: authReducer,
    form: formReducer
});Creating a form with Redux-Form requires 3 things:
- Wire redux form into the component that contains the form using the
reduxFormfunction. - Wire up form fields using the
Fieldwrapper component (seeFieldandrenderInputnext). - Wire how to handle the form submission event using
handleSubmitto wrap our customonSubmitfunction. - Wire a custom action creator to be used inside our
onSubmitthat will trigger an API request.
import React from 'react';
// Field is a react component
// reduxForm is a function
import { Field, reduxForm } from "redux-form";
import { connect } from "react-redux";
import {createStream} from "../../actions";

class StreamCreate extends React.Component {

    // When given to a Field component, redux form will call this function passing formProps.
    // formProps is an object that contains:
    //   1) Information about the the state of the field (the name, the value). Remember, we want controlled elements.
    //   2) A collection of event handlers that internally contain action creators that we need to wire to update
    //      the redux store.
    //   3) Any other custom props that we pass to the Field component that are NOT part of 1 and 2 (e.g. label in this case)
    //   4) A `meta` property that contains a bunch of meta info about the field's state including the `error` we give
    //      on validation
    // formProps.input has the shape of:
    // {name: "title", onBlur: ƒ, onChange: ƒ, onDragStart: ƒ, ..., value: "my title", meta: {error: '', ...}}
    renderInput (formProps) {
        // Under the hood we want to do something like this:
        // return <input  onChange={formProps.input.onChange} value={formProps.input.value }/>;
        // However, the {...formProps.input} syntax is a shorthand to wire everything inside the formProps.input to the
        // input component using the same keys as the ones in the object.
        return (
            <div className="field">
                <label>{formProps.label}</label>
                <input  {...formProps.input} />
            </div>
        );
    }

    // Our custom onSubmit function that will get wrapped by handleSubmit
    // handleSubmit passes the formValues as an argument.
    // e.g. formValues:  {title: "my title", description: "my description"}
    // handleSubmit does NOT call our custom onSubmit function if the form has errors.
    onSubmit = (formValues) => {
        this.props.createStream(formValues);
    };

    render() {
        return (
            // handleSubmit is injected by redux-form and wraps our custom 'onSubmit' function.
            // - It preventsDefault so that we don't need to do it
            // - It gets all the form values and passes them as an argument to our 'onSubmit' function.
            <form className="ui form" onSubmit={this.props.handleSubmit(this.onSubmit)}>

                {/* Field is a wrapper for any type of input that wires up all the redux-form infrastructure required. */}
                {/* Field needs some props: */}
                {/* - name: the name of the property this field is going to manage */}
                {/* - component: a component or a function that actually returns the field to be rendered */}
                {/*   - the function will be called with the formProps argument */}
                <Field name='title' component={this.renderInput} label="Enter Title"/>
                <Field name='description' component={this.renderInput} label="Enter Description"/>
                <button className="ui button primary">Submit</button>
            </form>
        );
    }
}


// reduxForm is a function that serves an similar purpose connect function from react-redux
// but limited to redux-form instrumentation.
//   - It maps the state of the redux store to the props of the component
//   - It injects the necessary action creators
// reduxForm receives a single object to configure it
//   - 'form' can be any string to describe the purpose of the form
// @return The return of reduxForm(...)(StreamCreate) is a component that is our
// component wrapped by reduxForm
const formWrapped = reduxForm({
    form: 'streamCreate'
})(StreamCreate);

// To inject custom state or action creators (not related to redux-form), we
// still need to use connect.
export default connect(null, {createStream})(formWrapped);
The example shows how to do client-side validation that is rendered only after the field has been touched.
import React from 'react';
// Field is a react component
// reduxForm is a function
import { Field, reduxForm } from "redux-form";

class StreamCreate extends React.Component {
    // formProps is an object that contains a `meta` property that contains a bunch of meta info about the field's
    // state including the `error` we give on validation and whether the field has been touched
    renderInput = (formProps) => {
        const meta = formProps.meta;
        const className = `field ${meta.error && meta.touched ? 'error' : ''}`;
        return (
            <div className={className}>
                <label>{formProps.label}</label>
                <input  {...formProps.input} />
                { this.renderError(meta) }
            </div>
        );
    };

    // Helper function to decide when to render errors
     renderError ({error, touched}) {
        if (error && touched) {
            return (
                <div className="ui error message">
                    <div className="header">{error}</div>
                </div>
            );
        }
    };

    // handleSubmit does NOT call our custom onSubmit function if the form has errors.
    onSubmit = (formValues) => {
        // ...
    };

    render() {
        return (
            <form className="ui form" onSubmit={this.props.handleSubmit(this.onSubmit)}>
                {/* The errors get injected into the formProps that are passed to the component functions */}
                <Field name='title' component={this.renderInput} label="Enter Title"/>
                <Field name='description' component={this.renderInput} label="Enter Description"/>
                <button className="ui button primary">Submit</button>
            </form>
        );
    }
}

// We define this function OUTSIDE the component and wire it in into the component
// using the `reduxForm` function.
// The function gets called with a `formValues` object that contains the values of each Field using the name as key
// e.g. { title: 'My title', description: 'My description' }
// If the fields are ok, then we must return an empty objects
// Else we must return an object that contains the fields with errors along with a message. The match with the
// Field names is VERY IMPORTANT
const validate = (formValues) => {
    const errors = {};
    if (!formValues.title) {
        errors.title = 'You must enter a title';
    }
    if (!formValues.description) {
        errors.description = 'You must enter a description';
    }
    return errors;
};

export default reduxForm({
    form: 'streamCreate',
    validate: validate
})(StreamCreate);This section shows a pattern for re-using a form component for a very common use case new and edit forms. The
diagram shows the high-level strategy for re-use.

The key points are:
onSubmitis injected as a prop into the wrappedStreamFormcomponent.- The
initialValuesproperty of any component that has been wrapped byredux-formis a special prop that allows us to set the values of theformobject in the redux store, which in turns changes the value of theFieldcomponents inside the forms. - Use
StreamFormwithin both theStreamCreateand theStreamEditcomponents.
// StreamForm
import React from 'react';
import { Field, reduxForm } from "redux-form";


class StreamForm extends React.Component {
    // Redux form automatically changes the formProps with the initialValues prop
    renderInput = (formProps) => {
        const meta = formProps.meta;
        const className = `field ${meta.error && meta.touched ? 'error' : ''}`;
        return (
            <div className={className}>
                <label>{formProps.label}</label>
                <input {...formProps.input} />
                { this.renderError(meta) }
            </div>
        );
    };

    renderError ({error, touched}) {
        // ...
    };

    // onSubmit uses the injected onSubmit prop defined by the parent component.
    onSubmit = (formValues) => { this.props.onSubmit(formValues) };

    render() {
        return (
            // Everything else is the same as any form
            <form className="ui form error" onSubmit={this.props.handleSubmit(this.onSubmit)}>
                <Field name='title' component={this.renderInput} label="Enter Title"/>
                <Field name='description' component={this.renderInput} label="Enter Description"/>
                <button className="ui button primary">Submit</button>
            </form>
        );
    }
}

const validate = (formValues) => {
    // ...
};

// Returns the wrapped StreamForm
// Note that the 'streamForm' key will be shared inside the redux-store for both new and edit forms
export default reduxForm({
    form: 'streamForm',
    validate: validate
})(StreamForm);
// Stream Edit
import React from 'react';
import { connect } from 'react-redux';
import { fetchStream, editStream } from "../../actions";
import StreamForm from "./StreamForm";
class StreamEdit extends React.Component {
componentDidMount() {
// Load data for this component to work
}
// Our custom onSubmit function that will get injected into the StreamForm component as a prop
onSubmit = (formValues) => {
this.props.editStream(this.props.stream.id, formValues);
};
render(){
if (!this.props.stream) {
return <div>Loading...</div>;
}
const {title, description} = this.props.stream;
return (
<div>
<h3>Edit Stream</h3>
{/* InitialValues is a special redux-form prop to indicate the form values of the StreamForm */}
{/* Make sure you only pass initial values that have a corresponding Field in the form */}
<StreamForm initialValues={{title, description}}
onSubmit={this.onSubmit}/>
</div>
);
}
}
const mapStateToProps = (state, ownProps) => {
const urlId = ownProps.match.params.id;
return {
stream: state.streams[urlId]
};
};
export default connect(mapStateToProps, {fetchStream, editStream})(StreamEdit);React portals are a general concept that we will illustrate through the modal use case. However, there are other use cases for this feature.

- Modals in react will be deeply nested
- Portal, lets a components render another component NOT as a direct child, but as a child of another element (typically the body)
Problem
- StreamDelete needs to render a Modal but it can only do so by nesting it within itself.
- By the time an arbitrary element needs to render a modal, it could be arbitrarily nested, making it impossible to style as a modal reliably (because it depends on the styling of all the chain.)
Solution
- Portals allow a component to render another component but NOT as a direct child, but as a child of another element.
- This other element is typically the
body, but it doesn't have to be the body.
- This other element is typically the
- Typical Portal use cases: modals, use react to render content into an element that was not created by your react app (e.g. a 3rd party element or a server-rendered html element.).
Create a target html element for the portal:
<body>
    <div id="root"></div>
    <!--  This will be used as the modal portal target, everything inside will be replaced  -->
    <div id="modal"></div>
  </body>
Create the portal component:
import React from 'react';
import ReactDOM from 'react-dom';

const Modal = props => {
    // When we create a portal, we return whatever ReactDOM.createPortal returns.
    // The function takes 2 args:
    //   1) The jsx we want to render
    //   2) The element we want to render (1) into. Note that everything inside will be replaced
    // Note the classNames are specific to semantic ui
    return ReactDOM.createPortal(
        <div onClick={props.onDismiss} className="ui dimmer modals visible active">
            { /* MODAL SPECIFIC COMMENT: */ }
            { /* The default behaviour of HTML events is to propagate up the elements until */ }
            { /* some element handles it.  Here we want to stopPropagation to avoid navigating */ }
            { /* the user when he clicks inside the modal box */ }
            <div onClick={(e) => e.stopPropagation()} className="ui standard modal visible active">
                <div className="header">{props.title}</div>
                <div className="content">{props.content}</div>
                <div className="actions">{props.actions}</div>
            </div>
        </div>,
        document.querySelector('#modal')
    );
};

export default Modal;
Render the portal from other component:
import React from 'react';
import Modal from "../Modal";
import history from "../../history";

const StreamDelete = () => {
    const actions = (
        <div>
            <button className="ui button negative">Delete</button>
            <button className="ui button">Cancel</button>
        </div>
    );

    return (
        <div>
            StreamDelete
            <Modal
                title="Delete Stream"
                content="Are you sure you want to delete this stream?"
                actions={actions}
                onDismiss={()=> history.push('/')}
            />
        </div>
    );
};

export default StreamDelete;By default, to return sibling elements in JSX we are forced to wrap them with a "dummy div" so that we only return one element.
This wrapping may be unacceptable in some circumstances. For example, it might throw-off the styling of a CSS framework that expects a specific structure.
React.Fragments allow us to use "an invisible wrapper" that does not get rendered in the DOM.
const actions = (
        <React.Fragment>
            <button className="ui button negative">Delete</button>
            <button className="ui button">Cancel</button>
        </React.Fragment>
);Note: the app 9_translate_context contains the code samples for this section.
- The Props System: communicate from parent to DIRECT child.
- The Context System: Pass data from a PARENT component to ANY NESTED child component.
- Not necessarily the direct children.
- It is just about data communication, just like props so it is not full replacement of Redux.
- Sometimes we just want to communicate something from the parent to a deeply nested child and the components in the middle don't really care about the communication.
- Using only props, we end up using the intermediate components just to push down data, even if they don't care.


The context system works as a pipeline that pushed data down from parents to children.
The first thing we want to do when working with context is to create dedicated context objects that we import inside
other files only when needed. We do so by creating a contexts folder and creating a someContext.js file per
context we are interested in.
Each context object represents a pipeline of data that is passed down from the parents to all children.
// src/contexts/LanguageContext.js
import React from 'react';
export default React.createContext();
- This is barely usable, way 2 makes much more sense.
// src/contexts/LanguageContext.js
import React from 'react';
// createContext takes a default value.  It can be anything (e.g. an object, an array, etc...)
export default React.createContext('english');- Allows us to modify the default value.
Provideris a component that allows us to signal the scope of a particular INSTANCE of a context object.- Every time we use the
<LangContext.Provider value={...}>...</LangContext.Provider>a new instance ofLangContextis created and used only within the scope of whatever is nested. - NOT the same
providerthan the one fromreact-redux.
- Every time we use the
import React from 'react';
import UserCreate from "./UserCreate";
import LanguageContext from "../contexts/LanguageContext";
class App extends React.Component {
state = { language: 'english' };
onLanguageChange = (newLanguage) => {
this.setState({language: newLanguage});
};
render() {
return (
<div className="ui container">
<div>
Select a Language:
<i className="flag us" onClick={() => this.onLanguageChange('english') }/>
<i className="flag nl" onClick={() => this.onLanguageChange('dutch') } />
</div>
{/* - With the LanguageContext.Provider component we create an instance of the LangContext */}
{/* - That instance is scoped to the all children nested within */}
{/* - With the value property, we can modify the value of the context. We can use anything for the value. */}
<LanguageContext.Provider value={this.state.language} >
<UserCreate/>
</LanguageContext.Provider>
{/* This is ANOTHER INSTANCE of LanguageContext that is completely independent from the one above */}
<LanguageContext.Provider value={'english'} >
<UserCreate/>
</LanguageContext.Provider>
</div>
);
}
}
export default App;import React from 'react';
import LanguageContext from "../contexts/LanguageContext";
class Button extends React.Component {
// Connect the Language Context to the Component
// contextType is a special property for React.
static contextType = LanguageContext;
render() {
// this.context is used to get the data in the contexts
const text = this.context === 'english' ? 'Submit' : 'Voorleggen';
return(
<button className="ui button primary">{text}</button>
);
}
}
export default Button;- The
Consumercomponent is automatically created within thecontextobject. - We use the
Consumerwhenever we want to use the value inside the context.
import React from 'react';
import LanguageContext from "../contexts/LanguageContext";

class Button extends React.Component {
    render() {
        return(
            <button className="ui button primary">
                <LanguageContext.Consumer>
                    {/* We always need to provide a function as a child to the Consumer */}
                    {/* The function is called with the context value as an argument and we */}
                    {/* can put any logic we want within the function (including returning other components) */}
                    {(value) => value === 'english' ? 'Submit' : 'Voorleggen'}
                </LanguageContext.Consumer>
            </button>
        );
    }
}
export default Button;- We need to use
Consumerwhen we need to access data out of MULTIPLE context objects within a single component.- The
this.contextapproach only allows for one context per object to be used.
- The
import React from 'react';
import LanguageContext from "../contexts/LanguageContext";
import ColorContext from "../contexts/ColorContext";

class Button extends React.Component {

    renderButton(color){
        return(
            <button className={`ui button ${color}`}>
                <LanguageContext.Consumer>
                    {(value) => value === 'english' ? 'Submit' : 'Voorleggen'}
                </LanguageContext.Consumer>
            </button>
        );
    }

    render() {
        return(
            // To read from multiple contexts we nest Consumer components.
            // The same rule of having a consumer return a function applies.
            // In this case we use a helper function to organize the code
            <ColorContext.Consumer>
                { (color) => this.renderButton(color) }
            </ColorContext.Consumer>
        );
    }
}

export default Button;
import React from 'react';
import UserCreate from "./UserCreate";
import LanguageContext from "../contexts/LanguageContext";
import ColorContext from "../contexts/ColorContext";
class App extends React.Component {
state = { language: 'english', color: 'red' };
//...
render() {
return (
<div className="ui container">
{/* To pass in multiple contexts, we just nest providers. */}
{/* Order does not matter in this case */}
<LanguageContext.Provider value={this.state.language} >
<ColorContext.Provider value={this.state.color}>
<UserCreate/>
</ColorContext.Provider>
</LanguageContext.Provider>
</div>
);
}
}
export default App;Not really, vanilla Context only provides ONE of the many other things that redux provides.
- Redux
- Features:
- Distributes data to various components
- Centralizes data in a store
- Provides a mechanism for changing data in the store
- Pros:
- Excellent documentation
- Well-known design patterns
- Tremendous amount of open source libraries
- Context:
- Features:
- Distribute data to various components
- Pros:
- No extra libraries
- Cons:
- Hard to build 'store' components that need to reach into other 'store' components
- Features:
- Stephen Grider does NOT personally recommend replacing
reduxwith context.
If you want to know how to replace redux with Context, watch the "Replacing Redux with Context" section in
Udemy.
- There is a fair amount of work involved in doing this properly.
See the 10_hooks_simple and TODO projects for sample applications built with hooks.

- At first, it may seem that we are trying to emulate
stateandlifecycle methodsin function components. This is NOT the reason to use them. - We use them because they makes it easy to share logic between components.
- They solve problems of code re-use that are hard to achieve with class based components.
These are some of the available hooks. The documentation contains more.

// useState allows us to use the state system in functional components
import React, {useState} from 'react';

const App = () => {
    // useState gives us access to the current value and the setState function of an INDEPENDENT slice of state.
    // Calling the setState function causes the component to automatically re-render.
    // Explanation:   [currentStateValue, functionToUpdateState] = functionFromReact( initialStateValue )
    // Analogies  :      this.state.foo    this.setState({foo: 'bar'})               state={foo: 'baz'}
    const [resource, setResource] = useState('posts');
    // Syntax: Array destructuring [redVar, greenVar] = ['red', 'green']

    // More on INDEPENDENT slice of state:
    // We can have multiple useStates in a component, and each will deal with their own independent state
    const [count, setCount] = useState(0);

    return (
        <div>
            <div>
                <button onClick={() => setResource('posts')}>Posts</button>
                <button onClick={() => setResource('todos')}>Todos</button>
            </div>
            {resource}
        </div>
    );
};

export default App;// useEffect hook: allows use of 'lifecycle methods' in function-based components
import React, {useState, useEffect} from 'react';
import axios from 'axios';
const ResourceList = ({ resource }) => {
const [resources, setResources] = useState([]);
// A custom function we built to fetch data and update the state
// useEffect forces us to declare a helper function for async requests to use within the effect.
// If we don't do this, we will get a warning related to "cleanup"
const fetchResource = async (resource) => {
const response = await axios.get(`https://jsonplaceholder.typicode.com/${resource}`);
setResources(response.data);
};
// useEffect is a hook serves the function componentDidMount + componentDidUpdate combined.
// It takes 2 arguments:
// 1. An 'effect' function that will get called when the conditions at 2 are met.
// 2. An array of stuff. The effect function will get called when the stuff passed on this re-render
// is different from the stuff on the previous re-render.
// - The function always gets called on the first render (i.e. on mount)
// - If the second argument is an empty array [], the function only gets called "on mount".
// - If the second argument is not given, the function always gets called when render happens (i.e. on mount and update)
//
// The effect of (2) is equivalent to guarding componentDidUpdate for change on a class-based component. e.g:
// async componentDidUpdate(prevProps) {
// if (!prevProps.resource !== this.props.resource) {
// const response = await axios.get(`https://jsonplaceholder.typicode.com/${resource}`);
// this.setState({resources: response.data});
// }
// }
useEffect(
() => {fetchResource(resource)},
[resource]
);
return <div>{resources.length}</div>;
};
export default ResourceList;This section illustrates code re-use with some examples. Custom hooks allow us to encapsulate business logic outside view logic and re-use it whenever needed.
This example illustrates a simple custom hook that follows community convention .
import {useState, useEffect} from 'react';

// Gets the user's latitude from the browser's geolocation and
// returns the latitude and an errorMessage
const useLocation =  () => {
    // Internally uses 2 independent pieces of state
    const [lat, setLat] = useState(null);
    const [errorMessage, setErrorMessage] = useState('');

    const getUserLocation = () => {
        // Gets 2 function callbacks: On success, On failure
        window.navigator.geolocation.getCurrentPosition(
            (position) => setLat(position.coords.latitude),
            (err) => setErrorMessage(err.message)
        );
    };

    useEffect(() => getUserLocation(), []);
    // It is community convention that hooks return values in array format
    return [lat, errorMessage];
};

export default useLocation;import React from 'react';
import useLocation from "./useLocation";
// ...
const App = () => {
// We use the custom hook as if it where any other hook (follows community convention).
const [lat, errorMessage] = useLocation();
let content;
if (errorMessage) {
content = <div>Error: {errorMessage}</div>;
} else if (!errorMessage && lat) {
content = <SeasonDisplay lat={lat} />
} else {
content = <Spinner message = 'Determining your Location...'/>;
}
return <div className="some-class-that-is-always-needed">{content}</div>;
};This example illustrates that multiple usages of the custom hook behave like independent instances (keep reading).
The useResources custom hook:
- Encapsulates the logic of calling an api.
- Encapsulates the logic of when resources need to be re-fetched (using
useEffect). - Separates the presentation logic form the api logic.
- Every use of
useResourcesscopes down an "instance" of theuseStateanduseEffectthat is tied THAT particular component that used it.- In this example,
UserListandResourceListboth have independent records ofstateandeffect. - For example, the
useEffectinsideResourceList, uses the information from the previous re-rendering ofResourceListto decide if the effect should get called.- As opposed to using information from the previous application-wide call to
useResources.
- As opposed to using information from the previous application-wide call to
- In this example,
import {useState, useEffect} from 'react';
import axios from 'axios';

// Code Reuse with hooks
// useResources is a utility function that gets a resource type (e.g. 'posts') and returns an array of resources.
// This function an easily be used by other components.
// This utility function holds no presentation logic, only api interaction logic.
const useResources = (resource) => {
    const [resources, setResources] = useState([]);
    const fetchResource = async (resource) => {
        const response = await axios.get(`https://jsonplaceholder.typicode.com/${resource}`);
        setResources(response.data);
    };

    useEffect(
        () => {fetchResource(resource)},
        [resource]
    );

    return resources;
};

export default useResources;import React from 'react';
import useResources from "./useResources";
const UserList = () => {
const users = useResources('users');
return(
<ul>
{ users.map( user => <li key={user.id}>{user.name}</li>) }
</ul>
);
};
export default UserList;import React from 'react';
import useResources from './useResources';
const ResourceList = ({ resource }) => {
const resources = useResources(resource);
return (
<ul>
{resources.map((record) => <li key={record.id}>{record.title}</li>)}
</ul>
);
};
export default ResourceList;Note: to edit any of the diagrams go to
https://www.draw.io/#Hserodriguez68%2Freact-cheatsheet-udemy-2019%2Fmaster%2Fdiagrams%2F{name of diagram}.svg