A network-enabled thermostat controller
A DIY thermostat project designed to let you operate multiple network controlled thermostats on heaters of various types.
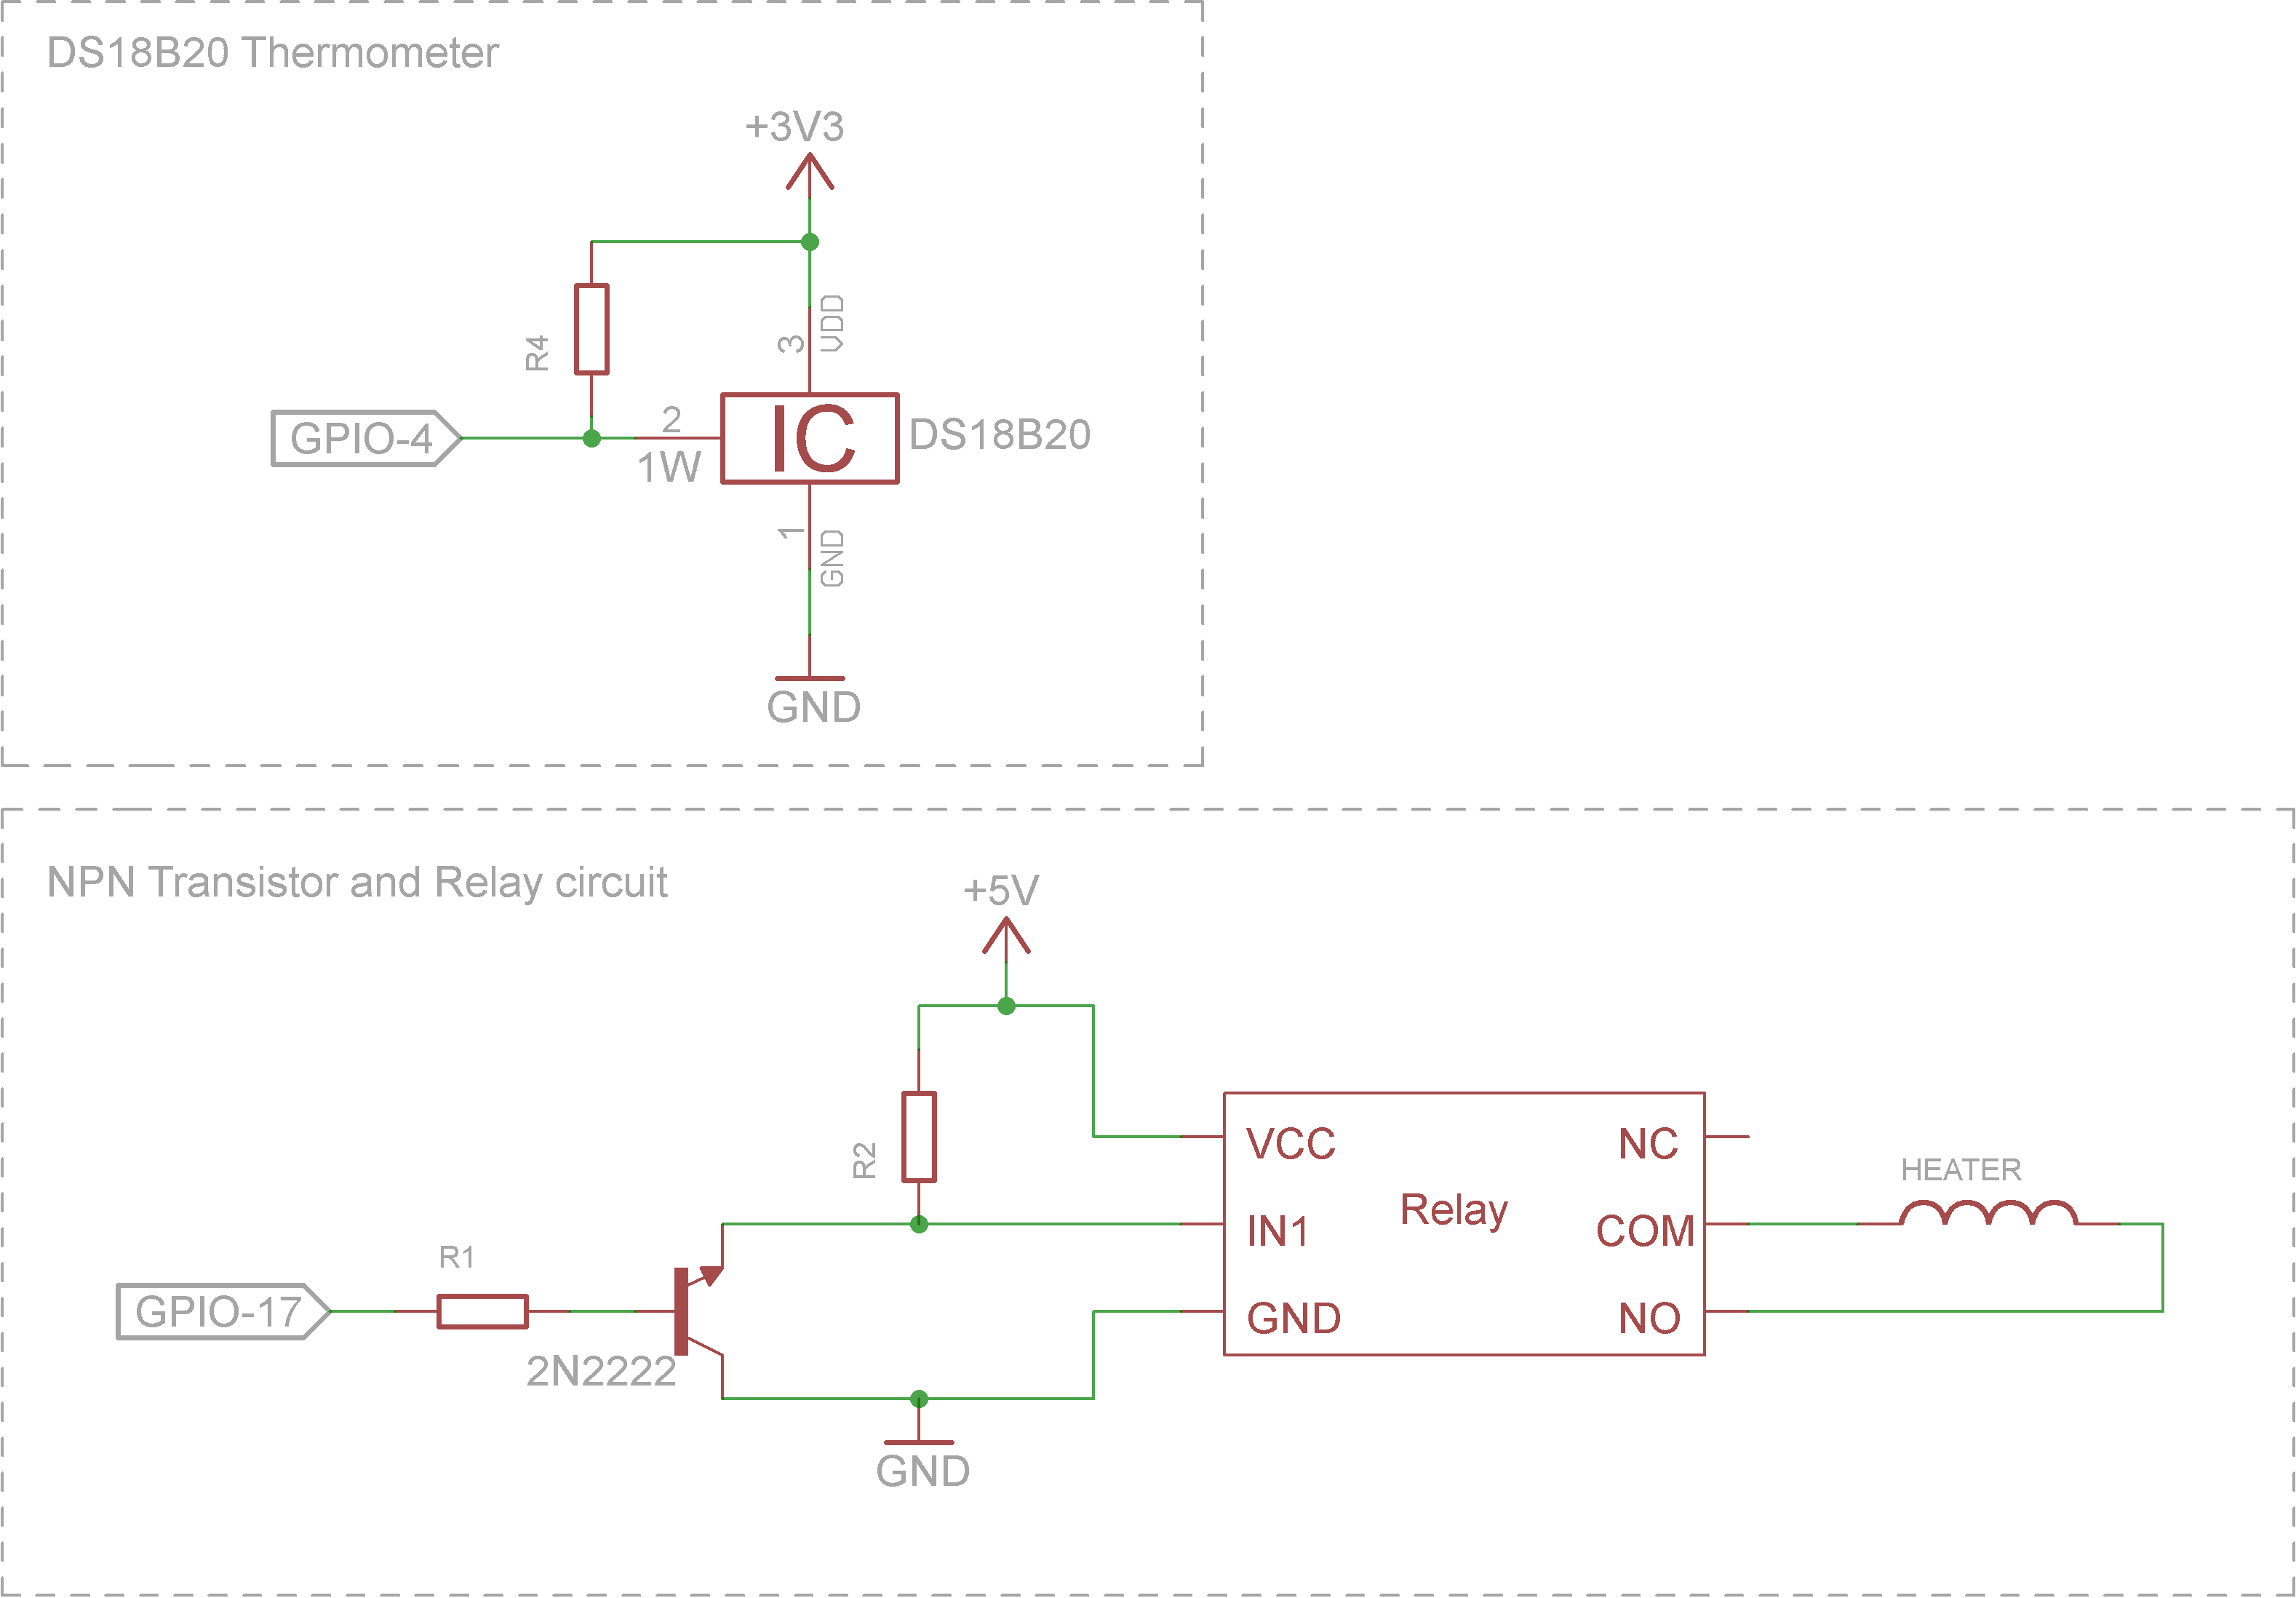
Currently, supported hardware is a Raspberry Pi with particular electronics and driver support. A schematic detailing the custom
electronics that connects to the Raspberry Pi are included with this project at this URL:
There are several configuration libraries required for this project to work with the hardware above, when running in production mode on a RaspberryPi:
- 1-wire control library: http://www.raspberrypi-spy.co.uk/2013/03/raspberry-pi-1-wire-digital-thermometer-sensor/
- GPIO WiringPi tools: http://wiringpi.com/
There are several parts of this project:
- A ruby client = thermoruby.rb and thermoruby_controller and test files
- thermoserver.rb server = this is used for testing and can be used for operations. It is a distinct codebase but required for testing thermoruby.rb. It also can be used in production operations to support thermoruby.rb and its controller.
More documentation to come, and contact welcome from interested users or contributors. Contact science@misuse.org with subject line including "openthermo" to discuss, or send pull requests to openthermo project on github.com.
Typical operations are:
- ThermoClient uploads status file to server
- ThermoClient downloads config file from server ** ThermoClient loops on download config file using 'if-file/newer-date' ** ThermoClient operates on config file, adjusting heater run-state accordingly
- ThermoApp displays list of available heaters to control
- ThermoApp displays current config and status for a selected heater
- ThermoApp accepts user input to change current config
- ThermoApp activates WebApp api to register that input with server
- Server adjusts appropriate config file to current settings
Look in specification.txt file for documentation on api and other implemented and planned details.
To install, be sure you have required libraries which can be found in thermoclient.rb and thermoserver.rb files. GEMSPEC file forthcoming. Ruby 1.9.3 was used in development.
To test, you must also have thermoserver project installed or an equivalent web server exposing the API specified in the docs folder of thermoserver.
If you are using thermoserver to run tests, you must first start the webserver prior to running tests. On Windows you can run "startserver.cmd" in the test folder. For Linux, you start the server with the command: "ruby ../../server/thermoserver.rb" from the test folder, assuming you have thermoserver installed in a folder parallel to thermoruby.
Once the server is running, you can start the tests from within the test folder with: "ruby test-thermoclient.rb"
Tests have been confirmed working on Raspberry Pi Wheezy Debian and Windows 8.
It is possible to operate a heater with the current version, but there is no support yet for web-based changes to the configuration file. You must manually create the configuration json file and put it the working folder specified by the boot-server.json file that is in the working folder when you start thermoserver.rb. You must configure your thermoclient to load that configuration file from the thermoserver via a URL in the boot.json file of thermoclient.
A web based editing system for modifying configuration files is forthcoming.
Security at this time is managed via hard coded API keys built-into the URLs of the API. To fully secure this system you must operate entirely over HTTPS. You configure the API key in the boot.json and boot-server.json files for thermclient and thermoserver, respectively. The API key in the boot.json is built into the URL that you access the thermoserver configuration file appropriate for that thermoclient instance.
The thermoclient_controller.rb is the file you run from the command line to maintain control over your heater. This file loads the thermostat system itself. The thermostat system (thermoclient.rb) first looks for a boot.json file stored on the local file system in the current working folder. It MUST find that file in that folder. From that file it determines several safety features and the URL where it can find its full configuration. A web server must make a file of the appropriate json format available at that URL. By updating the file at that URL you can control and change the operation the thermostat system, and thereby the heater itself.
A boot file (must be named "boot.json") looks like:
{
  "debug": {"log_level": 0},
  "config_source": {
    "immediate_polling_seconds": 15,
    "config_url": "http://127.0.0.1:8080/api/abc123xyz/file/backbedroom.json",
    "upload_status_url": "http://127.0.0.1:8080/api/abc123xyz/file/backbedroom.status.json",
    "upload_status_max_interval": "15 minutes"
  },
  "operating_parameters": {
    "max_temp_f": 79,
    "max_operating_time_minutes": "59",
    "hysteresis_duration": "10 minutes"
  }
}
Boot file field definitions:
- log_level: 0 = no logging, 10 = max logging
- immediate_polling_seconds: number of seconds to wait before re-polling server for configuration data
- config_url: URL where the client can download its configuration data from server
- upload_status_url: URL where the client should send it status metadata periodically
- upload_status_max_interval: status is uploaded whenever heater state changes or after this period of time
- operating paramters: defines operating limits for the heater
- max_temp_f: heater will not be allowed to operate when room temp is greater than this value
- max_operating_time_minutes: heater will not be allowed to operate longer than this number of minutes
- Note: heater will be allowed to turn on again after being shut off due to max operating time after hysteresis_duration elapses
- hysteresis_duration: A period of time that must elapse after the heater is turned off before it is allowed back on again. This prevents small fluctuations in room temperature from causing the heater to cycle on and off too frequently.
A configuration file looks like:
{
  "debug": {"log_level": 9},
  "operation_mode": "daily_schedule",
  "default_mode": "daily_schedule",
  "daily_schedule": {
    "times_of_operation": [
      {"start": "12:00 am", "stop": "6:30 am", "temp_f": 60},
      {"start": "6:30 am", "stop": "10:00 am", "temp_f": 72},
      {"start": "10:00 am", "stop": "6:00 pm", "temp_f": 74},
      {"start": "7:00 pm", "stop": "11:00 pm", "temp_f": 73},
      {"start": "11:00 pm", "stop": "12:00 am", "temp_f": 60}
  ]},
  "immediate": {"temp_f": 77, "time_stamp": "9/14/13 10:15am"},
  "off": "off"
}Once thermoclient loads the URL from the specified end-point, it will process that file to determine what if any actions it should take. Currently three modes are supported:
- daily_schedule
- immediate
- off
The daily schedule configuration allows you to set up a single day's temperature ranges by defining blocks of times and associated "goal" temperatures that you wish the thermostat system to maintain by using the heater. The thermostat system will compare the room temperature with these goal temperatures to determine when to turn the heater on and off. You can define an unlimited number of periods. The periods can overlap, but if they do, the first matching period will be in effect. If there is a gap between periods, the heater will be off during that time frame. If a period ends with "12:00 am" it is assumed this refers to tomorrow at 12:00am (ending a period at 12:00am today makes no sense otherwise, as that is the first possible time for any given day).
It is possible to cause the daily schedule to temporarily override the current goal temperature, allowing a user to set a new temperature. This new temperature will be in effect until the time period in which it resides within expires. After that time, the regular goal temperatures will be back in effect. Take this configuration file for example:
{
  "debug": {"log_level": 9},
  "operation_mode": "daily_schedule",
  "daily_schedule": {
    "times_of_operation": [
      {"start": "12:00 am", "stop": "6:30 am", "temp_f": 60},
      {"start": "6:30 am", "stop": "10:00 am", "temp_f": 72},
      {"start": "10:00 am", "stop": "6:00 pm", "temp_f": 65},
      {"start": "7:00 pm", "stop": "11:00 pm", "temp_f": 73},
      {"start": "11:00 pm", "stop": "12:00 am", "temp_f": 60}
  ]},
  "immediate": {"temp_f": 77, "time_stamp": "9/14/13 10:15am"},
  "temp_override": {"time_stamp": "9/14/13 10:15am", "temp_f": 72},
  "off": "off"
}
Assume that the time is 9/14/13 at 10:14am. This falls in the time frame 10am-6pm. The goal temperature would be 65 degrees. Assume that the time advances to 10:15am. This now coincides with the temp_override option. The thermostat system will use the goal temperature specified by "temp_override" (72 degrees) instead of the regularly scheduled temperature. This new temperature will be in effect until the temp_override option is removed from the file, or the time advances past 6pm, when the system will revert to normal daily schedule operations.
The immediate function serves to hold the temperature at a constant value for as long as the option is provided (the time_stamp on the option must be less than the current time as well -- allowing you to set an immediate temperature for some time in the future as well). A config file where the immediate function is active looks like:
{
  "debug": {"log_level": 9},
  "operation_mode": "immediate",
  "default_mode": "daily_schedule",
  "daily_schedule": {
    "times_of_operation": [
      {"start": "12:00 am", "stop": "6:30 am", "temp_f": 60},
      {"start": "6:30 am", "stop": "10:00 am", "temp_f": 72},
      {"start": "10:00 am", "stop": "6:00 pm", "temp_f": 65},
      {"start": "7:00 pm", "stop": "11:00 pm", "temp_f": 73},
      {"start": "11:00 pm", "stop": "12:00 am", "temp_f": 60}
  ]},
  "immediate": {"temp_f": 74, "time_stamp": "9/14/13 10:15am"},
  "off": "off"
}
In this mode of operation, the thermostat system will try to maintain the temperature at 74 degrees until the operation_mode or immediate temp_f value is changed.
The "default_mode" key is used to store the operation_mode that should be initiated when "immediate" mode is turned off. This can simplify the user experience, as the user can simply toggle immediate mode on/off and the heater can resume regularly scheduled operation. In the future additional modes of operation may be enabled, so this value will be more important then.
The off function serves to ensure the thermostat system keeps the heater off in all cases. An example of this config file is:
{
  "debug": {"log_level": 9},
  "operation_mode": "off",
  "daily_schedule": {
    "times_of_operation": [
      {"start": "12:00 am", "stop": "6:30 am", "temp_f": 60},
      {"start": "6:30 am", "stop": "10:00 am", "temp_f": 72},
      {"start": "10:00 am", "stop": "6:00 pm", "temp_f": 65},
      {"start": "7:00 pm", "stop": "11:00 pm", "temp_f": 73},
      {"start": "11:00 pm", "stop": "12:00 am", "temp_f": 60}
  ]},
  "immediate": {"temp_f": 74, "time_stamp": "9/14/13 10:15am"},
  "off": "off"
}
When operation_mode is set to "off" the heater will never turn on.
There are three main safety parameters and they are all defined in the boot.json file. They cannot be configured by URL configuration file. The three options are:
- Maximum operating temperature
- Maximum operating time
- Hysteresis duration
A boot.json file containing these three (required) safety options is:
{
  "config_source": {
    "immediate_polling_seconds": 15,
    "config_url": "http://127.0.0.1:8080/now/backbedroom.json",
  },
  "operating_parameters": {
    "max_temp_f": 79,
    "max_operating_time_minutes": "59",
    "hysteresis_duration": "1 minutes"
  }
}Defines the maximum temperature possible regardless of the configuration file settings or any other operations.
Defines the maximum period the heater is allowed to run before being shut off.
Defines the period of time that the heater is required to be shut off before it is allowed to be turned on again. This prevents overly rapid cycles of the heater being turned on or off. This value should be adjusted based on the insulation characteristics of your house. A house which is poorly insulated and cools off rapidly should probably have a lower hysteresis duration value than a well insulated house that cools down slowly, in order to maintain a reasonable range of temperature in the house.
Thermoruby will periodically upload status metadata to the server via a custom upload path (including pre-shared API key). Whenever the heater goes on/off (changes state) the metadata will be updated, or after a timeout period specified in the boot file. The status metadata file holds a lot of information about the operating state of the thermostat including the room temperature, whether the heater is on or off, the goal temperature the thermostat is attempting to reach if the heater is on, and various other related data. Generally this information is uploaded to the server because the client applications interacting with the thermostat will want access to this information.
Spark.io built a prototype thermostat in a day: http://blog.spark.io/2014/01/17/open-source-thermostat/ Codebase is here: https://github.com/spark/thermostat Their platform is dependent on spark's architecture, but it's an interesting alternative approach.
(c) 2013 Steve Midgley http://www.gnu.org/licenses/gpl-3.0.txt
This file is part of the Open Thermostat project.

The Open Thermostat project is free software: you can redistribute it and/or modify
it under the terms of the GNU General Public License as published by
the Free Software Foundation, either version 3 of the License, or
(at your option) any later version.

The Open Thermostat project is distributed in the hope that it will be useful,
but WITHOUT ANY WARRANTY; without even the implied warranty of
MERCHANTABILITY or FITNESS FOR A PARTICULAR PURPOSE.  See the
GNU General Public License for more details.

You should have received a copy of the GNU General Public License
along with The Open Thermostat project.
If not, see <http://www.gnu.org/licenses/>.