ESPHome Smart Coffee (Philips Series 2200)
This project integrates a Philips Series 2200 Coffee Machine into into Home Assistant through ESPHome. This component has been developed on a Philips EP2220 and an ESP8266.
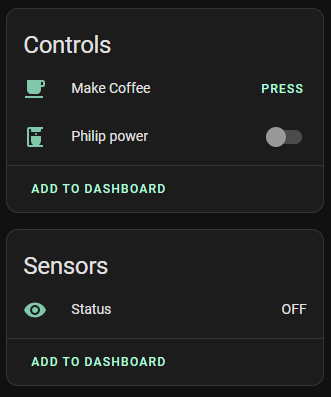
This component provides a Power Switch, a Status sensor and various Buttons which simulate user input.
The Power Switch can be used to turn on the coffee machine with and without a cleaning cycle during startup.
You might break/brick your coffee machine by modifying it in any way, shape or form. If you want to use this component, do so at your own risk.
Configuration variables
A example configuration can be found here
Philips Series 2200
- id(Required, string):Controller ID which will be used for entity configuration.
- display_uart(Required, string): ID of the UART-Component connected to the display unit
- mainboard_uart(Required, string): ID of the UART-Component connected to the mainboard
- power_pin(Required, Pin): Pin to which the MOSFET/Transistor is connected. This pin is used to temporarily turn of the display unit.
Philips Power switch
- controller_id(Required, string): The Philips Series 2200-Controller to which this entity belongs
- clean(Optional: boolean): If set to true the machine will perform a cleaning cycle during startup. Otherwise the machine will power on without cleaning. Defaults to
true. - All other options from Switch
Philips Action Button
- controller_id(Required, string): The Philips Series 2200-Controller to which this entity belongs
- action(Required, int): The action performed by this button. Select one of
MAKE_COFFEE,SELECT_COFFEE,SELECT_ESPRESSO,MAKE_ESPRESSO,SELECT_HOT_WATER,MAKE_HOT_WATER,SELECT_STEAM,MAKE_STEAM,BEAN,SIZE,AQUA_CLEAN,CALC_CLEAN,PLAY_PAUSE. - All other options from Button
Philips Status Sensor
- controller_id(Required, string): The Philips Series 2200-Controller to which this entity belongs
- All other options from Text Sensor
Fully automated coffee
The following script can be used to make a fully automated cup of coffee. The power switch used in this case does not perform a cleaning cycle. The cleaning check is required since after power loss the machine always cleans. This script will only continue to brew coffee under 2 conditions:
- There was no cleaning cycle during start-up
- A Mug is present
script:
  - id: coffee_script
    then:
      - if:
          condition:
            lambda: 'return id(status).state == "OFF";'
          then:
            - switch.turn_on: power
            - wait_until:
                condition:
                  lambda: 'return (id(status).state == "Idle") || (id(status).state == "Cleaning");'
                timeout: 120s
            - if:
                condition:
                  lambda: 'return (id(status).state == "Idle") && id(mug_sensor).state;'
                then:
                  - delay: 5s
                  - button.press: make_coffee_button
          else:
            if:
              condition:
                lambda: 'return (id(status).state == "Idle") && id(mug_sensor).state;'
              then:
                - button.press: make_coffee_button
Wiring
The coffee machines display unit is connected to the mainboard via a 8-pin ribbon cable with Picoflex connectors. The display is powered by the mainboard and the two units communicate using a serial bus. The ESP is placed in between this bus to perform a man-in-the-middle attack. The RX/TX lines are piped through the ESP such that messages can be read, intercepted and injected.
When injecting a 'turn coffee machine on' command, the coffee machine does turn on, but the display unit does not. To circumvent this behavior we can re-boot the display unit by temporarily removing it's power. Thus the display will power on and operate normally. To perform this operation a transistor or MOSFET can be used.
The following wiring guideline can be used to add a Wemos D1 Mini to the coffee machine. The unlabeled wires should be connected without changes.

The ribbon cable wires have the following functionalities.
| Pin | Mainboard | Functionality |
|---|---|---|
| 0 | 5V | 5V |
| 1 | GND | GND |
| 2 | GND | GND |
| 3 | unused | unused |
| 4 | TX/RX | Messages from mainboard to display |
| 5 | RX/TX | Messages from display to mainboard |
| 6 | 0V | unknown - very noisy |
| 7 | 5V |
Voltage regulation
The Wemos D1 Mini has a built in Voltage regulator, thus connecting it to the 5V provided by the mainboard is no problem. If you use a different ESP Module/Board please make sure it is 5V tolerant or use a Voltage regulator. Otherwise you might release magic smoke.
Communication protocol
More information on the communication protocol used by this component can be found here.
Related Work
- SmartPhilips2200 by @chris7topher
- The commands used in this Project are different. This is likely due to different model revisions.
Troubleshooting
- Make sure your wiring is correct
- The UART debug function can be used to analyze communication and verify correct wiring
- The commands used by the display unit may be different between different revisions/models (see Related Work)
