[TOC]
This article is a step by step guide for building your own PXE boot infrastructure which can be used to boot both legacy BIOS and EFI based hardware from network. There are many articles on the Internet for building PXE boot infrastructure however I found most of them does not work for EFI based hardware. I use iPXE as the boot image and dnsmasq as DHCP & TFTP server and I found it's dead simple to setup those two software.
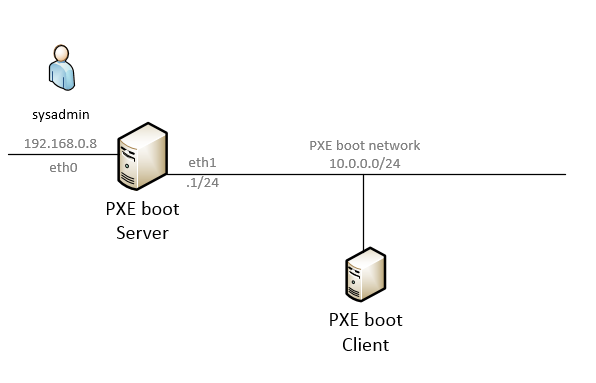
- PXE Boot server (Centos 7.5) with two interfaces. Interface 'eth0' is for sysadmin to login and manage the server. Interface 'eth1' is connected to the PXE boot subnet.
- PXE Boot subnet (10.0.0.0/24). This is an isolated network created just for booting new servers on the network. I strongly suggest to use isolated network for PXE boot to prevent it from interfering with existing DHCP servers on the network.
- PXE Boot client. A VMware VM set to PXE boot from network.
-
Make network interface connected to PXE boot network is correctly configured
[sysadmin@pxeboot-server ~]$ sudo ifconfig eth1 10.0.0.1 netmask 255.255.255.0 upif
ifconfigcommand is not available on your machine, you can add IP address this way:[sysadmin@pxeboot-server ~]$ sudo ip addr add 10.0.0.1/24 dev eth1 [sysadmin@pxeboot-server ~]$ sudo ip link set eth1 up
-
Update PXE boot server to latest version
[sysadmin@pxeboot-server ~]$ sudo yum update -y -
Install required packages
[sysadmin@pxeboot-server ~]$ yum install -y ipxe-bootimgs dnsmasq -
Create TFTP root directory
[sysadmin@pxeboot-server ~]$ mkdir /tftpboot(optional) Set the directory security label if SELinux is enforced
[sysadmin@pxeboot-server ~]$ sudo chcon -t tftpdir_t /tftpboot -
Copy iPXE boot images to TFTP directory
[sysadmin@pxeboot-server ~]$ sudo cp /usr/share/ipxe/{undionly.kpxe,ipxe.efi} /tftpboot/undionly.kpxeis for legacy BIOS based hardwareipxe.efiis for EFI based hardware -
Create iPXE menu directory and boot menu
$ sudo mkdir /tftpboot/menucreate a simple boot menu which drops to the iPXE shell
sudo vi /tftpboot/menu/boot.ipxewith content :
#!ipxe

menu PXE Boot Options

item shell iPXE shell
item exit  Exit to BIOS

choose --default exit --timeout 10000 option && goto ${option}

:shell
shell

:exit
exit
Full iPXE command help can be found here
-
Create dnsmasq config file at /etc/dnsmasq.conf. Delete all old content before editing.
# enable logs if required #log-queries #log-dhcp # disable DNS server port=0 # listen on PXEBOOT vlan (vlan110) only listen-address=10.0.0.1 interface=eth1 # enable built-in tftp server enable-tftp tftp-root=/tftpboot # DHCP range 10.0.0.200 ~ 10.0.0.250 dhcp-range=10.0.0.200,10.0.0.250,255.255.255.0,24h # Default gateway dhcp-option=3,10.0.0.1 # Domain name - homelab.net dhcp-option=15,homelab.net # Broadcast address dhcp-option=28,10.0.0.255 # Set interface MTU to 9000 bytes (jumbo frame) # Enable only when your network supports it # dhcp-option=26,9000 # Tag dhcp request from iPXE dhcp-match=set:ipxe,175 # inspect the vendor class string and tag BIOS client dhcp-vendorclass=BIOS,PXEClient:Arch:00000 # 1st boot file - Legacy BIOS client dhcp-boot=tag:!ipxe,tag:BIOS,undionly.kpxe,10.1.0.1 # 1st boot file - EFI client # at the moment all non-BIOS clients are considered # EFI client dhcp-boot=tag:!ipxe,tag:!BIOS,ipxe.efi,10.1.0.1 # 2nd boot file dhcp-boot=tag:ipxe,menu/boot.ipxe -
Open firewall rules to allow inbound DHCP and TFTP requests
$ sudo firewall-cmd --add-service=dhcp --permanent
$ sudo firewall-cmd --add-service=tftp --permanent
$ sudo firewall-cmd --add-service=dns --permanent
$ sudo firewall-cmd --reload
-
Start dnsmasq and make sure it's running
$ sudo systemctl start dnsmasq $ sudo systemctl status dnsmasq ● dnsmasq.service - DNS caching server. Loaded: loaded (/usr/lib/systemd/system/dnsmasq.service; disabled; vendor preset: disabled) Active: active (running) since Sat 2018-06-09 12:01:23 AWST; 6min ago Main PID: 24141 (dnsmasq) CGroup: /system.slice/dnsmasq.service └─24141 /usr/sbin/dnsmasq -k -
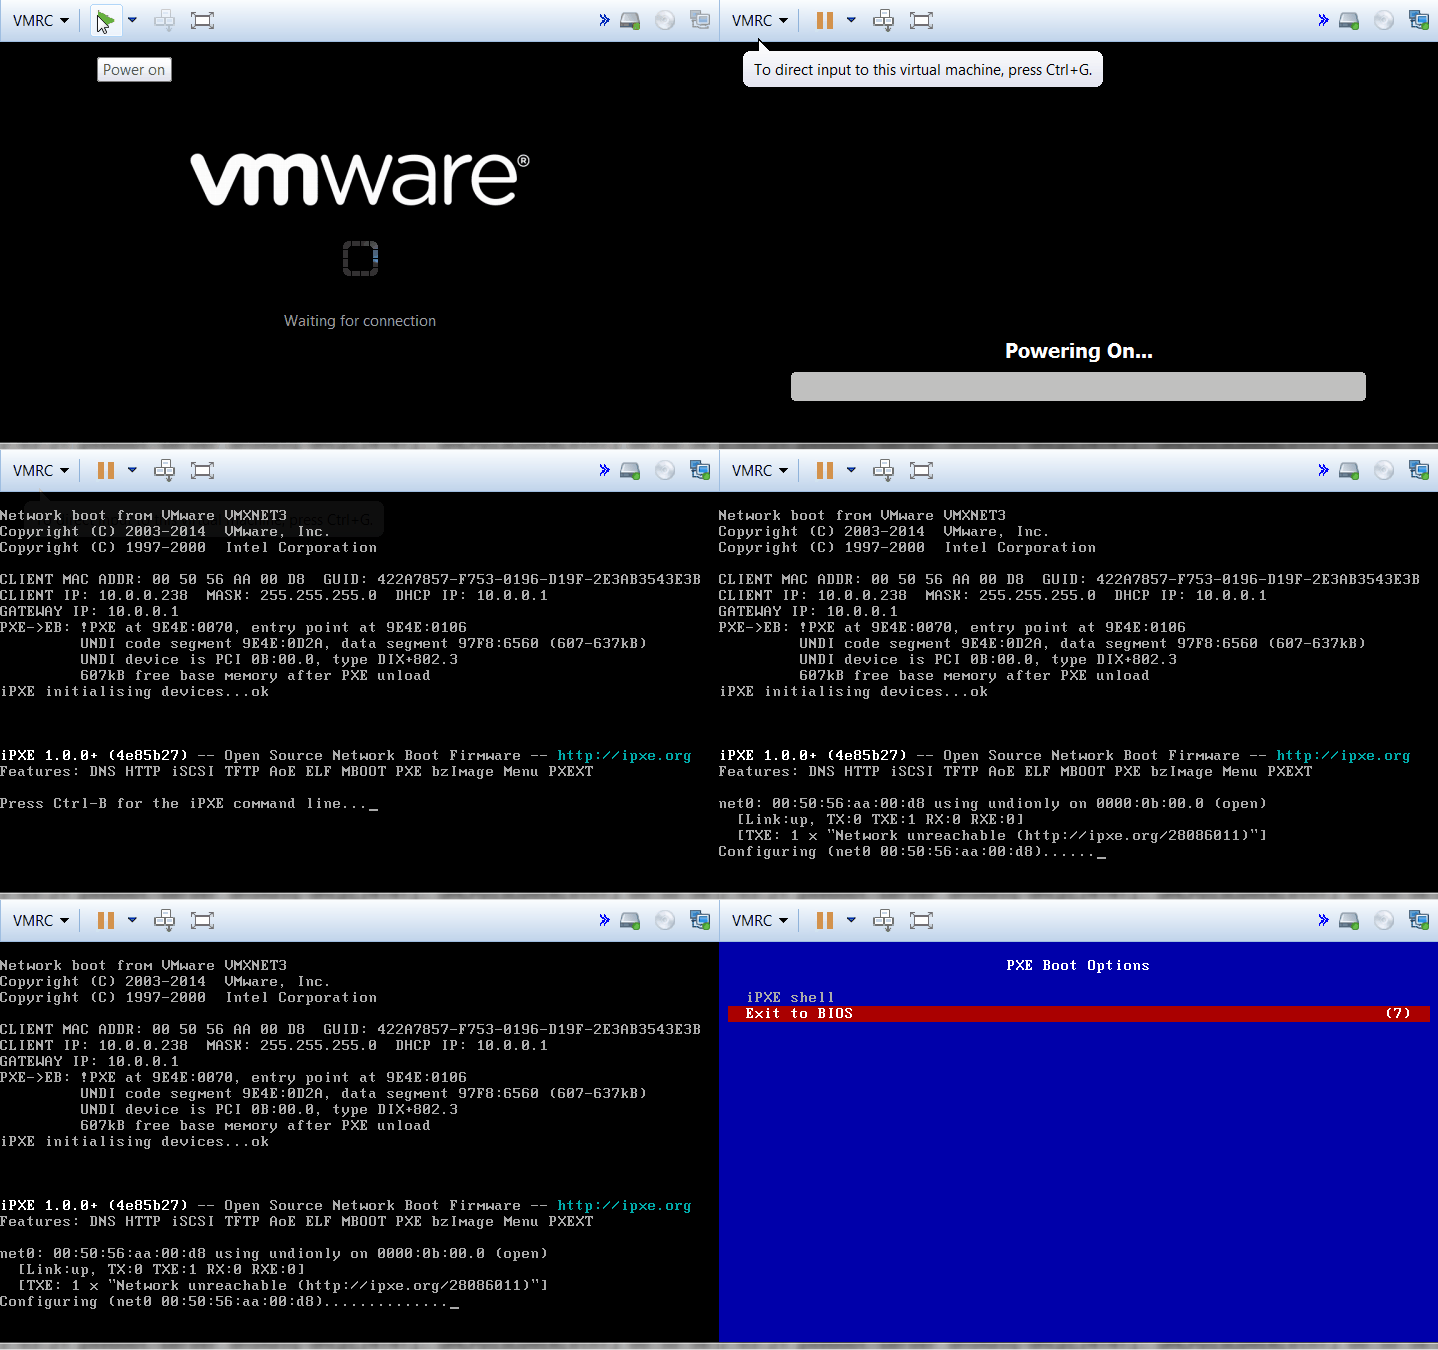
Now you can power on the client machine and, if the network has been configured correctly, you should see the boot process looks like this one:

click the above image to replay
In the part 1 we setup a bare bone PXE boot server using iPXE and a simple boot menu. In this section, I am going to explain how to enable network based installation for CentOS 7.
-
Install Apache web server or any web server of your choice. We are going to serve the installation media using web service.
$ yum install -y httpd -
Create media sub-directory under Apache's default document root directory and mount the CentOS 7 ISO image.
$ sudo mkdir -p /var/www/html/media/centos7I have the CentOS 7 ISO image at
/tmp/CentOS-7-x86_64-Minimal-1804.isoand I need to mount it at the mount point above$ sudo mount -t iso9660 -o ro,loop \ /tmp/CentOS-7-x86_64-Minimal-1804.iso /var/www/html/media/centos7 -
Update host firewall and start web service
$ sudo firewall-cmd --add-service=http --permanent
$ sudo firewall-cmd --reload

$ sudo systemctl start httpd
You need to make sure Apache is running at the end of this step
$ sudo systemctl status httpd ● httpd.service - The Apache HTTP Server Loaded: loaded (/usr/lib/systemd/system/httpd.service; enabled; vendor preset: disabled) Active: active (running) since Sat 2018-06-09 14:31:20 AWST; 3h 47min ago Docs: man:httpd(8) man:apachectl(8) Main PID: 1434 (httpd) Status: "Total requests: 660; Current requests/sec: 0; Current traffic: 0 B/sec" CGroup: /system.slice/httpd.service ├─1434 /usr/sbin/httpd -DFOREGROUND ├─1435 /usr/sbin/httpd -DFOREGROUND ├─1436 /usr/sbin/httpd -DFOREGROUND ├─1437 /usr/sbin/httpd -DFOREGROUND ├─1438 /usr/sbin/httpd -DFOREGROUND ├─1439 /usr/sbin/httpd -DFOREGROUND ├─1489 /usr/sbin/httpd -DFOREGROUND ├─1731 /usr/sbin/httpd -DFOREGROUND ├─1732 /usr/sbin/httpd -DFOREGROUND └─1878 /usr/sbin/httpd -DFOREGROUND -
Add CentOS installation option to
/tftpboot/menu/boot.ipxefile so it looks like this:#!ipxe :start menu PXE Boot Options item shell iPXE shell item centos7-net CentOS 7 installation item exit Exit to BIOS choose --default centos7-net --timeout 10000 option && goto ${option} :shell shell :centos7-net set server_root http://10.0.0.1/media/centos7 initrd ${server_root}/images/pxeboot/initrd.img kernel ${server_root}/images/pxeboot/vmlinuz inst.repo=${server_root}/ ip=dhcp ipv6.disable initrd=initrd.img inst.geoloc=0 devfs=nomount boot :exit exit -
Now, reboot your client machine you should be able to see the new option install CentOS
