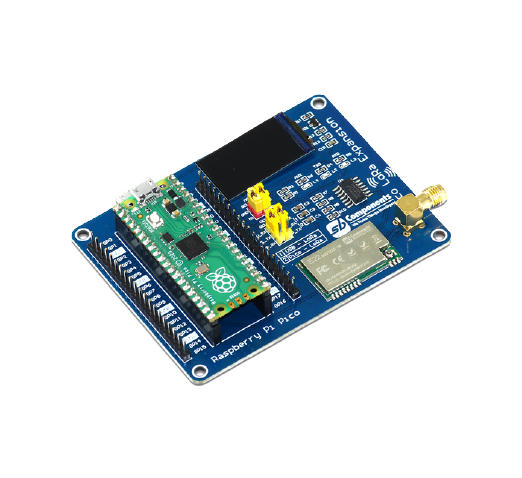
Pico LoRa™ Expansion is a low-power consumption data transmission board, comes with an onboard CH340 USB TO UART converter, Voltage Level Translator(74HC125V), E22-900T22S/E22-400T22S SMA antenna connector that covers 868MHz/433MHz frequency band , Onboard 1.14" LCD,IPEX antenna connector, LoRa™ Spread Spectrum Modulation technology with auto multi-level repeating.
- Pico LORA Expansion: (Buy it from : )
- Raspberry Pi Pico (Buy it from : https://shop.sb-components.co.uk/collections/latest-collections/products/raspberry-pi-pico-board-with-header )
- USB Cable
- First take 2 LORA Expansion board and set jumper position as mention below:
-
Mode Selection Jumper : we are going to use PICO gpio pi GP2 and GP3 to control MODE Selection
-
LoRa mode selection jumpers
- short M0, short M1: transmission mode (In this project we use transmission mode)
- short M0, open M1: configuration mode (You can configure the lora via this mode)
- open M0, short M1: WOR mode
- open M0, open M1: deep sleep mode
-
Device Selection Jumper :
- Set is as MODE 2 to enable PICO to LORA Communication (This is also mention in the board)
-
For Board 1
- Stack Raspberry Pi Pico on both boards.
- Now connect USB Cable on USB Port of Pico 1.
- Open Thonny IDE and Choose interpreter as MicroPython (Raspberry Pi pico).

- Save this firmware.uf2 in the pico by dragging this file to pico
- Now create a file "Lcd1_14driver.py" as the same content from PICO LORA Expansion's GitHub repository in thorny ide, and save it in the root location of the first Raspberry Pi Pico with same name "Lcd1_14driver.py" (without quotes).
- we have two codes "tx_rx_lora1.py" and "tx_rx_lora2.py" both the codes are the same, only change in "txdata", in one of the codes "txdata = 123456" and in other code "txdata = abcdef", from this we can see the message send or receive clearly in both the pi lora hat.
- Copy and Paste or Open the "tx_rx_lora1.py" code in thonny ide..
- Click on green play button to run example of Pico LORA Expansion on Board 1, You can either save this file on root location of PICO or on your Computer drive.
For Board 2
- Stack Raspberry Pi Pico on both boards.
- Now connect USB Cable on USB Port of Pico 2.
- Open Thonny IDE and Choose interpreter as MicroPython (Raspberry Pi pico).
- Now Create a file "Lcd1_14driver.py" as same content from PICO LORA Expansion's GitHub repository in thonny ide, and save it in the root location of second Raspberry Pi Pico with the same name "Lcd1_14driver.py" (without quotes).
- Copy and Paste or Open "tx_rx_lora2.py" code in thonny ide.
- Click on green play button to run example of Pico LORA Expansion on Board 2, You can either save this file on root location of PICO or on your Computer drive.
Once setup both board successfully, you can notice that both board are sending text to each other You can change below variable to change transmitting text :
txData = b'hello world'
Put your text between single quote.
In this folder you see two application
-
Pico Lora Broadcast (with LCD display), In this folder you see three files
- transmitter.py -> run this file to broadcast the data (any data eg: sensor data,any string and message etc)
- receiver.py -> run this file to receive broadcast data from other lora
- st7789.py -> this is the lcd library file
-
Pi Lora Homeautomation (with LCD display), In this folder you see three files
- lora_rx_automation.py.py
- lora_tx_automation.py.py
- Lcd1_14driver.py ->this is the lcd library file
- GatePi 4Channel
- GatePi 8channel
- RangePi
- LoRA HAT for RPi
- PICO LoRa Expansion*
You will simply need to make one device to work as reciever and another one is as a transmitter. So that you can communicate to each other and this can be done with any of our LoRa products mentioned above. For working with our other products please follow the below link:
- GatePi 4Channel https://github.com/sbcshop/GatePi-4CH
- GatePi 8channel https://github.com/sbcshop/GatePi-8CH
- RangePi https://github.com/sbcshop/RangePi
- LoRA HAT for RPi https://github.com/sbcshop/Lora-HAT-for-Raspberry-Pi
- PICO LoRa Expansion* (Itself)