
Library for testing React Native UI components and screens
$ npm install pixels-catcher --save-dev
or
$ yarn add pixels-catcher
The library depends on
react-native-save-view
which is used to convert View to base64 data and has native implementation.
Starting from RN 0.60 there is no need to link - Native Modules are now Autolinked, otherwise check
official react native documentation.
Note: react-native-save-view can be added to devDependencies of you project, otherwise auto-linking may not work. Check the version in package.json
Create new entry file, for example, indexSnapshot, and import
registerSnapshot, runSnapshots and Snapshot from pixels-catcher:
import {
  registerSnapshot,
  runSnapshots,
  Snapshot,
} from 'pixels-catcher';
After that create the snapshot component, which should extend Snapshot and
implement static snapshotName and renderContent method. Be sure that your
component can accept collapsable property, otherwise React can make an
optimization and drop the view. The implementation can be:
class AppSnapshot extends Snapshot {
  static snapshotName = 'AppSnapshot';

  renderContent() {
    return (<App />);
  }
}
after that register AppSnapshot component:
registerSnapshot(AppSnapshot);
and trigger runSnapshots which will register the application component and
run all snapshots:
runSnapshots(PUT_YOUR_APP_NAME_HERE);
Snapshots testing will be started as soon as the application is started.
Each Snapshot gets onReady property that is triggered after all
interactions (InteractionManager) are completed. In case if it is not enough, which can be some network requests, etc., it is possible to do:
- register animations by creating an interaction 'handle' and clearing it upon completion
- override
componentDidMountof theSnapshotand callonReadywhenever you need it.WebViewTestin demo project for more details
Register your component and Navigation.setRoot using registerComponent
property in runSnapshots:
runSnapshots(appName, {
  registerComponent: snapshot => {
    Navigation.registerComponent(appName, () => snapshot)

    Navigation.events().registerAppLaunchedListener(async () => {
      Navigation.setRoot({
        root: {
          stack: {
            children: [
              {
                component: {
                  name: appName,
                },
              },
            ],
          },
        },
      })
    })
  },
})
In case if some children components use useNavigation hooks, it might be necessary to use NavigationContainer. To do that use getRootElement config, which is available in the config.
Example:
import { NavigationContainer } from '@react-navigation/native';
import { createStackNavigator } from '@react-navigation/stack';

const Stack = createStackNavigator();

function getRootElement(SnapshotsContainer) {
  const RootElement = ({children}) => (
    <NavigationContainer>
      <Stack.Navigator>
        <Stack.Screen
          name="SnapshotsContainer"
          options={{ headerShown: false, title: '' }}
          component={SnapshotsContainer} />
      </Stack.Navigator>
    </NavigationContainer>
  )
  return RootElement;
}

runSnapshots(appName, { baseUrl, getRootElement });
There are two options to define config:
- Using
pixels-catcher.jsonfile in the root of the project - Using
package.jsonfile with new propertyPixelsCatcher
And both of these two options should describe the configuration according to the following format:
PixelsCatcher: {
  PLATFORM: {
    ...SHARED_CONFIGURATION,
    CONFIGURATION: {
      ...CONFIGURATION_SPECIFIC
    }
  },
  logLevel: number,
  timeout: number,
  canStopDevice: boolean
}
where
PLATFORMcan beandroidoriosCONFIGURATIONis a configuration with the following properties:activityName- (Android only) Activity name, example: com.demo.MainActivity.appFile- (Optional) Path to apk file on android or app folder on iOS, example: ./app/build/outputs/apk/debug/app-debug.apkdeviceName- Device name, for example emulator: Nexus_5X or iOS: iPhone 8 PlusdeviceParams- (Optional) Array of emulator params like -no-audio, -no-snapshot, -no-window, etc.physicalDevice- (Optional) Boolean value that indicates if real device should be used (iOS devices are not supported yet)packageName- Android package name, example: com.demo*. iOS bundle identifier, example: org.reactjs.native.example.demosnapshotsPath- Path to snapshots, example: ./snapshotsImagesport- Server port. Default value is3000locale- Locale to be used, for exampleuk-UA,nl-NL, etc. At this moment supported only on iOS simulators. (Pull request welcome for android implementation)
SHARED_CONFIGURATION. In case more that one configurations exists, shared parameters can be moved here.logLevel- log levels:e,w,i,d,v. This corresponds to ERROR, WARN, INFO, DEBUG, VERBOSEtimeout- tests timeout, with default value 2500ms. If timeout is reached, tests will fail automaticallycanStopDevice[Optional] Boolean parameter that allows to stop device (used to restart simulator/emulator). If set to false, the runner will start a new simulator/emulator if none is started. If a simulator/emulator is already started, it will be used for tests. The runner will also stop the device after tests. If set to "false" it is possible that wrong device will be used!. Default value istrue.
Example for package.json configuration (or check
demo project):
"PixelsCatcher": {
  "android": {
    "activityName": "MainActivity",
    "deviceName": "Nexus_5X",
    "packageName": "com.rumax.pixelscatcher.testapp",
    "snapshotsPath": "./snapshotsImages",
    "debug": {
      "deviceParams": ["-no-audio", "-no-snapshot"],
      "appFile": "./android/app/build/outputs/apk/debug/app-debug.apk"
    },
    "release": {
      "deviceParams": ["-no-audio", "-no-snapshot", "-no-window"],
      "appFile": "./android/app/build/outputs/apk/debug/app-debug.apk"
    }
  },
  "ios": {
    "deviceName": "iPhone 8 Plus",
    "packageName": "org.reactjs.native.example.testApp",
    "snapshotsPath": "./snapshotsImagesIOS",
    "dev": {},
    "debug": {
      "appFile": "./ios/build/Build/Products/Debug-iphonesimulator/testApp.app"
    }
  }
}
To run android emulator, emulator command is used. It has to be defined in the system PATH or an ANDROID_EMULATOR system variable can be used to specify it. If none is defined, it will try to fallback to ~/Library/Android/sdk/emulator/emulator on mac
There are two options to run UI snapshots:
-
Using the generated
apkfile, provided via theappFile. In this case pixels-catcher will open android emulator, installapkfile, execute all the tests and will provide a report at the end. This scenario can be used to integrate the screenshot testing with CI. -
In cases
appFileis not defined, the development mode will be used. This means that only the server will be started and the application should be started manually. This scenario can be used to debug snapshots, create new reference images, etc.
To run tests execute the following command:
$ ./node_modules/.bin/pixels-catcher android debug
By default the index.android.js file is used which refer to your application.
To fix it, in android/app/build.gradle add the following config:
project.ext.react = [
    entryFile: System.getProperty("entryFile") ?: "index.js",
    bundleInDebug: System.getProperty("bundleInDebug") ? System.getProperty("bundleInDebug").toBoolean() : false
]
And generate the apk:
cd android && ./gradlew assembleDebug -DentryFile="indexSnapshot.js"
Same as android there are two options to run UI snapshots:
-
Using the generated app, provided via the
appFile. In this case pixels-catcher will open iOS simulator, installapp, execute all the tests and will provide a report at the end. This scenario can be used to integrate the screenshot testing with CI. -
In cases
appFileis not defined, the development mode will be used. This means that only the server will be started and the application should be started manually. This scenario can be used to debug snapshots, create new reference images, etc.
To run tests execute the following command:
$ ./node_modules/.bin/pixels-catcher ios debug
To make a valid app you will need to do the following actions:
- Set the
FORCE_BUNDLINGenvironment variable, which is required to generate a bundle file - Set
RCT_NO_LAUNCH_PACKAGERto ignore the packager - Use different entry file which includes only snapshots or some flag that will switch your app to "testing" mode
You can also check the demo project and check the required changes.
While android emulator or iOS simulator is able to work with localhost with default values http://10.0.2.2:3000 for android and http://127.0.0.1:3000 for iOS, using the real device will require connecting to the server by real IP. To make it possible, pixels-catcher allows to define it using the baseUrl property that is passed to the runSnapshots method:
const baseUrl = 'http://127.0.0.1:3000';

// Snapshots implementation

runSnapshots(appName, { baseUrl });
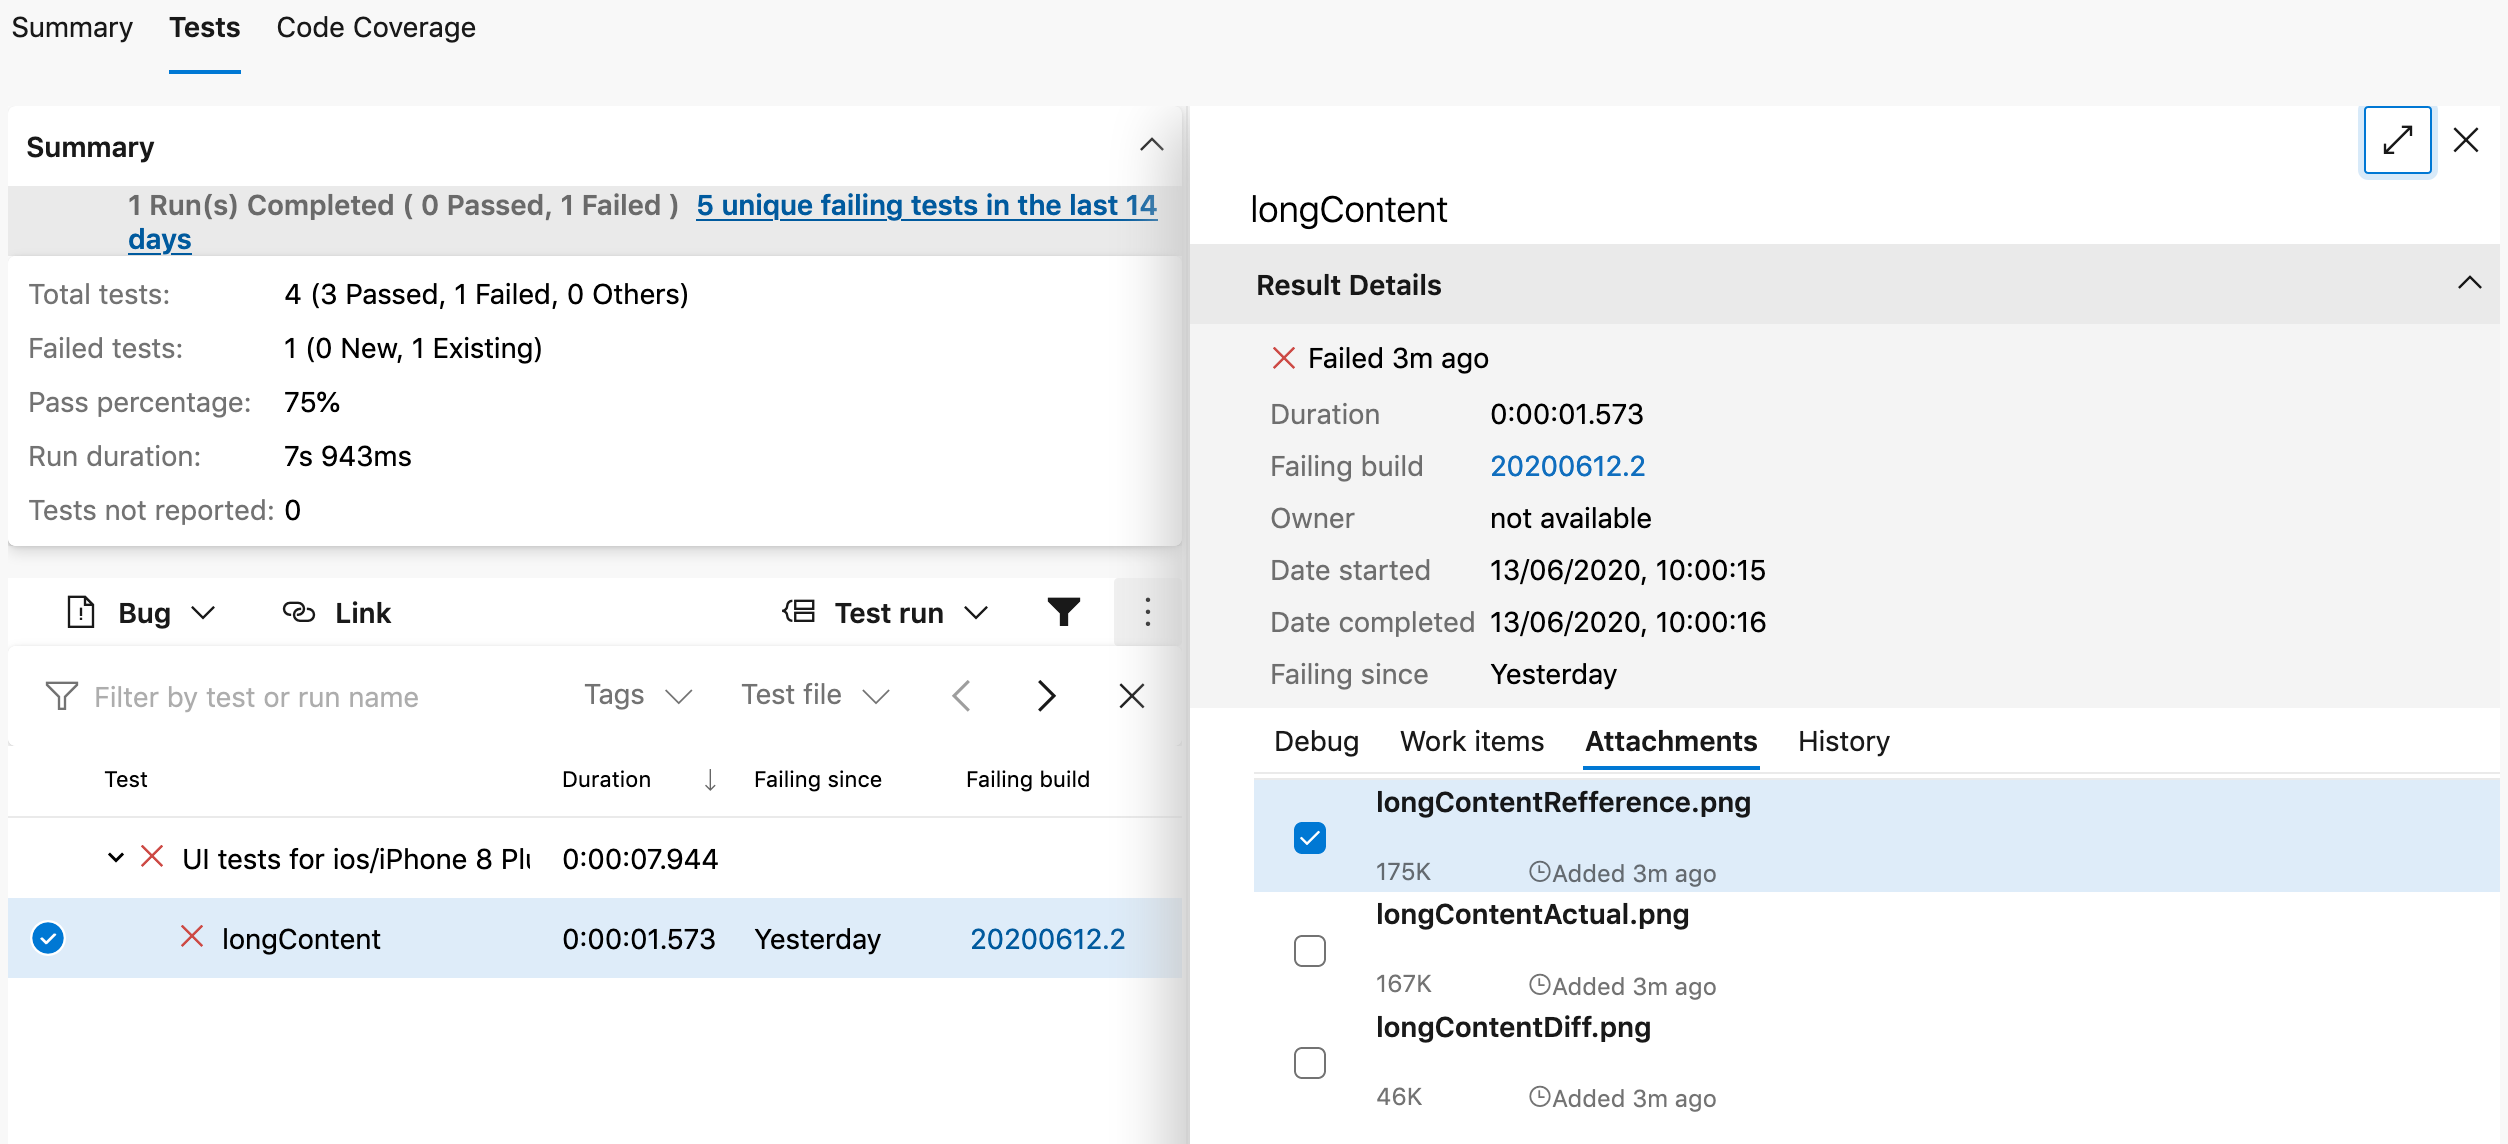
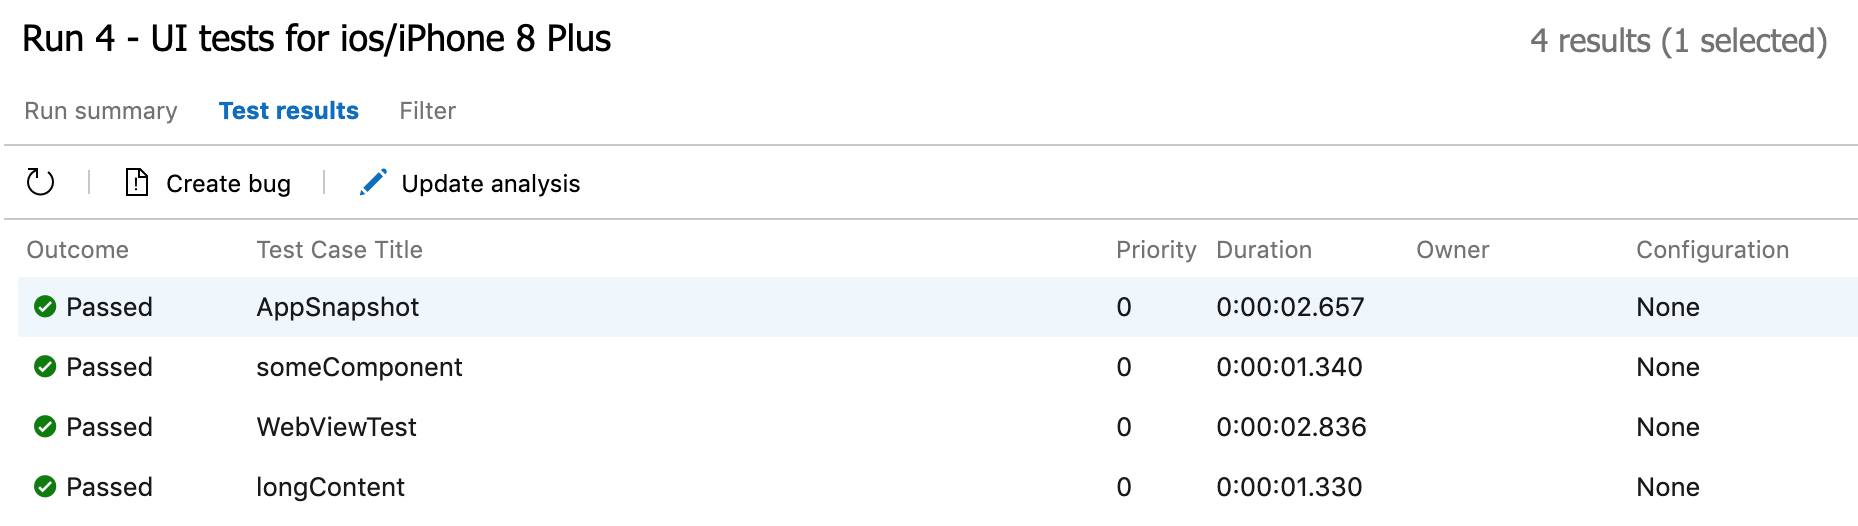
Each run of tests produces a JUnit test report that is generated and available in junit.xml file. For integrating it with Azure DevOps, follow the Azure DevOps and React Native UI testing article that describes how to automate iOS testing or Azure DevOps and React Native UI testing part 2 - Android for Android.
JUnit test report does not specify attachments, but to upload attachments to test report use third parameter azureAttachments. This can be done with azure task:
script: ./node_modules/.bin/pixels-catcher ios debug azureAttachments
  condition: failed()
  env:
    SYSTEM_ACCESSTOKEN: $(System.AccessToken)
  workingDirectory: '$(Build.SourcesDirectory)/demo'
  displayName: 'Upload screenshots'
that has to be executed after PublishTestResults@2 task. In this case the pixels-catcher will be started with the same parameters that were used for tests and will upload attachments for filed tests.
Each run of the tests collects logs for iOS (ios_logs.log) or android (android_logs.log) that can be used for further analysis of failed tests.
Check the demo which includes an example how the snapshots can be done and also has some useful scripts that can be used to integrate with CI.
Log report:
==> All tests completed: <==
┌─────────┬──────────────────────────────┬──────────┬───────┬────────────┬────────────────────────────────────┐
│ (index) │             name             │  status  │ time  │ renderTime │              failure               │
├─────────┼──────────────────────────────┼──────────┼───────┼────────────┼────────────────────────────────────┤
│    0    │        'AppSnapshot'         │ 'PASSED' │ 0.909 │    0.13    │                 ''                 │
│    1    │ 'AppSnapshotWithWrongRefImg' │ 'FAILED' │ 1.116 │   0.054    │ 'Files mismatch with 5088 pixels'  │
│    2    │       'someComponent'        │ 'PASSED' │ 0.684 │   0.019    │                 ''                 │
│    3    │        'WebViewTest'         │ 'FAILED' │ 3.123 │   2.697    │ 'Files mismatch with 19930 pixels' │
│    4    │        'longContent'         │ 'PASSED' │ 0.793 │   0.017    │                 ''                 │
└─────────┴──────────────────────────────┴──────────┴───────┴────────────┴────────────────────────────────────┘

==> Summary: <==
┌─────────┬───────────────────┬────────────────────────┐
│ (index) │         0         │           1            │
├─────────┼───────────────────┼────────────────────────┤
│    0    │   'Total tests'   │           5            │
│    1    │  'Passed tests'   │           3            │
│    2    │  'Skipped tests'  │           0            │
│    3    │  'Failed tests'   │           2            │
│    4    │ 'Min render time' │  '17ms (longContent)'  │
│    5    │ 'Max render time' │ '2697ms (WebViewTest)' │
└─────────┴───────────────────┴────────────────────────┘
==> Failed tests: <==
┌─────────┬──────────────────────────────┐
│ (index) │            Values            │
├─────────┼──────────────────────────────┤
│    0    │ 'AppSnapshotWithWrongRefImg' │
│    1    │        'WebViewTest'         │
└─────────┴──────────────────────────────┘
junit report:
<?xml version="1.0" encoding="UTF-8"?>
<testsuites name="UI tests for ios/iPhone 8 Plus" tests="4" skipped="0" errors="0" failures="0" time="4261" >
  <testsuite name="UI tests for ios/iPhone 8 Plus" tests="4" skipped="0" errors="0" failures="0" time="4261" >
    <testcase classname="AppSnapshot" name="AppSnapshot" time="989">
    </testcase>
    <testcase classname="someComponent" name="someComponent" time="738">
    </testcase>
    <testcase classname="WebViewTest" name="WebViewTest" time="1678">
    </testcase>
    <testcase classname="longContent" name="longContent" time="856">
    </testcase>
  </testsuites>
</testsuites>
Azure Devops integration result
- If you think that something is missing or would like to propose new feature, please, discuss it with the author
- Please, ⭐️ the project. This gives the confidence that you like it and a great job was done by publishing and supporting it 🤩