
CometChat Flutter UI Kit is a collection of custom UI Components designed to build text , chat features in your application.
The UI Kit is developed to keep developers in mind and aims to reduce development efforts significantly

Before you begin, ensure you have met the following requirements:
✅ You have Android Studio or Xcode installed in your machine.
✅ You have a Android Device or Emulator with Android Version 5.0 or above.
✅ You have a IOS Device or Emulator with IOS 11.0 or above.
✅ You have read CometChat Key Concepts.
To setup Flutter Chat UI Kit, you need to first register on CometChat Dashboard. Click here to sign up.
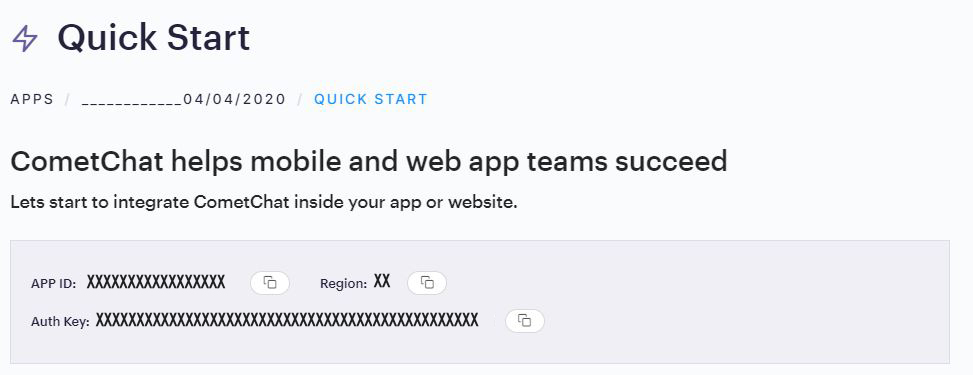
- Create a new app: Click Add App option available → Enter App Name & other information → Create App
- You will find
APP_ID,AUTH_KEYandREGIONkey at top in QuickStart section or else go to "API & Auth Keys" section and copy theAPP_ID,AUTH_KEYandREGIONkey from the "Auth Only API Key" tab.
Step 1 - To use this plugin, add flutter_chat_ui_kit as a dependency in your pubspec.yaml file.
flutter_chat_ui_kit: |
Step 2- add the following code to podfile inside IOS section of your app
post_install do |installer|
  installer.pods_project.targets.each do |target|
    flutter_additional_ios_build_settings(target)
    <COPY FROM HERE------------>
    target.build_configurations.each do |build_configuration|
    build_configuration.build_settings['EXCLUDED_ARCHS[sdk=iphonesimulator*]'] = 'arm64 i386'
    build_configuration.build_settings['ENABLE_BITCODE'] = 'NO'
    end
    <COPY TILL HERE------------>
  end
end |
Step 3- Open app/build.gradle file and change min SDk version to 33
        defaultConfig {
            // TODO: Specify your own unique Application ID (https://developer.android.com/studio/build/application-id.html).
            applicationId <YOUR_PACKAGE_NAME>
            minSdkVersion 33
            targetSdkVersion <TARGET_SDK_Version>
            versionCode flutterVersionCode.toInteger()
            versionName flutterVersionName
            }

lintOptions {
    disable 'InvalidPackage'
    disable "Instantiatable"
    checkReleaseBuilds false
    abortOnError false
} |
Step 4- For IOS change ios deployment target to 11 or higher
Step 5- For Ios navigate to your IOS folder in terminal or CMD and do pod install . For apple chip system use rositta terminal.
Step 5- To import use
import 'package:flutter_chat_ui_kit/flutter_chat_ui_kit.dart';
The init() method initializes the settings required for CometChat. We suggest calling the init() method on app startup, preferably in the init() method of the Home class.
import 'package:flutter_chat_ui_kit/flutter_chat_ui_kit.dart';


String appID = "APP_ID"; // Replace with your App ID
String region = "REGION"; // Replace with your App Region ("eu" or "us")
static const String authKey = "Auth key"; //Replace  with your auth key

 UIKitSettings authSettings = (UIKitSettingsBuilder()
          ..subscriptionType = CometChatSubscriptionType.allUsers
          ..region = region
          ..autoEstablishSocketConnection = true
          ..appId = appID
          ..apiKey = authKey)
        .build();

    CometChatUIKit.init(
            authSettings: authSettings,
            onSuccess: (String successMessage){
              debugPrint("Initialization completed successfully  $successMessage");
            },
            onError: (CometChatException e) {
              debugPrint("Initialization failed with exception: ${e.message}");
            }
); |
ℹ️ Note: Make sure to replace region, appID and authKey with your credentials. |
|---|
Once initialisation is successful, you will need to create a user. You need to user createUser() method to create user on the fly.
import 'package:flutter_chat_ui_kit/flutter_chat_ui_kit.dart';


User user = User(uid: "usr1", name: "Kevin");

CometChatUIKit.createUser(user, onSuccess: (User user) {
   debugPrint("Create User succesfull ${user}");
}, onError: (CometChatException e) {
   debugPrint("Create User Failed with exception ${e.message}");
});
|
Once you have created the user successfully, you will need to log the user into CometChat using the login() method.
String UID = "user_id"; // Replace with the UID of the user to login

final user = await CometChat.getLoggedInUser();//checking if already logged in
if (user == null) {

  await CometChatUIKit.login(UID, onSuccess: (User loggedInUser) {
         debugPrint("Login Successful : $user" );
       }, onError: (CometChatException e) {
         debugPrint("Login failed with exception:  ${e.message}");
       });
}else{
//Already logged in
} |
| ℹ️ Note - The login() method needs to be called only once. Use this method while development |
|---|
📝 Please refer to our Developer Documentation for more information on how to configure the CometChat Pro SDK and implement various features using the same.
-
To read the full documentation on Flutter UI Kit integration visit our Documentation .
-
Facing any issues while integrating or installing the UI Kit please connect with us via real time support present in CometChat Dashboard..
Thanks to the following people who have contributed to this project:
⚔️ @shantanukhare 🛡
⚔️ @nabhodiptagarai 🛡
Contact us via real time support present in CometChat Dashboard.