In this hands-on workshop, you will learn how to:
- Create and render multiple React components
- Work with component data, including props and state
- Reuse an open source component
- Integrate REST services into your React application
We will be using the following resources
We will use https://codesandbox.io to code this workshop without the need of any software or library installations.
You can also follow along the exercises with with these workshop slides
- Exercise 1: Create your first React component
- Exercise 2: Pass custom data to a component using props
- Exercise 3: Render multiple components
- Exercise 4: Use State to manage how your component renders & behaves
- Exercise 5: Use controlled components in React
- Exercise 6: Use Open Source Components
- Exercise 7: Use of Lifecycle Methods
- Exercise 8: Connect to a REST service
At the beginning of each exercise, there is a "Starting Point" codesandbox project. At the end of each exercise there is a "Solution" codesandbox project. Use these to quickly get caught up with the workshop if there are any issues during an exercise. For example, if you encounter an issue with your code during exercise 3 and the workshop moves on to exercise 4. You will be able to use exercise 4 "Starting Point" project to continue on with the workshop and overcome the issues with your previous code. The "Solution" to Exercise 3 is identical to the "Starting Point" of Exercise 4.
Start with the Starting Point from this exercise. Codesandbox simplifies and hides the build configuration so that only React code is the main focus. This makes it possible to begin coding right away!
Starting point: https://codesandbox.io/s/0y2vm4mmvw
-
Open the "Starting Point" project and there is html code for a simple web page. In the the
index.jsfile, change the title to"Hello San Diego JS"by editing the text on the<h1>tag. You will see that a save button appears on the top menu bar, click it to save the project to your own profile.

-
Convert the title
<h1>tag into its own react component. On the left hand panel, click on the "src" folder and then click on the "New File" icon that appers on the menu right hand side to create theheader.jsfile.
Add the following code in
header.jsand then save the file:// src/header.js import React from "react"; class Title extends React.Component { render() { return <h1>Bitfolio</h1>; } } class SubTitle extends React.Component { render() { return <div>Track your bitcoin net worth</div>; } } export class Header extends React.Component { render() { return ( <div> <Title /> <SubTitle /> </div> ); } }
There are actually three components being created in this file. Each class that extends
React.Componentis a component. TheTitleandSubTitlecomponents are used the render method of theHeadercomponent. The way that the components are written like html tags is what JSX is all about. This workshop isn't going to cover the details of JSX, but just know that it allows you to reuse your components as though they were html elements themselves. Finally, theHeadercomponent is exported so that it can be used in other files. -
In
index.js, import theHeadercomponent fromsrc/header.js. Add the following to the top of the file with the rest of the imports.// src/index.js import { Header } from "./header";
Replace the
<h1>title tag with theHeadercomponent.// src/index.js <div style={styles}> <Header /> <h2>Start editing to see some magic happen {"\u2728"}</h2> </div>
The
Headercomponent now displays on the web page. Any changes made to theHeadercomponent will update and be rendered in the browser window. -
Now do the same with the footer. Create a new file called
footer.jsunder thesrcdirectory. Add the following code tofooter.jsand then save the file:// src/footer.js import React from "react"; const styles = { margin: "50px" }; export class Footer extends React.Component { render() { return ( <footer style={styles}>Created just for: (your name) on 6/3/2018</footer> ); } }
Import the
Footercomponent inindex.js. Add the following code:// src/index.js import { Footer } from "./footer";
Replace the
<h2>tag with theFootercomponent:// src/index.js <div style={styles}> <Header /> <Footer /> </div>
The
HeaderandFooterof the app are now extracted from the main page. If there were more pages, importing and reusing those same components would render the same header and footer on each page.

Solution: https://codesandbox.io/s/k0x77oymvr

Starting point: https://codesandbox.io/s/481vm60p94
Components can dynamically render different data that is passed into them. Data passed into a component is called a prop. Using props allows Components to act like a template that defines a structure of html and other Components with placeholders for data that will be passed in.
-
Create a new folder
portfoliounder thesrcfolder by clicking on theNew Foldericon right next to theNew Filebutton. Inside theportfoliofolder, create a file calledindex.js. Add the following code:// src/portfolio/index.js import React from "react"; import { data } from "../data"; export class Portfolio extends React.Component { render() { const price0 = data[0].ticker.price; const time0 = data[0].timestamp; const price1 = data[1].ticker.price; const time1 = data[1].timestamp; return ( <div> ${price0} USD @ {time0} ms <br /> ${price1} USD @ {time1} ms </div> ); } }
This creates a new component called
Portfolio.datais imported from the existingdata.jsfile which is prepulated with price point data of Bitcoin.Right now, the render method just returns a
divwith a line of text, followed by a break, followed by another line of text. Each line of text shows the price at a certain time. It is easy to already see that rendering prices and times this way will follow a pattern. Since it follows a pattern, it is a great candidate for code reuse as a Component. -
Import the
Portfoliocomponent insrc/index.js. Add the following code to the top of the file with the rest of the imports:// src/index.js import { Portfolio } from "./portfolio";
Add the
Portfoliocomponent between theHeaderandFooterin the render method ofApp:// src/index.js <div style={styles}> <Header /> <Portfolio /> <Footer /> </div>
-
Create a
Pricecomponent that renders just one line of the price points that is being rendered inPortfolio. Create a new file namedprice.jsinside theportfoliofolder and add the following code:// src/portfolio/price.js import React from "react"; export class Price extends React.Component { render() { return ( <div> ${this.props.price} USD @ {this.props.time} ms </div> ); } }
Inside of the
divthere is code that looks like{this.props.price}. The curly braces allow you to inject the value of a variable into what is rendered on the screen.this.props.priceis a variable that thePricecomponent is expecting will be passed into it when another render method calls it. The same goes for the variablethis.props.time. This creates a simple template of adivthat renders some text where the variables forpriceandtimecan be passed in as data from a parent component. -
Import the
Pricecomponent in thePortfolio. Add the following code to the top of the file with the rest of the imports:// src/portfolio/index.js import { Price } from "./price";
Use the
Pricecomponent to replace the hard-coded lines of text in the render method of thePortfoliocomponent:// src/portfolio/index.js <div> <Price price={price0} time={time0} /> <Price price={price1} time={time1} /> </div>
Differnt price and time variables are passed into each
Pricecomponent. Each individual component will render these values into the template defined by thePricecomponent's render method.
Solution: https://codesandbox.io/s/9zq8xk97qo

Starting point: https://codesandbox.io/s/xpyx0k4llz
It doesn't really make sense to type out the Price component for each instance of it if there are going to be a lot of data points. This exercise will show how to use an array of data to programmatically generate components and pass different props into each one.
-
In the
Portfoliocomponent, replace the hardcodedPricecomponents with an array of components generated from the javascriptArray.mapfunction:// src/portfolio/index.js import React from "react"; import { Price } from "./price"; import { data } from "../data"; export class Portfolio extends React.Component { render() { const prices = data.map((dataPoint, index) => { const price = dataPoint.ticker.price; const time = dataPoint.timestamp; return <Price key={`${index}-${time}`} price={price} time{time}/>; }); return <div>{prices}</div>; } }
This way, no matter how long the array of data is, all data points will be captured and turned into a React component that is rendered by
Portfolio.
Solution: https://codesandbox.io/s/rmvz66kvlm

Starting point: https://codesandbox.io/s/14x5xnq1z3
-
Create a
ProfitLosscomponent that recieves props from thePortfoliocomponent. Create a new file namedsrc/portfolio/profitLoss.jsand add the following code:// src/portfolio/profitLoss.js import React from "react"; export class ProfitLoss extends React.Component { render() { const numBitcoins = this.props.numBitcoins; const price = this.props.price; const startingPrice = this.props.startingPrice; const value = numBitcoins * price; const PL = numBitcoins * (price - startingPrice); return ( <div style={{ margin: "10px", textAlign: "left" }}> <div>Bitcoins Owned: {numBitcoins}</div> <div>Total Value: {value}</div> <div>P/L: {PL}</div> </div> ); } }
ProfitLossright now is just a simple component that takes some data as props, does some calculations with that data, and renders it to the screen. -
Go back to
src/portfolio/index.jsto import theProfitLosscomponent. Add the following code to the top of the file with the rest of the imports:// src/portfolio/index.js import { ProfitLoss } from "./profitLoss";
Add the
ProfitLosscomponent to the body of thePortfoliocomponent and pass data to it:// src/portfolio/index.js export class Portfolio extends React.Component { render() { const prices = data.map(dataPoint => { const price = dataPoint.ticker.price; const time = dataPoint.timestamp; return <Price price={price} time={time} />; }); return ( <div> <ProfitLoss numBitcoins={4} price={data[0].ticker.price} startingPrice={data[data.length - 1].ticker.price} /> {prices} </div> ); } }
The
ProfitLosscomponent is rendered with the number of bitcoins, the price from the 0th position of the array, and starting price as the last element in the array. -
Now add state to the
Portfoliocomponent. Add the following code to start using the state ofPortfolio:// src/portfolio/index.js export class Portfolio extends React.Component { state = { numBitcoins: 4 };
Send the state value for
numBitcoinsas the prop to theProfitLosscomponent:// src/portfolio/index.js <ProfitLoss numBitcoins={this.state.numBitcoins} price={data[0].ticker.price} startingPrice={data[data.length - 1].ticker.price} />
ProfitLossnow uses the state value of the portfolio for the number of bitcoins. So now if the value ofnumBitcoinsin the portfolio state ever changes, theProfitLosscomponent will automatically update.
Solution: https://codesandbox.io/s/m3xm33v54y

Starting point: https://codesandbox.io/s/oj6rlw9y3y
In React, input components (think user interaction) must have a defined behavior. The value that is displayed in a text box must be linked to a variable, and have a function that defines how updating that field works. Because the code defines all this behavior, these components are referred to as controlled components in React.
-
Add an input box that will control the number of bitcoins a user has. Add an input tag element and a handleChange event:
// src/portfolio/index.js export class Portfolio extends React.Component { state = { numBitcoins: 4 }; handleChange = evt => { this.setState({ numBitcoins: evt.target.value }); }; render() { const prices = data.map(dataPoint => { const price = dataPoint.ticker.price; const time = dataPoint.timestamp; return <Price price={price} time={time} />; }); return ( <div> <div> Bitcoins owned:{" "} <input type="text" value={this.state.numBitcoins} onChange={this.handleChange} /> </div> <ProfitLoss numBitcoins={this.state.numBitcoins} price={data[0].ticker.price} startingPrice={data[data.length - 1].ticker.price} /> {prices} </div> ); } }
-
Remove the old bitcoin number display from the
ProfitLosscomponent:// src/portfolio/profitLoss.js import React from "react"; export class ProfitLoss extends React.Component { render() { const numBitcoins = this.props.numBitcoins; const price = this.props.price; const startingPrice = this.props.startingPrice; const value = numBitcoins * price; const PL = numBitcoins * (price - startingPrice); return ( <div> <div>Total Value: {value}</div> <div>P/L: {PL}</div> </div> ); } }
The input next to "Bitcoins owned:" now controls the state for
numBitcoinson thePortfoliocomponent. Change it, and watch the values update automatically.
Solution: https://codesandbox.io/s/q3v8prrmw9

Starting point: https://codesandbox.io/s/ko60ryoj25
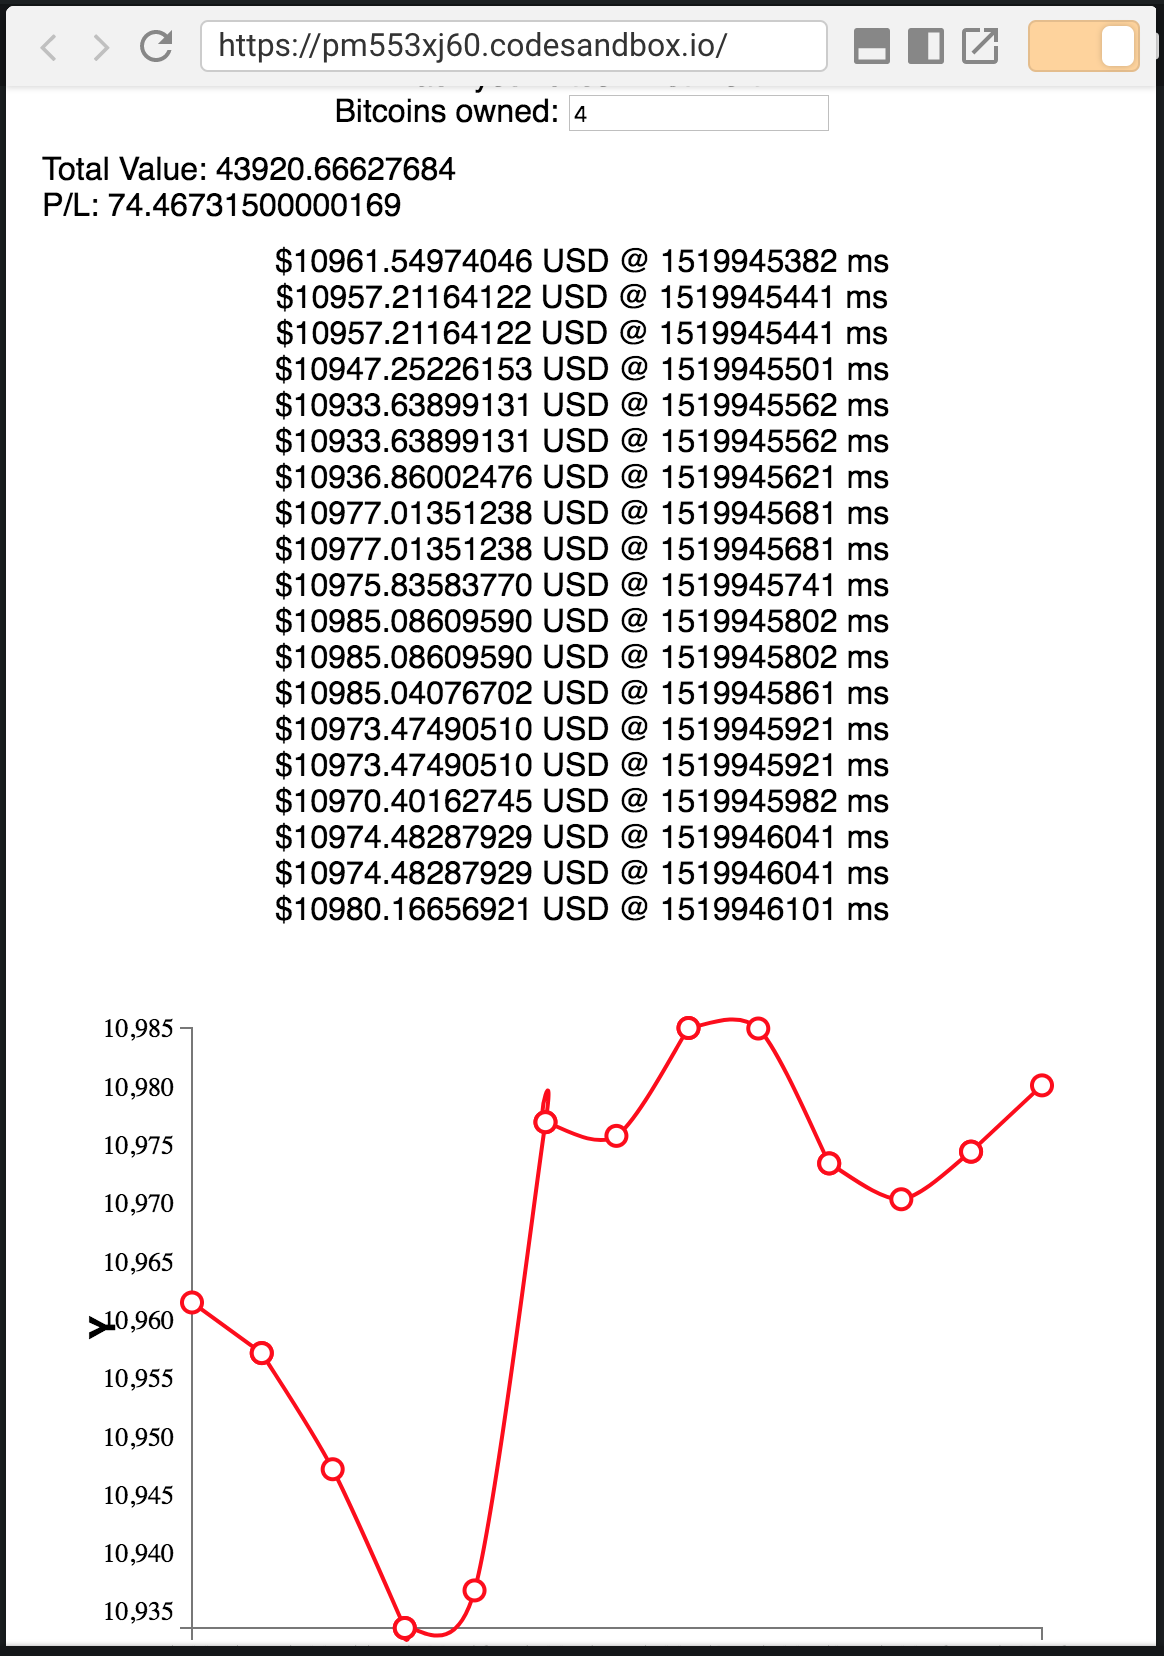
Since React is written as reusable components, open-source components can be installed as a node module and then imported into a project just like any other component. A line chart will go nicely with tracking the price of bitcoin. Do a google search for "react linechart" and this should be the first result. The API for the linechart component is documented on the npm page.
-
Prepare the data to send to the linechart component. To do that, create a new variable called
priceLinein thePortfolioand add data to it in the existing map function inportfolio/index.js:// src/portfolio/index.js render() { const priceLine = { color: "red", points: [] }; const priceData = []; const prices = data.map(dataPoint => { const price = dataPoint.ticker.price; const time = dataPoint.timestamp; priceLine.points.push({ x: time, y: price }); return <Price price={price} time={time} />; }); priceData.push(priceLine); return ( ...
-
Now that there is an array of data for
react-linechartto consume, add the module to your project and pass the data in as a prop.On the left hand panel, scroll down to the "dependencies" section and click to expand it. Scroll down until you see the
Add Dependencybutton and click it. Search forreact-linechart, once you see the right component, double click it.
-
Import the react-linechart component into the portfolio. Add the following code to the top of the
src/portfolio/index.jsfile with the rest of the imports.// src/portfolio/index.js import LineChart from "react-linechart"; import "../../node_modules/react-linechart/dist/styles.css";
The css file needs to be imported as well per the documentation of
react-linechart.Add the
LineChartcomponent to the body of the portfolio component and pass thepriceDataobject as thedataprop:// src/portfolio/index.js ... <ProfitLoss numBitcoins={this.state.numBitcoins} price={data[0].ticker.price} startingPrice={data[data.length - 1].ticker.price} /> {prices} <LineChart width={500} height={400} data={priceData} /> </div> ...
Solution: https://codesandbox.io/s/8kp8ol0p1l

Starting point: https://codesandbox.io/s/6l34rvw5ln
React Components have lifecycle hooks beyond just the render method. Lifecycle hooks can be used to control how a component behaves during certain phases of receiving prop and state updates.
-
Add the following code to see first hand how the
componentDidMountand thecomponentDidUpdatemethods work:export class Portfolio extends React.Component { state = { numBitcoins: 4 }; componentDidMount() { console.log("Portfolio component mounted"); } componentDidUpdate() { console.log("Portofolio component updated"); } ...
These methods are predefined lifecycle hooks supported by React. React supports more lifecycle hooks which are documented here.
The
componentDidMountfunction is only run once, when the component mounts. ThecomponentDidUpdatemethod runs every time the component needs to update. Changing the value in the input cause the component to do an update.
Solution: https://codesandbox.io/s/24z8qr4n8p

Starting point: https://codesandbox.io/s/x7xypj8874
-
Using everything that's been built so far, connect the app to a REST service. This will show how the app is reactive to data. Update the state and the
componentDidMountmethod, call the API and store it's data:// src/portfolio/index.js ... state = { numBitcoins: 4, data: [], startingPrice: 0 }; componentDidMount() { fetch("https://api.cryptonator.com/api/ticker/btc-usd") .then(res => { return res.json(); }) .then(data => { this.setState({ data: this.state.data.concat([data]), startingPrice: data.ticker.price }); }); } ...
-
This only fetches one data point. After the original
fetch, set an interval to run thefetchevery 40 seconds:// src/portfolio/index.js ... componentDidMount() { fetch("https://api.cryptonator.com/api/ticker/btc-usd") .then(res => { return res.json(); }) .then(data => { this.setState({ data: this.state.data.concat([data]), startingPrice: data.ticker.price }); }); setInterval(() => { fetch("https://api.cryptonator.com/api/ticker/btc-usd") .then(res => { return res.json(); }) .then(data => { this.setState({ data: this.state.data.concat([data]) }); }); }, 40000); } ...
And that’s it! In the
componentDidMountmethod an interval is created, so every 40 seconds, the API is requested and the data is stored in the portfolio state. At first the line chart will be blank, there will be no price points shown, and the P/L will be 0. This data will automatically populate over time and the app with update completely on it's own. Update the number of bitcoins owned and see that multiple pieces of changing data can interact very smoothly.Solution: https://codesandbox.io/s/pm553xj60

Thanks goes to these wonderful people (emoji key):
 rmontes 💻 |
This project follows the all-contributors specification. Contributions of any kind welcome!