(Cascaded Sunray Server And Rover Application)
CaSSAndRA is a Python server application that allows you to control the Ardumower (or Alfred) with the Sunray firmware. The server application runs on a separate computer and can communicate with the Sunray firmware in one of three ways:
- HTTP (Post requests)
- MQTT
- UART (serial port)
Installation and use of the app is at your own risk. I assume no liability for any damage caused by using the app. This is my hobby project, which doesn't have to work for you. Your robot must be equipped with an emergency stop switch. When operating the robot from the app, please always keep visual contact with the robot and in the event of unexpected behavior switch it off immediately using the emergency stop switch. If you agree, then proceed with the installation.
Installation for Linux-based operating systems (all commands are run in the terminal): First the repository has to be cloned. (Warning! In this example, ardumower is the username under which everything is installed. Replace ardumower with your username under which the system is running).
git clone https://github.com/EinEinfach/CaSSAndRA.git
Navigate to the cloned folder:
cd /home/ardumower/CaSSAndRA
Install the dependencies by entering the following in the terminal:
pip3 install -r /home/ardumower/CaSSAndRA/requirements.txt
after that you can go get some coffee first, because that can take a while. Please ensure that the installation completes without errors (warnings can be ignored).
If the operating system greets you with -bash: pip command not found, you still have to install pip:
sudo apt install python3-pip
Please check the library path of your pip installation with the following command:
python3 -m site --user-site
Please switch to the library path (e.g.). Attention with the 64bit system the folder lib64 can be called:
cd ./local/lib/python3.9/site-packages
Locate the dash_daq folder and go to it:
cd dash_daq
Copy the dash_daq.min.js file from the repository you cloned into the dash_daq libraries folder and replace the existing file:
cp /home/ardumower/CaSSAndRA/bugfix_dash_daq_min/dash_daq.min.js dash_daq.min.js
It turned out that Raspberry Pi OS 32bit (bullseye) in particular can cause problems when installing the Pandas library. It works much more smoothly with the 64-bit version. If you have problems with the installation on the Raspberry Pi OS, first check which version of Raspberry Pi OS is running on your single-board computer:
uname -r
If the answer is armv7l, then you have the 32-bit version. If the answer is aarch64, then you have a 64-bit version and the cause of the problem lies elsewhere.
For the 32-bit Raspberry OS version of bullseye, the following must be additionaly installed:
sudo apt install libatlas-base-dev libgeos-dev
Start CaSSAndRA for the first time (all commands except the last call (this is done in the browser) are executed in the terminal):
Go to the folder where your app.py file is located. If you haven't moved the folder after installation, then change to the folder as follows:
cd /home/ardumower/CaSSAndRA/CaSSAndRA
Start app with:
./app.py
At first time you will get follow message:
You are starting CaSSAndRA without an existing external data directory
CaSSAndRA stores your data (settings, maps, tasks, logs, etc) separate from the app
directory. This allows us to update the app without losing any data.

Configured data_path: /home/lex/.cassandra (missing)

If you continue, CaSSAndRA will:
 - Create /home/lex/.cassandra
 - Sync missing files from /src/data to /home/lex/.cassandra

Each time you run CaSSAndRA, only missing files are copied and existing files aren't
overwritten, so no data will be lost.

If this is the first time you are seeing this message, you can also:
 - Review the readme at https://github.com/EinEinfach/CaSSAndRA#cassandra-starten
 - enter python app.py --help on the command line
If you agree with creating a data path on suggested location just confirm start by pressing Y
The successful start is acknowledged with a few warnings and INFO Dash is running on xxx:8050:
2023-04-28 08:38:24 INFO Dash is running on http://0.0.0.0:8050/
* Serving Flask app 'app'
* Debug mode: off
2023-04-28 08:38:24 INFO Backend: Try initial HTTP request
Congratulations, the app has started successfully and you can access the app in the browser of your choice:
http://IP-des-Rechners:8050
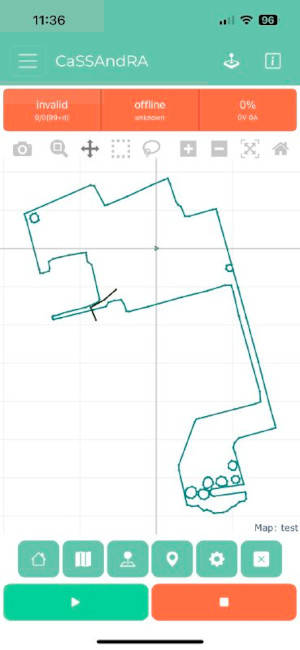
The app should now greet you with 3 red lights:
To stop cassandra press Strg+C
You can see all the options available when starting CaSSAndRA by executing:
python app.py --help
Usage: app.py [OPTIONS]

  Start the CaSSAndRA Server

  Only some Dash server options are handled as command-line options. All other
  options should use environment variables. Find supported environment
  variables here: https://dash.plotly.com/reference#app.run

Options:
  -h, --host TEXT                 [default: 0.0.0.0]
  -p, --port INTEGER              [default: 8050]
  --proxy TEXT                    format={{input}}::{{output}} example=http://
                                  0.0.0.0:8050::https://my.domain.com
  --data_path TEXT                [default: /Users/<username>/.cassandra]
  --debug                         Enables debug mode for dash application
  --app_log_level [DEBUG|INFO|WARN|ERROR|CRITICAL]
                                  [default: DEBUG]
  --app_log_file_level [DEBUG|INFO|WARN|ERROR|CRITICAL]
                                  [default: INFO]
  --server_log_level [DEBUG|INFO|WARN|ERROR|CRITICAL]
                                  [default: ERROR]
  --pil_log_level [DEBUG|INFO|WARN|ERROR|CRITICAL]
                                  [default: WARN]
  --init                          Accepts defaults when initializing app for
                                  the first time
  --help                          Show this message and exit.
The data_path option is important to review. We are now storing your data and configuration in your user folder ~/.cassandra. This will persist this data separate from the application, so that you can update the app without losing data.
Custom port
python app.py --port=8060
Using custom data location:
python app.py --data_path=/Users/myusername/my_app_data/cassandra
Run two instances of CaSSAndRA:
- Terminal 1:
python app.py(data in ~/.cassandra) - Terminal 2:
python app.py --data_path=/Users/myusername/.cassandra2(data in ~/.cassandra2)
To allow CaSSAndRA start each time on system boot you can create a deamon service. First you have to check is daemon service (systemd) is available on your OS:
systemd --version
If you get a message that systemd was not found, then it needs to be installed or it is not supported by your operating system. Then please cancel at this point.
In next step we create a service file:
sudo nano /etc/systemd/system/cassandra.service
Copy and paste the follow content in new file:
[Unit]
Description=CaSSAndRA
After=multi-user.target

[Service]
#your username!
User=ardumower
Type=simple
Restart=always
#ExecStart: your app.py directory!
ExecStart=python3 /home/ardumower/CaSSAndRA/CaSSAndRA/app.py
[Install]
WantedBy=multi-user.target
Save new file: Strg+o confirm with return and exit: Strg+x
Reload systemd:
sudo systemctl daemon-reload
Activate cassandra.service:
sudo systemctl enable cassandra.service
Start cassandra.service:
sudo systemctl start cassandra
Check current status:
sudo systemctl status cassandra
Terminal output(important is state of 'Active' it should be active (running)):
cassandra.service - CaSSAndRA service
 Loaded: loaded (/etc/systemd/system/cassandra.service; enabled; vendor preset: enabled)
 Active: active (running) since Thu 2023-04-27 07:48:22 CEST; 1 day 5h ago
Change to the project directory. Example: cd /Users/<username>/projects/CaSSAndRA
Build the docker image
docker build . -t cassandra
This example is fine to use with MacOS, where docker automatically handles user permissions.
docker run -it \
	-v /Users/<myusername>/.cassandra:/home/cassandra/.cassandra \
	cassandra
This example shows how you can:
- use a different port (
8080) on your host system and map that to the default cassandra port of8050. - pass in an environment variable
TZfor the timezone (see options) - pass in Host user and group ids
- The dockerfile creates a
cassandrauser for everyone - This means the data_path in the container will be
/home/cassandra/.cassandra - The entrypoint script will then update the
cassandrauser within the container to use the same user and group ids as the host system
- The dockerfile creates a
docker run -it \
	-p 8080:8050 \
	-v /path/to/my/data:/home/cassandra/.cassandra \
	-e TZ=Europe/Berlin \
	-e HOST_UID=$(id -u) \
	-e HOST_GID=$(id -g) \
	cassandra
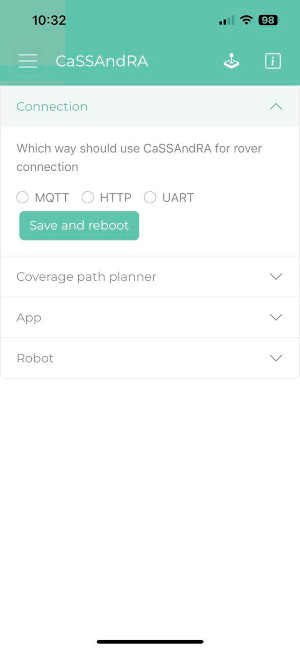
Go to the "Settings" page or if you on mobile device click on burger menu and then "Settings". Go to "Connection" and choose one of possiblities. Input your specific data (please keep syntax suggestion alos for your data). At the end click on "save and reboot" and let cassandra restart backendserver:
If you have returned to the homepage (e.g. by clicking on CaSSAndRA in the navbar) and the connection worked, some traffic lights should no longer be red.
Select "Coverage path planner" on "Settings" page. Here you can set default planner settings which are used after server restart.
Pattern: Selection of [lines, squares, rings]
Mow width: positive value [0.0 - 1.0]
Mow angle: positive value [0 - 359]
Distance to border: positive value [0 - 5]. Defines distance to border for area to mow calculation (Distance to border * Mow width)
Mow cut edge border (laps): positive value [0 - 5]. Defines which lap should be mowed (first lap: border, second lap: border - mow width, third lap: border - 2*mow width)
Mow area: [on, off]. Should the area to be mowed
Mow cut edge exclusion: [on, off]. Should exclusions and border to be mowed
Mow cut edge border in ccw: [on, off]. Should exclusions and border to be mowed counter clockwise
Select “App” under Settings. Here you have the option to configure some frontend settings.
-
Mower picture: Select one image what should be shown in the App
-
Max age for measured data: Every day on 00:00 CaSSAndRA removes unneccasarry data from storage. Confugure here how long the measured data should be stored
-
Time to wait before offline: Configure here how long should CaSSAndRA wait before state is changed to offline. If you using CaSSAndRA connection over HTTP or MQTT and you WiFi coverage not the best one increase the time to avoiding toggling of state message
-
Min charge current: Configure here from which charge current is rover in charging state (Attention: charge current has to be negative value)
-
Voltage to SoC: Conversion of voltage to state of charge (simple linear interpolation). The recommended voltage min (0%) is the shutdown voltage from the config.h of your sunray FW +0.5V. The recommended voltage max (100%) is the final charging voltage from the config.h of your sunray FW -0.5V. The SoC display has no controlling function and only serves as an overview on the home page
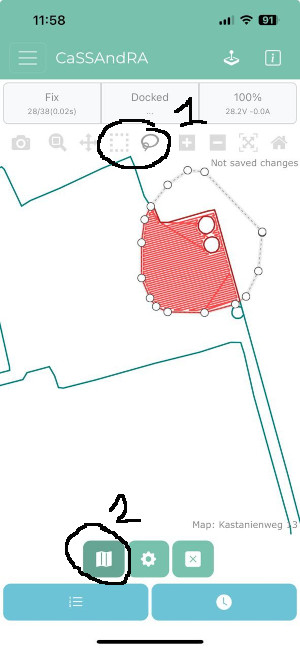
A new map or existing map can be created/modified on the "Mapping" page.
In the app click on “Mapping”. To change an existing map, select the desired map in the "select map" area. Now you can start editing. An additional backup of the existing map before processing is not necessary. After completing the map, you will be asked to save the edited map in a separate slot. To create a new map, click on the file icon with the plus in the "select map" section.
Position the robot at the location where a new point is to be recorded and press "add new point" to add a new coordinate or "remove last point" to delete the last set coordinate.
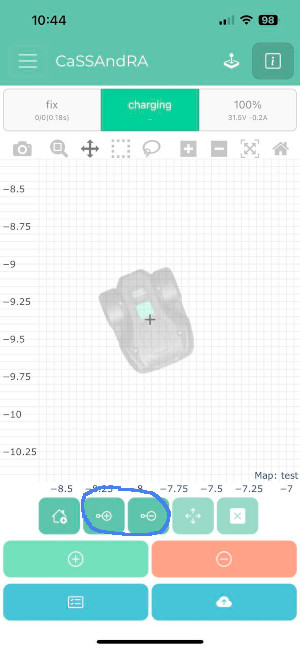
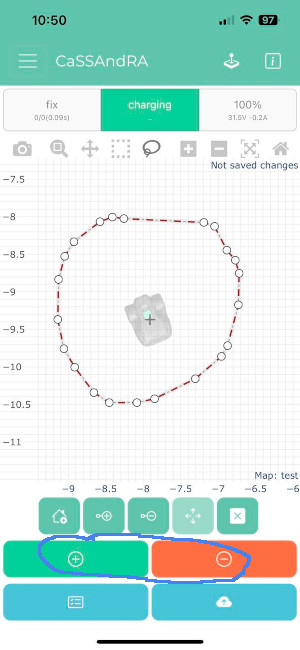
Once the figure is finished, it can be added to the area (perimeter) or removed from the area (exclusion). To do this, click on the corresponding buttons.
To create a figure, you can use the well-known tools Box-Select or Lasso-Select. For example, deleting an exclusion also works by circling the exclusion with lasso select and selecting add to area. The new figure is added to the perimeter and covers over the existing exclusion. The Lasso-Select selection and Box-Select selection can be removed by double click event if corespondent tool selected
To record a dock path, select the symbol with the house. The new dock path can then be recorded using the “add new point” and “remove last point” buttons. When a new dock path has been recorded or an existing one has been revised, CaSSAndRA notices it and when saving the new perimeter, CaSSAndRA automatically moves the last dock point by 10cm in the docking direction to ensure safe docking. This feauture isn't active if you modify dock path in edit or moving mode.
Edit mode: Select a point what you want to modify. Related figure chages his color and selected point is also marked. Now you can remove the point by clicking remove point or you can add a new point to the figure. The new point is added between current point and point before or next point
Moving mode: Has to be descipted...
If you are finished. Click on the cloud with plus button in "Select map" section and give an unique name for new/changed map.

It is possible to import a map that was created in the Sunray app.
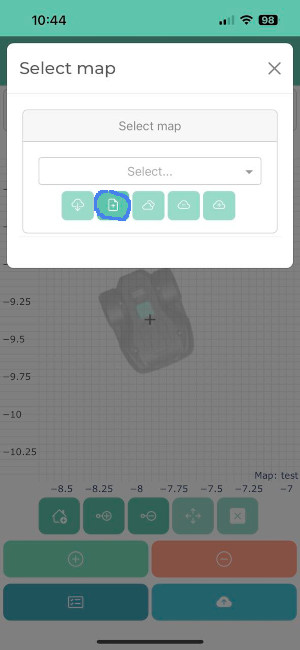
In the “Import map” area, click on the button with the “txt file icon”.
Choose your Sunray export file.
You can now select the map you want in the drop-down menu.
A preview of the map is displayed in red with the note "From upload (please save first)".
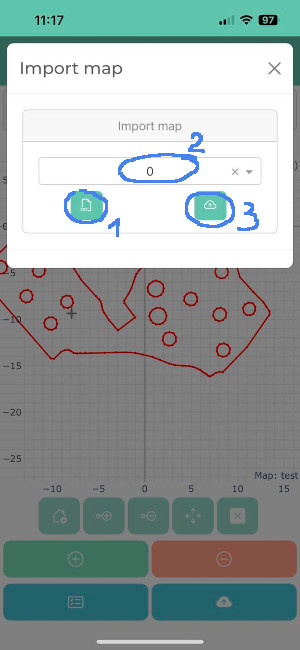
If you want save selected upload. Click on the cloud with plus button in "Select map" section and give an unique name for imported map.
The map is now available in "Select map" section
The map can be activated using the cloud with the outgoing arrow.
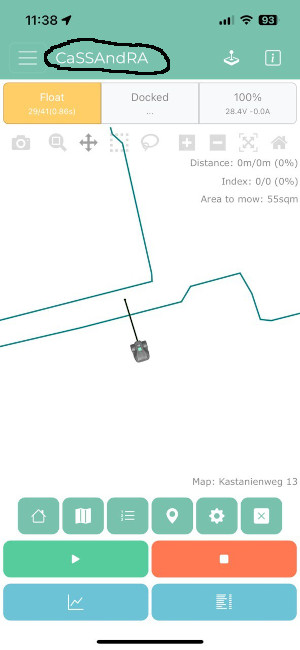
Switches to the home page. The new map is displayed in the overview and can be used.
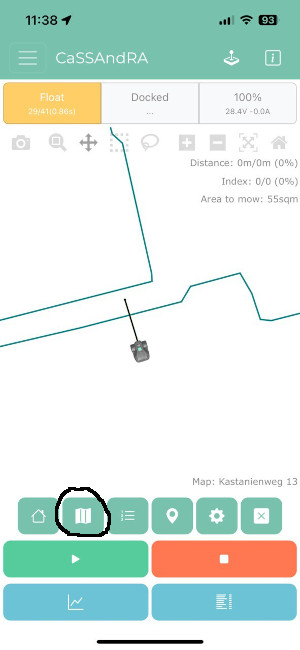
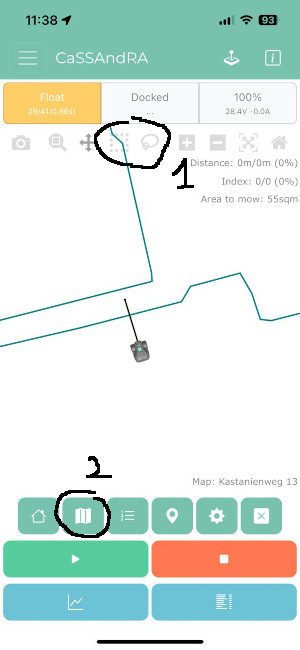
Overview page can be called by clicking "CaSSAndRA" in the navbar. This is your main page where you can track status of your robot and start some tasks.
Click on "go home" button and confirm the action by clicking play button.
Click on "mow all" button. CaSSAndRA calculates the mowing paths according to your settings. Depending on the performance of your computer or the size of your map, the calculation may take some time. The calculated route appear green on the map. Click on play button to start mowing
Click on "select zone to mow" button. Select "Lasso Select" or "Box Select" in the tool bar on top of the map. Then mark the desired area on the map. Depending on the performance of your computer or the size of your map, the calculation may take some time. The calculated routes appear green on the map. You can repeat the calculation for selected area. Change your mow settings and click "select zone to mow" again. The Lasso-Select selection and Box-Select selection can be removed by double click event if corespondent tool selected. Click on play button to start mowing
Click on "select go to". Slect a target point on the map and click play button. The rover moves to desired coordinates
Current restrictions: If the charging station is outside the perimeter and the mower is supposed to drive from the charging station to the desired point, the task will be aborted with an error
Click on the gear symbol. Configure path planner for next calculation. These settings are only applied to the calculation on this page. If the server is restarted, the values will be set to default values from the settings
Click on cancel button to remove elements from the map. If there are any obstacles in the map the first cancel click will remove obstacles the second click will remove created job.
The play button starts created task (Mow, go to, go home) but also it is possible to resume a previous task. To do that just click play button without creating a new task even deleted lines by pressing cancel button will be restored
Click on "Taskplanner" in navigation bar or if you on mobile device click on burger menu and then select "Taskplanner"
Configure the coverage path planner by pressing "mow settings" button. Confirm new settings with "ok". Use Lasso-Select or Box-Select from the toolbar on top of the map to select an area and confirm it with "confirm selection" button for calculation or click "plan mow all" button to calculate for the whole map. A preview of the task appears in red. You can adjust mow settings for selected area by changing "mow settings" and trigger calculation again. The Lasso-Select selection and Box-Select selection can be removed by double click event if corespondent tool selected. By pressing "cancel" button the current preview will be removed.
...
To remove a task select a task in dropdown menu in "Tasks" section. Click on "remove selected task" and confirm it.
...
To extend a task select wanted task in dropdown menu in "Tasks" section. Selected task is appear now. Create a new task as it described in "Create a task" section. And save extended task as it described in "Save a task" section.
Select one or more tasks in dropdownmenu in "Tasks" section. Click on "start selected tasks order". The processing order corresponds to the order in the drop-down menu.
The tasks are assigned to a currently loaded map. If this is switched, the tasks will only be available when the map is loaded again.
If a map is deleted, all tasks that were created with this map will also be deleted without warning
The task planner always recalculates the mowing paths after the task has been started. No saved paths are loaded. Depending on the scope of the task and the performance of your computer, this can take some time
After you data has been moved to an external data folder, like ~/.cassandra, you no longer need to copy your data folder when updating.
Stop the server (whatever it is in your case (e.g. strg+c, systemctl stop cassandra...))
git pull
python app.py
If your data folder is still in /src/data, then do the following:
The app will be improved in small steps. Also reported problems will be fixed. In order to make the changes productive for you too, proceed as follows when updating.
- Back up your /src/data folder
- Clone the repository again and replace all files and folders in your production directory with the new downloaded files.
- Replace the downloaded /src/data folder with the folder you backed up in step 1.
- App can be started as usual