Part 1 now published @ The Block Journal on Medium
Part 2 now published @ The Block Journal on Medium
Part 3 now published @ The Block Journal on Medium
Parity’s Substrate blockchain framework, of which Polkadot is being built on top of, is in active development and making rapid progress towards a final release. Ink (or ink! as the name is commonly termed in documentation) is Parity’s solution to writing smart contracts for a Substrate based blockchain.
Like Substrate, Ink is built on top of Rust, and therefore adheres to Rust language rules and syntax. This tutorial will walk through an example smart contract replicating a non-fungible token, commonly referred to as ERC721 tokens on the Ethereum blockchain. Specifically, the contract resembles a non-fungible token contract that will support 3 main features: minting tokens, transferring tokens, and approving another account to send tokens on your behalf.
Non-fungible tokens, or NFTs, differ from ERC20 style tokens whereby every token is unique. In our contract, each token will have a unique ID used to represent the token. From here, each token could have its own value, its own metadata, or have a specific use within an application or value system.
Approving non-owner accounts to transfer or manage the token is also different, and has to be done on a per-token basis with Non-fungible tokens. Cryptokitties is the best known example where Non-fungible tokens have been implemented — each token representing a kitten on the platform.
NFTs present different challenges to a standard token, and therefore give us more to explore in terms of Ink syntax and capabilities.
The easiest way to bootstrap an Ink project currently is to install the "Hello World" contract of Ink, named Flipper. With Flipper installed, we can build upon what is already included and not have to worry about configuration and compile scripts — these are provided in Flipper.
Note: Both Substrate and Ink are in rapid development and are not yet feature complete, therefore the smart contract environment, and the smart contract code itself, will most likely change as Parity get nearer to a final release of the framework.
To jump start our Ink project fetch Flipper using cargo:
# fetch the Flipper Ink contract

cargo contract new flipper
Flipper provides us a project boilerplate needed to start writing the smart contract. Included is:
The folder structure and configuration metadata of the project A bare-bones Flipper contract in src/lib.rs, that simply “flips” a boolean value between true and false via a flip() method, and gets this value on-chain using the get() method. We will be replacing this file with the NFT contract The Rust specific Cargo.toml file, outlining the project dependencies and module metadata, a .gitignore file, and a build.sh file. The build.sh file is what we run to compile our smart contract, resulting in a compiled .wasm file of the contract, a JSON abstraction of the contract, and more. We’ll explore the built contract further down.
Note: Now is a good time to check out src/lib.rs to get a feel of the contract syntax.
Let’s change the name flipper to a more suitable name: nftoken. Amend the following:
flipper/folder name to /nftokenCargo.toml: Change[package] nameand[lib] nametonftokenbuild.sh: amendPROJNAME=nftoken
Also, ensure we have permissions to run nftoken/build.sh:
cd nftoken
chmod +x build.sh
Lastly, add the /nftoken folder to a VS Code Workspace, and we are ready to start writing.
Ink has multiple levels of abstraction, where higher levels abstract over the lower levels. We will be using the highest level, which is dubbed the language level, or lang level. These levels have also been separated into modules that can be explored here.
Below the lang module are the model and core modules, that focus on mid-level abstractions and core utilities respectively. Below the core module we can also expect a CLI specifically for creating and managing Ink contracts.
Although there is little coverage on how to use these modules at the time of writing, we do indeed have the raw API docs to browse through, both for the core module and model module. If you are following this article these docs can be browsed through now, although our contract below will utilise some of these APIs intended to show how they are used in the context of the lang level via the non-fungible token contract.
With this in mind, let’s next examine what the structure of our lang derived contract looks like, and compare it to what we expect from a Solidity based smart contract.
Structuring an Ink contract is similar to that of a Solidity contract, where the major components we have come to expect with Solidity are also consistent in Ink: contract variables, events, public functions and private functions, as well as environment variables to grab the caller address and more.
Below is an abstraction of how the NFToken contract is structured:
// declare modules
use parity::<module>
...

//wrap entire contract inside the contract! macro
contract! {

   // contract variables as a struct
   struct NFToken {
      owner: storage::Value<AccountId>,
      ...
   }

   // compulsory deploy method that is run upon the initial contract instantiation
   impl Deploy for NFToken {
      fn deploy(&mut self, init_value: u64){}
   }

   // define events
   event EventMint { owner: AccountId, value: u64 }
   ...

   // public contract methods in an impl{} block
   impl NFToken {
      pub(external) fn total_minted(&self) -> u64 {}
      ...
   }

   // private contract methods in a separate impl{} block
   imp NFToken {
      fn is_token_owner(
         &self,
         of: &AccountId,
         token_id: u64) -> bool {}
       ...
   }
}

// test functions
mod tests {
   fn it_works() {}
   ...
}
Let’s briefly visit these sections and how they differ from what we have come to expect from a Solidity contract. Ink is built upon Rust, so all the syntax here is valid Rust syntax.
- Our module declaration section is where we bring external functionality into the contract, and is the similar in nature to Solidity’s
usingdeclarations.
// Ink
use ink_core::{
    env::{self, AccountId},
    memory::format,
    storage,
};
use ink_lang::contract;
use parity_codec::{Decode, Encode};

// Solidity
interface ContractName {
   using SafeMath for uint256;
   using AddressUtils for address;
}
- Events are declared inside the
!contractmacro, whereas with Solidity we define our events within a contract interface, typing each as anevent:
// Ink
event Transfer { from: AccountId, to: AccountId, token_id: u64 }

// Solidity
event Transfer(
   address indexed from,
   address indexed to,
   uint256 indexed _tokenId
);
- Where a Solidity contract is embedded within an
interfaceblock, an Ink contract is embedded within acontract!macro. Our events are declared inside of this macro, whereas events are declared within a Solidity interface. This is described below.
Note: A macro in Rust is a a declaration that represents a block of syntax that the wrapped expressions will be surrounded by. Macros abstract at a syntactic level, so the contract! macro is wrapping its contents with more syntax.
// Ink
contract! {
   // contract
}

// Solidity
interface ContractName {
   // contract
}
- With Ink, our contract variables are written in a struct of the name of our contract. Hash maps derived from Rust’s
HashMaptype are in place of Solidity’smappingtype, providingkey => valuelists.
### How Substrate stores values
Any piece of data persisted on a Substrate chain is called an extrinsic, and Ink provides us the means to store extrinsics on-chain via the storage module, that lives within the core module of the language. In other words, all contract variables that you plan to persist on chain will use a type from storage. Conversely, the memory module is also available for data structures to operate on memory.
Solidity on the other hand adopts a different approach to this. From Solidity 0.5, storage and memory reference types were introduced to function arguments or function variables, so the contract knows where to reference those variables. However, this is not necessary for contract variables in Solidity.
Primitive types are also available and consistent throughout both languages; where Rust uses u64, Solidity adopts a more verbose uint64 type declaration. Overall it is quite simple to achieve the same contract variable structure between the two languages.
// Ink
struct NFToken {
   owner: storage::Value<AccountId>,
   approvals: storage::HashMap<u64, AccountId>,
}

// Solidity
address owner;
mapping (uint64 => address) approvals;
In the above example, the type of values that storage objects handle are passed in via the angled brackets in place of the type’s generics.
- The concept of an initialisation function is present within both Ink and Solidity, albeit implemented in different ways. With Ink, we explicitly define a
deploy()method within aDeploy{}implementation block. The parameters we define for this method are representative of what data we send when initialising the contract. E.g. for our non-fungible token, we will provide an initial amount of tokens to be minted:
// Inks initialisation function, deploy()
impl Deploy for NFToken {
   fn deploy(&mut self, init_value: u64) {
      ...
   }
 }
- Public and private methods are also defined within
implblocks, where public methods are explicitly defined withpub(external). Again, when comparing this syntax to that of Solidity’s,internalandexternalare used to define a private or public resource.
Note: In Rust, functions, modules, traits and structs are private by default, and must be defined with the pub keyword in order for them to be externally reachable. The (external) extension to pub here is Ink specific, and is compulsory to include with public Ink functions.
// public functions
impl NFToken {
   pub(external) fn total_minted(&self) -> u64 {}
}
// private functions
impl NFToken {
   fn mint_impl(
      &mut self,
      receiver: AccountId,
      value: u64) -> bool {
    }
}
Again, we have separated our private and public functions in separate impl blocks, and have included pub(external) for public functions defined.
As the last building block of our contract, a tests module is defined that asserts various conditions as our functions are tested. Within the tests module, we can test our contract logic without having to compile and deploy it to a Substrate chain, allowing speedy ironing out of bugs and verification that the contract works as expected.
## Contract syntax in depth
To review, the structure of an Ink contract, is as follows:
// Ink smart contract structure
module declarations
event definitions
contract macro
   struct containing contract variables
   deploy function
   public methods
   private methods
tests
Let’s explore how these sections are implemented in more detail.
Ink does not rely on the Rust standard library — instead, we import Ink modules to code all our contract logic. Let’s take a quick look at what we are importing into our smart contract:
use ink_core::{
   env::{self, AccountId},
   memory::format,
   storage,
};
use ink_lang::contract;
use parity_codec::{Decode, Encode};
We are exposing which modules need to be used in our smart contract here, importing the ink_core vital modules of storage and memory, as well as some env objects, exposing critical data such as the caller of an address. In addition, Encode and Decode have been declared from parity_codec to be used for encoding events into a raw format.
You will also notice the following before our module declarations:
#![cfg_attr(not(any(test, feature = "std")), no_std)]
This line is declaring that we are using the standard library if we run the tests module, or if we use a std feature flag within our code. Otherwise the contract will always compile with no_std. Ink contracts do not utilise the Rust standard library, so it is omitted from compilation unless we explicitly define it not to.
The AccountId type is provided by Ink core; if you recall the previous section, we imported both types via destructuring syntax from the env module within ink_core. AccountId represents an account (the equivalent of Ethereum’s address type. Another type that is available, Balance, is a u64 type, or a 64 bit unsigned integer.
Note: We could have use the Balance type in place of u64 to represent token values here. Although it is preferable that the Balance type be used with token values, I experienced some ambiguity working with the type, where the compiled contract did not like addition of u64 values to Balance values. It is conceivable that Balance will be enhanced in the future as Ink is further developed, providing more attributes that further represent a balance, such as the type of units. Balance will be implemented in the NFToken contract once the ambiguity surrounding its usage is cleared up.
Note: In Rust, omitting the semi-colon from the last expression of a function returns the result of that expression, removing the need to write return, although it is perfectly valid to do so if you’d like to return further up the function.
Another important Rust (and therefore Ink) programming concept to understand is that of ownership. The deposit_event function (no longer implemented in NFToken) utilises ownership. Take a look at & used before the event argument in env::deposit_raw_event:
deposit_raw_event(&event.encode()[..])
                  ^
                  we are referencing `event` here
In Rust, & represents a reference to an object.
Had we not used a reference, env::deposit_raw_event would take ownership of event, and thus would no longer be available to use in deposit_event(). event would “move” into the containing function, and would no longer be in scope in the outer function. If we attempted to use event after this point, we would receive an error , as event would no longer exist in that scope.
Even though our deposit_event() function only has one line of code, and therefore moving event out of scope would have no impact of the rest of the function, env::deposit_raw_event actually expects a reference. Take a look at the error we receive when removing the reference:
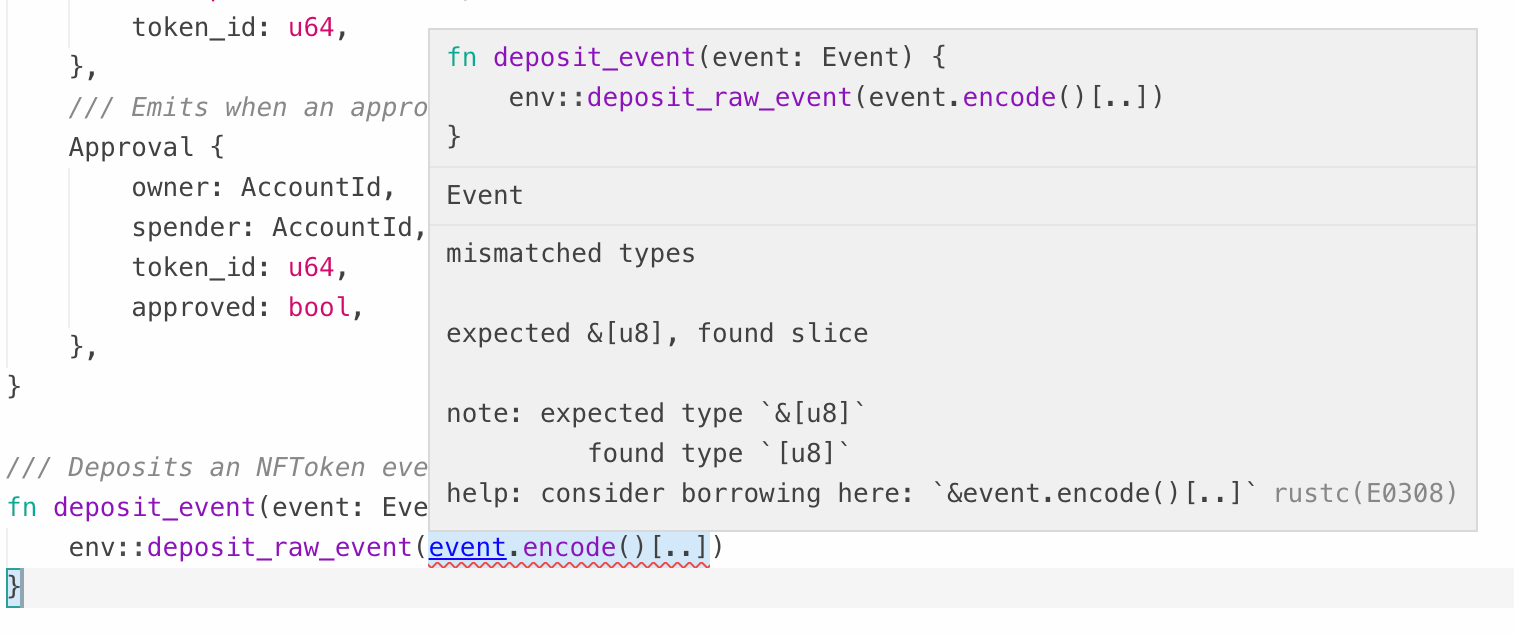
The editor is extremely helpful when dealing with Rust ownership, and will ensure that you iron out ownership issues before attempting to compile the program. In this case, it actually tells us how to fix this error under the help section.
To read more about Rust ownership, The Rust Book has a great section explaining the concepts; it is advised to understand Rust ownership before endeavouring into Ink smart contract programming.
With our events defined (and the helper function for emitting those events), let’s now explore the contents of the contract! macro itself.
Contract variables can be thought of as class properties that are accessed within functions via self. Here are the contract variables of our NFToken contract:
struct NFToken {
   /// owner of the contract
   owner: storage::Value<AccountId>,

   /// total tokens minted
   total_minted: storage::Value<u64>,

   /// mapping of token id -> token owner
   id_to_owner: storage::HashMap<u64, AccountId>,

   /// mapping of token owner -> amount of tokens they are holding
   owner_to_token_count: storage::HashMap<AccountId, u64>,

   /// mapping of token id -> approved account
   approvals: storage::HashMap<u64, AccountId>,
}
The first two variables are of type storage::Value, and the following three of storage::HashMap. In fact, the ink_core storage module has to be used for any contract data we wish to persist on chain.
storage types are generic, and as such we explicitly provide the type of data we are storing, in angle brackets.
With the required contract data defined, let’s explore some of the contract implementation, highlighting some key logic and syntax.
The deploy function is compulsory in any Ink contract, and is called when instantiating a contract once it is deployed to a chain.
Wrap the deploy() function within an impl Deploy for <contract_name> block. The actual implementation of deploy is very straight forward; here it is in its entirety:
impl Deploy for NFToken {
   fn deploy(&mut self, init_value: u64) {

      // set initial total minted tokens to 0
      self.total_minted.set(0);

      // set the contract owner to the caller
      self.owner.set(env::caller());

      // if initial token value provided, call the minting function
      if init_value > 0 {
         self.mint_impl(env::caller(), init_value);
      }
   }
}
We are simply setting default values here, with the addition of some initial token minting. We will explore the minting implementation next.
Minting is the process of generating new tokens. For our NFToken contract the following conditions need to be met for minting:
- Each token must have a unique index represented by a
token_id - An
AccountIdto mint the tokens to needs to be provided - Only the contract owner can mint new tokens
The public function mint() is declared to handle calls to mint tokens:
// mint function signature

pub(external) fn mint(
   &mut self,
   value: u64) -> bool {
}
Mint accepts two arguments; the account to mint tokens to, and an amount of tokens to be minted. The first parameter to our function signature is always a reference to self. In addition we can also include mut to declare that self can be updated, essentially providing a mutable reference to the contract instance.
mint() calls the private mint_impl() function, that carries out the actual minting process. This pattern of exposing a private function via a public one is also consistent for transferring and approving.
mint_impl() will carry out the following tasks:
-
Work out the first new
token_idand the lasttoken_idto be minted. This is calculated based on theself.total_mintedcontract variable. -
We define a for loop that will increment token ids and insert each one into the
self.id_to_ownerhash map. The specific syntax for this loop is interesting, adopting afor instructure, and adopting a spread operator:
for token_id in start_id..stop_id {
   self.id_to_owner.insert(token_id, receiver);
   //                      ^         ^
   //                      new id    owner of the token
}
Ink’s implementation of HashMap closely mirrors that of the standard Rust implementation. insert() will add a new record to our mapping. Check out the full reference here for all the ways we can manipulate a HashMap.
To obtain the raw value of our contract variables we need to “dereference” them. The concept of dereferencing is explained in detail here in The Rust Book, but essentially dereferencing allows us get to an underlying value of a pointer or a reference.
Let’s take a look at how we calculate start_id inside mint_impl() as an example of where dereferencing has been used:
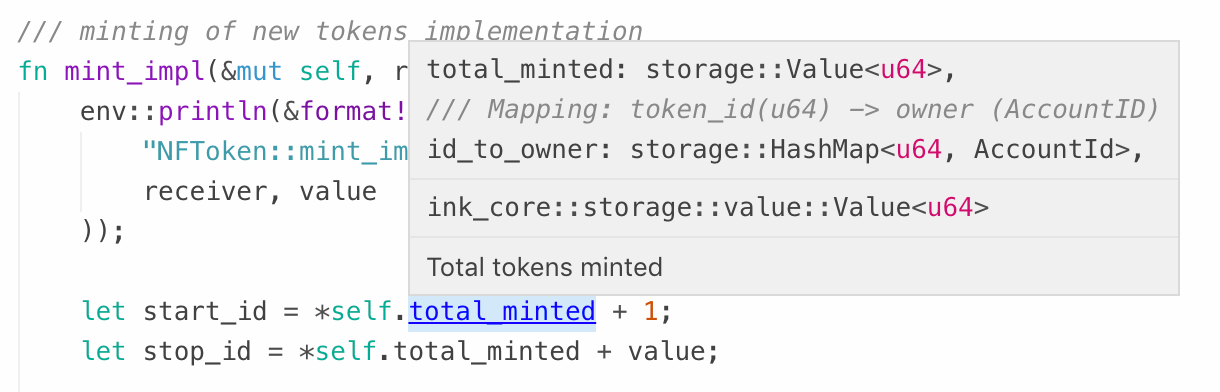
Hovering over self.total_minted reveals that we need to dereference storage::Value to obtain the underlying u64 value. Like referencing, the editor is intelligent enough to realise when an expression does not make sense — e.g. trying to add 1 to a storage::Value object, that would result in an error.
Even though dereferencing may not be suggested as a fix, it should be obvious to the programmer once the error is pointed out in the editor.
Once the new tokens have been assigned to id_to_owner, the owner_to_token_count mapping is also updated reflecting the new amount of tokens the owner has. In addition, total_minted is also updated to reflect the newly minted tokens.
You may have noticed the way we update the owner_to_token_count hash map may be slightly confusing upon first inspection. Here are the lines of code that do so:
// get the current owner count if it exists
let from_owner_count = *self.owner_to_token_count.get(&self.owner).unwrap_or(&0);

// insert new token count, or overwrite if self.owner exists already
self.owner_to_token_count.insert(*self.owner, from_owner_count + value);
The first line of code attempts to retrieve an existing token count from the hash map with get(), or assign a value of 0 to from_owner_count if none are found. The next line should be familiar, where we use insert() to either insert a new record or overwrite an existing one.
But what does unwrap_or() actually do? Well, instead of returning the token count itself, get() actually returns an Option enum, which we can then unwrap in the event a value exists. In the event a value does not exist, we can provide an alternative value, as an argument of unwrap_or(), which is 0 in the above case.
Let’s briefly explore this concept further; not only it is used in other areas of the contract, Option it is a fundamental design pattern in Rust.
As we have determined already, fetching values from HashMap contract variables will actually result in an Option enum. The Option enum in Rust provides two possible values: Some or None. This essentially avoids null values, returning None in the case a value does not exist.
Now, a common convention used in our NFToken smart contract is to firstly check if a value exists within a HashMap, and returning false in some cases where a None option is returned. In the case a Some value is present, we then use an unwrap modifier on the Option value to obtain the value that Some is wrapping.
The is_token_owner() function is one example that adheres to this pattern:
// attempt to get a value from the mapping
let owner = self.id_to_owner.get(&token_id);

// if a None option is fetched, return false
if let None = owner {
   return false;
}

// must be Some option - unwrap (and dereference) value
let owner = *owner.unwrap();
Instead of using unwrap_or() such as in the previous example, unwrap() simply assumes that owner is a Some option; we have already dealt with the case that owner is a None value, so it is safe to assume that a Some value exists to unwrap.
To conclude is_token_owner(), we then check to see if the retrieved token owner matches the AccountId we provided in the function call:
   ...
   // return false if owner does not match provided account
   if owner != *of {
      return false;
   }
   // owner must be `of`, return true
   return true;
}
Our minting implementation has introduced us to the concepts and conventions used within the rest of the contract implementation. Let’s visit the transfer function text.
The transferring of tokens is arguably the most important feature of our contract, allowing us to transfer tokens to and from accounts. The public transfer() function is available to send transfer requests to, and has the following signature:
pub(external) fn transfer(
   &mut self,
   to: AccountId,
   token_id: u64) -> bool {
}
This function calls the private transfer_impl() function to carry out the actual transferring logic. It ensures the following conditions are met for transferring:
- We immediately check if the caller is the token owner, and return false if not
- The
id_to_tokenmapping is updated, overwriting the value of thetoken_idindex to the new owner’s account - Token counts are updated, decreasing the senders’ count and increasing the receivers’ count
- The
EventTransferevent is emitted iftransfer_impl()returns true
Arguably a simpler function than the minting process, this transfer implementation allows tokens to be sent on an individual basis. The underlying mechanism here is simply to update the id_to_owner mapping, keeping track of who owns what. From here, the sender and receiver owner_to_token_count records are also updated to keep track of tokens owned on an individual account basis.
The last feature of NFToken is the ability to approve another account to send a token on your behalf. Let’s see how that works.
Approvals are a mechanism by which a token owner can assign someone else to transfer a token on their behalf. In order to do so, an additional function has been implemented specifically for approving or disapproving an account for a particular token_id.
Note: The contract is currently limited to one approval per token until the Ink language is further developed.
The public approvals() function accepts three arguments when being called:
- The
token_idwe are adding or removing an approval to - The
AccountIdwe wish to approve or disapprove - An
approvedboolean, indicating whether we wish to approve or disapprove theAccountId
The signature of approvals() looks like the following:
pub(external) fn approval(
   &mut self,
   to: AccountId,
   token_id: u64,
   approved: bool) -> bool {
}
The approval process boils down to the following logic, ensuring that only the token owner can make the approval, and that the approval can successfully be inserted or removed:
- We firstly check whether an owner for the token exists, via the
id_to_ownermapping. ANonevalue here will suggest the token does not exist, in which case we exit the function. - With a token successfully fetched, we then check whether the caller (
env.caller()), is indeed the owner of the token we’re configuring the approval for. If not, we exit the function, returning false once again. - Next, we attempt to get an existing approval record:
// returns an Option of either Some or None

let approvals = self.approvals.get(&token_id);
- If an approval record does not exist, we then refer to
approvedto see if the caller intended to either approve or disapprove the provided account. If the caller did wish to approve, the provided account is added to approvals. If not, there will be nothing to remove as the record was not found — we return false. - If an approval record exists, the value is unwrapped with
unwrap(), and we again check the intention of the caller. If a disapproval was intended, we remove the record fromapprovalsvia the HashMapremove()method. On the other hand, we insert the record again, overwriting the existing record, in the event the caller intended to insert (or update) the approval. - Finally, the
EventApprovalevent is emitted and we returntrue:
env.emit(EventApproval { owner: env.caller(), spender: to, token_id: token_id, approved: approved });
true
Testing an Ink smart contract can (and should) be done both off-chain and on-chain. The prior can be done via a tests module within the contract itself, and the latter on a local Substrate dev chain.
Your first means of testing an Ink contract is via the tests module under your contract! macro. The boilerplate looks like the following:
// test function boilerplate

#[cfg(all(test, feature = "test-env"))]
mod tests {

   use super::*;
   use std::convert::TryFrom;
   #[test]
   fn it_works() {
      // test function...
   }
}
The test functions are wrapped in a separate tests module, that import everything from the parent module and thus knows about everything about the smart contract in question. Let’s break down some of the more ambiguous lines of code, starting with the top cfg flag.
// config flag to only compile in a test environment

#[cfg(all(test, feature = "test-env"))]
Tests are not compiled with the smart contract — they would take up unnecessary space on chain. We’ve also included two use statements within the tests module:
// use everything from super module (the smart contract)
use super::*;

// use the TryFrom trait - allowing safe type conversions
use std::convert::TryFrom;
The first line, super::* is quite self explanatory; the tests module needs to be aware of the smart contract it is testing, so everything is bought into scope with * from the parent module — the smart contract itself. The second argument brings the TryFrom trait into scope.
The TryFrom trait implements simple and safe type conversions that may fail in a controlled way under some circumstances.
We use the try_from() method, derived from the TryFrom trait, to try to obtain AccountId addresses for use in our testing. This is in fact the first thing we do within the it_works() test after initialising a contract instance:
#[test]
fn it_works() {

   // initialise a contract instance to test
   let mut _nftoken = NFToken::deploy_mock(100);

   // try to obtain alice's account
   let alice = AccountId::try_from([0x0; 32]).unwrap();
   ...
}
An AccountId in Substrate consists of 32 characters, therefore Alice’s address is simply declared as 32 zeros. The account is unwrapped to obtain the actual address from either a Result or Error enum.
A #[test] statement exists before the function definition; this is Rust syntax that lets the compiler know we intend this function to be a test function. VS Code will embed a test button under each function that is labelled as a test in this way — but clicking this button to invoke cargo test will fail, as we need a slightly modified test command to test Ink contracts. We will visit that command further down.
Within it_works(), we initialise a mutable instance of the contract using deploy_mock(), a mock deployment function provided by the Ink framework. The contract can now be called and manipulated via the _nftoken variable. deploy_mock() will call the contract’s deploy() method — which expects an init_value argument — so the value of 100 has been provided, consequently minting 100 tokens at test runtime.
From here the rest of it_works() is simple to follow. We have taken advantage of Rust’s assertion macros to ensure that our contract’s state is changing as we expect when transferring tokens and approving other accounts to send tokens.
Rust includes three assertion macros available for us to use in the standard library:
// assert! - true or false
assert!(some_expression());

// assert_eq! - asserts that 2 expressions are equal
assert_eq!(a, b, "Testing if {} and {} match", a, b);

// assert_ne! - asserts that 2 expressions are not equal
assert_ne!(a, b, "Testing that a and b are not equal");
Where an assertion fails, the test function will also fail and be reported as a failure once the tests complete. to test our Ink contract we run the following command:
cargo test --features test-env -- --nocapture
Using --no-capture will provide more verbose output, including println() output where it has been used within the tests module. The test-env feature ensures that we are only testing the Ink environment, as defined in Cargo.toml:
[features]
default = []
test-env = [
    "ink_core/test-env",
    "ink_model/test-env",
    "ink_lang/test-env",
]
...
A successful test will result in the following output:

With tests passing, we can now compile the contract. Run build.sh within the project directory to do so:
./build.sh
The resulting files will be sitting in your target/ folder:
nftoken.wat
nftoken-fixed.wat
nftoken.wasm
nftoken-opt.wasm
nftoken-pruned.wasm
NFToken.json
Ink contracts are compiled into the web binary standard WebAssembly, or .wasm. We are interested in two files from the above compiled output that we will upload to Substrate:
nftoken-pruned.wasm: an optimised.wasmfile we’ll upload to our Substrate chainNFToken.json: the contract ABI code in JSON format
Note: Although we are not WebAssembly focussed, it is worth mentioning that the format is being heavily used in the blockchain space for a more efficient runtime. Ethereum 2.0 will rely on a subset of WebAssembly they have dubbed eWasm, and of course, Substrate chains are also adopting the standard. Although primarily aimed for the web, WebAssembly is by no means limited to the browser. The WebAssembly spec is under development and we can expect more features to be released in the coming years, making it a very interesting technology to work with.
You may be familiar with contract ABI from Ethereum based contracts, that provide front-end Dapps the means to communicate to the contract on-chain. They essentially describe the structure of the contract including its functions and variables within a JSON object, making it particularly simple for Javascript based apps to integrate.
Now, to deploy the contract, spin up your local Substrate chain if you have not done so already, and let’s turn to the Polkadot JS app to manage our deployment.
# run your local Substrate chain

substrate --dev
Deploying and instantiating a contract on a Substrate chain involves firstly deploying the contract, and then instantiating it. This two step process allows developers to deploy a particular standard — perhaps a token standard — where other interested parties could then instantiate that same contract with their own token details. This removes the need to upload duplicates of the same contract for essentially identical functionality and identical ABI code.
To reiterate, this two step process involves:
- Uploading the contract onto a Substrate chain
- Instantiating the contract, which can then be interacted with
Both these tasks can be achieved via the Polkadot JS app, an open source Typescript and React based project available on Github.
Now we’ll be uploading our compiled .wasm and .json ABI to a Substrate dev chain. To do so, the Polkadot JS client is needed.
You can either clone the project to run on your local machine, or simply visit https://polkadot.js.org/apps to access it online. Load up the client to commence the deployment process that follows.
Step 1: Ensure the client is connected to your local Substrate node
We firstly need to ensure that the client is connected to the correct chain. Navigate to the Settings tab and ensure that the remote node/endpoint to connect to is set to Local Node (127.0.0.1:9944). Hit Save and Reload if a change is needed.
Note: The other chains, Alexander and Emberic Elm, are Substrate based chains that are managed by Parity. Working with other Substrate chains such as Polkadot is out of the scope of this article, however, the Pokakdot JS client is actually designed to work with any Substrate based blockchain, and therefore is extremely dynamic in what is presented throughout the app.
Step 2: Deploy the compiled contract onto your node
To deploy our contract, navigate to the Contracts page from the side bar, and ensure you are on the Code tab. If you have not yet deployed a contract onto your node, the Code tab will be the only one available. The UI will be similar to the following:
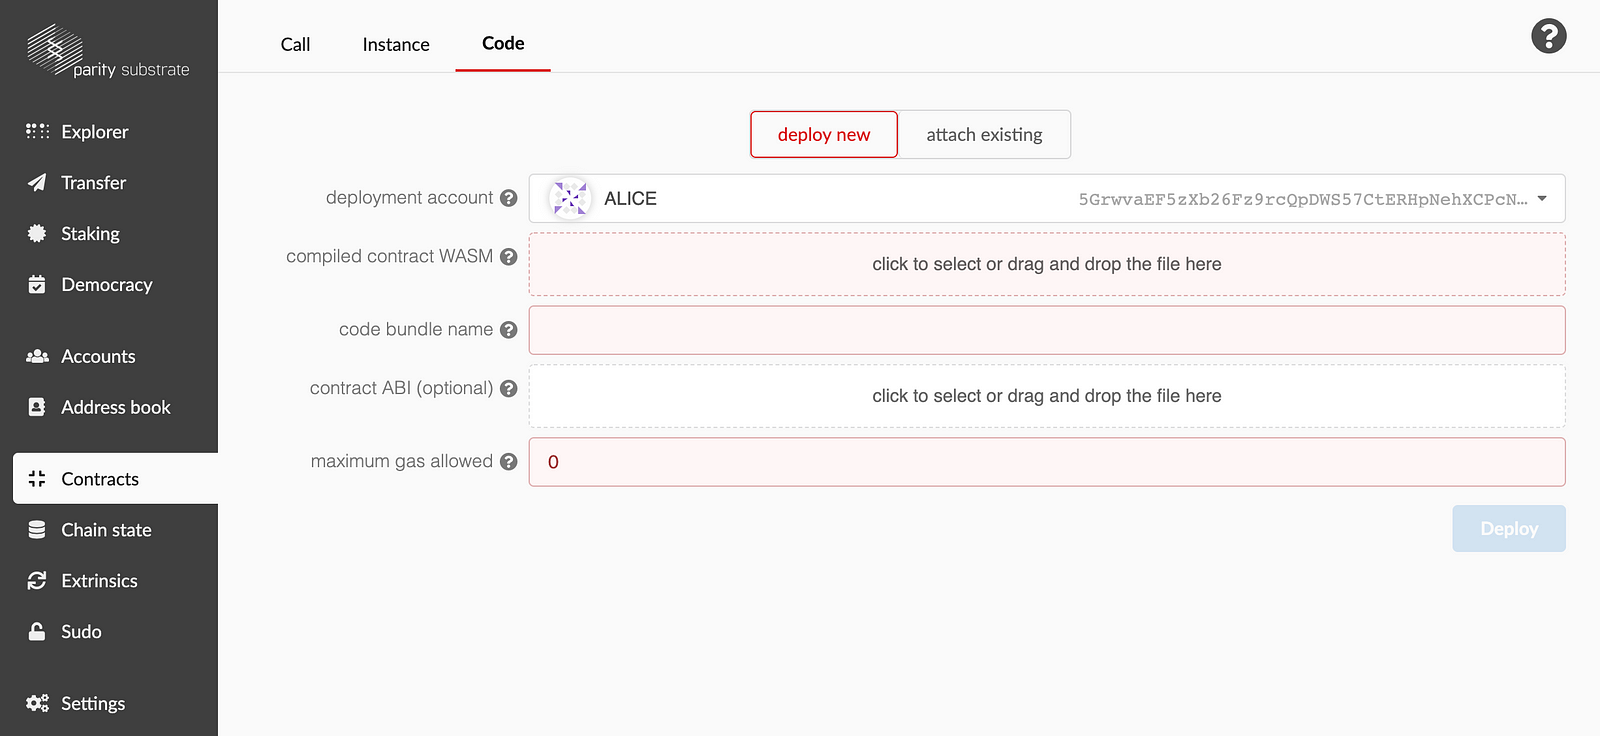
Now on the Code tab:
- Ensure the
deployment accountis set toALICE. Alice will have a sufficient balance for us to deploy, instantiate and test the contract - Drag
nftoken-pruned.wasmonto thecompiled contract WASMfield - Optional: Amend the
code bundle namevalue for a more human-friendly name - Drag
NFToken.jsononto thecontract ABIfield - Set the
maximum gas allowedto 500,000 to ensure that we supply enough gas to process the transaction
Once configured, hit Deploy and then confirm once again. The transactions will take place and the contract will be deployed.
Step 3: Instantiating the contract
You will now notice that two additional tabs are available, Instance and Call. We will firstly use the Instance tab to instantiate the contract, then the Call tab to test our functions. The Instance tab will resemble something similar to the following:

Within the Instance tab:
- Check the
code for this contractvalue is pointing to your deployed contract - Set an initial token amount to be minted as the
initValuevalue.
Note: The Polkadot UI is now picking up on our contract structure, and specifically the arguments that need to be supplied for the deploy function we defined for the contract, including the expected data type. This is one example of the dynamic nature of the Polkadot UI and how its designed to cater for a wide-range of contract types.
- Set the
endowmentvalue to 1,000 to ensure the new contract account is minted with some value. This is an advised value from the official Ink docs. Like Ethereum contracts, Ink contracts are deployed to a separate address with their own uniqueAccountIdand balance. - Again, set the
maximum gas allowedto 500,000 to ensure that we supply enough gas for the transaction - Hit
Initiateand confirm to carry out the transaction
Upon a successful transaction, the contract will now be instantiated and functions callable.
Step 4: Calling functions from instantiated contract
Our final job is now to ensure that functions are working as expected. You will notice that all the pub(external) functions we defined in the contract are now available to call and test within the Call tab:
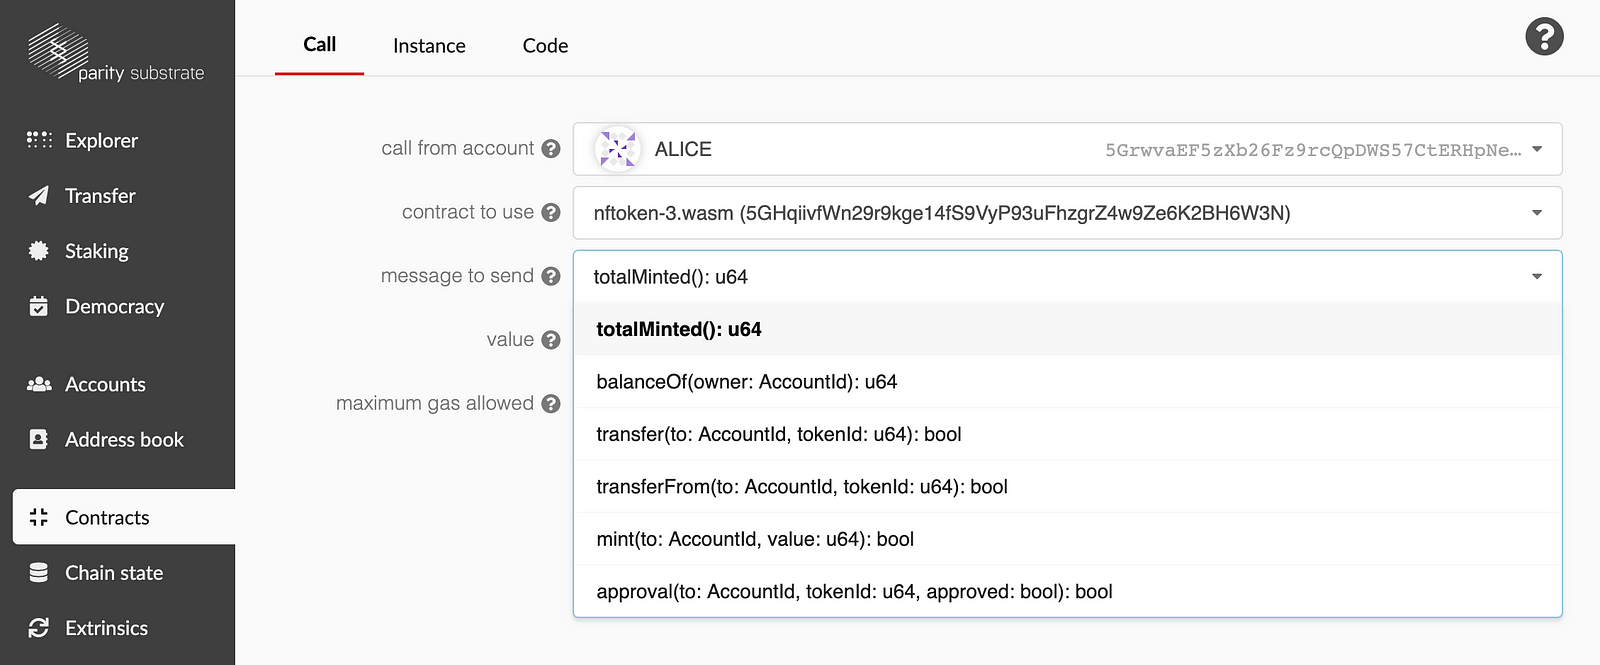
Polkadot JS does not yet provide feedback from calls in the client itself, but your node feed in your terminal should reflect the transactions as new blocks are validated. What we have in terms of UX now are success or failure event notifications that pop up on the top right of your browser window as a function call is processed.
Note: Feedback mechanisms will be posted here as and when they become available, either on the command line or in the Polkadot JS client.
We have completed the Ink smart contract deployment journey, from Installation to Instantiation on chain. As a brief summary, let’s visit the various pieces that made the process possible:
- Bootstrapping of the basic
FlipperInk contract to obtain the Ink boilerplate, including environment configuration andbuild.shfile - Writing the NFToken contract adhering to Rust concepts and conventions, with minting, transferring and approval functionalities, along with event emission
- Testing via the
testsmodule, before compiling the contract withbuild.sh - Deploying, instantiating and testing function calls via the Polkadot JS client, connected to your local Substrate dev chain