ansible-openwisp2

Ansible role that installs the openwisp2 controller.
Tested on debian, ubuntu, fedora, redhat and centos.
NOTE: it is highly suggested to use this procedure on clean virtual machines or linux containers.
Minimum ansible version supported: 2.2.
Architecture
If you are fond of Python, Django and Unix/Linux systems, you may find interesting to know more about what happens under the hood in OpenWISP 2.
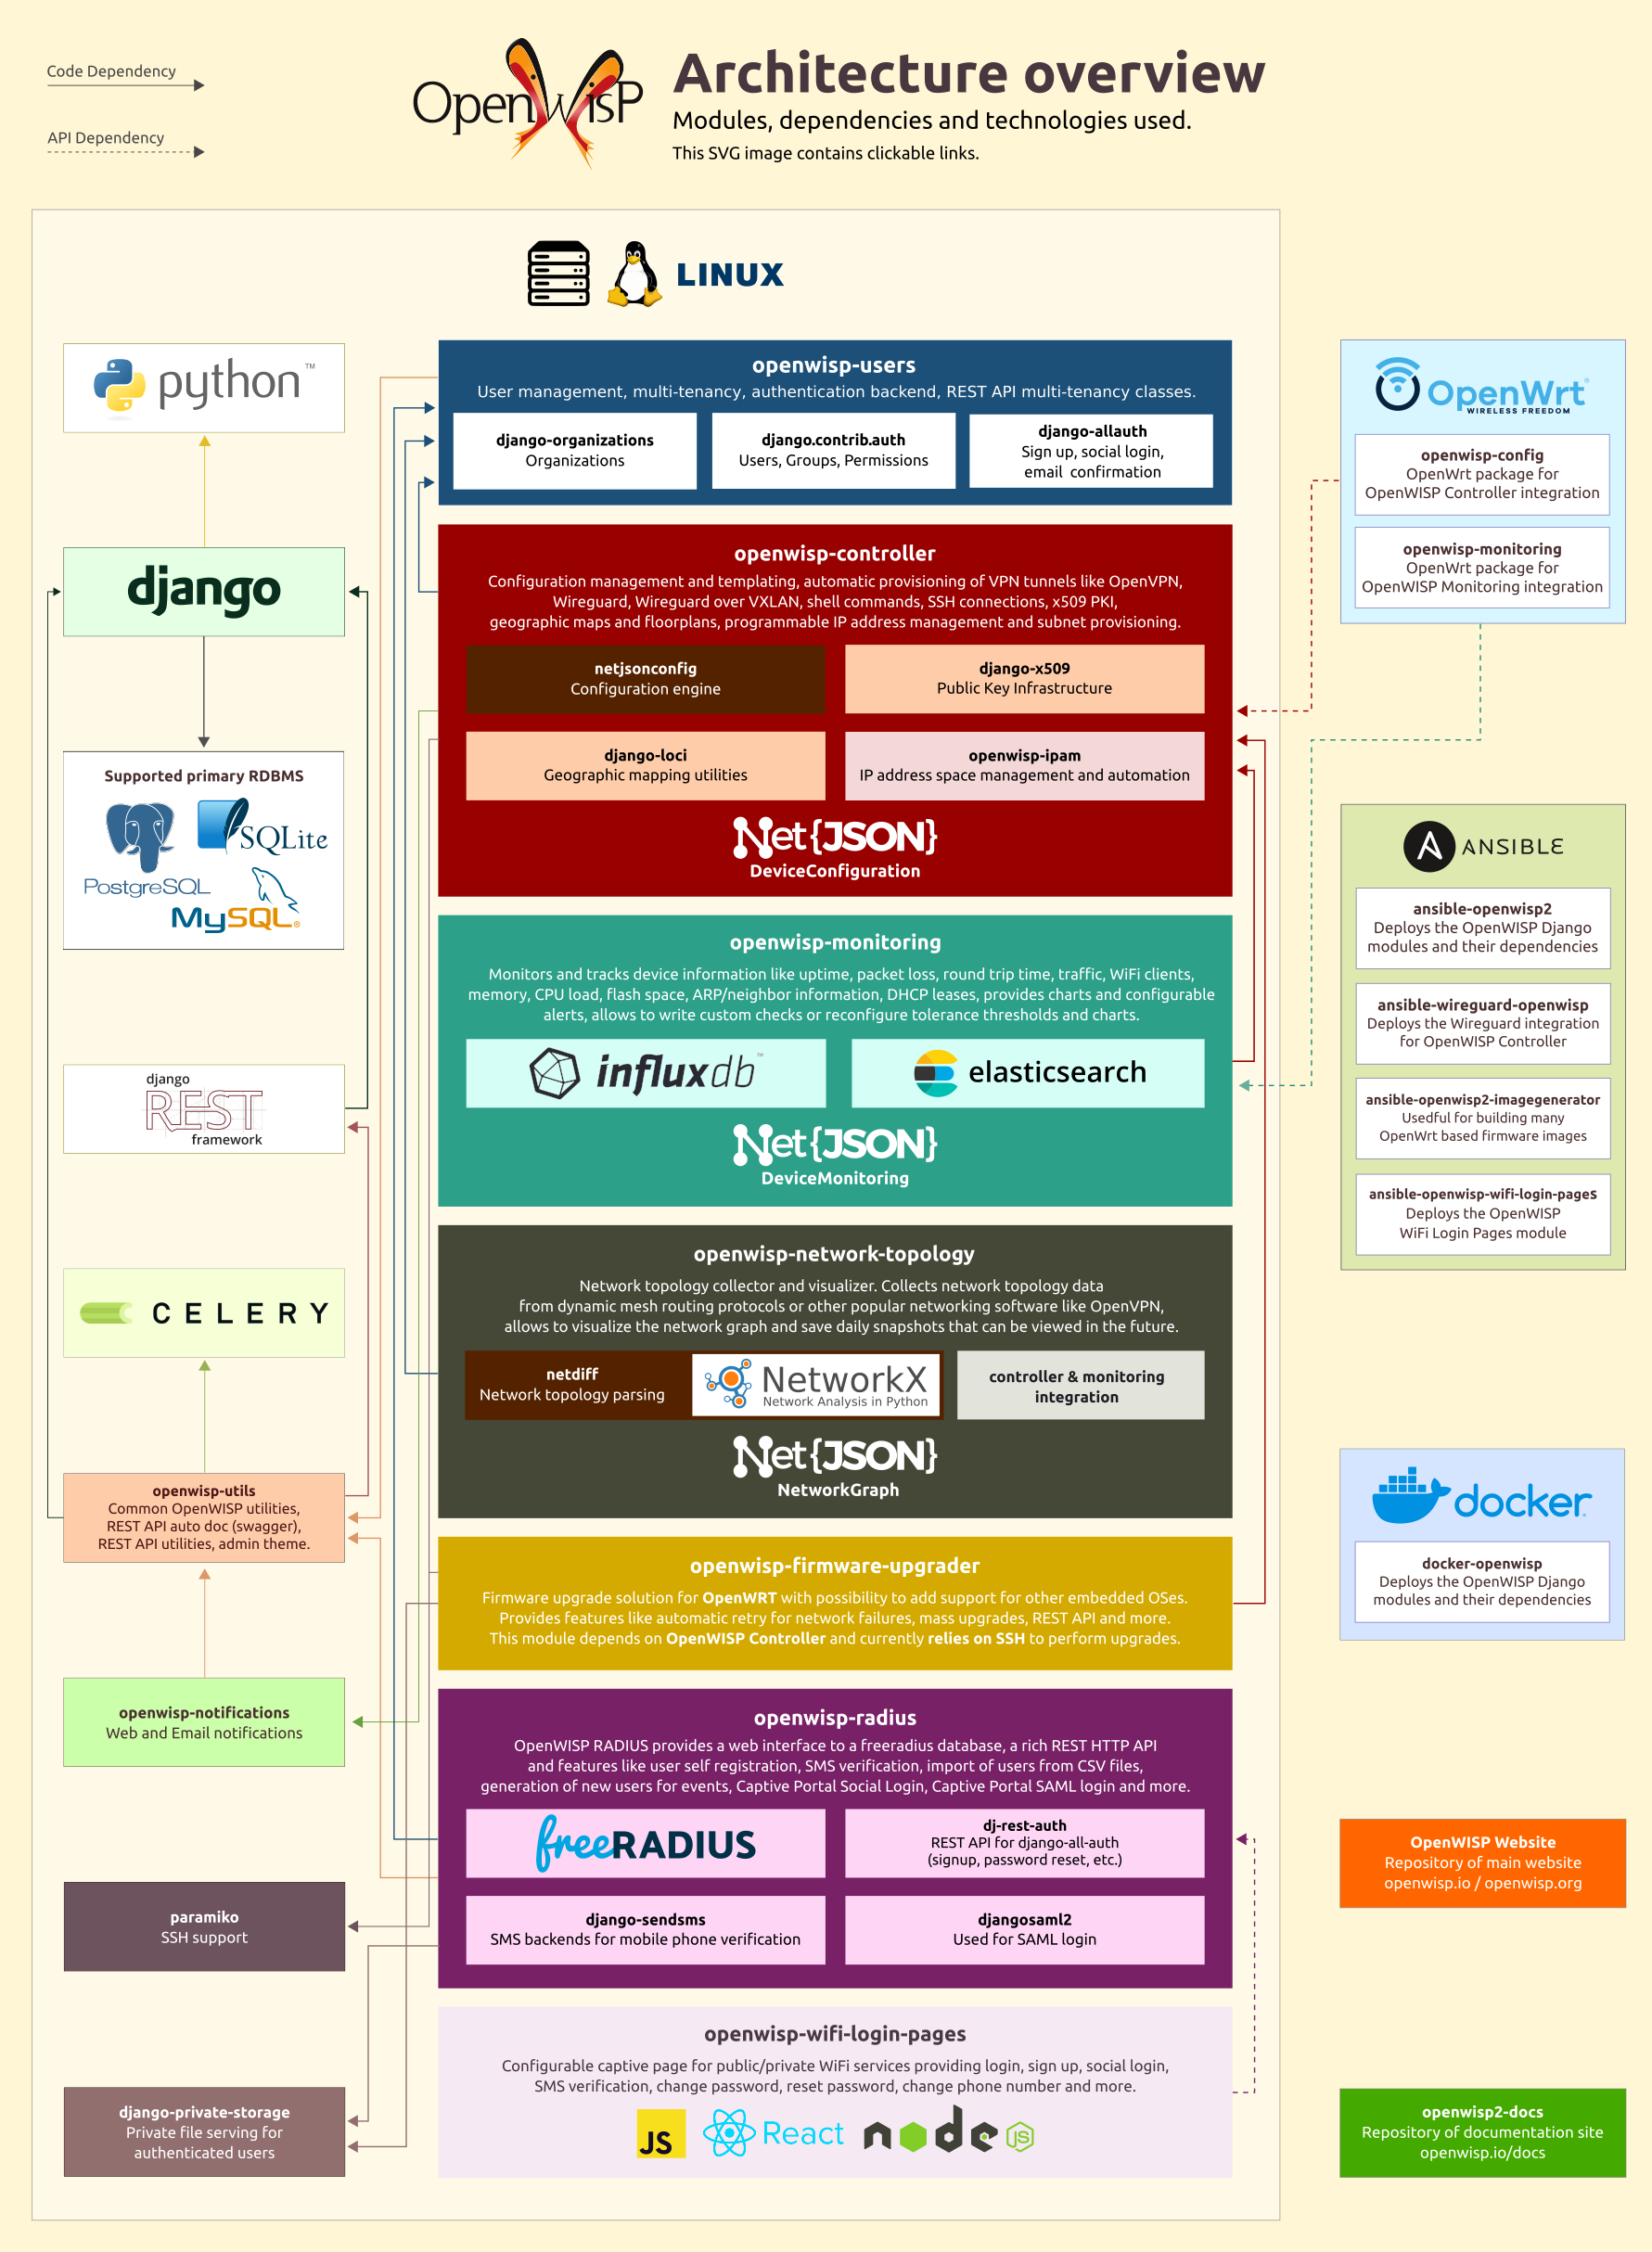
For more information see also Applying the Unix Philosophy to Django projects: a report from the real world.
Usage (tutorial)
If you don't know how to use ansible, don't panic, this procedure will guide you towards a fully working basic openwisp2 installation.
If you already know how to use ansible, you can skip this tutorial.
First of all you need to understand two key concepts:
- for "production server" we mean a server (not a laptop or a desktop computer!) with public ipv4 / ipv6 which is used to host openwisp2
- for "local machine" we mean the host from which you launch ansible, eg: your own laptop
Ansible is a configuration management tool that works by entering production servers via SSH, so you need to install it and configure it on the machine where you launch the deployment and this machine must be able to SSH into the production server.
If you are trying to install OpenWISP2 on your laptop or desktop pc just for testing purposes, please read Install OpenWISP2 locally (laptop, desktop pc).
Install ansible
Install ansible (version 2.2 or higher) on your local machine (not the production server!) if you haven't done already, there are various ways in which you can do this, but we prefer to use the official python package manager, eg:
sudo pip install ansible>=2.2
If you don't have pip installed see Installing pip on the pip documentation website.
Installing ansible in other ways
is fine too, just make sure to install a version of the 2.x series (which is the version with
which we have tested this playbook).
Install this role
For the sake of simplicity, the easiest thing is to install this role on your local machine
via ansible-galaxy (which was installed when installing ansible), therefore run:
sudo ansible-galaxy install openwisp.openwisp2
Choose a working directory
Choose a working directory on your local machine where to put the configuration of openwisp2.
This will be useful when you will need to upgrade openwisp2.
Eg:
mkdir ~/openwisp2-ansible-playbook
cd ~/openwisp2-ansible-playbook
Putting this working directory under version control is also a very good idea.
Create inventory file
The inventory file is where group of servers are defined. In our simple case we can get away with defining just one group in which we will put just one server.
Create a new file hosts on your local machine with the following contents:
[openwisp2]
openwisp2.mydomain.com
Substitute openwisp2.mydomain.com with your hostname (ip addresses are allowed as well).
Create playbook file
Create a new playbook file playbook.yml on your local machine with the following contents:
- hosts: openwisp2
  become: "{{ become | default('yes') }}"
  roles:
    - openwisp.openwisp2
The line become: "{{ become | default('yes') }}" means ansible will use the sudo
program to run each command. You may remove this line if you don't need it.
Run the playbook
Now is time to deploy openwisp2 to the production server.
Run the playbook from your local machine with:
ansible-playbook -i hosts playbook.yml -u <user> -k --ask-sudo-pass
Substitute <user> with your user.
The --ask-sudo-pass argument will need the sshpass program.
You can remove -k and --ask-sudo-pass if your public SSH key is installed on the server.
When the playbook is done running, if you got no errors you can login at:
https://openwisp2.mydomain.com/admin
username: admin
passowrd: admin
Substitute openwisp2.mydomain.com with your hostname.
Now proceed with the following steps:
- change the password (and the username if you like) of the superuser as soon as possible
- edit the information of the default organization
- in the default organization you just updated, note down the automatically generated shared secret option, you will need it to use the auto-registration feature of openwisp-config
Now you are ready to start configuring your network! If you need help you can ask questions on one of the official OpenWISP Support Channels.
Install OpenWISP2 locally (laptop, desktop pc)
If you are trying to install OpenWISP 2 on your laptop or desktop pc for testing purposes,
you can run ansible-playbook with the --connection=local flag.
Step 1: Install ansible
Step 2: Install this role
Step 3, create playbook.yml:
- hosts: localhost
  roles: [openwisp.openwisp2]
  vars:
    postfix_myhostname: "localhost"
Step 4, become root and launch ansible-playbook locally:
sudo -s  # become root, needs sudo password
ansible-playbook -i "localhost," --connection local playbook.yml
When the playbook is done running, if you got no errors you can login at:
https://localhost/admin
username: admin
passowrd: admin
Note: do not use this method in a production system.
SSL certificate gotchas
When you access the admin website you will get an SSL certificate warning because the
playbook creates a self-signed (untrusted) SSL certificate. You can get rid of the warning by
installing your own trusted certificate and set the openwisp2_ssl_cert and openwisp2_ssl_key
variables accordingly or by following the instructions explained in the section
"Automatic SSL certificate".
If you keep the untrusted certificate, you will also need to disable SSL verification on devices
using openwisp-config by setting verify_ssl to 0,
although I advice against using this kind of setup in a production environment.
Automatic SSL certificate
This section explains how to automatically install and renew a valid SSL certificate signed by letsencrypt.
The first thing you have to do is to setup a valid domain for your openwisp2 instance, this means your inventory file (hosts) should look like the following:
[openwisp2]
openwisp2.yourdomain.com
You must be able to add a DNS record for openwisp2.yourdomain.com, you cannot use an ip address
in place of openwisp2.yourdomain.com.
Once your domain is set up and the DNS record is propagated, proceed by installing the ansible role thefinn93.letsencrypt:
sudo ansible-galaxy install thefinn93.letsencrypt
Then proceed to edit your playbook.yml so that it will look similar to the following example:
- hosts: openwisp2
  become: "{{ become | default('yes') }}"
  roles:
    - thefinn93.letsencrypt
    - openwisp.openwisp2
  vars:
    # SSL certificates
    openwisp2_ssl_cert: "/etc/letsencrypt/live/{{ ansible_fqdn }}/fullchain.pem"
    openwisp2_ssl_key: "/etc/letsencrypt/live/{{ ansible_fqdn }}/privkey.pem"
    # letsencrypt configuration
    letsencrypt_webroot_path: "{{ openwisp2_path }}/public_html"
    letsencrypt_email: <YOUR_EMAIL_HERE>
    letsencrypt_renewal_command_args: '--renew-hook "service nginx restart"'
    letsencrypt_renewal_frequency:
      day: "*"
      hour: "7,19"  # renewal cronjob runs at 7 AM and at 7 PM
      minute: 0
Fill a real email address in place of <YOUR_EMAIL_HERE>, it may be used by letsencrypt
to send you important communications regarding your SSL certificate.
Once you have set up all the variables correctly, run the playbook again.
Upgrading openwisp2
Update this ansible-role via ansible-galaxy:
sudo ansible-galaxy install --force openwisp.openwisp2
Run ansible-playbook again from your local machine:
ansible-playbook -i hosts playbook.yml
You may also run the playbook automatically periodically or when a new release of OpenWISP2, for example, by setting up a continuous integration system.
Role variables
This role has many variables values that can be changed to best suit your needs.
Below are listed all the variables you can customize (you ma also want to take a look at the default values of these variables).
- hosts: yourhost
  roles:
  # you can add other roles here
    - openwisp.openwisp2
  vars:
    # you may set one of these variables to true if you need to
    # use the development version of a specific openwisp2 module
    openwisp2_controller_dev: false
    openwisp2_users_dev: false
    openwisp2_django_netjsonconfig_dev: false
    openwisp2_django_x509_dev: false
    openwisp2_netjsonconfig_dev: false
    # by default python3 is used, if may need to set this to python2.7 for older systems
    openwisp2_python: python2.7
    # customize the app_path
    openwisp2_path: /opt/openwisp2
    # edit database settings only if you are not using sqlite
    openwisp2_database:
        engine: django.db.backends.postgresql
        name: openwisp2
        user: postgres
        password: ""
        host: ""
        port: ""
        options: {}
    # customize other django settings:
    openwisp2_language_code: en-gb
    openwisp2_time_zone: UTC
    # django-netjsonconfig context
    openwisp2_context: {}
    # additional allowed hosts
    openwisp2_allowed_hosts:
        - myadditionalhost.openwisp.org
    # specify path to a valid SSL certificate and key
    # (a self-signed SSL cert will be generated if omitted)
    openwisp2_ssl_cert: "/etc/nginx/ssl/server.crt"
    openwisp2_ssl_key: "/etc/nginx/ssl/server.key"
    # customize the self-signed SSL certificate info if needed
    openwisp2_ssl_country: "US"
    openwisp2_ssl_state: "California"
    openwisp2_ssl_locality: "San Francisco"
    openwisp2_ssl_organization: "IT dep."
    # the following setting controls which ip address range
    # is allowed to access the controller via unencrypted HTTP
    # (this feature is disabled by default)
    openwisp2_http_allowed_ip: "10.8.0.0/16"
    # additional python packages that will be installed with pip
    openwisp2_extra_python_packages:
        - bpython
        - django-owm-legacy
    # additional django apps that will be added to settings.INSTALLED_APPS
    # (if the app needs to be installed, the name its python package
    # must be also added to the openwisp2_extra_python_packages var)
    openwisp2_extra_django_apps:
        - owm_legacy
    # spdy protocol support (disabled by default)
    openwisp2_nginx_spdy: false
    # HTTP2 protocol support (disabled by default)
    openwisp2_nginx_http2: false
    # ipv6 must be enabled explicitly to avoid errors
    openwisp2_nginx_ipv6: false
    # install ntp client (enabled by default)
    openwisp2_install_ntp: true
    # enable sentry
    openwisp2_sentry:
        dsn: "https://7d2e3cd61acc32eca1fb2a390f7b55e1:bf82aab5ddn4422688e34a486c7426e3@getsentry.com:443/12345"
    openwisp2_default_cert_validity: 1825
    openwisp2_default_ca_validity: 3650