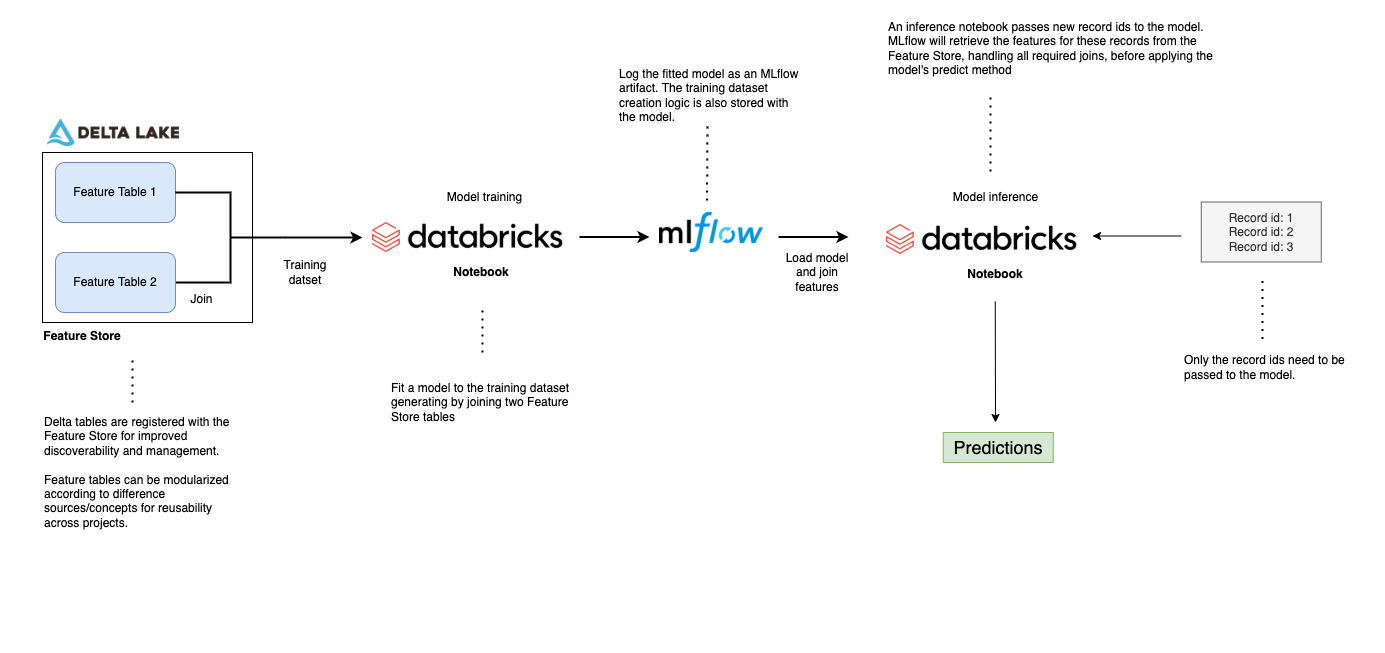
This Databricks Repo provides an example Feature Store workflow based on the titanic dataset. The dataset is split into two domain specific tables: features based on purchases and demographic information. Machine learning features are typically sourced from many underlying tables/sources, and this simple workflow is designed to mimic this characteristic.
Also, by creating domain-specific feature sets, tables become more modular and can be leveraged across multiple projects and across teams.
Note: If you require model deployment via Rest API, see the online_store directory for a demo deployment.
Note: Step 3 below differs slightly for AWS Single Tenant customers.
-
Clone this repository into a Databricks Repo
-
Provision a Databricks Cluster with an ML Runtime. This project was developed using runtime 10.3 ML.
-
Run the delta_table_setup notebook to create the source tables used for feature generation.
- This notebook uses arbitrary file support by referencing a function stored in a .py file. Also, note the use of ipython autoloading for rapid development of functions and classes.
- Arbitrary files are not support for AWS Single Tenant customers, though this project will still run with minor alterations.
-
Clone the repository to your local machine. Then, select the Data tab on the left hand pane of the Databricks UI. Choose DBFS and upload the three .csv files to a directory of your choosing.
-
Instead of running the delta_table_setup notebook, which relies on a .py file, run the st_create_tables Notebook in the data folder of the Databricks Repo. Be sure to alter the 'dbfs_file_locations' variable to match the directories you chose during file upload to DBFS.
-
-
Run the passenger_demographic_features and passenter_ticket_features notebooks to create and populate the two feature store tables.
- Navitate to the Feature Store icon on the left pane of the Databricks UI. There will be two entries, one for each feature table.
-
Run the fit_model notebook, which will perform the following tasks.
- Create an MLflow experiment
- Create a training dataset by joining the two Feature Store tables
- Fit a model to the training dataset
- Log the model and the training dataset creation logic to the MLflow experiment
- Create an entry for the model in the Model Registry
- Promote the model to the 'Production' stage
-
Run the model_inference notebook, which will perform the following tasks.
- Create a sample DataFrame of new record ids to score
- Create a helper function that given a model name and stage, will load the model's unique id
- Apply the model to the record ids. MLflow joins the relevent features to the record ids before applying the model and generating a prediction.
