This guide will help you to learn PHP Symfony 6 Framework basics. The concepts in this course include:
- Basic of handling requests
- Twig templates
- Databases and Doctrine
- Doctrine Relations
- Querying the database
- Authentication (registration, e-mail confirmation, login page, banning users)
- Authorization of users (roles, voters)
- User permission system (role-based)
- File uploads and displaying uploaded images
- Sending e-mail
You'll learn all this while building a fun and interesting project, a Twitter-like clone, using the most modern CSS framework Tailwind CSS.

PHP will be used to run a built-in server and run console commands. Install PHP 8.1 or higher. Download the Thread safe version here.
Show Steps
-
Extract the downloaded zip file in
C:\Program Files\directory. -
Copy the full directory of the extracted folder.
-
Now click on Start Menu and search
Environment variablesand open it. -
Under System variables, add a new value inside the
Pathvariable and paste the full directory in step 2. -
Save your changes and check the php version in command prompt.
php --version
PHP 8.1.13 (cli) (built: Nov 22 2022 15:49:14) (ZTS Visual C++ 2019 x64)
Copyright (c) The PHP Group
Zend Engine v4.1.13, Copyright (c) Zend Technologies
Composer will be used to install PHP packages. Download it here.
Show Installations
-
Windows Installer - The installer, which requires that you have PHP already installed, will download Composer for you and set up your PATH environment variable so you can simply call composer from any directory. Download and run Composer-Setup.exe - it will install the latest composer version whenever it is executed.
-
Command-line installation - To quickly install Composer in the current directory, run the following script in your terminal. Use this guide to install Composer programatically.
php -r "copy('https://getcomposer.org/installer', 'composer-setup.php');"
php -r "if (hash_file('sha384', 'composer-setup.php') === '55ce33d7678c5a611085589f1f3ddf8b3c52d662cd01d4ba75c0ee0459970c2200a51f492d557530c71c15d8dba01eae') { echo 'Installer verified'; } else { echo 'Installer corrupt'; unlink('composer-setup.php'); } echo PHP_EOL;"
php composer-setup.php
php -r "unlink('composer-setup.php');"
Download the 386 binaries here.
Show Installations
-
Extract the ZIP file to C:\symfony-cli.
-
Add to the Path environment variable under User Variables.
-
Run
symfonyin terminal to see the CLI version and commands.

Docker will be used to run a database server and db admin panel.
Open your console terminal and run any of these commands to create a new Symfony application:
symfony new my_project_directory --version="6.2.*"composer create-project symfony/skeleton:"6.2.*" my_project_directory
cd my_project_directory
composer require webappFor local development, the most convenient way of running Symfony is by using the local web server provided by the symfony binary.
# Run server in background with -d
symfony server:start -dsymfony check:requirementssymfony check:securityconfig/- Contains all configuration files such as routes, services and packages.migrations/- Contains all doctrine migration class files.src/- Contains all PHP code.templates/- Contains all Twig templates.bin/- Contains files for the bin/console command. Ex:php bin/console <command>var/- Contains all automatically-created files like cache files and logs.vendor/- Contains all third-party libraries. These are downloaded via the Composer package manager.public/- It is the document root of the project where any publicly accessible files are contained.
A Controller is the PHP function you write that builds the page. You take the incoming request information and use it to create a Symfony Response object, which can hold HTML content, a JSON string or even a binary file like an image or PDF.
After running the command, a new controller and its twig file is created in their respective directory.
symfony console make:controller HelloControllerA Route is the URL (e.g. /about) to your page and points to a controller.
PHP attributes allow to define routes next to the code of the controllers associated to those routes. Attributes are native in PHP 8 and higher versions.
#[Route('/hello', name: 'app_hello')]In order to differentiate between two routes, ex: /hello/{id} & /hello/{personId}, the requirements option will be used.
The requirements option defines the PHP regular expressions that route parameters must match for the entire route to match.
#[Route('/hello/{id}', name: 'app_hello', requirements: ['id' => '\d+'])]Requirements can be inlined in each parameter using the syntax {parameter_name<requirements>}.
#[Route('/hello/{id<\d+>}', name: 'app_hello')]Optional Parameters are added if a parameter value is null. For example, if a user visits /hello/1, it will match. But if they visit /hello, it will not match. A default value can be added when visiting the /hello page for the {id} parameter.
#[Route('/hello/{id}', name: 'app_hello', requirements: ['id' => '\d+'])]
public function index(int $id = 1): Response
{
    // ...
}
Default values can also be inlined in each parameter using the syntax {parameter_name?default_value}.
#[Route('/hello/{id<\d+>?1}', name: 'app_hello')]Symfony evaluates routes in the order they are defined. If the path of a route matches many different patterns, it might prevent other routes from being matched. The optional parameter priority can be set to control the routes priority.
#[Route('/hello/{id<\d+>?1}', name: 'app_hello', priority: 2)]A template is the best way to organize and render HTML from inside your application, whether you need to render HTML from a controller or generate the contents of an email. Templates in Symfony are created with Twig: a flexible, fast, and secure template engine.
The Twig templating language allows you to write concise, readable templates that are more friendly to web designers and, in several ways, more powerful than PHP templates.
<!DOCTYPE html>
<html>
    <head>
        <title>Welcome to Symfony!</title>
    </head>
    <body>
        <h1>{{ page_title }}</h1>

        {% if user.isLoggedIn %}
            Hello {{ user.name }}!
        {% endif %}

        {# ... #}
    </body>
</html>
Twig syntax is based on these three constructs:
{{ ... }}, used to display the content of a variable or the result of evaluating an expression.{% ... %}, used to run some logic, such as a conditional or a loop.{# ... #}, used to add comments to the template (unlike HTML comments, these comments are not included in the rendered page).
Using the AbstractController in the Controller class to render the Twig template.
class HelloController extends AbstractController
{
    #[Route('/hello', name: 'app_hello')]
    public function index(): Response
    {
        return $this->render('hello/index.html.twig', [
            'controller_name' => 'HelloController',
        ]);
    }
}The extends tag can be used to extend a template from another one. We also need to surround all of our content with a {% block body %} tag and a closing {% endblock %}.
{# Child template #}
{% extends "base.html" %}
{% block body %}
    <div class="row">
        {# ... #}
    </div>
{% endblock %}
{# Parent template #}
{% block body %}{% endblock %}A for loop can be used inside a twig template to display all the values from an array (from controller).
{% for num in tests %}
  <div>{{ num }}</div>
{% endfor %}{% for num in tests %}
{% if num <= 2 %}
<div>{{ num }}</div>
{% else %}
<div>Num greater than 2</div>
{% endif %}
{% endfor %}Filters in Twig can be used to modify variables. Filters are separated from the variable by a pipe symbol. They may have optional arguments in parentheses.
A list of filters can be find here.
{{ content|safe_join(", ")|lower }} Twig provides a number of handy functions that can be used directly within Templates.
A list of functions can be find here.
The include function returns the rendered content of a template. Included templates have access to the variables of the active context.
{{ include('template.html') }}Partial Twig templates help you reduce code duplication by adding code in a template and including it in multiple other templates. Partial templates starts with an _. The _ prefix is optional, but it's a convention used to better differentiate between full templates and template fragments.
{% for num in tests %}
    {% if num.test <= 2 %}
        <div>{{ num.test }}</div>
    {% else %}
        <div>Num greater than 2</div>
    {% endif %}
    {{ include('hello/_test.html.twig', {date: num.created}) }}
{% endfor %}Use the path() Twig function to link pages and pass the route name as the first argument and the route parameters as the optional second argument.
<a href={{ path('app_id', {id: num.test}) }}>{{ num.test }}</a>Symfony Maker helps you create empty commands, controllers, form classes, tests and more so you can forget about writing boilerplate code.
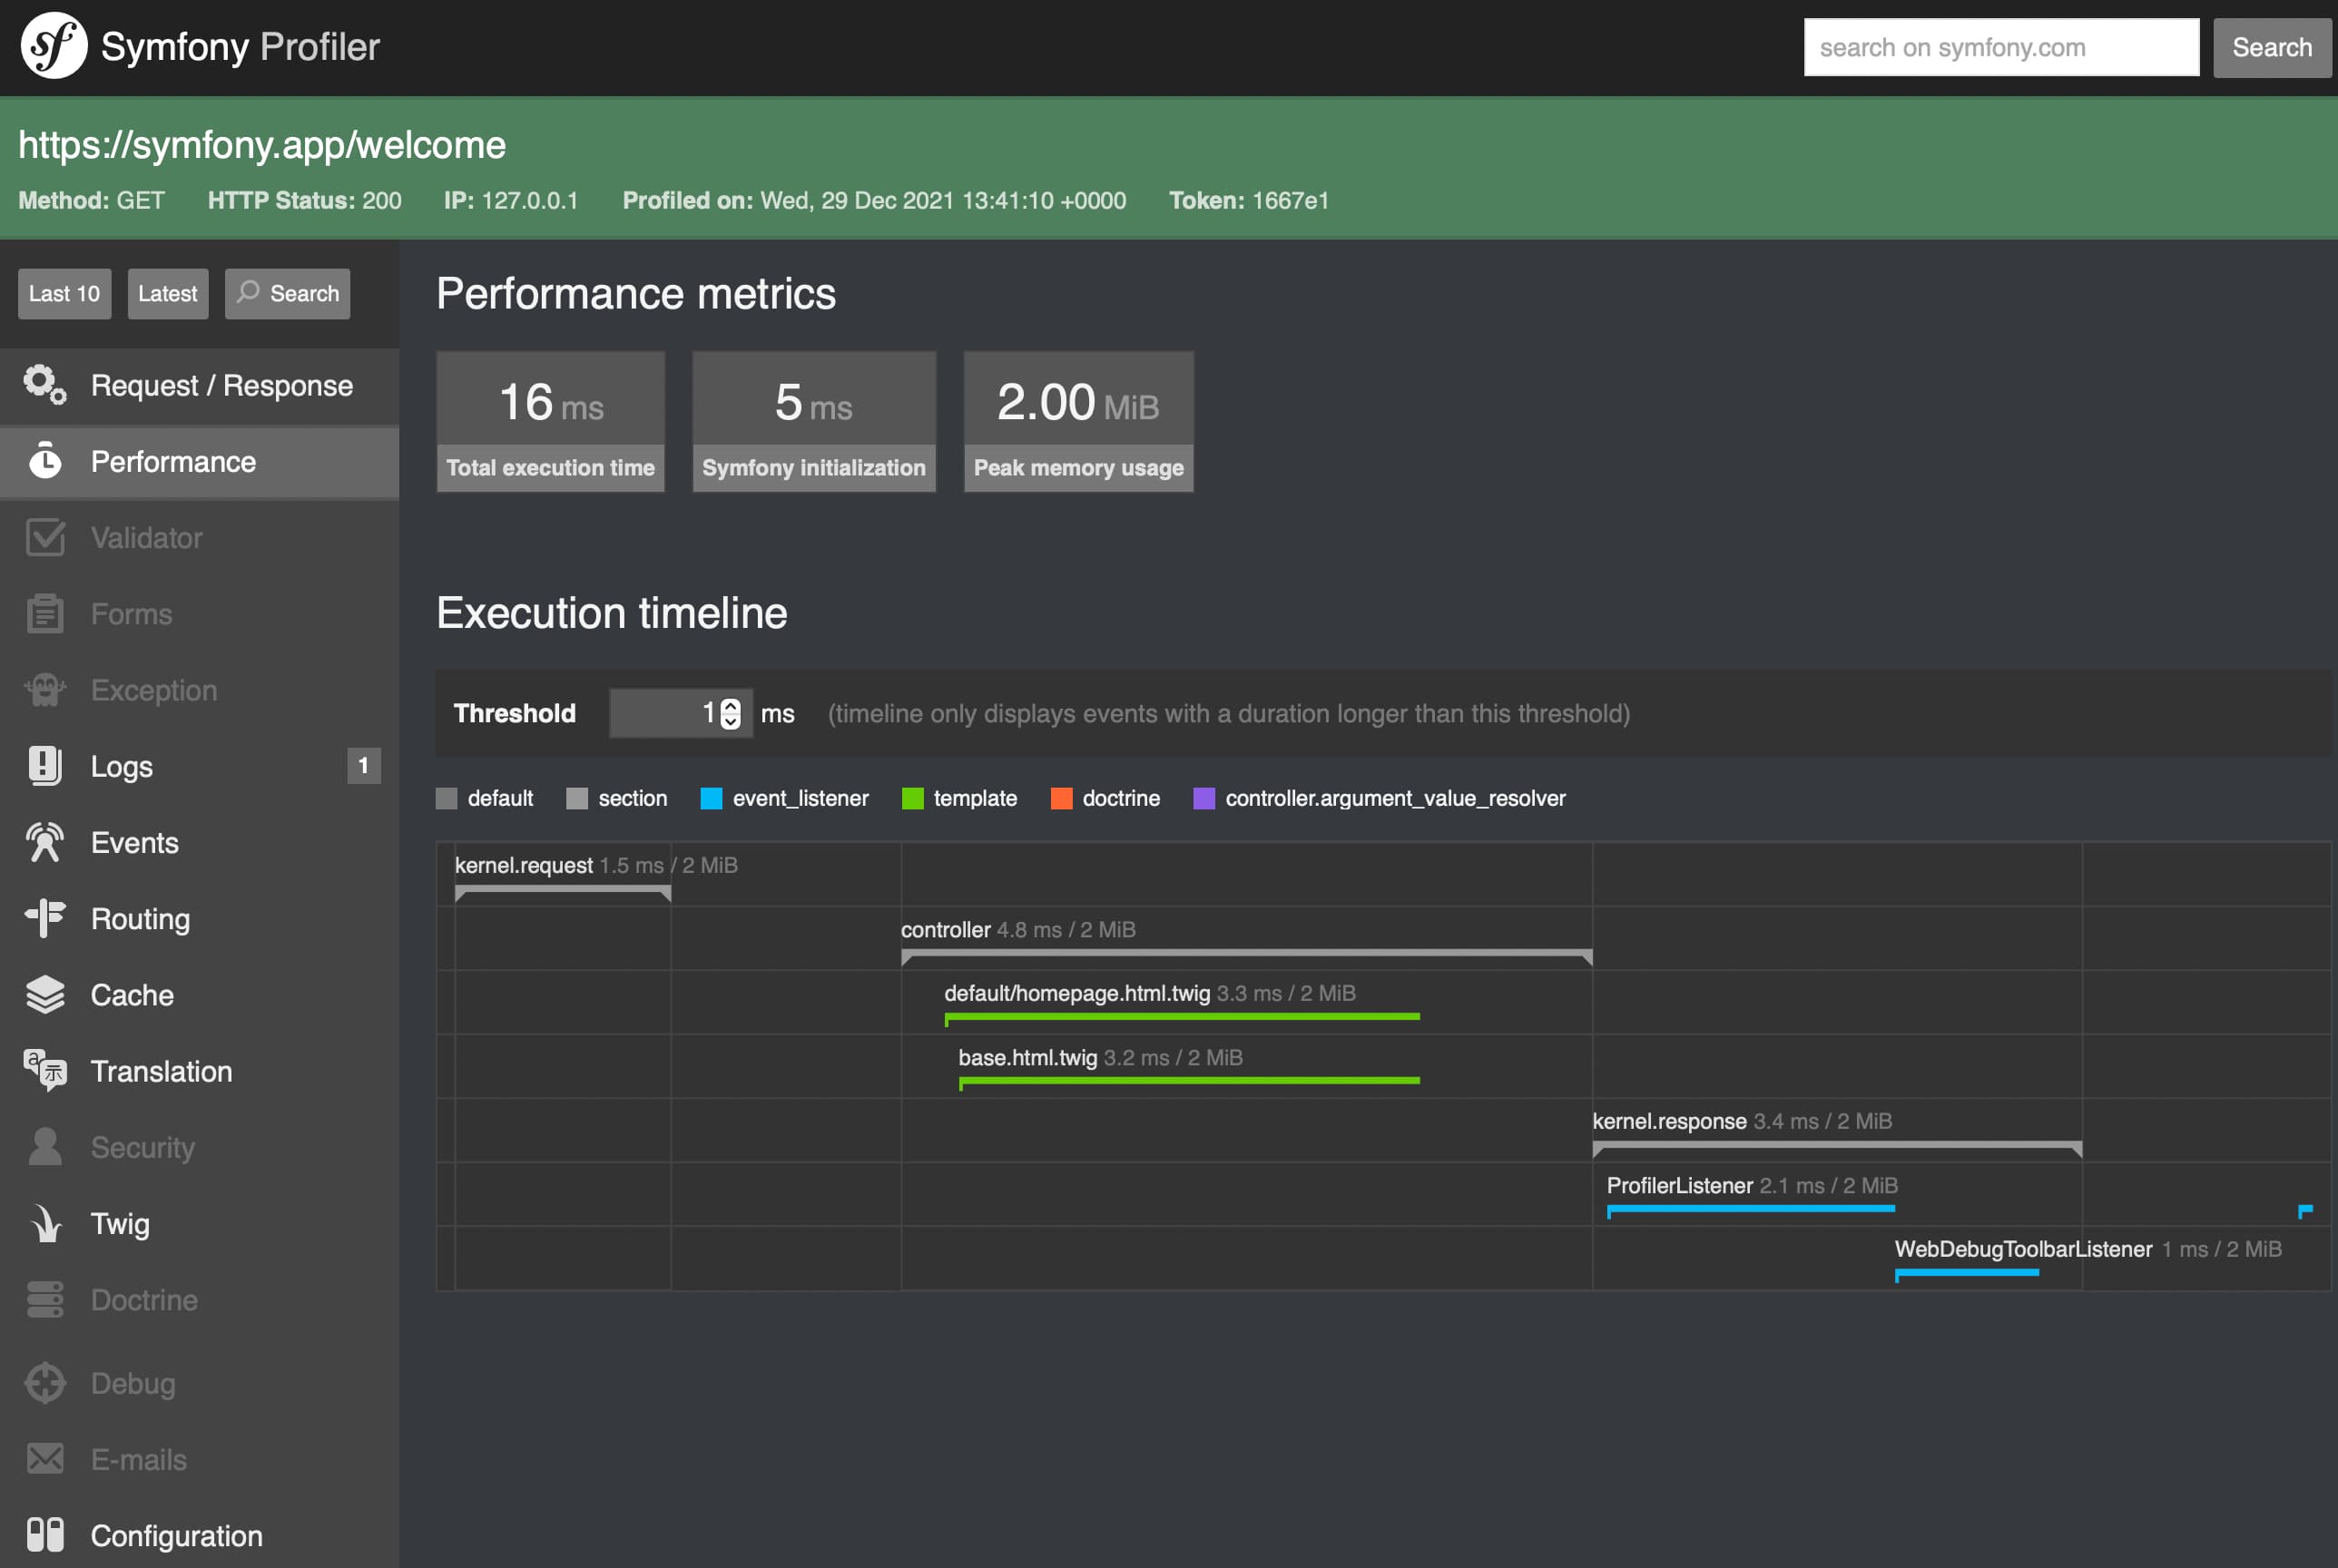
composer require --dev symfony/maker-bundlesymfony console list makeThe profiler is a powerful development tool that gives detailed information about the execution of any request.
Symfony provides all the tools you need to use databases in your applications thanks to Doctrine, the best set of PHP libraries to work with databases. These tools support relational databases like MySQL and PostgreSQL and also NoSQL databases like MongoDB.

Docker is a software platform that allows you to build, test, and deploy applications quickly. Docker packages software into standardized units called containers that have everything the software needs to run including libraries, system tools, code, and runtime.

version: "3.8"
services:
  mysql:
    image: mariadb:10.8.3
    command: --default-authentication-plugin=mysql_native_password
    restart: always
    environment:
      MYSQL_ROOT_PASSWORD: root
    ports:
      - 3306:3306

  adminer:
    image: adminer
    restart: always
    ports:
- 8080:8080- Configure the database connection by changing the
DATABASE_URLin.envfile.DATABASE_URL="mysql://root:root@127.0.0.1:3306/SymfonyGuide?serverVersion=mariadb-10.8.3&charset=utf8mb4" - Change the
server_versionindoctrine.yamlfile.doctrine: dbal: url: '%env(resolve:DATABASE_URL)%' server_version: '10.8.3'
- Create database with Symfony command.
symfony console doctrine:database:create - If you obtain error
could not find driver in ExceptionConverter.php, then enable the extensionpdo_mysqlinphp.inifile.
Entities are PHP Objects that can be identified over many requests by a unique identifier or primary key. They represent the tables in a database with the columns as variables.
symfony console make:entity
Database migrations are a way to safely update your database schema both locally and on production. Instead of running the doctrine:schema:update command or applying the database changes manually with SQL statements, migrations allow to replicate the changes in your database schema in a safe manner.
- Create migration file in the migrations folder with the SQL query and with the
up()anddown()functions.symfony console make:migration - Verify the status of the migration.
symfony console doctrine:migrations:status - Execute the migration.
symfony console doctrine:migrations:migrate - Reverse a migration.
symfony console doctrine:migrations:migrate prev - Execute migration on server without the need to interact with the warning message.
symfony console doctrine:migrations:migrate --no-interaction
Fixtures are used to load a "fake" set of data into a database that can then be used for testing or to help give you some interesting data while you're developing your application.
composer require --dev orm-fixtures
composer require --dev doctrine/doctrine-fixtures-bundlepublic function load(ObjectManager $manager): void
{
$microPost1 = new MicroPost();
$microPost1->setTitle('Welcome to Mauritius');
$microPost1->setText('Port-Louis');
$microPost1->setCreated(new DateTime());
$manager->persist($microPost1);
$manager->flush();
}symfony console doctrine:fixtures:load
A repository is a term used by many ORMs. It means the place where our data can be accessed from, a repository of data. This is to distinguish it from a database as a repository does not care how its data is stored.
- Retrieve all data
$microPostRepository->findAll()
- Retrieve data by id
$microPostRepository->findOne(1)
- Retrieve one data corresponding to title
$microPostRepository->findOneBy(['title' => 'Welcome to Mauritius'])
- Retrieve all data corresponding to title
$microPostRepository->findBy(['title' => 'Welcome to Mauritius'])
- Add new data in table
$microPost = new MicroPost();
$microPost->setTitle('Welcome to Germany');
$microPost->setText('Belgium');
$microPost->setCreated(new DateTime());
$microPostRepository->save($microPost, true);
- Update existing data in table
$microPost = $microPostRepository->find(2);
$microPost->setTitle('Welcome update');
$microPostRepository->save($microPost, true);
- Remove data from table
$microPost = $microPostRepository->find(2);
$microPostRepository->remove($microPost, true);
The function
flush()flushes all changes to objects that have been queued up to now to the database. This effectively synchronizes the in-memory state of managed objects with the database.
The default Symfony FrameworkBundle implements a basic but robust and flexible MVC framework. SensioFrameworkExtraBundle extends it to add sweet conventions and annotations. It allows for more concise controllers.
composer require sensio/framework-extra-bundle
/**
 * @Route("micro-post/{microPost}", name="app_micro_post_show")
 */
public function showOne(MicroPost $microPost): Response
{
    dd($microPost);
    return $this->render('micro_post/index.html.twig', [
        'controller_name' => 'MicroPostController',
    ]);
}
The {microPost} variable in the URL will be equal to the id of the MicroPost object in the database. By default, it is fetching by the primary key but this can be configurable (Documentation).
Creating and processing HTML forms is hard and repetitive. You need to deal with rendering HTML form fields, validating submitted data, mapping the form data into objects and a lot more. Symfony includes a powerful form feature that provides all these features and many more for truly complex scenarios.
composer require symfony/form
The recommended workflow when working with Symfony forms is the following:
- Build the form in a Symfony controller or using a dedicated form class.
- Render the form in a template so the user can edit and submit it.
- Process the form to validate the submitted data, transform it into PHP data and do something with it.
#[Route('/micro-post/add', name: 'app_micro_post_add', priority: 2)]
public function add(): Response
{
    $microPost = new MicroPost();
    $form = $this->createFormBuilder($microPost)
    ->add('title')
    ->add('text')
    ->add('submit', SubmitType::class, ['label' => 'Save'])
    ->getForm();

    return $this->render('micro_post/_add.html.twig', [
        'form' => $form,
    ]);
}The recommended way of processing forms is to use a single action for both rendering the form and handling the form submit.
$form->handleRequest($request);
if ($form->isSubmitted() && $form->isValid()) {
    $microPost = $form->getData();
    $microPost->setCreated(new DateTime());
    $microPostRepository->save($microPost, true);
}
Flash messages are temporary messages used for user notifications. They are stored in a session and vanish as soon as they are retrieved.
// Flash Message
$this->addFlash('success', 'Your micro post has been added!');

// Redirect Page
return $this->redirectToRoute('app_micro_post');
{% block body %}
{% for message in app.flashes('success') %}
<div style='color: green'>{{ message }}<div>
{% endfor %}
{% endblock %}A single call to the form() Twig function is enough to render an entire form, including all its fields and error messages.
{{ form(form) }}There are different twig functions that will enable you to customize different parts of the form by adding HTML elements and attributes.
form_start()- Renders the start tag of a form.form_end()- Renders the end tag of a form.form_label()- Renders the label for the given field.form_help()- Renders the help text for the given field.form_errors()- Renders any errors for the given field.form_widget()- Renders the HTML widget of a given field.form_row()- Renders the "row" of a given field, which is the combination of the field's label, errors, help and widget.form_rest()- Renders all fields that have not yet been rendered for the given form.form_parent()- Returns the parent form view or null if the form view already is the root form.
Symfony comes with several built-in form themes that make your forms look great when using some of the most popular CSS frameworks.
Symfony recommends putting as little logic as possible in controllers. That's why it's better to move complex forms to dedicated classes instead of defining them in controller actions. Besides, forms defined in classes can be reused in multiple actions and services.
Form classes are form types that implement FormTypeInterface.
symfony console make:form
$form = $this->createForm(MicroPostType::class, new MicroPost());Nowadays, frameworks, like Bootstrap and Tailwind, are used to design a website more easily and rapidly. They offer some pre-defined styles and also several components.
Tailwind CSS works by scanning all of your HTML files, JavaScript components, and any other templates for class names, generating the corresponding styles and then writing them to a static CSS file.
<head>
  <script src="https://cdn.tailwindcss.com"></script>
  <script>
      tailwind.config = {
          darkMode: 'class'
      }
  </script>
</head><html class="dark">
<body class="bg-gray-100 text-gray-800 m-10 dark:bg-gray-800 dark:text-white">
</body>
</html>👤 Rohan Bhautoo
- Github: @rohan-bhautoo
- LinkedIn: @rohan-bhautoo
Give a ⭐️ if this project helped you!