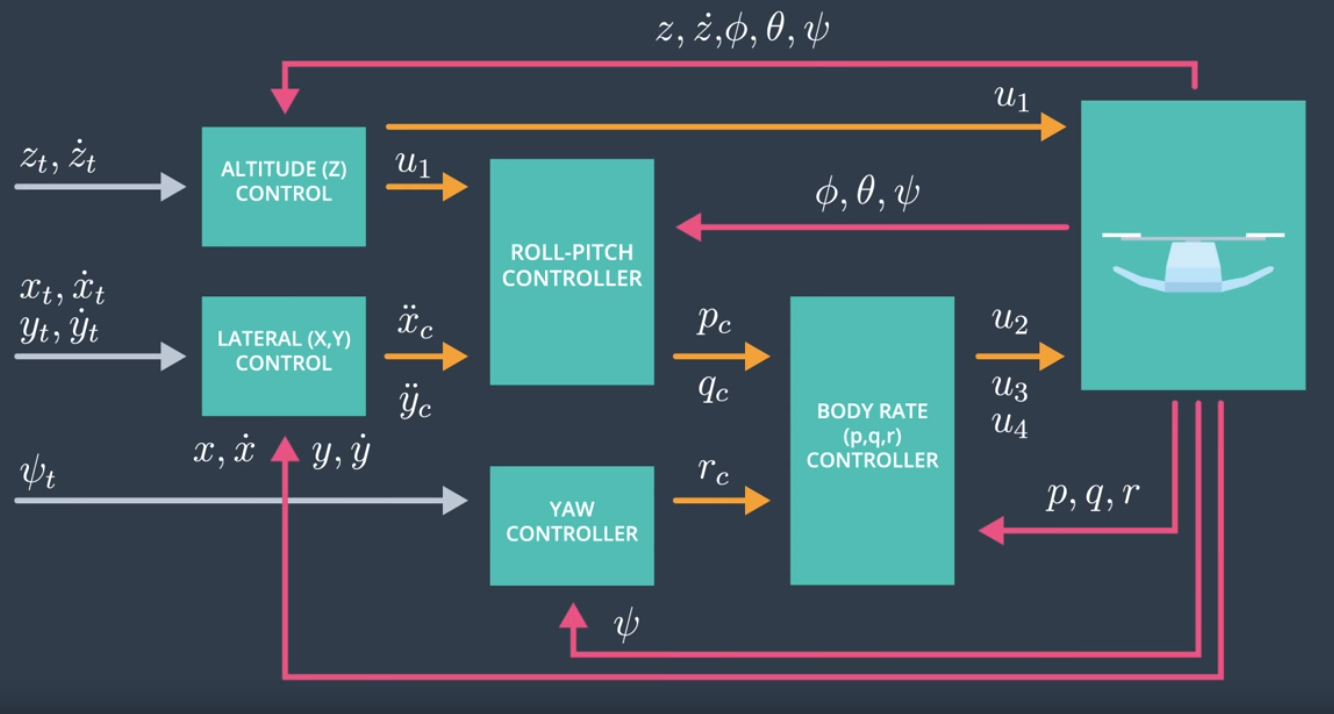
This is the general architecture of the controller we are implementing.
The mass parameter was adjusted to 0.49 to make the vehicle more balanced.
First, you will implement the body rate and roll / pitch control. For the simulation, you will use Scenario 2. In this scenario, you will see a quad above the origin. It is created with a small initial rotation speed about its roll axis. Your controller will need to stabilize the rotational motion and bring the vehicle back to level attitude.
To accomplish this, you will:
- Implement body rate control
- implement the code in the function
GenerateMotorCommands() - implement the code in the function
BodyRateControl() - Tune
kpPQRinQuadControlParams.txtto get the vehicle to stop spinning quickly but not overshoot
If successful, you should see the rotation of the vehicle about roll (omega.x) get controlled to 0 while other rates remain zero. Note that the vehicle will keep flying off quite quickly, since the angle is not yet being controlled back to 0. Also note that some overshoot will happen due to motor dynamics!.
If you come back to this step after the next step, you can try tuning just the body rate omega (without the outside angle controller) by setting QuadControlParams.kpBank = 0.
- Implement roll / pitch control We won't be worrying about yaw just yet.
- implement the code in the function
RollPitchControl() - Tune
kpBankinQuadControlParams.txtto minimize settling time but avoid too much overshoot
If successful you should now see the quad level itself (as shown below), though it’ll still be flying away slowly since we’re not controlling velocity/position! You should also see the vehicle angle (Roll) get controlled to 0.
GenerateMotorCommands()
- Isolate the collective thrust, p, q
- Using the following we can convert the input to commands.
//omega_4 = (c_bar + p_bar - r_bar - q_bar) / 4
//omega_3 = (r_bar - p_bar) / 2 + omega_4
//omega_2 = (c_bar - p_bar) / 2 - omega_3
//omega_1 = c_bar - omega_2 - omega_3 - omega_4
BodyRateControl()
This is a p controller. It takes in desired pqr and measure error by subtracting
from estimated body rates. Then angular propeller velocities is calculated by
multiplying with the moment of inertia. This is then adjusted by the p controller
RollPitchControl()
Roll Pitch controller is a p controller.
b_x_c_dot = kpBank * (b_x_c - b_x_a[R13])
b_y_c_dot = kpBank * (b_y_c - b_y_a[R23])
Then using the equation in the python notebook we can calculate the angular
velocity in the body frame
Next, you will implement the position, altitude and yaw control for your quad. For the simulation, you will use Scenario 3. This will create 2 identical quads, one offset from its target point (but initialized with yaw = 0) and second offset from target point but yaw = 45 degrees.
- implement the code in the function
LateralPositionControl() - implement the code in the function
AltitudeControl() - tune parameters
kpPosZandkpPosZ - tune parameters
kpVelXYandkpVelZ
If successful, the quads should be going to their destination points and tracking error should be going down (as shown below). However, one quad remains rotated in yaw.
- implement the code in the function
YawControl() - tune parameters
kpYawand the 3rd (z) component ofkpPQR
Tune position control for settling time. Don’t try to tune yaw control too tightly, as yaw control requires a lot of control authority from a quadcopter and can really affect other degrees of freedom. This is why you often see quadcopters with tilted motors, better yaw authority!
Hint: For a second order system, such as the one for this quadcopter, the velocity gain (kpVelXY and kpVelZ) should be at least ~3-4 times greater than the respective position gain (kpPosXY and kpPosZ).
LateralPositionControl()
- Making sure the maximum horizontal velocity limit is set to maxSpeedXY
- Advancing equation
accelCmd = kpPosXY * (posCmd - pos) + kpVelXY * (velCmd - vel) + accelCmd; - Making sure that acceleartion velocity limit is set to maxAccelXY
- acceleration z command set to zero similar to position and veolocity
AltitudeControl()
Altitude controller is a PD controller.
We calculate the errors of z_err and z_err_dot
Then we apply the advance function
u_1_bar = p_term + d_term + z_dot_dot_target
In this part, we will explore some of the non-idealities and robustness of a controller. For this simulation, we will use Scenario 4. This is a configuration with 3 quads that are all are trying to move one meter forward. However, this time, these quads are all a bit different:
- The green quad has its center of mass shifted back
- The orange vehicle is an ideal quad
- The red vehicle is heavier than usual
-
Run your controller & parameter set from Step 3. Do all the quads seem to be moving OK? If not, try to tweak the controller parameters to work for all 3 (tip: relax the controller).
-
Edit
AltitudeControl()to add basic integral control to help with the different-mass vehicle. -
Tune the integral control, and other control parameters until all the quads successfully move properly. Your drones' motion should look like this:
I added an i_term which was then added to the advance function Parameters adjusted.
Now that we have all the working parts of a controller, you will put it all together and test it's performance once again on a trajectory. For this simulation, you will use Scenario 5. This scenario has two quadcopters:
- the orange one is following
traj/FigureEight.txt - the other one is following
traj/FigureEightFF.txt- for now this is the same trajectory. For those interested in seeing how you might be able to improve the performance of your drone by adjusting how the trajectory is defined, check out Extra Challenge 1 below!
How well is your drone able to follow the trajectory? It is able to hold to the path fairly well?
Initially I was struggling with mostly the Z axis motion. I focused on tuning it first and then I fixed the roll pitch of drone 3.

