Creating Kubernetes Cluster with Kubeadm and Using Ksonnet/Seldon to Serve Keras Machine Learning Algorithm on the Cluster, Monitor Model Perfomance with Seldon Analytics, and Distributed Train Models with Jupyter Hub.
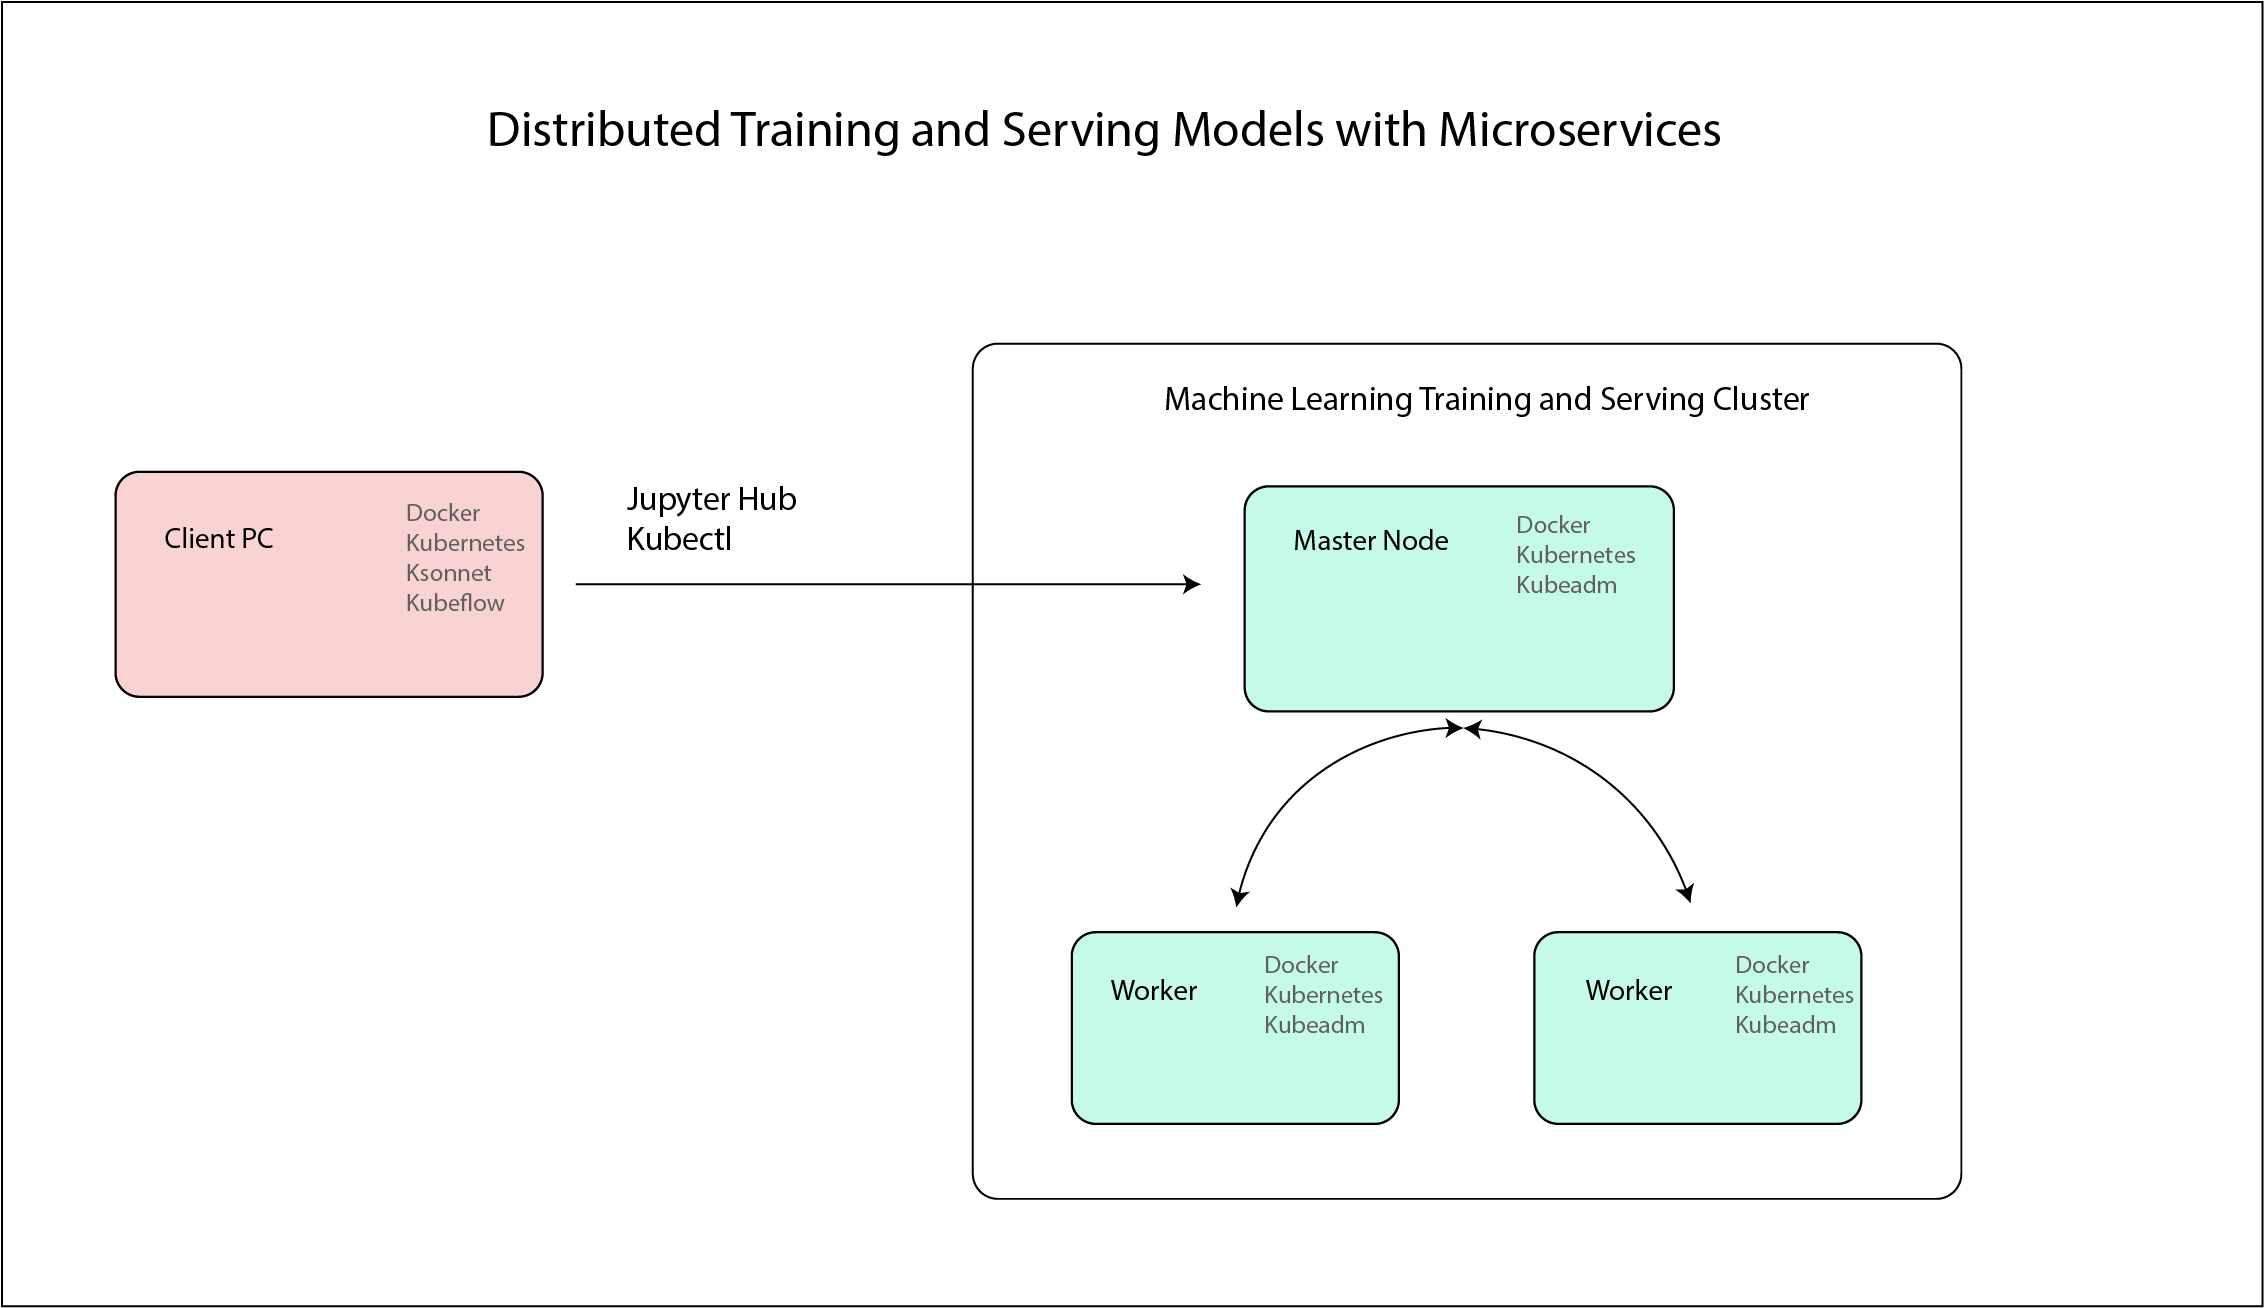
The Final design of the cluster is as follow:
- Download Docker
- Download Kubernetes
- Download Kubeadm
- Download Docker
- Download Kubernetes
- Download Kubeadm
- Download Docker
- Download Kubernetes
- Download Ksonnet
- Download Kubeflow
Follow the instructions here https://www.docker.com/get-started When downloading Docker on Windows and Mac it will also download kubernetes
Follow the instructions here https://kubernetes.io/docs/getting-started-guides/ubuntu/
Follow the insturctions here https://kubernetes.io/docs/setup/independent/install-kubeadm/
Follow the instructions here https://github.com/ksonnet/ksonnet
As detailed in the below instructions
Swap memory needs to be off: sudo swapoff -a
After installing the appropriate installation you can run the following codes to download the appropriate software.
Run the following code:
sudo apt-get update \
  && sudo apt-get install -y \
  kubelet \
  kubeadm \
  kubernetes-cni
Figure out computer IP address to be used next:
ifconfigsudo kubeadm init --pod-network-cidr=10.244.0.0/16 --apiserver-advertise-address=10.0.10.107 --kubernetes-version stable-1.12Optional:
sudo useradd packet -G sudo -m -s /bin/bash
sudo passwd packet
The following codes makes sure you are utilizing the correct appropriate configuration files
cd $HOME
sudo whoami

sudo cp /etc/kubernetes/admin.conf $HOME/
sudo chown $(id -u):$(id -g) $HOME/admin.conf
export KUBECONFIG=$HOME/admin.conf

echo "export KUBECONFIG=$HOME/admin.conf" | tee -a ~/.bashrc
To use the master node as a Worker
kubectl taint nodes --all node-role.kubernetes.io/master-Apply your pod network (flannel)
kubectl apply -f https://raw.githubusercontent.com/coreos/flannel/master/Documentation/kube-flannel.yml
kubectl apply -f https://raw.githubusercontent.com/coreos/flannel/master/Documentation/k8s-manifests/kube-flannel-rbac.ymlSimilarly to above download the appropriate software and run the following codes to double check all software are downloaded.
sudo apt-get update \
  && sudo apt-get install -y \
  kubelet \
  kubeadm \
  kubernetes-cni
Join the cluster with whatever Token provided above after running the kubeadm init...
example:
kubeadm join --token f2292a.77a85956eb6acbd6 10.100.195.129:6443 --discovery-token-ca-cert-hash sha256:0c4890b8d174078072545ef17f295a9badc5e2041dc68c419880cca93d084098Once the master and worker nodes are set there is not much additional to do on the above and the rest is just adding and configuring the containers on the cluster.
Run this code on either the master or the client node
This will help you to use your computer instead of the master node to communicate with the cluster. scp root@:/etc/kubernetes/admin.conf .
scp root@10.0.10.107:/etc/kubernetes/admin.conf .
export KUBECONFIG=~/Documents/Kubernetes/my-kubeflow/admin.conf
You can use your computer instead of the master.
You will need ksonnet to help packaging your application. To download run the following (Mac):
brew install ksonnet/tap/ksfor other operating systems check the following: https://github.com/ksonnet/ksonnet
Run the following to download kubeflow to make it easier to utilize machine learning tools over the cluster. For further details check the following: https://github.com/katacoda/kubeflow-ksonnet
# Create a namespace for kubeflow deployment
NAMESPACE=kubeflow
kubectl create namespace ${NAMESPACE}

# Which version of Kubeflow to use
# For a list of releases refer to:
# https://github.com/kubeflow/kubeflow/releases
VERSION=v0.1.3

# Initialize a ksonnet app. Set the namespace for it's default environment.
APP_NAME=my-kubeflow
ks init ${APP_NAME} --api-spec=version:v1.11.3
cd ${APP_NAME}
ks env set default --namespace ${NAMESPACE}

# Install Kubeflow components
ks registry add kubeflow github.com/kubeflow/kubeflow/tree/${VERSION}/kubeflow

ks pkg install kubeflow/core@${VERSION}
ks pkg install kubeflow/tf-serving@${VERSION}
ks pkg install kubeflow/tf-job@${VERSION}

# Create templates for core components
ks generate kubeflow-core kubeflow-core

# If your cluster is running on Azure you will need to set the cloud parameter.
# If the cluster was created with AKS or ACS choose aks, it if was created
# with acs-engine, choose acsengine
# PLATFORM=<aks|acsengine>
# ks param set kubeflow-core cloud ${PLATFORM}

# Enable collection of anonymous usage metrics
# Skip this step if you don't want to enable collection.
ks param set kubeflow-core reportUsage true
ks param set kubeflow-core usageId $(uuidgen)

# Deploy Kubeflow
ks apply default -c kubeflow-coreRun the following codes to start jupyter hub
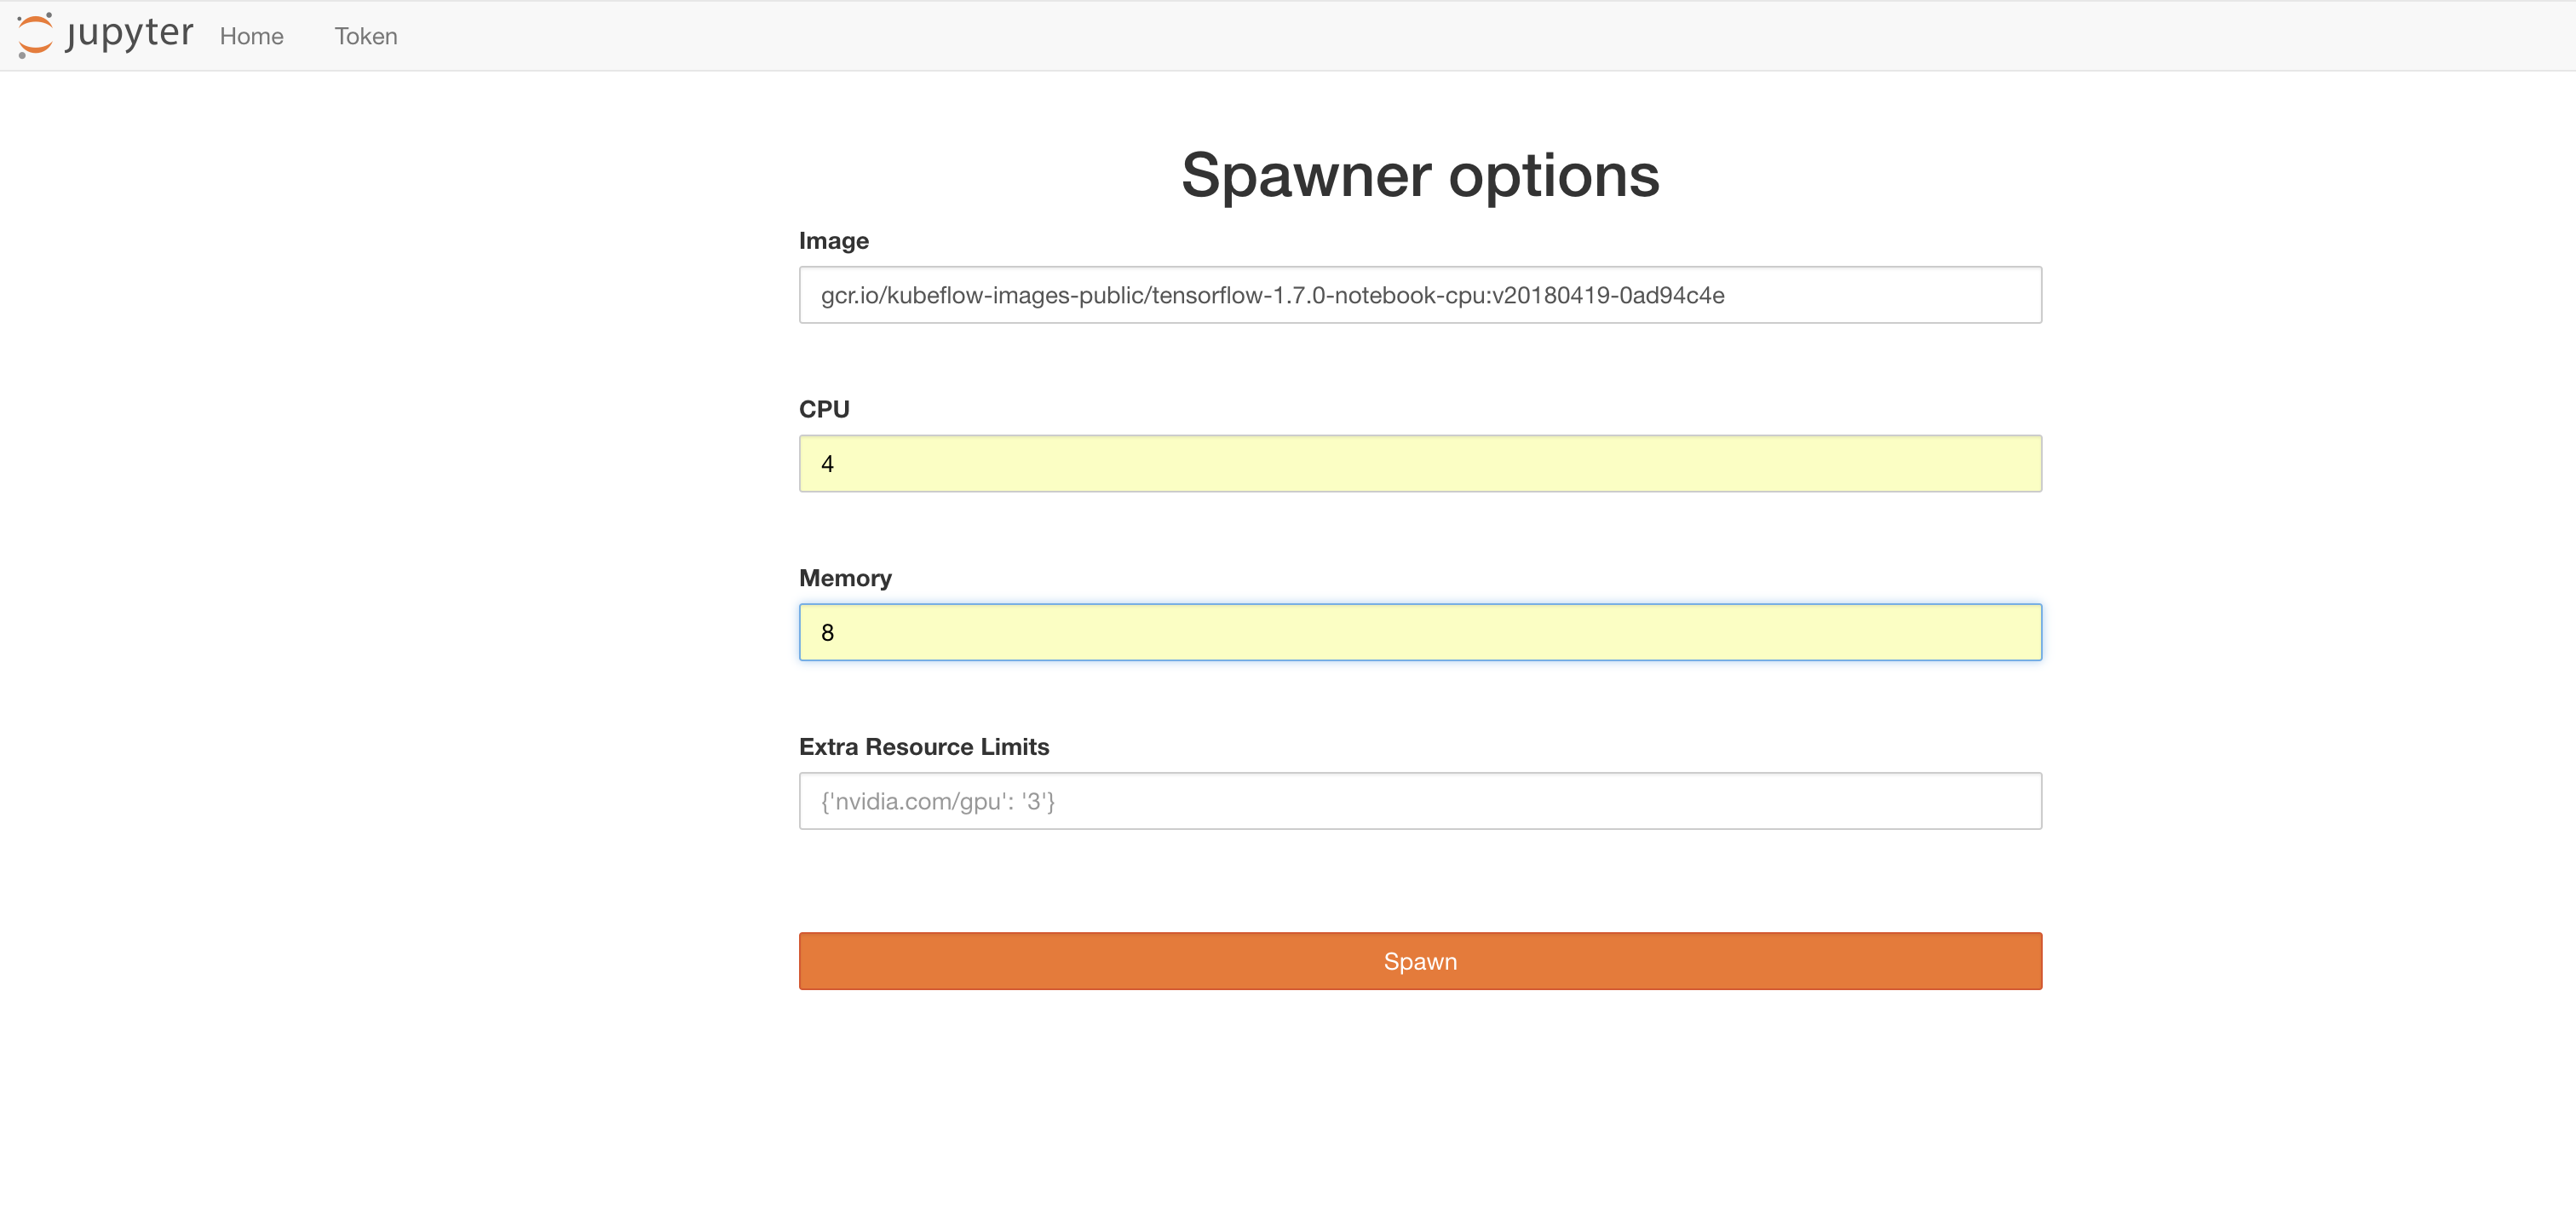
# To connect with jupyer hub locally
PODNAME=`kubectl get pods --namespace=${NAMESPACE} --selector="app=tf-hub" --output=template --template="{{with index .items 0}}{{.metadata.name}}{{end}}"`
kubectl port-forward --namespace=${NAMESPACE} $PODNAME 8000:8000To create the docker image you can use seldon wrapper using the ksonnet packaging system.
ks pkg install kubeflow/seldon
ks generate seldon seldon
ks apply default -c seldon --namespace KubeflowOnce you download seldon using ksonnet and through kubeflow you can build the docker image as follow (for further details check the following https://github.com/kubeflow/examples/tree/master/xgboost_ames_housing):
- Create a folder with three files: prediction file, the saved keras model, and requirements file. An example here is the Example_Folder where testServing is the prediction file, test_model.h5 is the saved keras model, and requirements.txt is the python library requirements.
- Build the image with the help of seldon (https://github.com/SeldonIO/seldon-core).
- You have now an image that is ready to deploy on kubernetes.
For the testServing file you only need to load the model and and return the prediction as follow:
from keras.models import load_model

class testServing(object): # The file is called MnistClassifier.py

    def __init__(self):
        # You can load your pre-trained model in here. The instance will be created once when the docker container starts running on the cluster.
        self.model = load_model('./test_model.h5')

    def predict(self,X,feature_names):
		 # X is a 2-dimensional numpy array, feature_names is a list of strings. This methods needs to return a numpy array of predictions.
        return self.model.predict(X)
To create the build folder in the Example_Folder run the following after adjusting the path and the name of the image:
docker run -v ~/Documents/Kubernetes/my-kubeflow/ModelServing:/my_model seldonio/core-python-wrapper:0.7 /my_model testServing 0.1 seldoniothen to build the model and push run the following (you would need to edit both files for appropriate nameing and pushing to dockerhub)
cd build
./build_image.sh
./push_image.shOnce the image is pushed you need add it to your kubernetes cluster as follow
ks generate seldon-serve-simple testserving   \
                                --name=mytestserving   \
                                --image=rocketheat/testclassifier:0.5   \
                                --namespace=kubeflow   \
                                --replicas=1

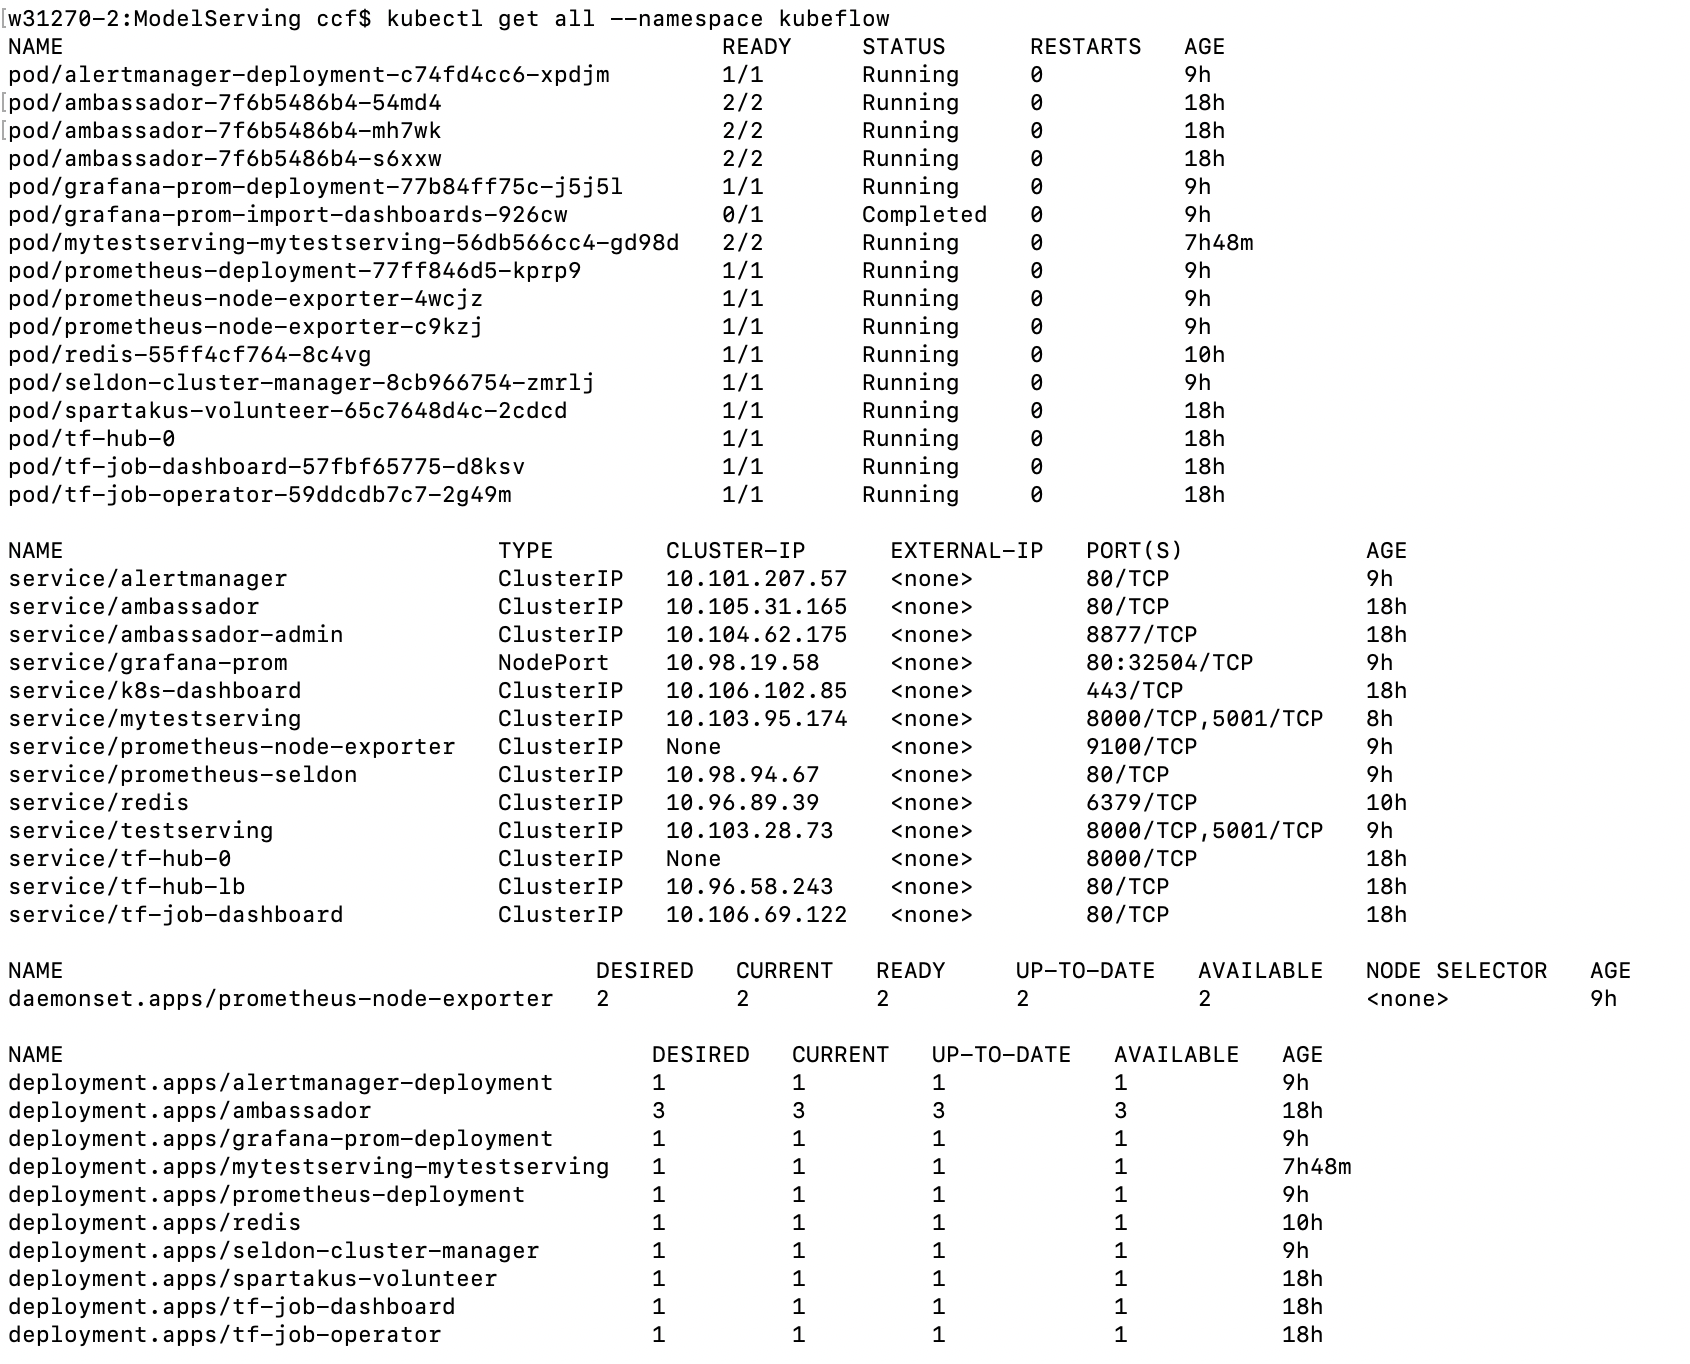
ks apply default -c testserving --namespace kubeflow
Once the container is up and running you can test it as follow: First run forward it locally with
kubectl port-forward $(kubectl get pods -n ${NAMESPACE} -l service=ambassador -o jsonpath='{.items[0].metadata.name}') -n ${NAMESPACE} 8080:80or
kubectl port-forward $(kubectl get pods -n kubeflow -l service=ambassador -o jsonpath='{.items[0].metadata.name}') -n kubeflow 8002:80Then you can test the api as follow: Can be used on kubernetes
curl -X POST -H 'Content-Type: application/json' -d '{"data":{"ndarray":[[1,3]]}}' http://localhost:8002/seldon/mytestserving/api/v0.1/predictionsIf you run the api as simple docker container you can use the following
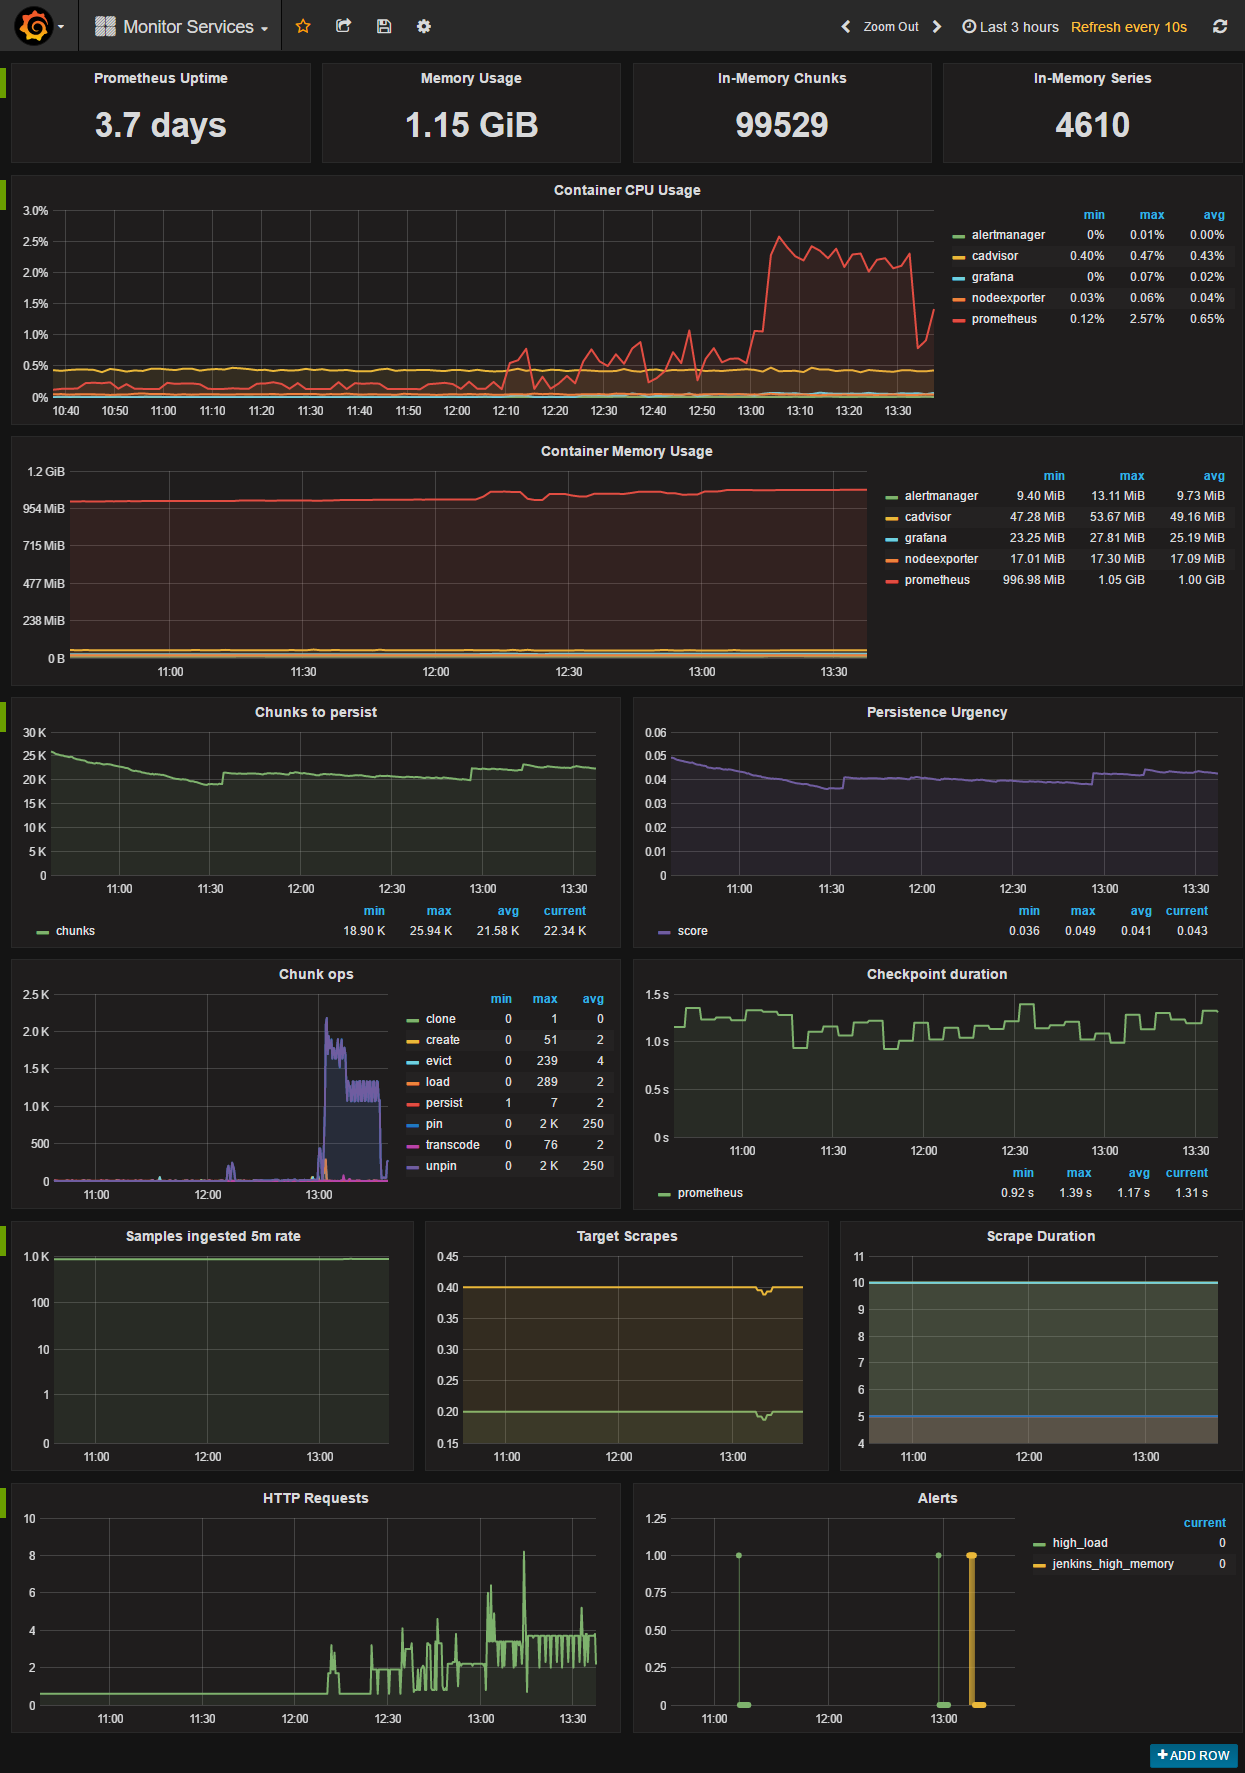
curl -H "Content-Type: application/x-www-form-urlencoded" -d 'json={"data":{"tensor":{"shape":[1,2],"values":[1,3]}}}' http://localhost:8002/seldon/mytestserving/api/v0.1/predictionsThere is a powerful seldon core analytics that you can use to monitor perfomance of all models, cluster, memory....
You will need to download helm. You can get more details here: https://github.com/helm/helm
brew install kubernetes-helmTo download the dashboard you can follow the information here (https://github.com/SeldonIO/seldon-core/blob/master/docs/analytics.md):
helm install seldon-core-analytics --name seldon-core-analytics \
     --repo https://storage.googleapis.com/seldon-charts \
     --set grafana_prom_admin_password=password \
     --set persistence.enabled=false \
and to run locally
kubectl port-forward $(kubectl get pods -l app=grafana-prom-server -o jsonpath='{.items[0].metadata.name}') 3000:3000Link: http://localhost:3000/dashboard/db/prediction-analytics?refresh=5s&orgId=1
Username admin, and password password
unbind port already in use
lsof -ti:8002 | xargs kill -9or
netstat -lnp | grep 1025


