
The Developer Rig can be used in two modes to test your Extension, Online Mode and Local Mode. Online Mode will let you test with production APIs and hosted assets on Twitch, but will first require completion of Extensions Developer onboarding here. The Rig also supports Local Mode to let you get started building quickly pre-onboarding, using mock versions of the APIs.
Take these steps to get Hello World running in Local Mode in the Rig.
- If you already have Git installed, clone the rig. Otherwise, download and extract the Zip file.
- Open the
scriptsfolder in thedeveloper-rigfolder. - Double-click the
runfile on Mac,run.cmdfile on Windows. The first time you run the script it will take a while since it will install and configure all of the dependencies.
When you are done using the Developer Rig, you may either close all opened terminal windows or press Ctrl-C in all of them.
See additional documentation on how to use the Developer Rig in Local Mode here: Using Local Mode
If you're looking to move past Local Mode and run the Rig in Online Mode, go here: Getting Started in Online Mode
- Twitch Extensions 101
- Overview
- Getting Started in Online Mode
- Loading an Example Extension
- TL;DR
- Using Local Mode
- FAQs
- Troubleshooting
Think of Twitch Extensions as Apps for Twitch. Developers can create sandboxed web applications that run on Twitch that provide new and different ways for viewers and broadcasters to interact.
To build the simplest Extension, a developer creates a web application (a collection of assets that include HTML, CSS, and Javascript) and then hosts these assets from the Twitch CDN ext.twitch.tv. A more complicated but more common Extension leverages an Extension Backend Service (EBS). An EBS is a web service written by a developer for managing the state of their Extension. These two blocks of developer written code are often referred to as the frontend and the backend.
Developers are currently completely responsible for operating their backends.
The Twitch Developer Site is currently where the lifecycle of an Extension is managed. This includes creation, frontend asset upload, submitting to review, and promoting to be released. The Dev Site is where key pieces of data are retrieved to configure and run the Developer Rig.
The Developer Rig hosts Extension frontends locally. This gives developers complete flexibility to run and test their Extensions without needing to load Twitch. For example, the Developer Rig does not currently stream video, reducing friction for testing a Video Overlay Extension. Additionally, multiple views of a single Extension can be loaded onto a single page, giving developers a single pane of glass for the different relevant views for their Extension.
The Developer Rig is a tool that enables Twitch Extensions developers to iterate more quickly and focus on building great Extensions, by providing a single pane of glass for all end user Extensions views and interactions. It is a lightweight web app that runs in a browser and is built using NodeJS 6+ and React. The Developer Rig allows Extensions Developers to quickly and easily, locally end-to-end test in development Extensions.
The Developer Rig renders Extensions in a combination of user contexts, views and different anchor types.
Supported user contexts include:
- broadcaster
- logged in viewers (linked and unlinked)
- logged out viewers (i.e. anonymous users)
Supported views include:
- channel page
- live dashboard
- broadcaster configuration
Supported anchor types include:
- panels
- video overlays
- mobile and video components
Extension output logs can be redirected to the Rig Console, a Developer Rig specific local console.
If you're just getting started with Extensions and haven't gone through Extension Developer Onboarding, follow the steps at the top of the documentation for Local Mode. Otherwise, the following guide will help you create your first Extension on Twitch and run it in the Developer Rig in Online Mode.
There are detailed guides for Mac and Windows to get you from nothing to Hello World.
For each Extension to be tested online in the Developer Rig, a corresponding Extension needs to be created on the Twitch Dev Site. More detailed instructions to do this can be found here. Most fields are not relevant for the Developer Rig. The Type of Extension is loaded into the Developer Rig, and is hence important. Similarly, the Author Email must be correctly set and verified, before an Extension secret can be created.

There are several highly pertinent pieces of data that need to be taken from the dev site, and surfaced in the Developer Rig for it to operate. These include:
- The Client ID of the Extension
- The version of the Extension to be loaded in the Developer Rig
- A generated Extension Secret, to be used to sign Extension JWTs
These are hard requirements that enable the Developer Rig to function correctly in Online Mode!
Where possible, the Developer Rig is self-contained. Note that you should sign in with your Twitch credentials in Local Mode before using online mode, as it provides necessary information for the Rig Configuration.
If you are new to building Twitch Extensions, read this first.
There are several pieces of configuration that the Developer Rig requires to function correctly:
-
Client ID: the unique identifier for your Extension. Go to the Extensions Dashboard, select the Extension you want to run in the Developer Rig, then look for
Client IDunderAbout This Extension.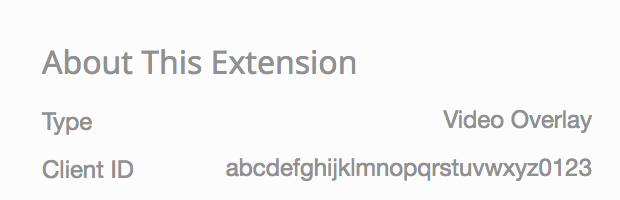
-
Extension Secret: a valid secret, that allows your Extension to authenticate. Go to the Extensions Dashboard, select the Extension you want to run in the Developer Rig, select the
settingstab, and then navigate toSecret Keysand create/retrieve a valid secret.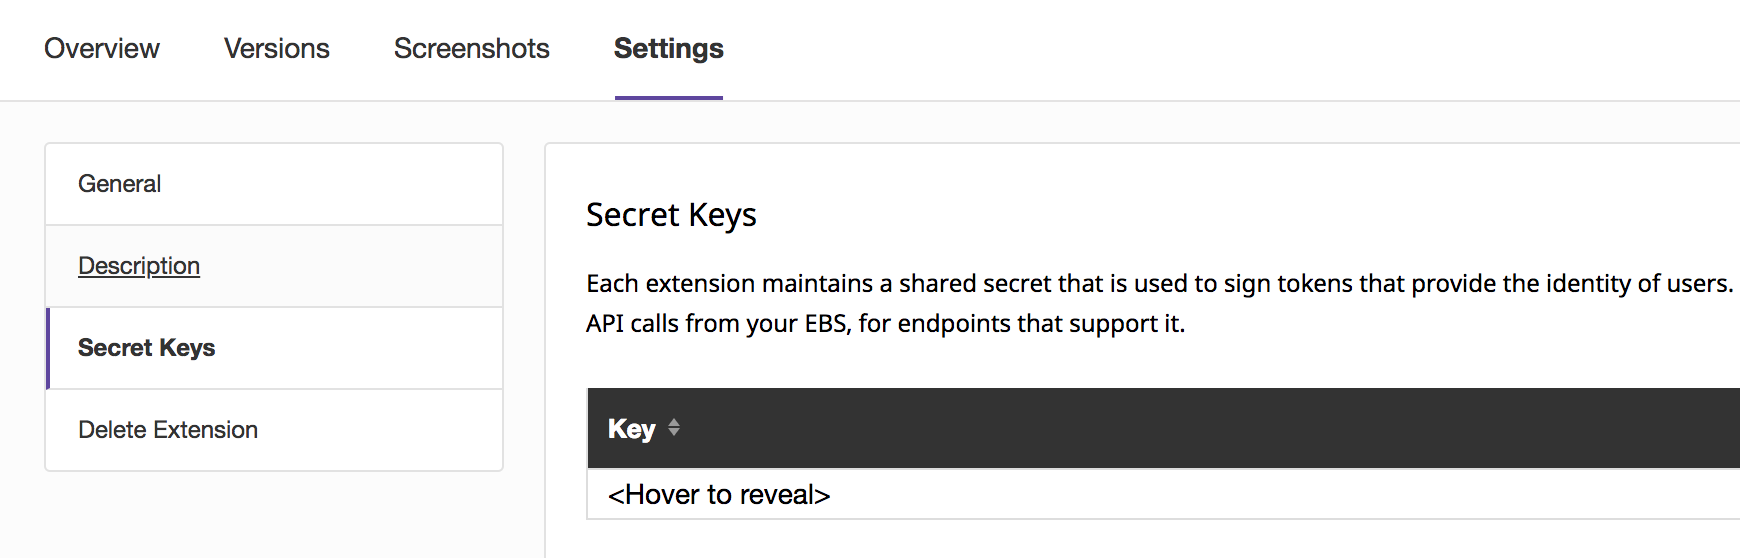
This is not the Client Secret field located on the General tab under settings. Please ensure to go to Secret Keys.
-
Version: the exact version of an Extension to be loaded in the Developer Rig. Go to the Extensions Dashboard, find the Extension you want to run in the Developer Rig, and take note of the version number displayed under
status.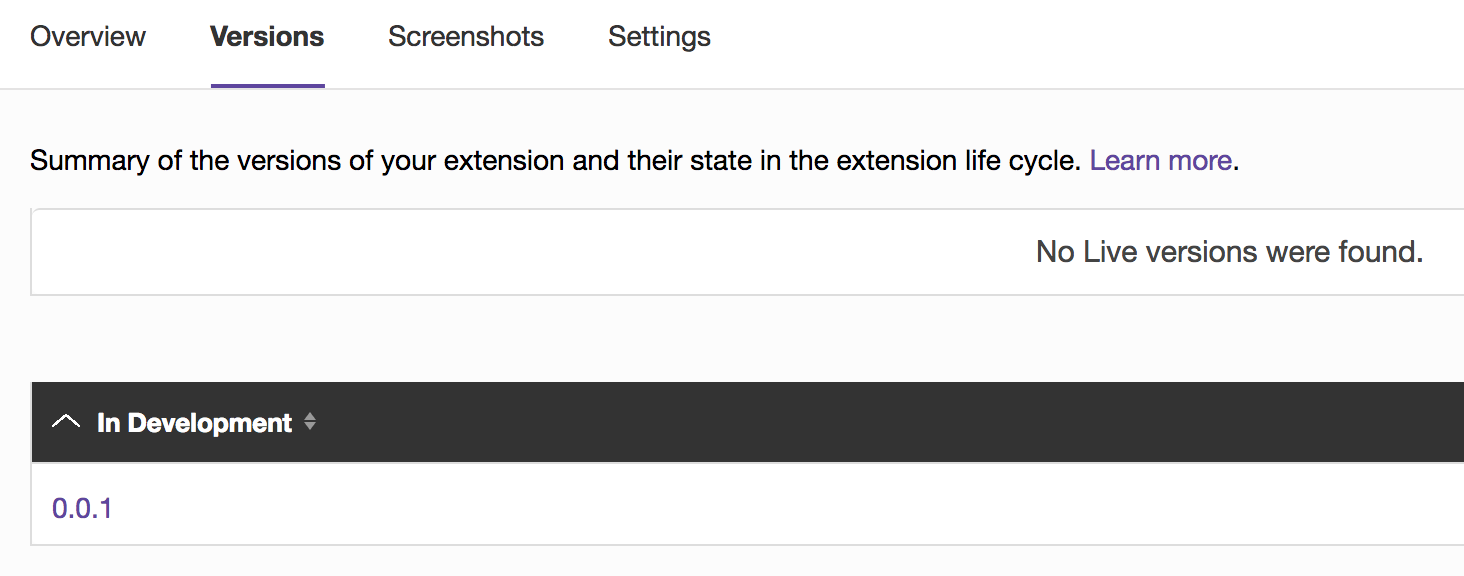


Values for these fields need to be injected as environment variables to the Developer Rig at startup. The environment variables names are:
EXT_CLIENT_IDEXT_SECRETEXT_VERSION
If you don't want to set these values via environment variables, all but the extension secret can be set through a configuration file. This file is specified via a command line argument and is in the format of
{
  "clientID": "<client id>",
  "version": "<version>"
}Ensure that the Developer Rig dependencies are installed and required configuration is available.
To start the rig with environment variables, run:
EXT_CLIENT_ID=<client id> EXT_SECRET=<secret> EXT_VERSION=<version> yarn startTo start the rig with a config file and command line arguments, run:
yarn start -s <secret> -c location/of/your/configThe location of your config file can be either relative to the directory you are running the command or an absolute path to the file.
This will cause your browser to open to https://localhost.rig.twitch.tv:3000.
Note: Depending on your browser and operating system, you may see a warning that the TLS certificate is illegitimate as it is self-signed. You can choose to proceed through this warning. TLS certificate generation occurs the first time the Developer Rig is started or it is used to host an example extension. Generated certificates are stored in the ssl directory. If you are on OSX, we'll generate and install the certs in the keychain. If you are on Windows or Linux, you'll have to configure that yourself.
The Developer Rig UI presents a variety of views, anchors, and contexts.
This is likely the most used area for the Developer Rig. Views, anchors, and contexts can be configured to support comprehensive testing of an Extension.
Click the plus button to add a new view for the configured Extension Client ID, and remove them by clicking on the x on a view.
This section displays the Broadcaster Config view that is presented to broadcasters after they have installed an Extension, but before they are able to activate it.
This section displays the Live Config view that appears on a broadcaster's dashboard for an Extension.
The section displays manifest data pulled from Twitch for the corresponding Extension Client ID.
At the bottom of every page, there is the Developer Rig Console. Extensions are able to output directly to this console by making the following call from their Extension's frontend javascript:
window.Twitch.ext.rig.log(<message to log>)
Each view is prefixed with the corresponding "user context", i.e logged in viewer, broadcaster etc. An active video stream is not required to leverage video overlays in the Developer Rig. When an Extension is running in the Developer Rig, developers can interact with it just like an end user.
For developers currently in the Bits Limited Preview, this tab will let you configure your various bits products for use in your extension. You will need to sign in with your developer credentials to get this working. If you are not currently in the Bits Limited Preview, you will not be able to access this page (but stay tuned for when it goes to general availability).
By default, the Developer Rig links to example Extension code available on GitHub. To pull and link this code into the Developer Rig, run:
# Usage: yarn extension-init -a [github_account] -r [github_repo] -d [directory]
yarn extension-init -d <directory>
To have the Developer Rig host the frontend assets of an Extension, use the host command. Assets for the example Extension can be hosted on https://localhost.rig.twitch.tv:8080 by issuing the following command:
# Usage: yarn host -d <directory> -p [port]
yarn host -d <directory>/public -p 8080
Ensure that the URL that the example Extension's Extension Backend Service (EBS) is running on and the Extension secret, match what is specified in the dev site!

In the above screenshot, assets are specified as being available at:
https://localhost:8080/viewer.html
https://localhost:8080/config.html
If the Developer Rig is used to host an Extension's front end assets, the Testing Base URI must be set to:
https://localhost.rig.twitch.tv:[port]
When an Extension has been loaded into the Developer Rig, refreshing your browser window will cause the latest Extension assets to be pulled into the page.
Conceptualizing how an Extension works can be tricky, particularly in the context of the Developer Rig. Three main pieces are needed:
- the Developer Rig service (i.e.
yarn start) - a service hosting the Extension front end and associated assets (i.e.
yarn host) - an Extension Backend Service (EBS)
The Developer Rig loads the front end assets into its pages. The front end pages are able to call the EBS (signing requests with the Extension's JWT). An EBS can either respond directly to a front end client, or is able to push messages to all connected front ends via PubSub.
If you are experience difficulties getting things to work:
- ensure that everything is running on HTTPS and accessible in your browser
- ensure that the secret that is loaded into the Developer Rig matches the secret present in your EBS
- if you are struggling to get PubSub to work, assert that your EBS receives and extracts the channel name from the JWT sent by the Extension front end
Local Mode enables developers to run their extension projects against mock APIs and mock PubSub locally on their machine. Developers can start building extensions without having first gone through the Twitch Extension Developer onboarding. Additionally, it provides an ability to perform integration tests against your extension via configurable responses to the Extensions Helper Library. The following sections will illustrate how to use Local Mode in the Rig.
There are several options for creating an extension manifest file. The
example above creates an extension manifest file for a panel extension.
There are four types of extensions. You may specify multiple types
for the -t parameter, any combination of panel, video_overlay,
mobile and video_component. There are other options for panel or
component attributes along with some text descriptors. They all have
reasonable defaults; specifying them is optional. For more information
on the available options, run yarn create-manifest -h in a terminal
window. Note that you can edit the JSON file to make changes or
adjustments.
The foundation of Local Mode is a JSON document called the "Run List". It provides developers the ability to trigger specific callback responses through the Extensions Helper Library. To your extension, it will appear like these have come from Twitch Extension APIs.
When you get the Local Mode edition of the rig, it will contain a Run List pre-populated with mock responses. You'll be able to alter these responses by directly editing the document.
When Local Mode is enabled, each extension view will have a dropdown that enables the developer to choose a response from the "Run List". When a response is selected, clicking the "Trigger" button will send it through the Extension Coordinator and it will pass through Helper to your extension code.
Different views can be pointing at different places in the "Run List" at the same time.
For more details about the APIs and responses see the documentation here
To edit the "Run List" look for the document called runlist.json in your Rig directory. Each entry in the Run List has 3 components:
- A name for easy identification
- The type of callback e.g OnContext
- The callback response
You should refer to the Helper API documentation here before editing and creating new responses.
When you use Local Mode with your EBS, you'll be using a hard-coded secret in the Rig. This is also included already in the Hello World example. When creating an extension on Twitch, you'll have your own client ID and secret.
The base-64-encoded Local Mode Secret is: kkkkkkkkkkkkkkkkkkkkkkkkkkkkkkkkkkkkkkkkkkkk
Do not expose your EBS beyond your local machine while using the Local Mode secret. It is purely meant to speed up initial development.
When you are in Local Mode, to make calls to Pub Sub, it's important to make sure your EBS is pointing at the correct URI. You'll want to be making calls to localhost.rig.twitch.tv:3000/extensions/message as opposed to api.twitch.tv/extensions/message in order to correctly send your message. The rest of your message should be formatted the same as if you were sending to Twitch PubSub. See the Hello World backend.js files for examples.
After you create your local extension manifest, you can open up manifest.json and edit the fields directly. Most of the fields are not relevant to running your extension locally in the Developer Rig, but you should be aware of a few:
- name: Not critical for Local Mode, but it's always important to give your project a sweet name
- anchor: This should be left blank
- panel_height: This is the height of a panel extension. Default is 300 pixels and must be between 100 and 500 pixels. For Panel extensions only.
- URLS of various views - When adding a view in the rig, it will look to these for the front end assets. If you use the Rig host command, be sure to make sure the port and base URI are correct.
- aspect_width: expressed as a % of the screen width and must be < 50%. 30% would show up as 3000. For Component Extensions only.
- aspect_height: expressed as a % of the screen height from 1% to 100%. 30% would show up as 3000. For Component Extensions only.
- zoom_pixels: default is 1024. For Component extensions only.
- zoom: default is true. For Component Extensions only
When creating additional manifests, use the -h flag to see what additional arguments you can add.
Can I use the Developer Rig without first completing Extensions Developer On-boarding?
Yes, but you must use the Developer Rig in Local Mode. For Online Mode, valid client IDs and Extension secrets are required to leverage the Developer Rig. Currently, these can only be generated on the Twitch Dev Site, once on-boarding is complete.
Are the Extensions Actions supported?
Extensions Actions will be added shortly to the Developer Rig.
XXX in the Developer Rig sucks! The Developer Rig is missing feature YYY!
Neither of these are questions :) . Raise a PR with proposed changes, and let's help each other!
What are these Twitch Extensions of which you speak, and how can I learn more?
More information about Twitch Extensions is available on the Twitch Developer Site, and in the Twitch Developer Forums.
The linked Hello World repository uses EXT_OWNER_ID while the Developer Rig uses EXT_OWNER_NAME. What's up with that?
The Developer Rig uses an API call to the Twitch /users endpoint to retrieve an owner's user id. This has not been done yet in the Hello World repository. It should be added shortly.
What browsers and platforms are supported?
We know the Developer Rig works in Chrome and Firefox on Mac and Windows. Feel free to help ensure it works in other browsers and platforms!
The Extension I have specified is not appearing the Developer Rig.
There are a number of things that can create problems. The most common causes are: invalid NPM or NodeJS installations; a missing host file entry for the Developer Rig; misconfigured Environment variables being passed to the Developer Rig; or Extension configuration that does not match the contents of the Twitch Developer Site.
I am certain that my Developer Rig Configuration is correct, but my Extension is still not working.
Clear your browser cache and local storage, restart the Developer Rig, and cross your fingers. To delete the rig's local storage open the javascript console in your browser on a tab with the rig open and do
localStorage.clear();then refresh. Ensure you've included the Twitch Extension Helper in your front end files.
I see an error when attempting to run yarn test.
Sometimes deleting and reinstalling your
node_modulescan correct this issue. On MacOS, you may need to explicitly install watchman viabrew install watchman.
yarn install fails in libssh2
See issue #48. Be sure
libsshand its dependencies are installed.
I get an error when pulling in the example project!
Ensure that Git is in your PATH variables by attempting to run "git" at your commmand line. If that works, also ensure that the local folder does not currently exist.
The Developer Rig stops running unexpectedly in Local Mode.
Try deleting the
node_modulesdirectory and rerunningyarn install.