- Validation results:

The module for "3D" landmark detection(Look at the chin in the figure above) using the model trained with synthetic data. Because this is not a "2D" detection, it even predicts the opposite side of the face. This project is inspired by these two MicroSoft papers: Dataset and Overall pipeline from this one and GNLL Loss from this one
Note: I only conducted a shallow parameter search. Therefore, it may not be the module that produces the best performance. Please find parameters that make it better
1. Download the pretrained weights from Here
Take these example commands written below:
#General command
python test.py --datasetPath <test dataset directory> --pretrained <pretrained weight path>\
    --saveDir <directory for saving test results> --gpu <gpu number>\
    --IsGNLL <whether to use models trained with GNLL loss(boolean, default=False)>\
    --modelType <modelType(ResNet34 or MoblieNetv2)>

# Using ResNet34 model trained with MSE loss
python test.py --pretrained your_path/resNet_MSE_120epoch.pt

# Using ResNet34 model trained with GNLL loss
python test.py --pretrained your_path/resNet_GNLL_120epoch.pt --IsGNLL True

# Using MoblieNetv2 model trained with MSE loss
python test.py --pretrained your_path/moblieNet_MSE_120epoch.pt --modelType MoblieNetv2

# Using MoblieNetv2 model trained with GNLL loss
python test.py --pretrained your_path/moblieNet_GNLL_120epoch.pt --IsGNLL True --modelType MoblieNetv2import test as T
module = T.test_module(datasetPath = None, pertrained = './pretrained/pretrained_model.pt', \
saveDir = './test_result', IsGNLL = False, modelType = 'ResNet34')
# pred_ladmks = [[x1,y1],[x2,y2]...]
info_1 = module.inference_imgFolder(your_img_folder)
'''info_1 - landmarks information of images in your_img_folder:
[
[
[pred_ladmks(2D array)],
[pred_ladmks],
... ],
[
[pred_ladmks],
[pred_ladmks],
... ]
]
'''
info_2 = module.inference_imgPath(your_img_path)
'''info_2 - landmarks information for an image of your_img_path:
[
[pred_ladmks(2D array)],
[pred_ladmks],
... ]
'''
info_3 = module.inference_img(your_img) #input: PIL image
'''info_3 - a predicted landmark(2D array):
[[x1,y1],[x2,y2]...]
'''1. Download the dataset from Here
2.1 Make new directory named bbox_leftcorner_coord for saving bounding box coordinate in your your_dataset/
python Make_Bbox.py --datasetPath <directory of images>
(Note: Among the 100,000 images, 385 images were not recognized. These images were treated as center crop)
Take these example commands written below:
#General command
python train.py --name <name of the experiment> --datasetPath <test dataset directory>\
    --saveDir <directory for saving logging> --gpu <gpu number>\
    --numEpoch <the number of epoch> --batchSize <batch size>\
    --lr_landmark <learning rate> --print_interval <the interval of the printing log>\
    --IsGNLL <whether to use models trained with GNLL loss(boolean, default=False)>\
    --modelType <modelType(ResNet34 or MoblieNetv2)> --IsAug <whether to use augmentation(boolean, default=True)>

# Train with ResNet34 model and MSE loss
python train.py --name <name of the experiment> --saveDir <directory for saving test results>

# Train with ResNet34 model and GNLL loss
python train.py --name <name of the experiment> --saveDir <directory for saving test results>\
                --IsGNLL True

# Using MoblieNetv2 model trained with GNLL loss
python train.py --name <name of the experiment> --saveDir <directory for saving test results>\
                --modelType MoblieNetv2

# Using MoblieNetv2 model trained with MSE loss without data augmentation
python train.py --name <name of the experiment> --saveDir <directory for saving test results>\
--modelType MoblieNetv2 --IsAug FalseYou can make visualization from the predicted landmarks and test figure.
The visualization function is placed in visualization.py. Check def save_result and def save_result_std of it. Or you can make the visualzation figure with by python visualization.py. See the if __name__ == "__main__": in visualization.py
You can also make visualization from test module like:
import test as T

module = T.test_module(datasetPath = None, pertrained = './pretrained/pretrained_model.pt', \
                        saveDir = './test_result', IsGNLL = False, modelType = 'ResNet34')

path = "./test_image/FFHQ00002.png"
img = Image.open(path)
img = img.resize((256, 256))

pred_ldmks = module.inference_img(img)
#MSE model
module._save_result(img, np.expand_dims(pred_ldmks, axis = 0), "_save_result", 0)
# the results will be saved in "./_save_result.png"

#GNLL model
module._save_result_std(img, np.expand_dims(pred_ldmks, axis = 0), "_save_result_std", 0)
# the results will be saved in "./_save_result_std.png"Here is some good result of our module. Check test_image/ and test_result/ for the original test image and more results of them. The color of the landmark indicates confidence with the model trained by GNLL loss. The more red it is, the more reliable it is.

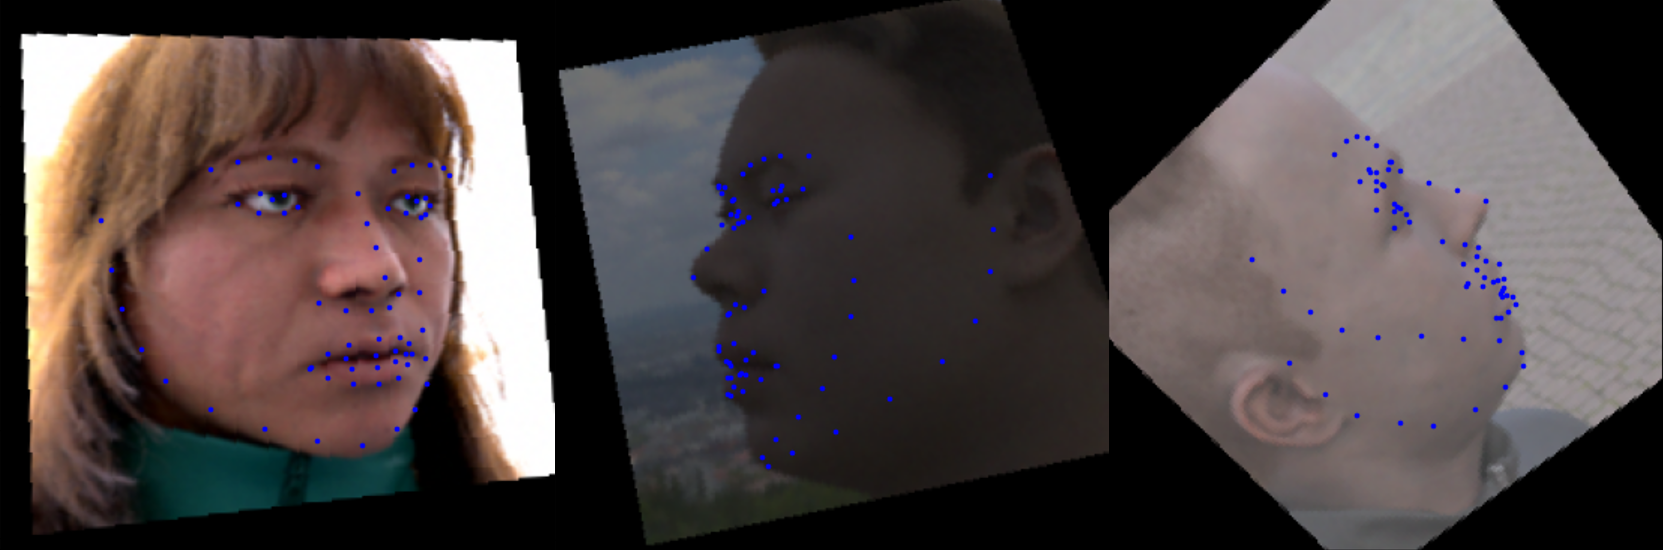
Unfortunately, this module is not perfect. Here are some examples of failures. In my opinion, the reasons for failure are: first, out of the distribution of training dataset (baby face, leftmost), second, face occlusion(middle), and third, face recognition or alignment failure(rightmost).

Fake It Till You Make It Face analysis in the wild using synthetic data alone (ICCV2021)
3D Face Reconstruction with Dense Landmarks (ECCV 2022)
RetinaFace for making bounding box
pip install pandas
pip install natsort
pip install retina-face
pip install "opencv-python-headless<4.3"