This repository contains the necessary steps to implement a High-Availability Kubernetes cluster (HA) for deploying micro ONOS SDN controller as a set of microservices. We use a set of Raspberry pi as OpenFlow switches, Kubernetes workers, and vagrant virtual machines to implement the control plane. All Raspberrys are running as worker nodes and deployed via Ansible implementation. The control plane uses vagrant and virtualbox for functionalities and storage. To use this repo, follow the setup instructions below.

Control plane and etcd:
- Master-1
- Master-2
- Master-3
Worker:
- rPi 4(ARM) x1
- rPi 4(ARM) x2
- rPi 4(ARM) x3
CNI:
- Calico
HA Kubernetes cluster:
- Keepalived and HAproxy
# Write the image to the SD card
# Raspbian for ARM processor (https://downloads.raspberrypi.org/raspios_arm64/images/raspios_arm64-2022-09-26/2022-09-22-raspios-bullseye-arm64.img.xz)

# Linux
$ sudo dd if=YYYY-MM-DD-raspios-buster-arm64-lite.img of=/dev/sdX bs=16M status=progress

# I use Raspberry Pi Imager

# Provision wifi settings on the first boot
$ cat bootstrap/wpa_supplicant.conf
ctrl_interface=DIR=/var/run/wpa_supplicant GROUP=netdev
update_config=1
country=AU

network={
    ssid=""
    psk=""
    key_mgmt=WPA-PSK
}

$ cp bootstrap/wpa_supplicant.conf /mnt/boot/

# Enable SSH on first boot
$ cp bootstrap/ssh /mnt/boot/ssh
Example flash and ssh/wifi:
sudo umount /media/<user>/boot
sudo umount /media/<user>/rootfs
sudo dd if=2021-05-07-raspios-buster-arm64-lite.img of=/dev/<disk> bs=16M status=progress
sync

# Unplug/replug SD card

cp bootstrap/wpa_supplicant.conf /media/<user>/boot/
cp bootstrap/ssh /media/<user>/boot/

sync
sudo umount /media/<user>/boot
sudo umount /media/<user>/rootfs
The individual rPi's are configured with an HA embedded etcd database here. Since the rPi setup is headless, I haven't altered any passwords or set up SSH keys, as it's a complex task. To ensure that each PI is given the same IP address, I'm using DHCP static assignment. You should update the file to suit your specific setup.
This is used as part of ansible connecting to the pi's over SSH with password auth
sudo apt-get install sshpass
apt-get upgrade
ansible-playbook -i cluster.yml playbooks/upgrade.yml
Ensure you update cluster.yml with the correct children mappings for each rpi model
ansible-playbook -i cluster.yml playbooks/overclock-rpis.yml
With the below commands, you need to include the master node (node00) in all executions for the token to be set correctly.
# Bootstrap the master and all slaves
ansible-playbook -i cluster.yml site.yml

# Bootstrap a single slave (node05)
ansible-playbook -i cluster.yml site.yml -l node00,node05

# When running again, feel free to ignore the common tag as this will reboot the rpi's
ansible-playbook -i cluster.yml site.yml --skip-tags common
This logs into node00 and copies the .kube/config file back into the local users ~/.kube/config file Allowing a locally installed kubectl/etc to be able to query the cluster
# Copy in your kube config
ansible-playbook -i cluster.yml playbooks/copy-kube-config.yml

# Set an alias to make it easier
alias kubectl='docker run -it --rm -v ~/.kube:/.kube -v $(pwd):/pwd -w /pwd bitnami/kubectl:1.21.3'

# Run kubectl within the docker
kubectl version
# Shutdown all nodes
ansible -i cluster.yml -a "shutdown -h now" all

# Ensure NFS mount is active across cluster
ansible -i cluster.yml -a "mount -a" all
ansible-playbook -i cluster.yml site.yml --tags upgrade,kubernetes
To install the control plane nodes, this implementation applies the vagrant configuration file provided in this repository. In this file, we can configure the nodes. In this case, we are going to deploy three master nodes. The required packages are installed in each node through the bootstrap.sh file.
cd vagrantfile
vagrant up
Once vagrant deploys all VirtualBox machines, we must access to each one to install all the packages required.
vagrant ssh master1
wget -c https://golang.org/dl/go1.16.3.linux-amd64.tar.gz -O - | sudo tar -xz -C /usr/local
nano ~/.profile
export PATH=$PATH:/usr/local/go/bin
source ~/.profile
go version
Install KIND
curl -Lo ./kind https://kind.sigs.k8s.io/dl/v0.17.0/kind-linux-amd64
chmod +x ./kind
sudo mv ./kind /usr/local/bin/kind
Install Helm
curl -fsSL -o get_helm.sh https://raw.githubusercontent.com/helm/helm/main/scripts/get-helm-3
chmod 700 get_helm.sh
./get_helm.sh
Install make, python-pip and reuse
sudo apt install make
apt-get install python3-pip -y
pip3 install --user reuse
Clone helmit repo
git clone https://github.com/onosproject/helmit.git
cd helmit
make deps
GO111MODULE=on go get github.com/onosproject/helmit/cmd/helmit
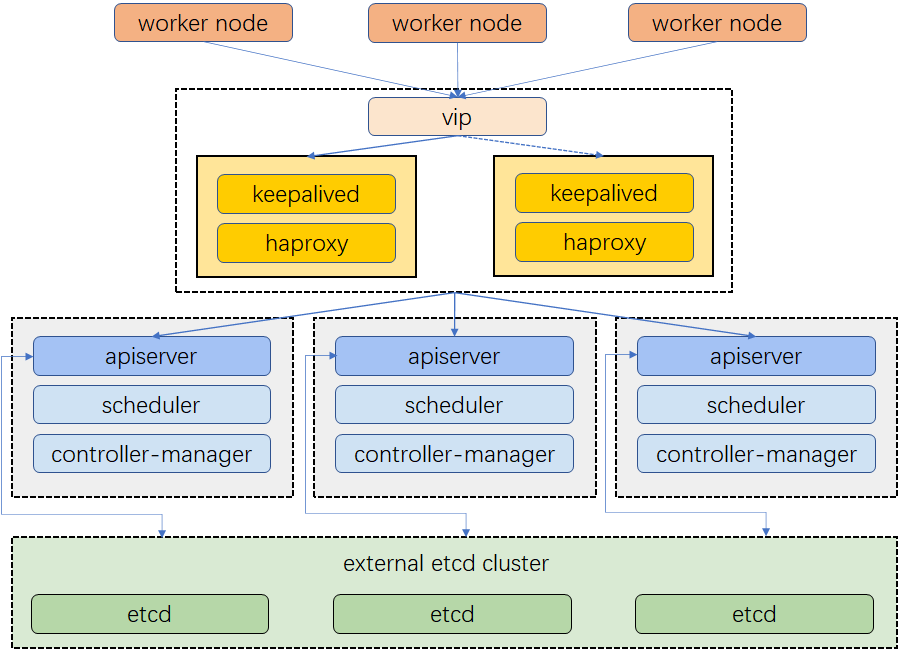
A highly available Kubernetes cluster ensures your applications run without outages which is required for production. In this connection, there are plenty of ways for you to choose from to achieve high availability. https://kubesphere.io/docs/v3.3/installing-on-linux/high-availability-configurations/set-up-ha-cluster-using-keepalived-haproxy/
This step describes how to configure Keepalived and HAproxy for load balancing and achieve high availability.
The cluster architecture is shown in the Figure below:
Install keepalived and haproxy on all nodes
sudo apt-get install keepalived haproxy -y
Configure HAproxy on all nodes
sudo nano /etc/haproxy/haproxy.cfg
Modify the following lines according to your environment:
global
    log /dev/log  local0 warning
    chroot      /var/lib/haproxy
    pidfile     /var/run/haproxy.pid
    maxconn     4000
    user        haproxy
    group       haproxy
    daemon

   stats socket /var/lib/haproxy/stats

defaults
  log global
  option  httplog
  option  dontlognull
        timeout connect 5000
        timeout client 50000
        timeout server 50000

frontend kube-apiserver
  bind *:6443
  mode tcp
  option tcplog
  default_backend kube-apiserver

backend kube-apiserver
    mode tcp
    option tcplog
    option tcp-check
    balance roundrobin
    default-server inter 10s downinter 5s rise 2 fall 2 slowstart 60s maxconn 250 maxqueue 256 weight 100
    server kube-apiserver-1 192.168.56.101:6443 check # Replace the IP address with your own.
    server kube-apiserver-2 192.168.56.102:6443 check # Replace the IP address with your own.
    server kube-apiserver-3 192.168.56.103:6443 check # Replace the IP address with your own.
Save the file and run the following command to restart HAproxy.
sudo systemctl restart haproxy
Configure Keepalived on all nodes
sudo nano /etc/keepalived/keepalived.conf
Add the following lines to the file, according to your environment:
global_defs {
  notification_email {
  }
  router_id LVS_DEVEL
  vrrp_skip_check_adv_addr
  vrrp_garp_interval 0
  vrrp_gna_interval 0
}

vrrp_script chk_haproxy {
  script "killall -0 haproxy"
  interval 2
  weight 2
}

vrrp_instance haproxy-vip {
  state BACKUP
  priority 100
  interface eth1                       # Network card
  virtual_router_id 60
  advert_int 1
  authentication {
    auth_type PASS
    auth_pass 1111
  }
  unicast_src_ip 192.168.56.121      # The IP address of this machine
  unicast_peer {
    192.168.56.122                         # The IP address of peer machines
  }

  virtual_ipaddress {
    192.168.56.200/24                  # The VIP address
  }

  track_script {
    chk_haproxy
  }
}
Save the file and run the following command to restart Keepalived.
sudo systemctl restart keepalived
Download KubeKey from its GitHub Release Page or use the following command directly.
curl -sfL https://get-kk.kubesphere.io | VERSION=v3.0.2 sh -
chmod +x kk
./kk create config --with-kubesphere v3.3.1 --with-kubernetes v1.22.12
After you run the commands above, a configuration file config-sample.yaml will be created. Edit the file to add machine information, configure the load balancer and more.
...
spec:
  hosts:
  - {name: master1, address: 192.168.56.101, internalAddress: 192.168.56.101, user: root, password: "admin"}
  - {name: master2, address: 192.168.56.102, internalAddress: 192.168.56.102, user: root, password: "admin"}
  - {name: master3, address: 192.168.56.103, internalAddress: 192.168.56.103, user: root, password: "admin"}
  - {name: worker1, address: 192.168.56.111, internalAddress: 192.168.56.111, user: root, password: "admin"}
  - {name: worker2, address: 192.168.56.112, internalAddress: 192.168.56.112, user: root, password: "admin"}
  - {name: worker3, address: 192.168.56.113, internalAddress: 192.168.56.113, user: root, password: "admin"}
  - {name: lb1, address: 192.168.56.121, internalAddress: 192.168.56.121, user: root, password: "admin"}
  - {name: lb2, address: 192.168.56.122, internalAddress: 192.168.56.122, user: root, password: "admin"}
  roleGroups:
    etcd:
    - master1
    - master2
    - master3
    control-plane:
    - master1
    - master2
    - master3
    worker:
    - worker1
    - worker2
    - worker3
  controlPlaneEndpoint:
    ## Internal loadbalancer for apiservers
    # internalLoadbalancer: haproxy

    domain: lb.kubesphere.local
    address: "192.168.56.200"
    port: 6443
...
Run the following command to deploy KubeSphere and Kubernetes.
./kk create cluster -f config-sample.yaml
Run the following command to inspect the logs of installation.
kubectl logs -n kubesphere-system $(kubectl get pod -n kubesphere-system -l 'app in (ks-install, ks-installer)' -o jsonpath='{.items[0].metadata.name}') -f
# Download openvswitch
wget http://openvswitch.org/releases/openvswitch-2.5.2.tar.gz
# Unpack archive
tar -xvzf openvswitch-2.5.2.tar.gz
# Install following dependancies
apt-get install python-simplejson python-qt4 libssl-dev python-twisted-conch automake autoconf gcc uml-utilities libtool build-essential pkg-config
apt-get install linux-headers-3.10-3-rpi
# Make the switch (Navigate to openvswitch-2.5.2 and enter the following commands)
./configure --with-linux=/lib/modules/3.10-3-rpi/build
make
make install

# Turn on openvswitch module
cd openvswitch-2.5.2/datapath/linux
modprobe openvswitch

# Create ovs_script.sh with the following code
#!/bin/bash
ovsdb-server --remote=punix:/usr/local/var/run/openvswitch/db.sock \
 --remote=db:Open_vSwitch,Open_vSwitch,manager_options \
 --private-key=db:Open_vSwitch,SSL,private_key \
 --certificate=db:Open_vSwitch,SSL,certificate \
 --bootstrap-ca-cert=db:Open_vSwitch,SSL,ca_cert \
 --pidfile –detach
ovs-vsctl --no-wait init
ovs-vswitchd --pidfile –detach
ovs-vsctl show

# Create a file for the database, which will contain the details of the switch
touch /usr/local/etc/ovs-vswitchd.conf
# Create the following directory
mkdir -p /usr/local/etc/openvswitch
# Populate the database, which will be used by the ovswitch
./openvswitch-2.5.2/ovsdb/ovsdb-tool create /usr/local/etc/openvswitch/conf.db openvswitch-2.5.2/vswitchd/vswitch.ovsschema

# Run ovs_script.sh

# Add a new bridge
ovs-vsctl add-br br0

# Bind the ports to the newly added bridge
ifconfig eth1 0 up
ifconfig eth2 0 up

# Set the interfaces up
ifconfig eth1 0 up
ifconfig eth2 0 up

# Connect the switch to an external controller
ovs-vsctl set-controller br0 tcp:20.0.0.7:6634

# Configuring the switch to initialize as an OpenFlow switch at startup
# Add the following bash script to the location of openvswitch-2.5.2 and rename it to main_script.sh
#!/bin/bash
cd openvswitch-2.5.2/datapath/linux
modprobe openvswitch
cd ..
cd ..
cd ..
./ovs_script.sh
ifconfig eth1 0 up
ifconfig eth2 0 up

# Then add the following line at the end of .bashrc
sudo sh [location of main_script.sh]/main_script.sh
To install Rancher on a single master node, access the official documentation.
https://ranchermanager.docs.rancher.com/v2.6/pages-for-subheaders/installation-and-upgrade
Install K3s on Raspberry Pi with Ansible.
Set up an HA Kubernetes Cluster Using Keepalived and HAproxy