
Git is a version control system (VCS) that developers use all over the world. It helps you track different versions of your code and collaborate with other developers. Git helps you to track of which changes were made, by whom, and when those changes were made.
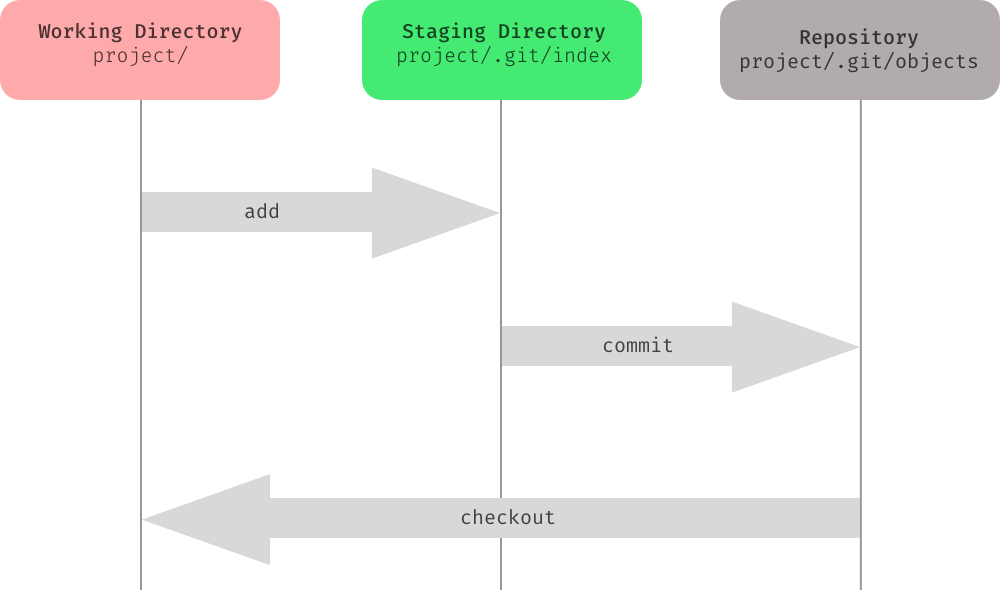
- Modified (Working directory) means that you have changed the file but have not committed it to your database yet.
- Staged (index) means that you have marked a modified file in its current version to go into your next commit snapshot.
- Committed (Git directory (Repository)) means that the data is safely stored in your local database.
The basic Git workflow goes something like this:
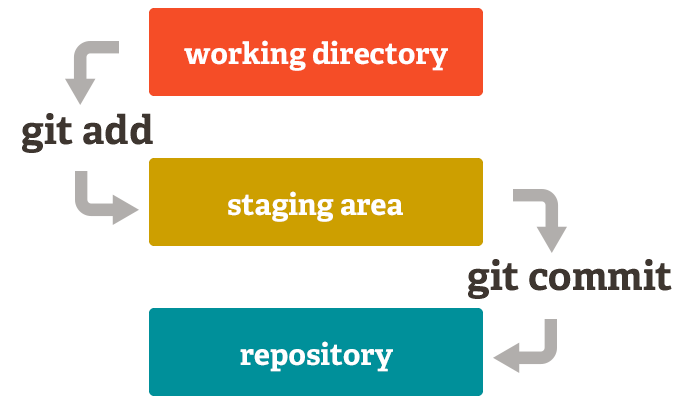
- You modify files in your working tree.
- You selectively stage just those changes you want to be part of your next commit, which adds only those changes to the staging area.
- You do a commit, which takes the files as they are in the staging area and stores that snapshot permanently to your Git directory.
In order to check if you already have Git installed on your computer you can type the command git --version in the terminal.
If you already have Git installed then you will see what version you have. If you don’t have Git installed you can visit the Git website and easily follow the download instructions to install the correct version for your operating system.
You typically obtain a Git repository in one of two ways:
1- Initializing a Repository in an Existing Directory using ..
$ git init
Output: Initialized empty Git repository in .git/
2- or Cloning an Existing Repository using ..
$ git clone https://github.com/nourahsaud/git-doc.git // You should use your project link
Output: Cloning into 'git-doc'...
    remote: Enumerating objects: 15, done.
    remote: Counting objects: 100% (15/15), done.
    remote: Compressing objects: 100% (7/7), done.
    remote: Total 15 (delta 2), reused 12 (delta 2), pack-reused 0
    Receiving objects: 100% (15/15), 5.93 KiB | 5.93 MiB/s, done.
    Resolving deltas: 100% (2/2), done.
// The output may changes depends on the project you're cloning
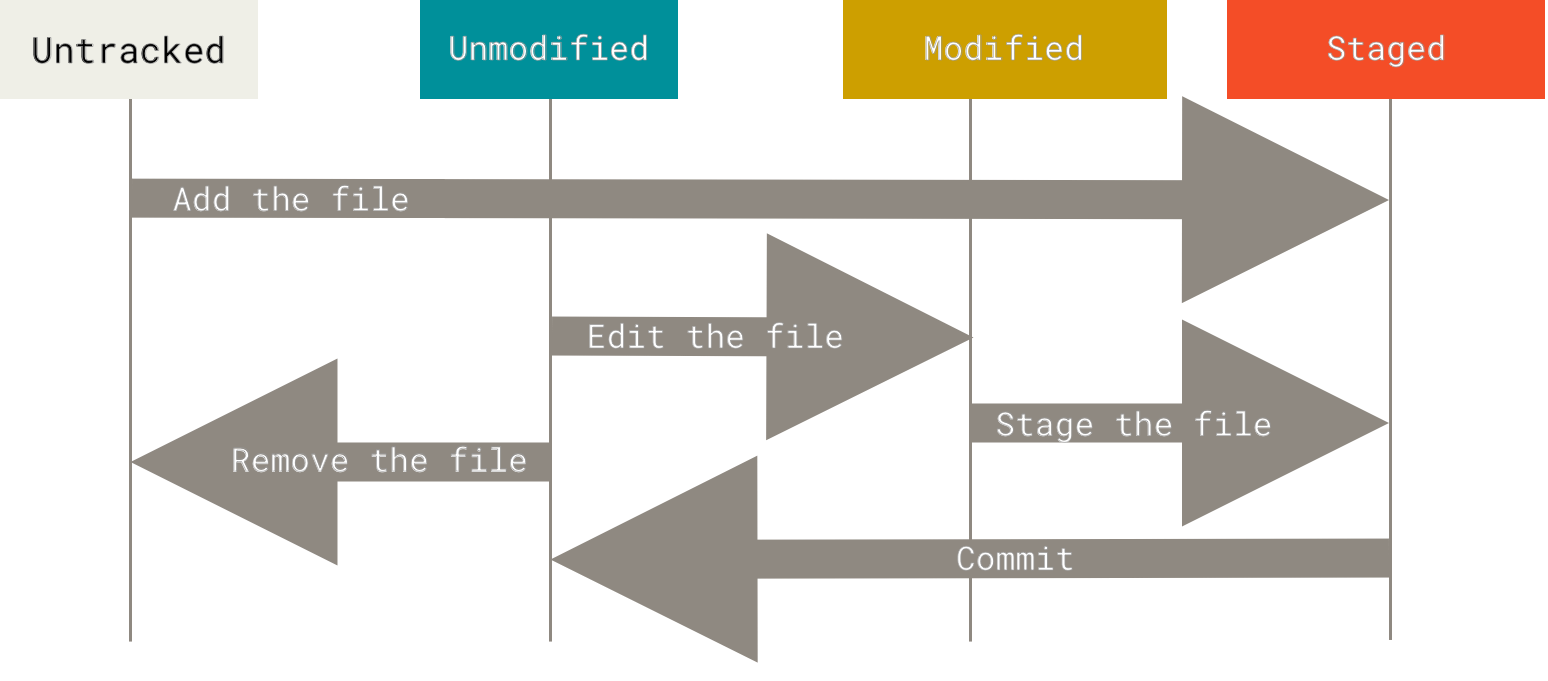
Each file in your working directory can be in one of two states: tracked or untracked. Tracked files are files that were in the last snapshot, as well as any newly staged files; they can be unmodified, modified, or staged. In short, tracked files are files that Git knows about where the untracked files are everything else .
Checking the Status of Your Files using ..
$ git status
Output: On branch main
        Your branch is up-to-date with 'origin/main'.
        nothing to commit, working tree clean
// This means you have a clean working directory; in other words, none of your tracked files are modified.
// Finally, the command tells you which branch you’re on | currently  that branch is always `main` which is the default
In order to begin tracking a new file, you use the command ..
$ git add <file-name>
There will be no expected output for the add command.
You can start tracking all the files at once by using . instead of the <file-name>
$ git add .
You can commit your changes using ..
$ git commit -m 'message'
Output:  [main (root-commit) 540aa5d] message
            1 file changed, 0 insertions(+), 0 deletions(-)
    create mode 100644 README

// Now you’ve created your first commit! You can see that the commit has given you some output about itself: which branch you committed to (main) the number next to it (540aa5d) is SHA-1 checksum which represnts this commit, how many files were changed.
After you have created several commits, you’ll probably want to look back to see what has happened and you can do that by using ...
$ git log
Output: commit ca82a6dff817ec66f44342007202690a93763949
        Author: Scott Chacon <schacon@gee-mail.com>
        Date:   Mon Mar 17 21:52:11 2008 -0700
            Change version number
        commit 085bb3bcb608e1e8451d4b2432f8ecbe6306e7e7
        Author: Scott Chacon <schacon@gee-mail.com>
        Date:   Sat Mar 15 16:40:33 2008 -0700
            Remove unnecessary test
        commit a11bef06a3f659402fe7563abf99ad00de2209e6
        Author: Scott Chacon <schacon@gee-mail.com>
        Date:   Sat Mar 15 10:31:28 2008 -0700
            Initial commit

// git log lists the commits made in that repository in reverse order; that is, the most recent commits show up first.
// this command lists each commit with its SHA-1 checksum, the author’s name and email, the date written, and the commit message.
to uncommit a commited files use: $ git commit --amend
to unstage a staged files use: $ git reset
To be able to collaborate on any Git project, you need to know how to manage your remote repositories. Remote repositories are versions of your project that are hosted on the Internet or network somewhere.
You can add a new remote Git repository using ...
$ git remote add <shortname> <url>
You can push your updates to your remote repo by using the command ..
$ git push
and pulling using ..
$ git pull
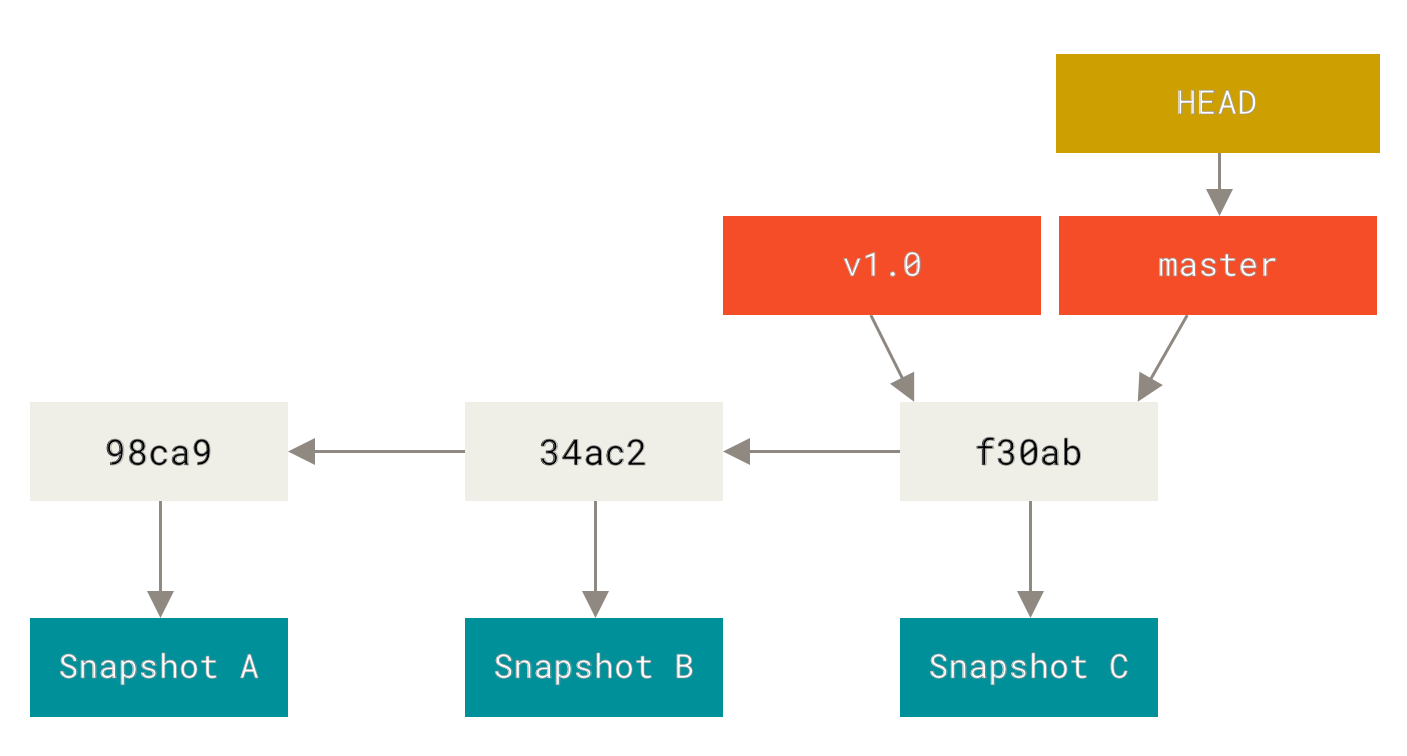
Git has the ability to tag specific points in a repository’s history as being important. Typically, people use this functionality to mark release points (v1.0, v2.0 and so on).
You can use the tagging by typing ..
$git tag <tag-name>
Branch in Git is used to keep your changes until they are ready. You can do your work on a branch while the main branch (main) remains stable. After you are done with your work, you can merge it with the main office.

The above diagram shows there is a master (main) branch. There are three separate branches called "Develop", and two "Feature" Once you are finished working with the separate branches, you can merge them and create a master branch.
A single Git repository can maintain multiple branches of development. you can create a new branch using ..
$ git branch <branch-name>
There will be no expected output, now you can brows your branches using the command: $ git branch
    Output:
        * main
         <branch-name>
    the star * sign before the main referese the the Head pointer whech contains the active branch number, meaning that the main is the active branch and you can switch to the other branches using the command: $ git checkout <branch-name>
First, let’s say you’re working on your project and have a couple of commits already on the master branch.
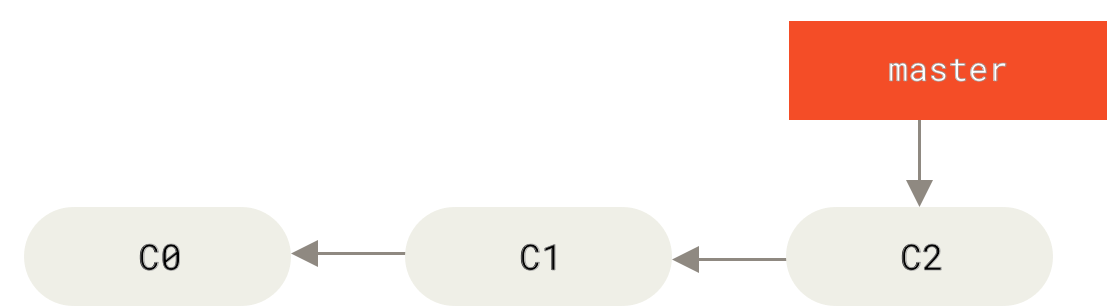
- the c0 c1 c2 represents the commits, technecly each commit point to it's parent and thats how git saves the hestory
Then you wanted to work on diffrent branch named 'iss53' you will switch to it using checkout.
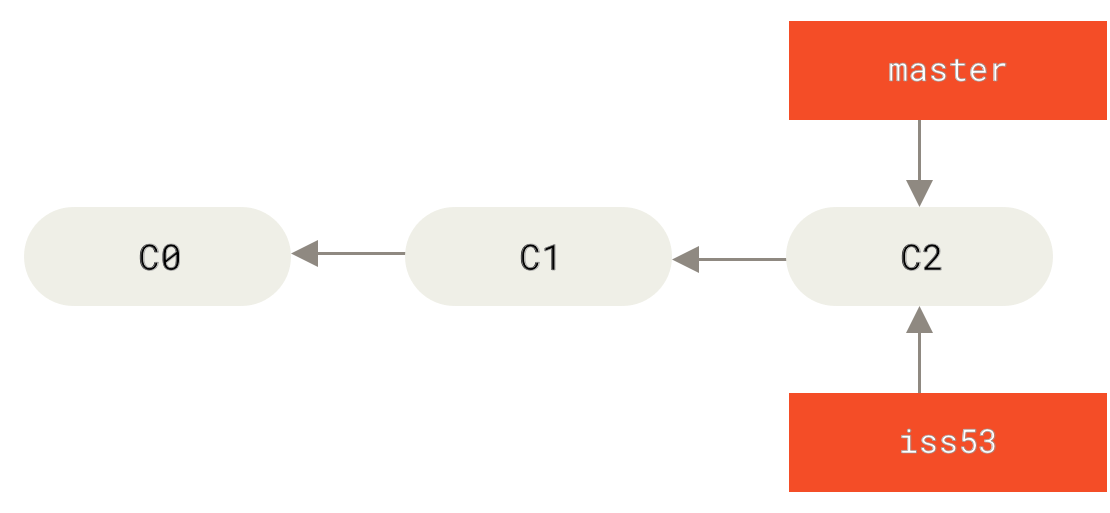
- After switching to the iss53 the Head will point on that branch
After making commit on the iss53 the setuation will be something like this:
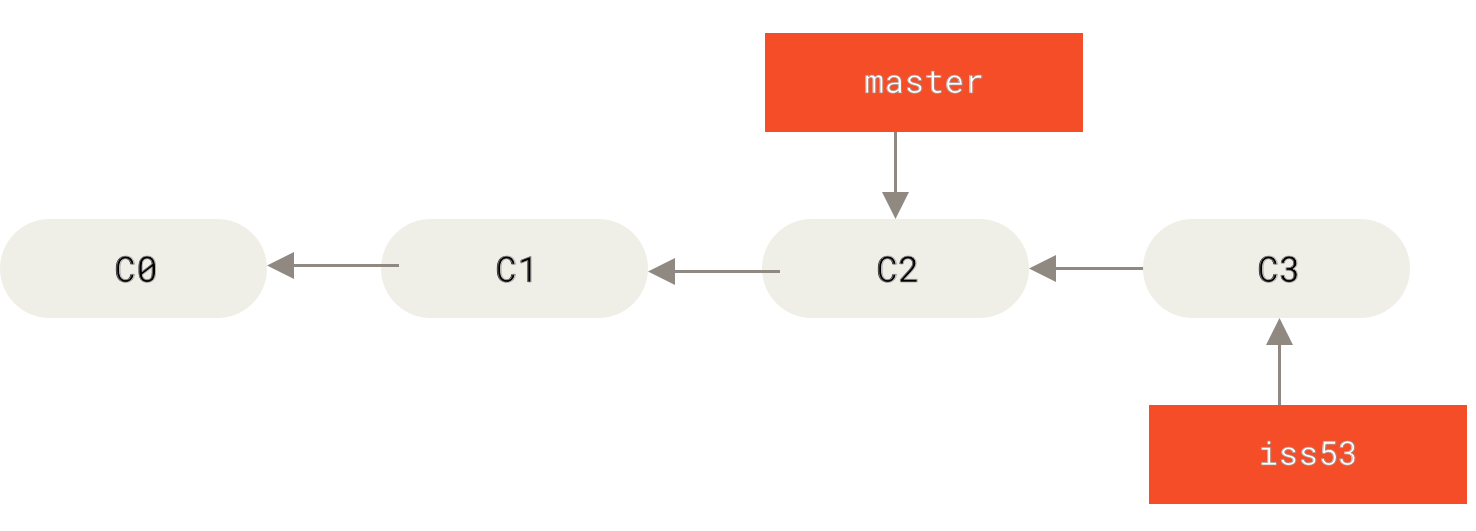
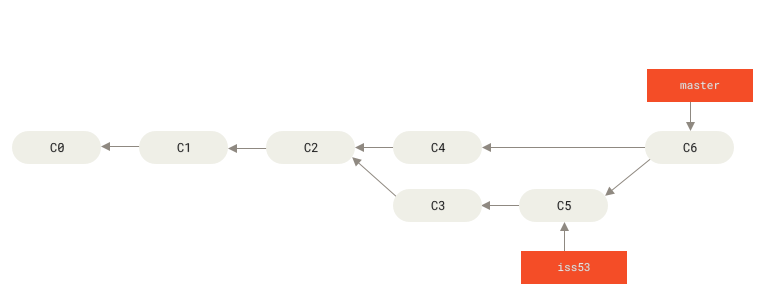
The master (main) branch is pointing in the C2 commit and the iss53 has moved to C3 whitch is not in the hestory of the master branch. if we swtich to the master and done some commit the setuation will be something like this:
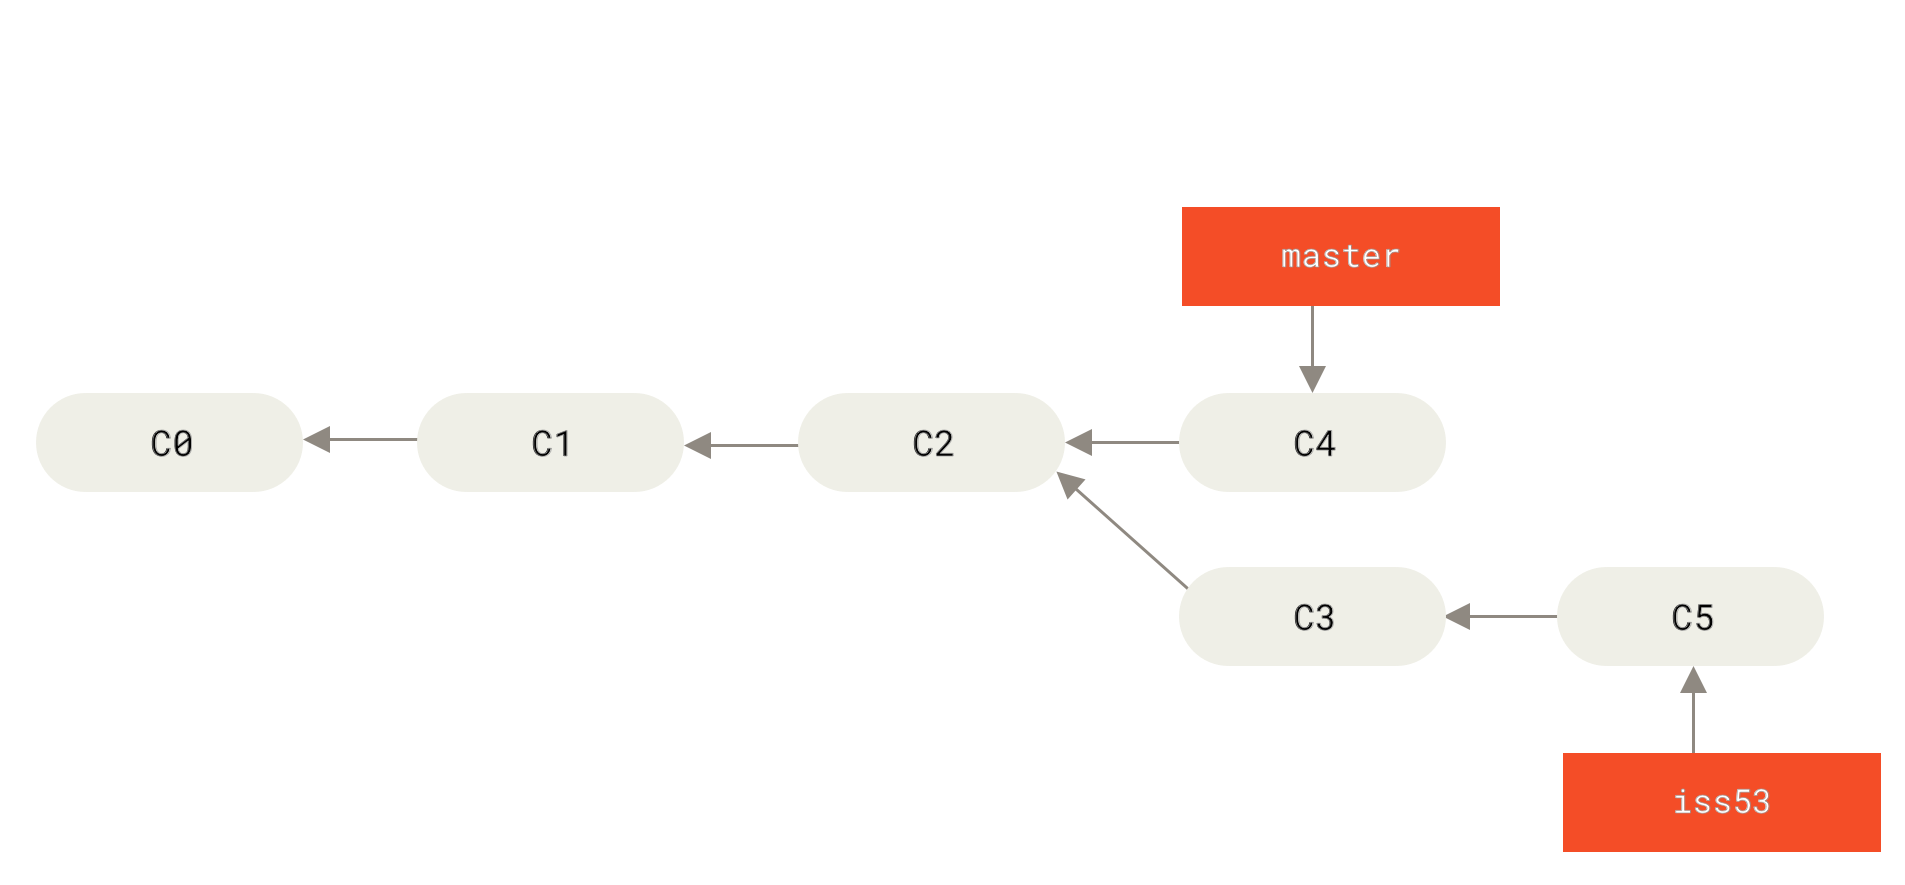
- the C4 commit is not in the hestory of the iss53 branch and C3, C5 are not in the hestory of the master
Suppose you’ve decided that your issue #53 work is complete and ready to be merged into your master branch. In order to do that, you’ll merge your iss53 branch into master, and you can do that using ..
$ git merge iss53
- before you do that you have to switched to the master branch
The iss53 will be merged with the master after you solve the conflict if available then the C6 commit will be created.
Now that your work is merged in, you have no further need for the iss53 branch. You can close the issue in your issue-tracking system, and delete the branch $ git branch -d iss53
There are different kind of merge one of them is the fast forward, the one we used above is the three way.
These are common Git commands used in various situations:
-
start a working area (see also: git help tutorial)
- clone Clone a repository into a new directory
- init Create an empty Git repository or reinitialize an existing one
-
work on the current change (see also: git help everyday)
- add Add file contents to the index
- mv Move or rename a file, a directory, or a symlink
- restore Restore working tree files
- rm Remove files from the working tree and from the index
-
examine the history and state (see also: git help revisions)
- bisect Use binary search to find the commit that introduced a bug
- diff Show changes between commits, commit and working tree, etc
- grep Print lines matching a pattern
- log Show commit logs
- show Show various types of objects
- status Show the working tree status
-
grow, mark and tweak your common history
- branch List, create, or delete branches
- commit Record changes to the repository
- merge Join two or more development histories together
- rebase Reapply commits on top of another base tip
- reset Reset current HEAD to the specified state
- switch Switch branches
- tag Create, list, delete or verify a tag object signed with GPG
-
collaborate (see also: git help workflows)
- fetch Download objects and refs from another repository
- pull Fetch from and integrate with another repository or a local branch
- push Update remote refs along with associated objects
- If you ever need help while using Git, there are three equivalent ways to get the comprehensive manual page (manpage) help for any of the Git commands:
$ git help <verb>|$ git <verb> --help|$ man git-<verb>