Using Terraform to build ROSA cluster with Private Link enabled and STS
Red Hat Openshift Service on AWS (ROSA) is a fully-managed turnkey application platform. A ROSA cluster can be created without any requirements on public subnets, internet gateways, or network address translation (NAT) gateways. In this configuration, Red Hat uses AWS PrivateLink to manage and monitor a cluster in order to avoid all public ingress network traffic.
To deploy Red Hat OpenShift Service on AWS (ROSA) into your existing Amazon Web Services (AWS) account, Red Hat requires several prerequisites to be met. There are several requirements , Review AWS service quota and enable ROSA in your AWS account Access.
NOTE: STS(secure token service) allows us to deploy ROSA without needing a ROSA admin account, instead it uses roles and policies with Amazon STS to gain access to the AWS resources needed to install and operate the cluster.
In this series, we use Terraform to provision all resources in AWS to deploy a ROSA cluster with Privatelink and STS.
Create the AWS Virtual Private Cloud (VPCs), Pub/Private Subnets and TGW
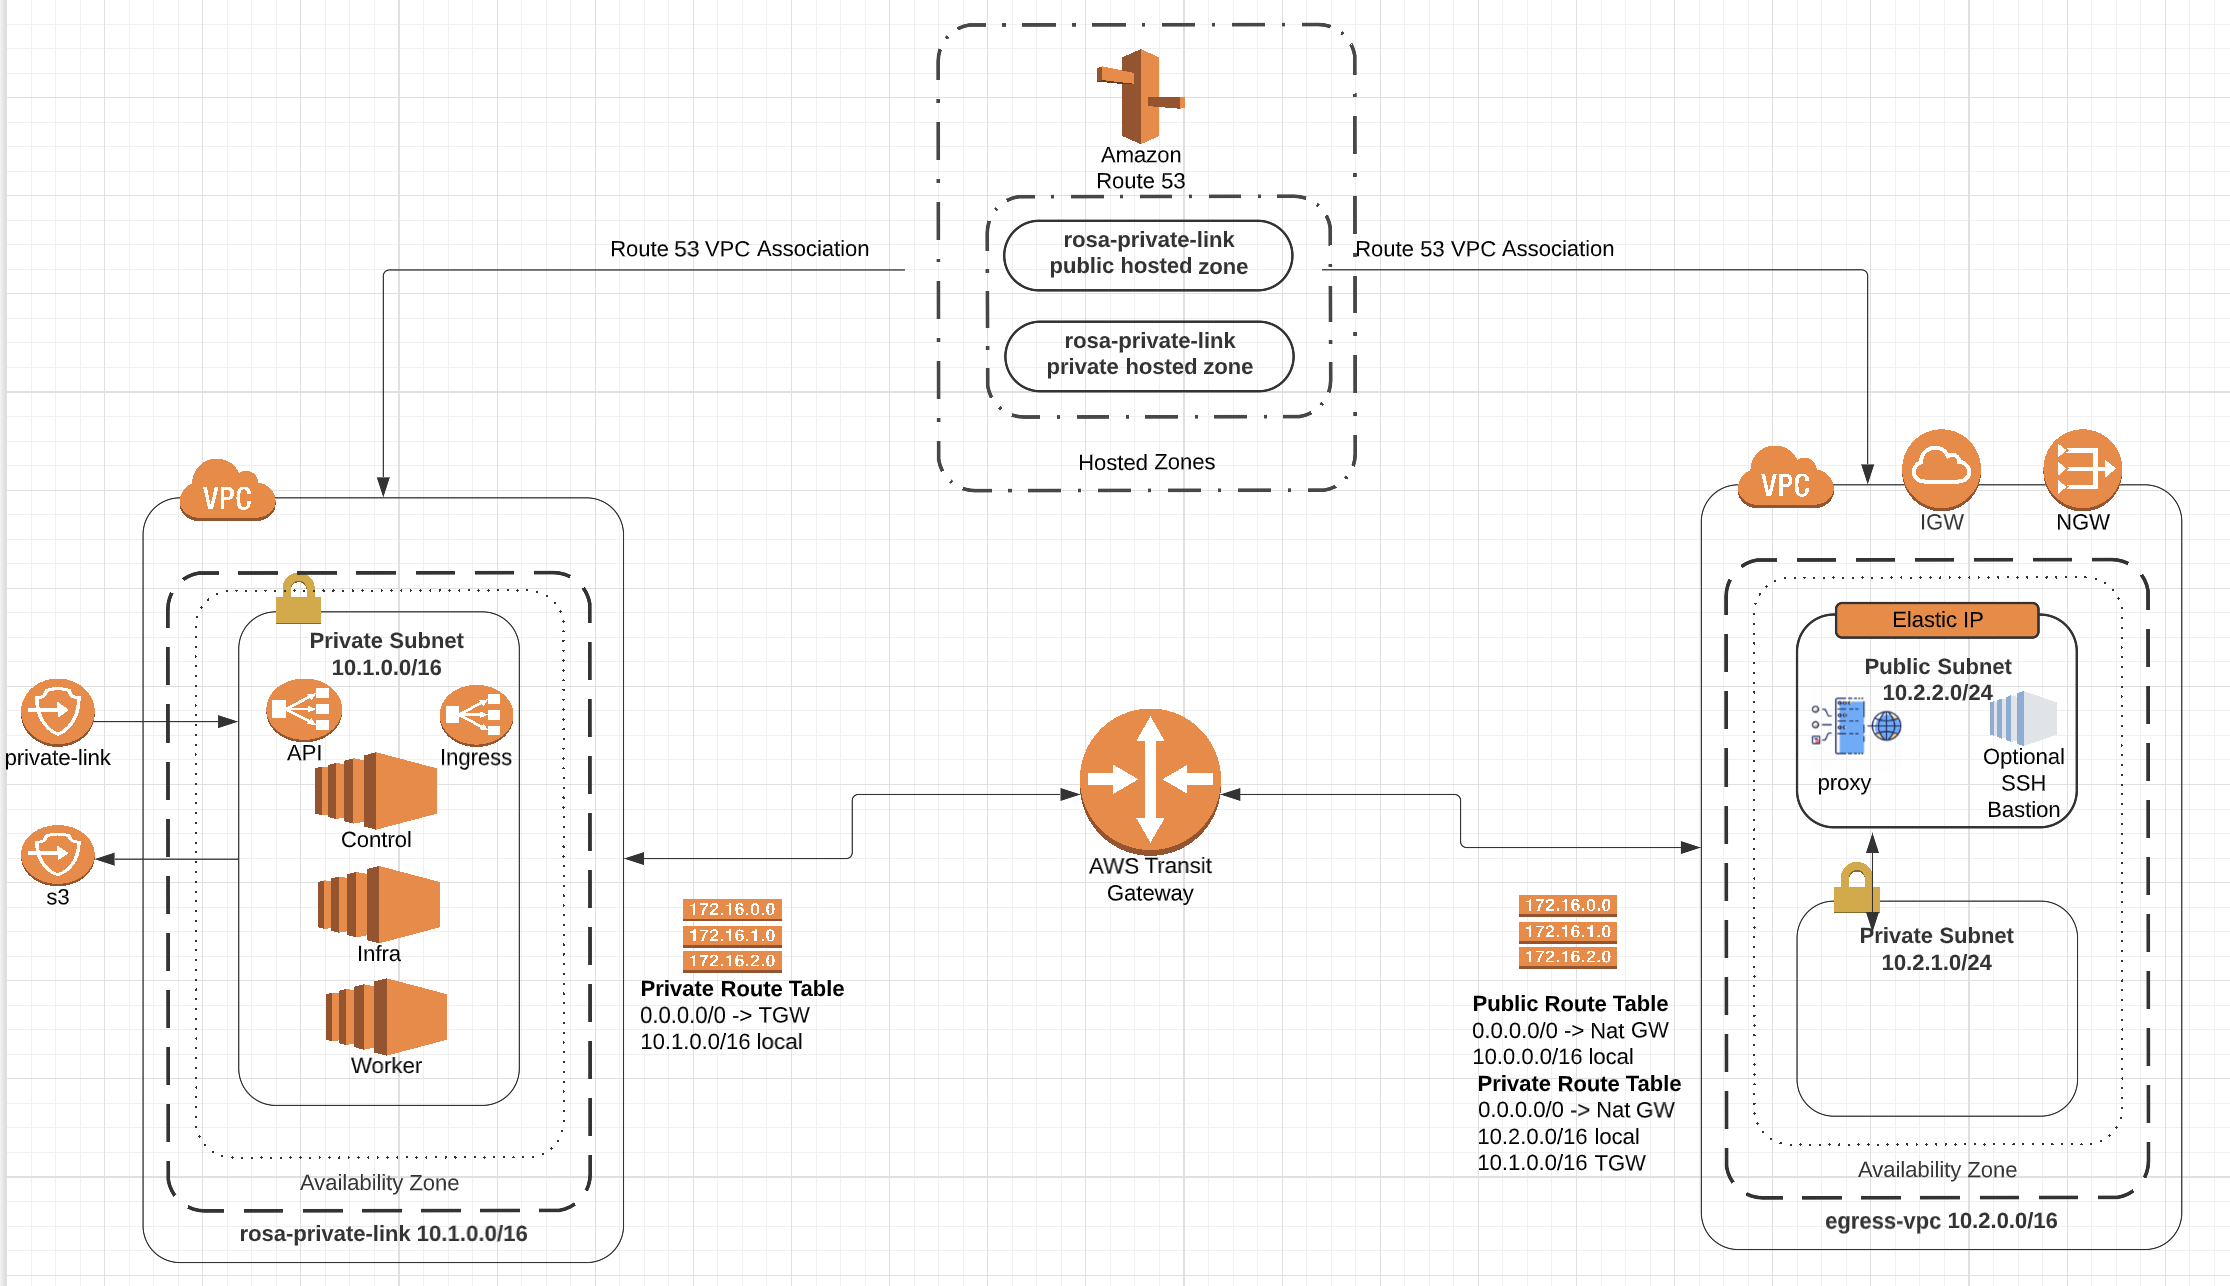
This terraform script provisions 2 VPCs(VPC for ROSA cluster and egress VPC), 3 subnets, a bastion, IGW, NGW and a forward proxy to control cluster's egress traffic.
Setup
Using the code in the repo will require having the following tools installed:
- The Terraform CLI
- The AWS CLI
- The ROSA CLI
- The OC CLI
- Ansible
Create Squid Certificates
ansible-playbook files/generate-proxy-cert.yml
Create the VPCs
-
Modify the
variable.tfvar file, or modify the following command to customize your cluster.terraform init terraform plan -var "cluster_name=my-tf-cluster" -out rosa.plan terraform apply rosa.plan
Deploy ROSA
-
Create ROSA cluster in the private subnet
The command provided in the Terraform output will create a private-link cluster in the private subnet. It should look something like this:
rosa create cluster --cluster-name mhs-8v --mode auto --sts \
--machine-cidr 10.201.0.0/16 --service-cidr 172.30.0.0/16 \
--pod-cidr 10.128.0.0/14 --host-prefix 23 --yes \
--private-link --subnet-ids subnet-03632b7e0e59f5773,subnet-0e6879794df1ba7cd,subnet-01b8e7c51e780c411 \
--multi-az \
--http-proxy http://10.200.2.38:3128 \
--https-proxy http://10.200.2.38:3128 \
--additional-trust-bundle-file ./files/squid-ca-cert.pem
Test Connectivity
-
Create a ROSA admin user and save the login command for use later
rosa create admin -c $ROSA_CLUSTER_NAME -
Note the DNS name of your private cluster, use the
rosa describecommand if neededrosa describe cluster -c $ROSA_CLUSTER_NAME -
Create a route53 zone association for the egress VPC
Option 1: using CLI
ZONE=$(aws route53 list-hosted-zones-by-vpc --vpc-id vpc-04fd66db807b5a2af \
 --vpc-region us-east-2 \
 --query 'HostedZoneSummaries[*].HostedZoneId' --output text)

aws route53 associate-vpc-with-hosted-zone \
   --hosted-zone-id $ZONE \
   --vpc VPCId=vpc-0ce55194f8d0a6472,VPCRegion=us-east-2 \
   --output text
Option 2: using GUI
find your cluster hosted zone($YOUR_OPENSHIFT_DNS) and associate egress VPC ($YOUR_CLUSTER_NAME.egress_vpc.) to it
To associate additional VPCs with a private hosted zone using the Route 53 console:

Sign in to the AWS Management Console and open the Route 53 console at https://console.aws.amazon.com/route53/.
In the navigation pane, choose ROSA cluster Hosted zones.
Choose the radio button for the private hosted zone that you want to associate more VPCs with.
Choose Edit.
Choose Add VPC.
Choose the Region and the ID of the VPC that you want to associate with this hosted zone.
To associate more VPCs with this hosted zone, repeat steps 5 and 6.
Choose Save changes.
You can use sshuttle or ssh tunneling to connect to your cluster
using sshuttle
-
Create a sshuttle VPN via your bastion:
sshuttle --dns -NHr ec2-user@18.119.138.69 10.128.0.0/9 -
Log into the cluster using oc login command from the create admin command above. ex.
oc login https://api.$YOUR_OPENSHIFT_DNS:6443 --username cluster-admin --password xxxxxxxxxx -
Check that you can access the Console by opening the console url in your browser.
using SSH tunneling
-
update /etc/hosts to point the openshift domains to localhost. Use the DNS of your openshift cluster as described in the previous step in place of
$YOUR_OPENSHIFT_DNSbelow127.0.0.1 api.$YOUR_OPENSHIFT_DNS 127.0.0.1 console-openshift-console.apps.$YOUR_OPENSHIFT_DNS 127.0.0.1 oauth-openshift.apps.$YOUR_OPENSHIFT_DNS -
Use public IP address from Terraform output to connect to bastion host. SSH to that instance, tunneling traffic for the appropriate hostnames. Be sure to use your new/existing private key, the OpenShift DNS for
$YOUR_OPENSHIFT_DNSand your jump host IP for$YOUR_EC2_IPsudo ssh -i PATH/TO/YOUR_KEY.pem \ -L 6443:api.$YOUR_OPENSHIFT_DNS:6443 \ -L 443:console-openshift-console.apps.$YOUR_OPENSHIFT_DNS:443 \ -L 80:console-openshift-console.apps.$YOUR_OPENSHIFT_DNS:80 \ ec2-user@$YOUR_EC2_IP
-
From your EC2 jump instances, download the OC CLI and install it locally
- Download the OC CLI for Linux
wget https://mirror.openshift.com/pub/openshift-v4/clients/ocp/stable/openshift-client-linux.tar.gz - Unzip and untar the binary
  gunzip openshift-client-linux.tar.gz
  tar -xvf openshift-client-linux.tar
- Download the OC CLI for Linux
-
Log into the cluster using oc login command from the create admin command above. ex.
oc login https://api.$YOUR_OPENSHIFT_DNS:6443 --username cluster-admin --password xxxxxxxxxx -
Check that you can access the Console by opening the console url in your browser.
Cleanup
-
Delete ROSA
rosa delete cluster -c $ROSA_CLUSTER_NAME -y
rosa delete operator-roles -c <cluster id>
rosa delete oidc-provider -c <cluster id>
-
Delete AWS resources
terraform destroy -auto-approve
